作ったプログラムの備忘録
はじめに
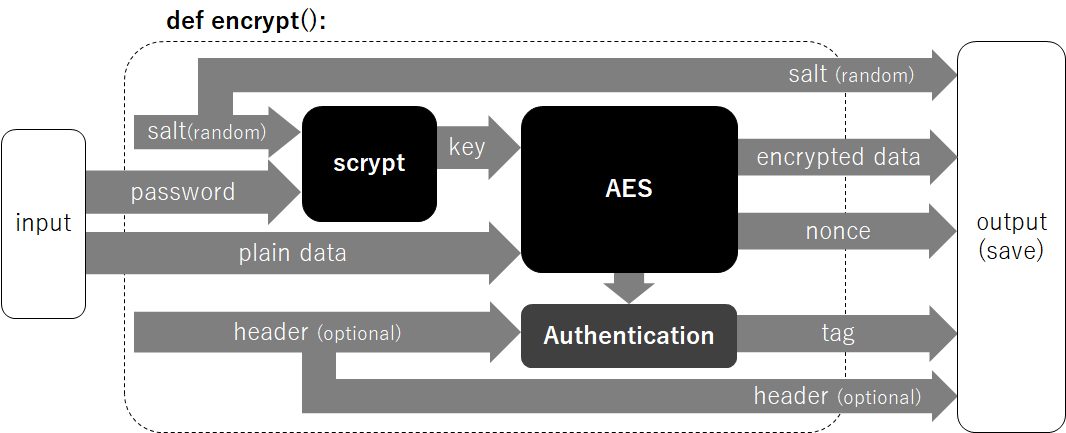
概要:パスワードをscryptでハッシュ化した値を鍵として、文字列をAES-GCMで暗号化する、という内容です
背景:RPAによる自動化を検討する際にログインパスワードが複数存在しており、最初にすべてのパスワードを入力するのが面倒でした
そのため複数パスワードをまとめて暗号化しておき、1つのパスワードで呼び出せるようにすることで省力化を図る目的で作成
※暗号化に関する知識はほぼない状態からはじめたので、AES暗号や鍵導出関数に関する詳細は参考文献をひとまず読んだ程度の知識しかありません。
動作テスト環境
OS: Windows 10 Pro 64bit
言語: Python 3.9.13
ライブラリ:pycryptodome(外部ライブラリなので要pip install)
ソースコード
import os
import hashlib
from Crypto.Cipher import AES
暗号化
def encrypt(message, password, header):
    salt = os.urandom(16)
    key = hashlib.scrypt(password=password, salt=salt, n=2**14, r=8, p=1, dklen=32)
    cipher = AES.new(key, AES.MODE_GCM)
    cipher.update(header)
    cipher_text, tag = cipher.encrypt_and_digest(message)
    return [salt, cipher_text, header, cipher.nonce, tag]
-
os.urandom(16):
暗号化の鍵を生成するのに必要な乱数生成(16バイトのバイト列) -
hashlib.scrypt:
暗号化の鍵をハッシュ関数(scrypt)でパスワードとsaltから生成
hashlib.scryptの引数n=2**14は計算負荷に直結する数値らしく、セキュリティ上、2**14以上が推奨されているらしい(小さい数値を使用しているソースコード例も存在し、正確性には欠ける情報)
n=2**7とすると処理時間が31.2 ms、n=2**14で109 msとなるので、1回暗号化するだけの処理時間としては微々たる差だが、辞書攻撃に対しては確かに有効そう
hashlib.scryptの引数dklen=32は、AES-GCM暗号の鍵長が256bitまでなので必須(デフォルト値はdklen=64で512bitが出力される) -
AES.new:
AES-GCM暗号化用インスタンス生成(初期化ベクトルに相当するノンス(nonce)はPyCryptodomeのGCMモードでは自動で生成されるので、再利用してしまうことはない) -
cipher.update(header):
ヘッダーの付与(なくてもいい) -
cipher.encrypt_and_digest(message):
暗号化(暗号化した文字列とタグが生成される) -
return:
パスワード以外の復号化に必要なデータをリストで返す
復号化
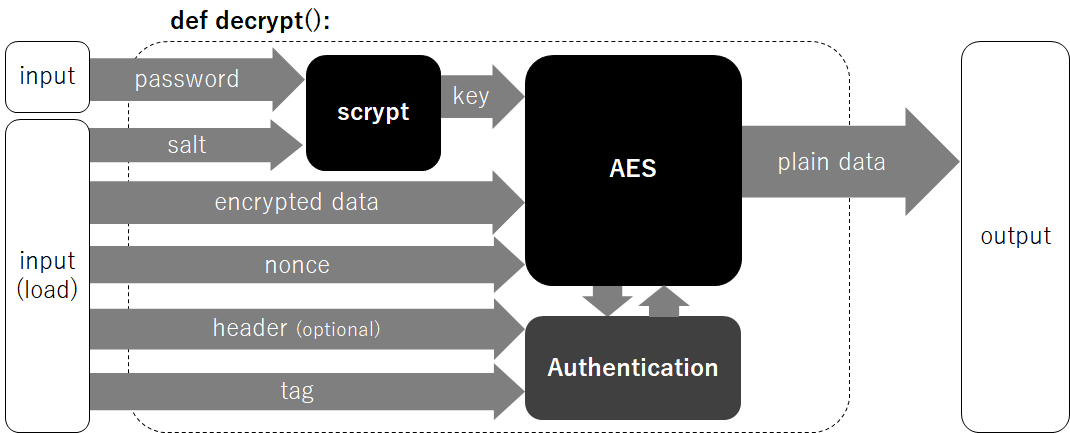
def decrypt(encrypted_message, password):
    salt, cipher_text, header, nonce, tag = encrypted_message
    key = hashlib.scrypt(password=password, salt=salt, n=2**14, r=8, p=1, dklen=32)
    cipher = AES.new(key, AES.MODE_GCM, nonce)
    cipher.update(header)
    return cipher.decrypt_and_verify(cipher_text, tag)
- 暗号化の手順とほぼ同じ
利用例
暗号化利用例
message = 'sampletext1234567890abcdefghijklmnopqrstuvwxyz!#$%&()=~-^[]{}/.,:;@'
password = 'PassW0rd!'
header = os.environ['USERNAME']

encrypted_message = encrypt(message.encode(), password.encode(), header.encode())

crypt_list = ['salt', 'cipher_text', 'header', 'nonce', 'tag']
for i in range(len(crypt_list)):
    print(f'{crypt_list[i]}:',encrypted_message[i])
salt: b'\xe4\xd1|N\xd0\xe0T\x95pn\xa1\xa2\xb3\xf7[g'
cipher_text: b"\xe0\x95}\x80\x86\x0e\xaf\xc1\xdb\xa98\xa1\x89\xf0imj\x19\xca\xf1t\x18\xc0\x86M\xea\xb9_-\xe0\x92\x95D/\x9f\xe5\xf2\x98\xbd\xa1_`7\xc7`_\x96,N\xe0?\xb1]\t\x8d1\xcc\x9d'\xb2\xfb\x06\x92\x9f\xa3\xb3\xa1"
header: b'user_name'
nonce: b'\x99\xfb3~\xb0\xb3\x01\x05\x7f\xaaQw3\x0c\xc8x'
tag: b'w\x8a\x07Bd0\xeb\x10\xb2\x9b\x1fh7\nT\xbd'
-
header:
AES-GCMの認証オプションなので、なくても動く(ただし使わない場合はdef encrypt():とdef decrypt():のcipher.update(header)を削除する)。ここではOSアカウント名を使って一意に決まるようにした。 -
PyCryptodomeのAESは文字列を入力できないのでバイト列に変換してから関数に渡す
復号化利用例
decrypted_message = decrypt(encrypted_message, password.encode()).decode()

print("decrypted_message: ", decrypted_message)
decrypted_message: sampletext1234567890abcdefghijklmnopqrstuvwxyz!#$%&()=~-^[]{}/.,:;@
備忘録
AES暗号について
-
任意のパスワードを使って文字列を暗号化する場合、やり方はいくつかあるようですが、共通鍵暗号方式のAES暗号が強度的に良さそう
-
AES暗号化にはいくつかモードがあり、ネットワーク関係では認証付き暗号(AEAD)であるAES-GCMかAES-CCMが用いられている
https://active.nikkeibp.co.jp/atclact/active/17/032000256/032000005/ -
今回の用途にGCMモードが必要かどうかは調べきれず…(ローカルに保存して読み出すだけなので秘匿性と完全性を両方担保する必要はないような気もする…)
-
AES-GCM暗号化は鍵として128ビット・192ビット・256ビットの3種類が選択でき、任意のパスワードを用いる場合には、鍵導出関数を用いたハッシュ値を用いて鍵を生成することでセキュリティ強度が高くなる(単なるハッシュ値はNG)
https://teratail.com/questions/332738
鍵導出関数によるハッシュ化について
-
鍵導出関数はPBKDF2→bcrypt(1999年)→scrypt(2009年)→argon2(2015年)という変遷を辿って改良が重ねられている
-
ただしargon2はpythonで利用可能なargon2-cffiは、同一saltを使ったハッシュ化ができないのでAESの鍵として不適
https://argon2-cffi.readthedocs.io/en/latest/
※パスワード認証だけならargon2を利用するのがよい -
pythonで今回の目的に利用できるscryptを実装可能なモジュールは以下の3つで、今回は標準モジュールのhashlibを使用
1.
hashlib.scrypt:https://docs.python.org/ja/3/library/hashlib.html2.
scrypt:https://pypi.org/project/scrypt/3.
passlib.hash.scrypt:https://passlib.readthedocs.io/en/stable/lib/passlib.hash.scrypt.html
暗号化したデータの保存
上記のソースコードで暗号化と復号化の間でデータを保存する処理
1. byte列のまま保存
pickleまたはjoblibなどで対応可能
2. base64でテキスト化して保存
import base64

# base64で保存
encrypted_message_b64 = [base64.b64encode(x).decode('utf-8') for x in encrypted_message]
with open("sample.key","w") as f:
    print(*encrypted_message_b64, sep=",", file=f)

# base64で保存したデータからの読込み
with open("sample.key", "r") as f:
    encrypted_message_b64 = f.read().split(',')
encrypted_message = [base64.b64decode(x) for x in encrypted_message_b64]
3. hexでテキスト化して保存
encrypted_message_hex = [x.hex() for x in encrypted_message]
with open("sample.key","w") as f:
    print(*encrypted_message_hex, sep=",", file=f)

# hexで保存したデータからの復号化
with open("sample.key", "r") as f:
    encrypted_message_hex = f.read().split(',')
encrypted_message = [bytes.fromhex(x) for x in encrypted_message_hex]
- 今回の目的では、暗号化する文字列が短いので、モジュールインポートが不要なこの方式で保存しています。
サンプル
import os
import hashlib
from Crypto.Cipher import AES

def encrypt(message, password, header):
    salt = os.urandom(16)
    key = hashlib.scrypt(password=password, salt=salt, n=2**14, r=8, p=1, dklen=32)
    cipher = AES.new(key, AES.MODE_GCM)
    cipher.update(header)
    cipher_text, tag = cipher.encrypt_and_digest(message)
    return [salt, cipher_text, header, cipher.nonce, tag]

def decrypt(encrypted_message, password):
    salt, cipher_text, header, nonce, tag = encrypted_message
    key = hashlib.scrypt(password=password, salt=salt, n=2**14, r=8, p=1, dklen=32)
    cipher = AES.new(key, AES.MODE_GCM, nonce)
    cipher.update(header)
    return cipher.decrypt_and_verify(cipher_text, tag)

# 平文、パスワード、ヘッダー
message = 'sampletext1234567890abcdefghijklmnopqrstuvwxyz!#$%&()=~-^[]{}/.,:;@'
password = 'PassW0rd!'
header = os.environ['USERNAME']

# 暗号化
encrypted_message = encrypt(message.encode(), password.encode(), header.encode())

# 暗号化文字列の保存
encrypted_message_hex = [x.hex() for x in encrypted_message]
with open("sample.key","w") as f:
    print(*encrypted_message_hex, sep=",", file=f)

# 暗号化文字列の読込み
with open("sample.key", "r") as f:
    encrypted_message_hex = f.read().split(',')
encrypted_message = [bytes.fromhex(x) for x in encrypted_message_hex]

# 復号化
decrypted_message = decrypt(encrypted_message, password.encode()).decode()

# 表示
crypt_list = ['salt', 'cipher_text', 'header', 'nonce', 'tag']
for i in range(len(crypt_list)):
    print(f'{crypt_list[i]}:',encrypted_message[i])
print("decrypted_message: ", decrypted_message)
salt: b'\xe4\xd1|N\xd0\xe0T\x95pn\xa1\xa2\xb3\xf7[g'
cipher_text: b"\xe0\x95}\x80\x86\x0e\xaf\xc1\xdb\xa98\xa1\x89\xf0imj\x19\xca\xf1t\x18\xc0\x86M\xea\xb9_-\xe0\x92\x95D/\x9f\xe5\xf2\x98\xbd\xa1_`7\xc7`_\x96,N\xe0?\xb1]\t\x8d1\xcc\x9d'\xb2\xfb\x06\x92\x9f\xa3\xb3\xa1"
header: b'user_name'
nonce: b'\x99\xfb3~\xb0\xb3\x01\x05\x7f\xaaQw3\x0c\xc8x'
tag: b'w\x8a\x07Bd0\xeb\x10\xb2\x9b\x1fh7\nT\xbd'
decrypted_message:  sampletext1234567890abcdefghijklmnopqrstuvwxyz!#$%&()=~-^[]{}/.,:;@
参考文献
メインのソースコード
AES Encrypt / Decrypt - Examples - CODEAHOY
Modern modes of operation for symmetric block ciphers - PyCryptodome
hashlib --- セキュアハッシュおよびメッセージダイジェスト - python.org
暗号技術について
暗号技術勉強メモ - Qiita
暗号利用モード - Wikipedia
認証付き暗号 - Wikipedia
Galois/Counter Mode - Wikipedia
AES暗号の選択
AES対応のPython暗号化ライブラリを比較検証してみた
ハッシュ関数の選択
鍵導出関数 - Wikipedia
Password Hashing: Scrypt, Bcrypt and ARGON2

