こちらの新機能をウォークスルーします。この例では、ワインの性質に基づいて、ポルトガルの"Vinho Verde"ワインの品質を予測するモデルを構築します。
Unity Catalog内のモデルのデータリネージを追跡する
Unity Catalogのテーブルでモデルをトレーニングする場合、モデルがトレーニングおよび評価された上流のデータセットへのモデルのリネージを追跡できます。 これを行うには、 mlflow.log_input を使用します。 これにより、モデルを生成した MLflow 実行とともに入力テーブル情報が保存されます。
ライブラリのアップデート
MLflow 2.11.0以降が必要なのでアップデートします。
%pip install --upgrade "mlflow-skinny[databricks]"
dbutils.library.restartPython()
from pyspark.sql.types import *

# モデル名
# Unity Catalogに登録するので事前にカタログとスキーマを作成しておきます
model_name = "takaakiyayoi_catalog.wine_db.wine_model"
データのインポート
import pandas as pd

white_wine = pd.read_csv("/dbfs/databricks-datasets/wine-quality/winequality-white.csv", sep=";")
red_wine = pd.read_csv("/dbfs/databricks-datasets/wine-quality/winequality-red.csv", sep=";")
red_wine['is_red'] = 1
white_wine['is_red'] = 0

data = pd.concat([red_wine, white_wine], axis=0)

# カラム名から空白を削除
data.rename(columns=lambda x: x.replace(' ', '_'), inplace=True)
トレーニングデータ・テストデータの保存
トレーニングデータとテストデータを分割して準備は完了です。また、リネージを捕捉できるようにトレーニング/テストデータはUnity Catalog配下のDeltaテーブルとして保存します。
from sklearn.model_selection import train_test_split
import pyspark.pandas as ps

train, test = train_test_split(data, random_state=123)
X_train = train.drop(["quality"], axis=1)
X_test = test.drop(["quality"], axis=1)
y_train = train.quality
y_test = test.quality

# トレーニング/テストデータはUnity Catalog配下のDeltaテーブルとして保存します
training_data_table = "takaakiyayoi_catalog.wine_db.wine_training"
test_data_table = "takaakiyayoi_catalog.wine_db.wine_test"

ps.from_pandas(train).to_table(training_data_table, mode="overwrite")
ps.from_pandas(test).to_table(test_data_table, mode="overwrite")

# Deltaバージョンの取得
training_temp = spark.sql(f"DESCRIBE history {training_data_table} limit 1").collect()
training_latest_version = int(training_temp[0][0])
test_temp = spark.sql(f"DESCRIBE history {test_data_table} limit 1").collect()
test_latest_version = int(test_temp[0][0])

print("training table version:", training_latest_version)
print("test table version:", test_latest_version)
training table version: 0
test table version: 0
モデルの構築
出力が2値であり、複数の変数間での相互関係がある可能性があることから、このタスクにはランダムフォレスト分類器が適しているように見えます。
以下のコードでは、scikit-learnを用いてシンプルな分類器を構築します。モデルの精度を追跡するためにMLflowを用い、後ほど利用するためにモデルを保存します。
import mlflow
import mlflow.pyfunc
import mlflow.sklearn
import numpy as np
import sklearn
from sklearn.ensemble import RandomForestClassifier
from sklearn.metrics import roc_auc_score
from mlflow.models.signature import infer_signature
from mlflow.utils.environment import _mlflow_conda_env
import cloudpickle
import time

# UC配下のモデルとして登録
mlflow.set_registry_uri("databricks-uc")

# sklearnのRandomForestClassifierのpredictメソッドは、2値の分類結果(0、1)を返却します。
# 以下のコードでは、それぞれのクラスに属する確率を返却するpredict_probaを用いる、ラッパー関数SklearnModelWrapperを構築します。

class SklearnModelWrapper(mlflow.pyfunc.PythonModel):
  def __init__(self, model):
    self.model = model

  def predict(self, context, model_input):
    return self.model.predict_proba(model_input)[:,1]


# mlflow.start_runは、このモデルのパフォーマンスを追跡するための新規MLflowランを生成します。
# コンテキスト内で、使用されたパラメーターを追跡するためにmlflow.log_param、精度のようなメトリクスを追跡するために
# mlflow.log_metricを呼び出します。
with mlflow.start_run(run_name='untuned_random_forest'):
  n_estimators = 10
  model = RandomForestClassifier(n_estimators=n_estimators, random_state=np.random.RandomState(123))
  model.fit(X_train, y_train)

  # predict_probaは[prob_negative, prob_positive]を返却するので、出力を[:, 1]でスライスします。
  predictions_test = model.predict_proba(X_test)[:,1]
  auc_score = roc_auc_score(y_test, predictions_test)
  mlflow.log_param('n_estimators', n_estimators)
  # メトリックとしてROC曲線のAUCを使用します。
  mlflow.log_metric('auc', auc_score)
  wrappedModel = SklearnModelWrapper(model)
  # モデルの入出力スキーマを定義するシグネチャをモデルとともに記録します。
  # モデルがデプロイされた際に、入力を検証するためにシグネチャが用いられます。
  signature = infer_signature(X_train, wrappedModel.predict(None, X_train))

  # トレーニング/テストデータのロギング
  training_dataset = mlflow.data.load_delta(table_name=training_data_table, version=training_latest_version)
  test_dataset = mlflow.data.load_delta(table_name=test_data_table, version=test_latest_version)
  mlflow.log_input(training_dataset, context="training")
  mlflow.log_input(test_dataset, context="test")

  # MLflowにはモデルをサービングする際に用いられるconda環境を作成するユーティリティが含まれています。
  # 必要な依存関係がconda.yamlに保存され、モデルとともに記録されます。
  conda_env =  _mlflow_conda_env(
        additional_conda_deps=None,
        additional_pip_deps=["cloudpickle=={}".format(cloudpickle.__version__), "scikit-learn=={}".format(sklearn.__version__)],
        additional_conda_channels=None,
    )
  mlflow.pyfunc.log_model("random_forest_model", python_model=wrappedModel, conda_env=conda_env, signature=signature)
Unity Catalogにモデルを登録
run_id = mlflow.search_runs(filter_string='tags.mlflow.runName = "untuned_random_forest"').iloc[0].run_id
run_id
'82291f0ef991403ca1fcd209673e81e4'
# モデルレジストリにモデルを登録します
model_version = mlflow.register_model(f"runs:/{run_id}/random_forest_model", model_name)
Successfully registered model 'takaakiyayoi_catalog.wine_db.wine_model'.

Created version '1' of model 'takaakiyayoi_catalog.wine_db.wine_model'.
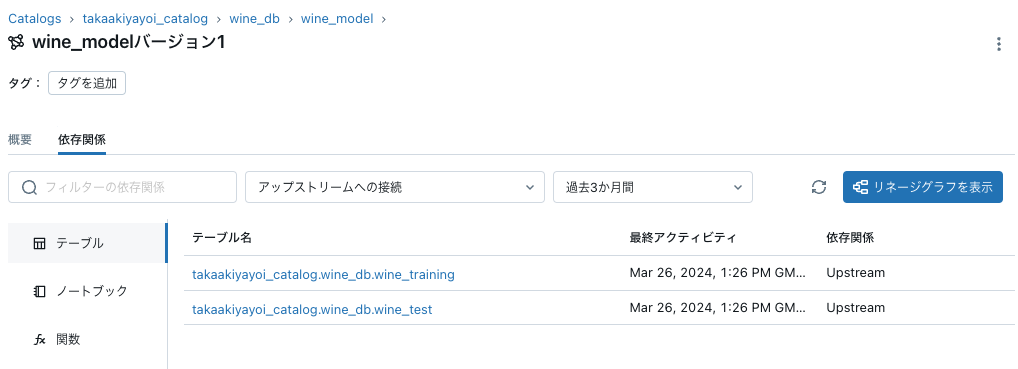
依存関係タブでトレーニングデータ、テストデータとのリネージを確認できます。


