これは面白い。Databricksで動かします。
ようこそ!このノートブックでは、OpenAIのVisionおよびResponses APIを使用して、Retrieval-Augmented Generation(RAG)システムを構築する方法を示します。画像とテキストの入力を組み合わせて顧客体験を分析することに焦点を当てています。このシステムはGPT-4.1を活用し、画像理解とファイル検索を統合してコンテキストに基づいた応答を提供します。
マルチモーダルデータセットは特に医療分野のような領域でますます一般的になっています。医療記録には視覚データ(例:放射線画像)とそれに付随するテキスト(例:臨床ノート)が含まれることが多いからです。実世界のデータセットは不完全または欠落した情報を含むことが多いため、複数のモダリティを同時に分析することが重要です。
このガイドでは、顧客サービスのユースケースに焦点を当てています。写真や書かれたレビューを含む顧客フィードバックを評価します。画像とテキストの入力を合成的に生成し、コンテキスト検索のためにファイル検索を使用し、画像理解を取り入れることで全体的なパフォーマンスにどのように影響するかを評価する方法を学びます。
セットアップと依存関係
%pip install openai evals pandas numpy matplotlib tqdm ipython mlflow --upgrade --quiet
%restart_python
import base64
from io import BytesIO
import os
from pathlib import Path

import matplotlib.pyplot as plt
import numpy as np
import pandas as pd
from openai import OpenAI
from IPython.display import display, Image
from tqdm.notebook import tqdm

os.environ["OPENAI_API_KEY"] = dbutils.secrets.get(scope="demo-token-takaaki.yayoi", key="openai_api_key")

cache_dir = Path('.local_cache')
cache_dir.mkdir(parents=True, exist_ok=True)

client = OpenAI()
MLflow Tracingを有効化します。
import mlflow
mlflow.openai.autolog()
例の生成
機械学習タスクのための高品質なトレーニングおよび評価データの生成は、コストと時間がかかることがあります。合成データは実用的でスケーラブルな代替手段を提供します。このノートブックでは、OpenAIのImage APIを使用して合成画像を生成し、Responses APIを用いて合成テキストを作成することで、マルチモーダルタスクの効率的なプロトタイピングと実験を可能にします。
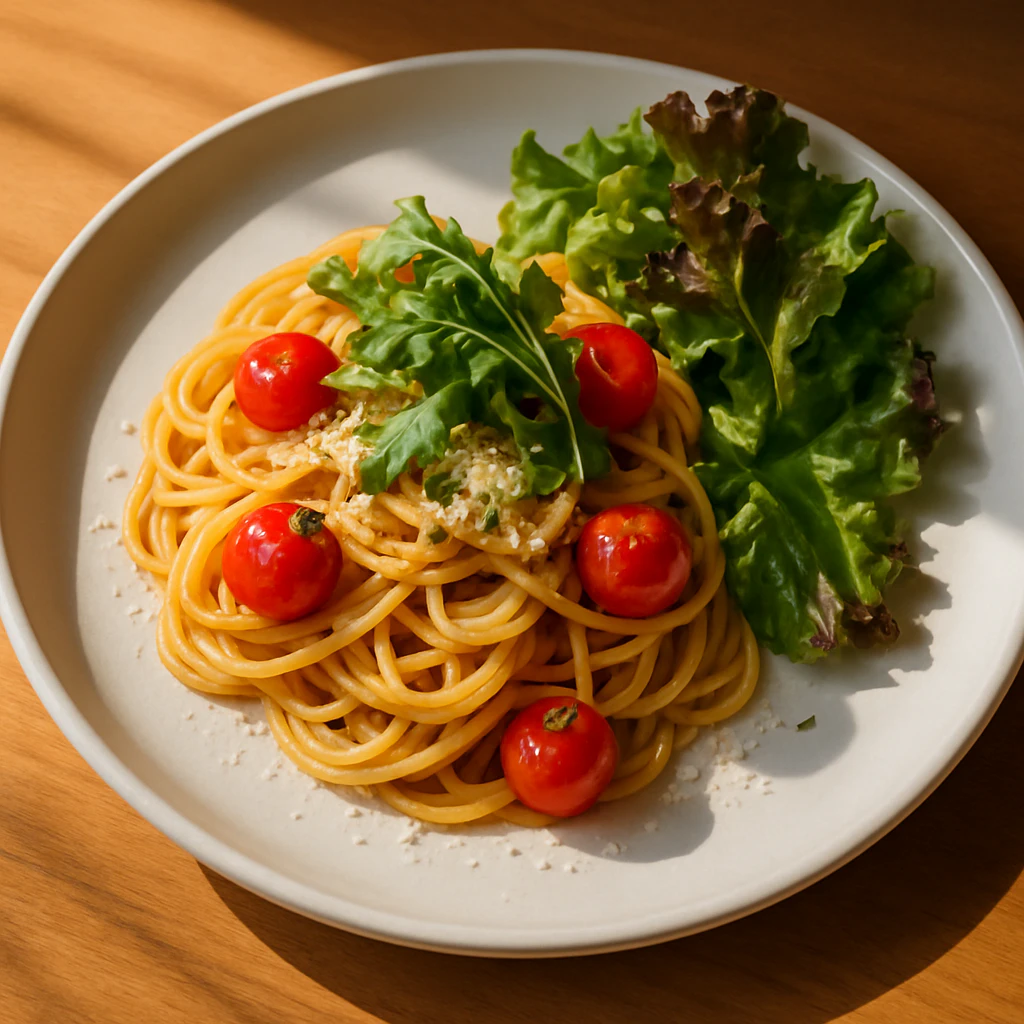
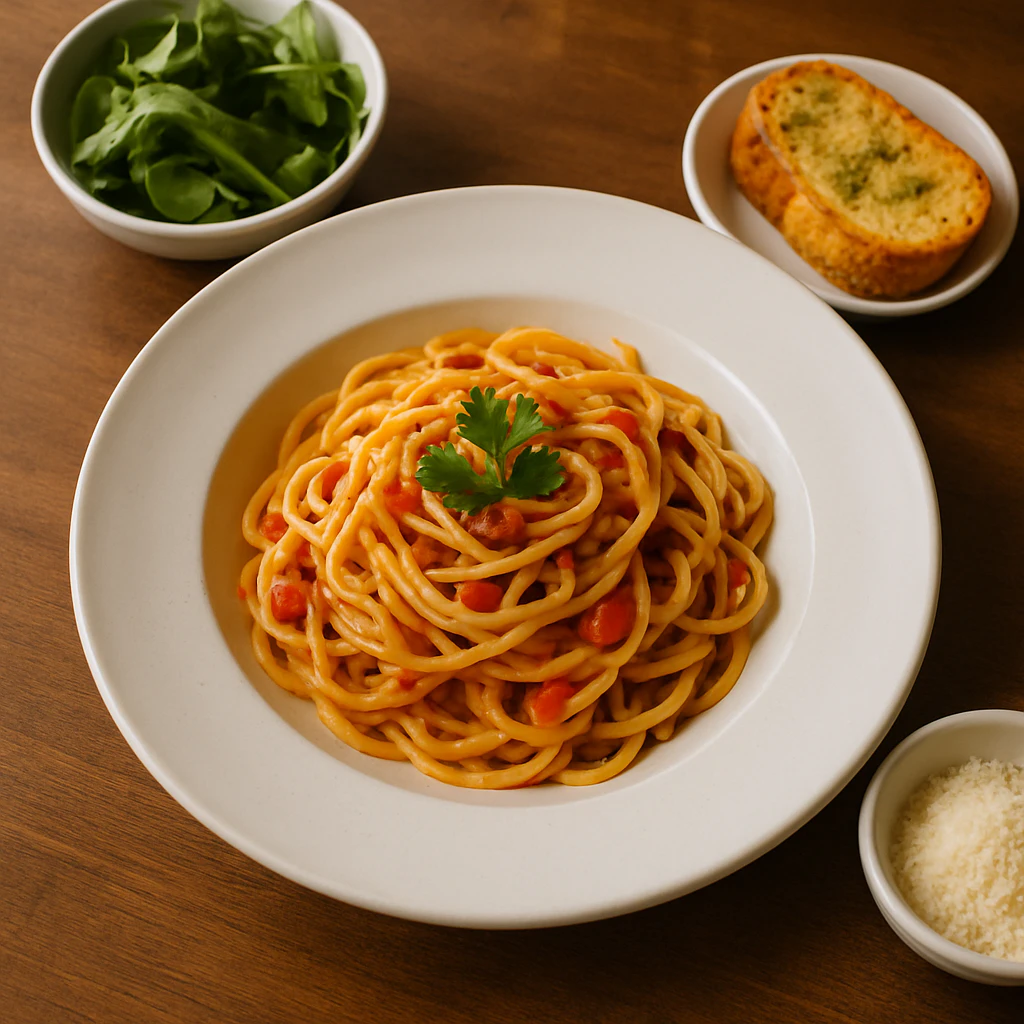
prompt = ("白いセラミックの皿に盛り付けられたガーニッシュとサイド付きのグルメパスタ、"
          "レストランのテーブルの上から撮影。柔らかい影と鮮やかな色。")
cache_path = f".local_cache/{hash(prompt)}.png"

if not os.path.exists(cache_path):
    response = client.images.generate(
        model="gpt-image-1",
        prompt=prompt,
        size="1024x1024"
    )

    with open(cache_path, "wb") as f:
        f.write(base64.b64decode(response.data[0].b64_json))
    print(f"生成してキャッシュしました: {cache_path}")

else:
    print(f"キャッシュから読み込み: {cache_path}")

display(Image(filename=cache_path))
生成してキャッシュしました: .local_cache/8595077658513654576.png
def generate_food_delivery_review(sentiment: str = 'positive') -> str:
"""
指定された感情で合成フードデリバリーレビューを生成します。
Args:
sentiment: 'positive' や 'negative' などの形容詞。
Returns:
生成されたレビューのテキスト
"""
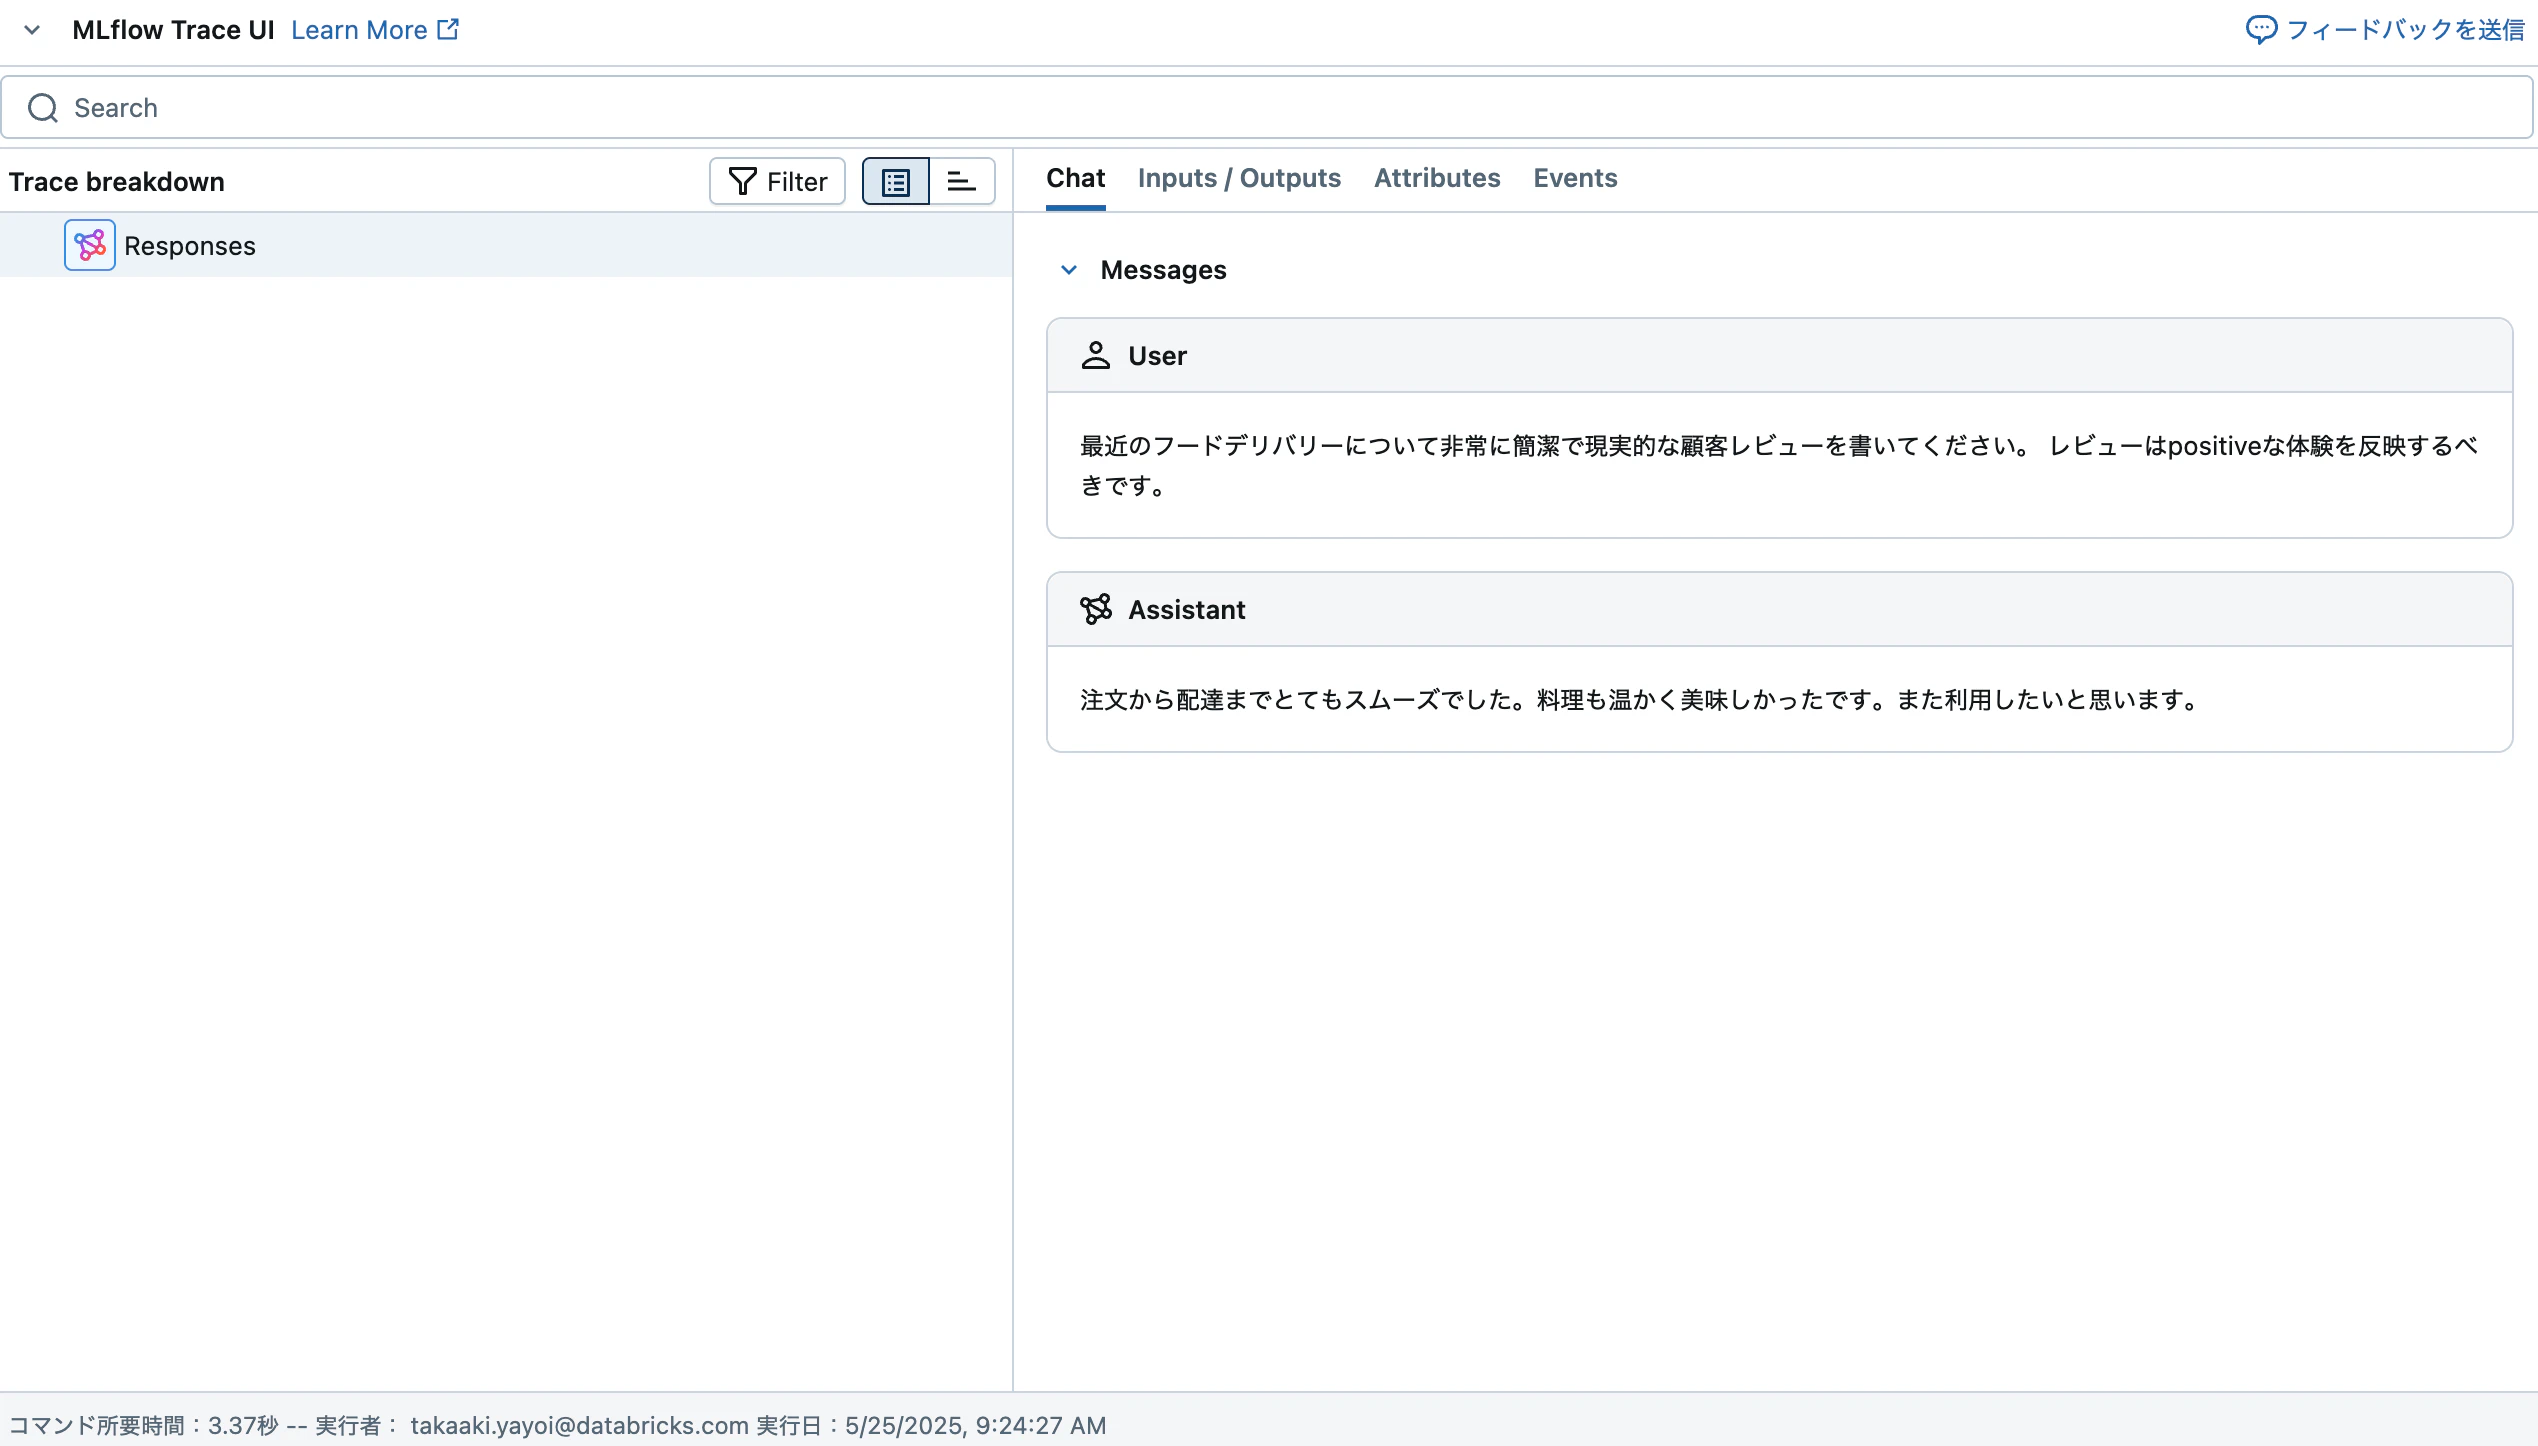
prompt = "最近のフードデリバリーについて非常に簡潔で現実的な顧客レビューを書いてください。"
prompt += f" レビューは{sentiment}な体験を反映するべきです。"
response = client.responses.create(
model="gpt-4.1",
input=[{"role": "user", "content": prompt}]
)
return response.output_text
review = generate_food_delivery_review()
print(review)
注文から配達までとてもスムーズでした。料理も温かく美味しかったです。また利用したいと思います。
データ処理
この例では、短いテキストスニペット、顧客レビューからの画像、および時折組み合わされたマルチモーダルエントリを含む顧客フィードバックの事前生成された合成データセットを使用します。また、上記の例を使用して独自の合成データセットを生成し、特定のユースケースに合わせてデータを調整することもできます。
# データセットのダウンロード
! mkdir -p .local_cache/images
! wget https://raw.githubusercontent.com/robtinn/image_understanding_rag_dataset/main/data/df.csv -O .local_cache/df.csv


! wget https://raw.githubusercontent.com/robtinn/image_understanding_rag_dataset/main/data/images/1.png -O .local_cache/images/1.png
! wget https://raw.githubusercontent.com/robtinn/image_understanding_rag_dataset/main/data/images/2.png -O .local_cache/images/2.png
! wget https://raw.githubusercontent.com/robtinn/image_understanding_rag_dataset/main/data/images/3.png -O .local_cache/images/3.png
! wget https://raw.githubusercontent.com/robtinn/image_understanding_rag_dataset/main/data/images/4.png -O .local_cache/images/4.png
! wget https://raw.githubusercontent.com/robtinn/image_understanding_rag_dataset/main/data/images/5.png -O .local_cache/images/5.png
! wget https://raw.githubusercontent.com/robtinn/image_understanding_rag_dataset/main/data/images/6.png -O .local_cache/images/6.png
! wget https://raw.githubusercontent.com/robtinn/image_understanding_rag_dataset/main/data/images/7.png -O .local_cache/images/7.png
def encode_image(image_path: str) -> str:
"""画像ファイルをbase64文字列にエンコードします。"""
with open(image_path, "rb") as f:
return base64.b64encode(f.read()).decode("utf-8")
def analyze_image_sentiment(image_path: str) -> str:
"""フードデリバリー画像を分析し、感情分析を返します。"""
base64_image = encode_image(image_path)
response = client.responses.create(
model="gpt-4.1",
input=[{
"role": "user",
"content": [
{
"type": "input_text",
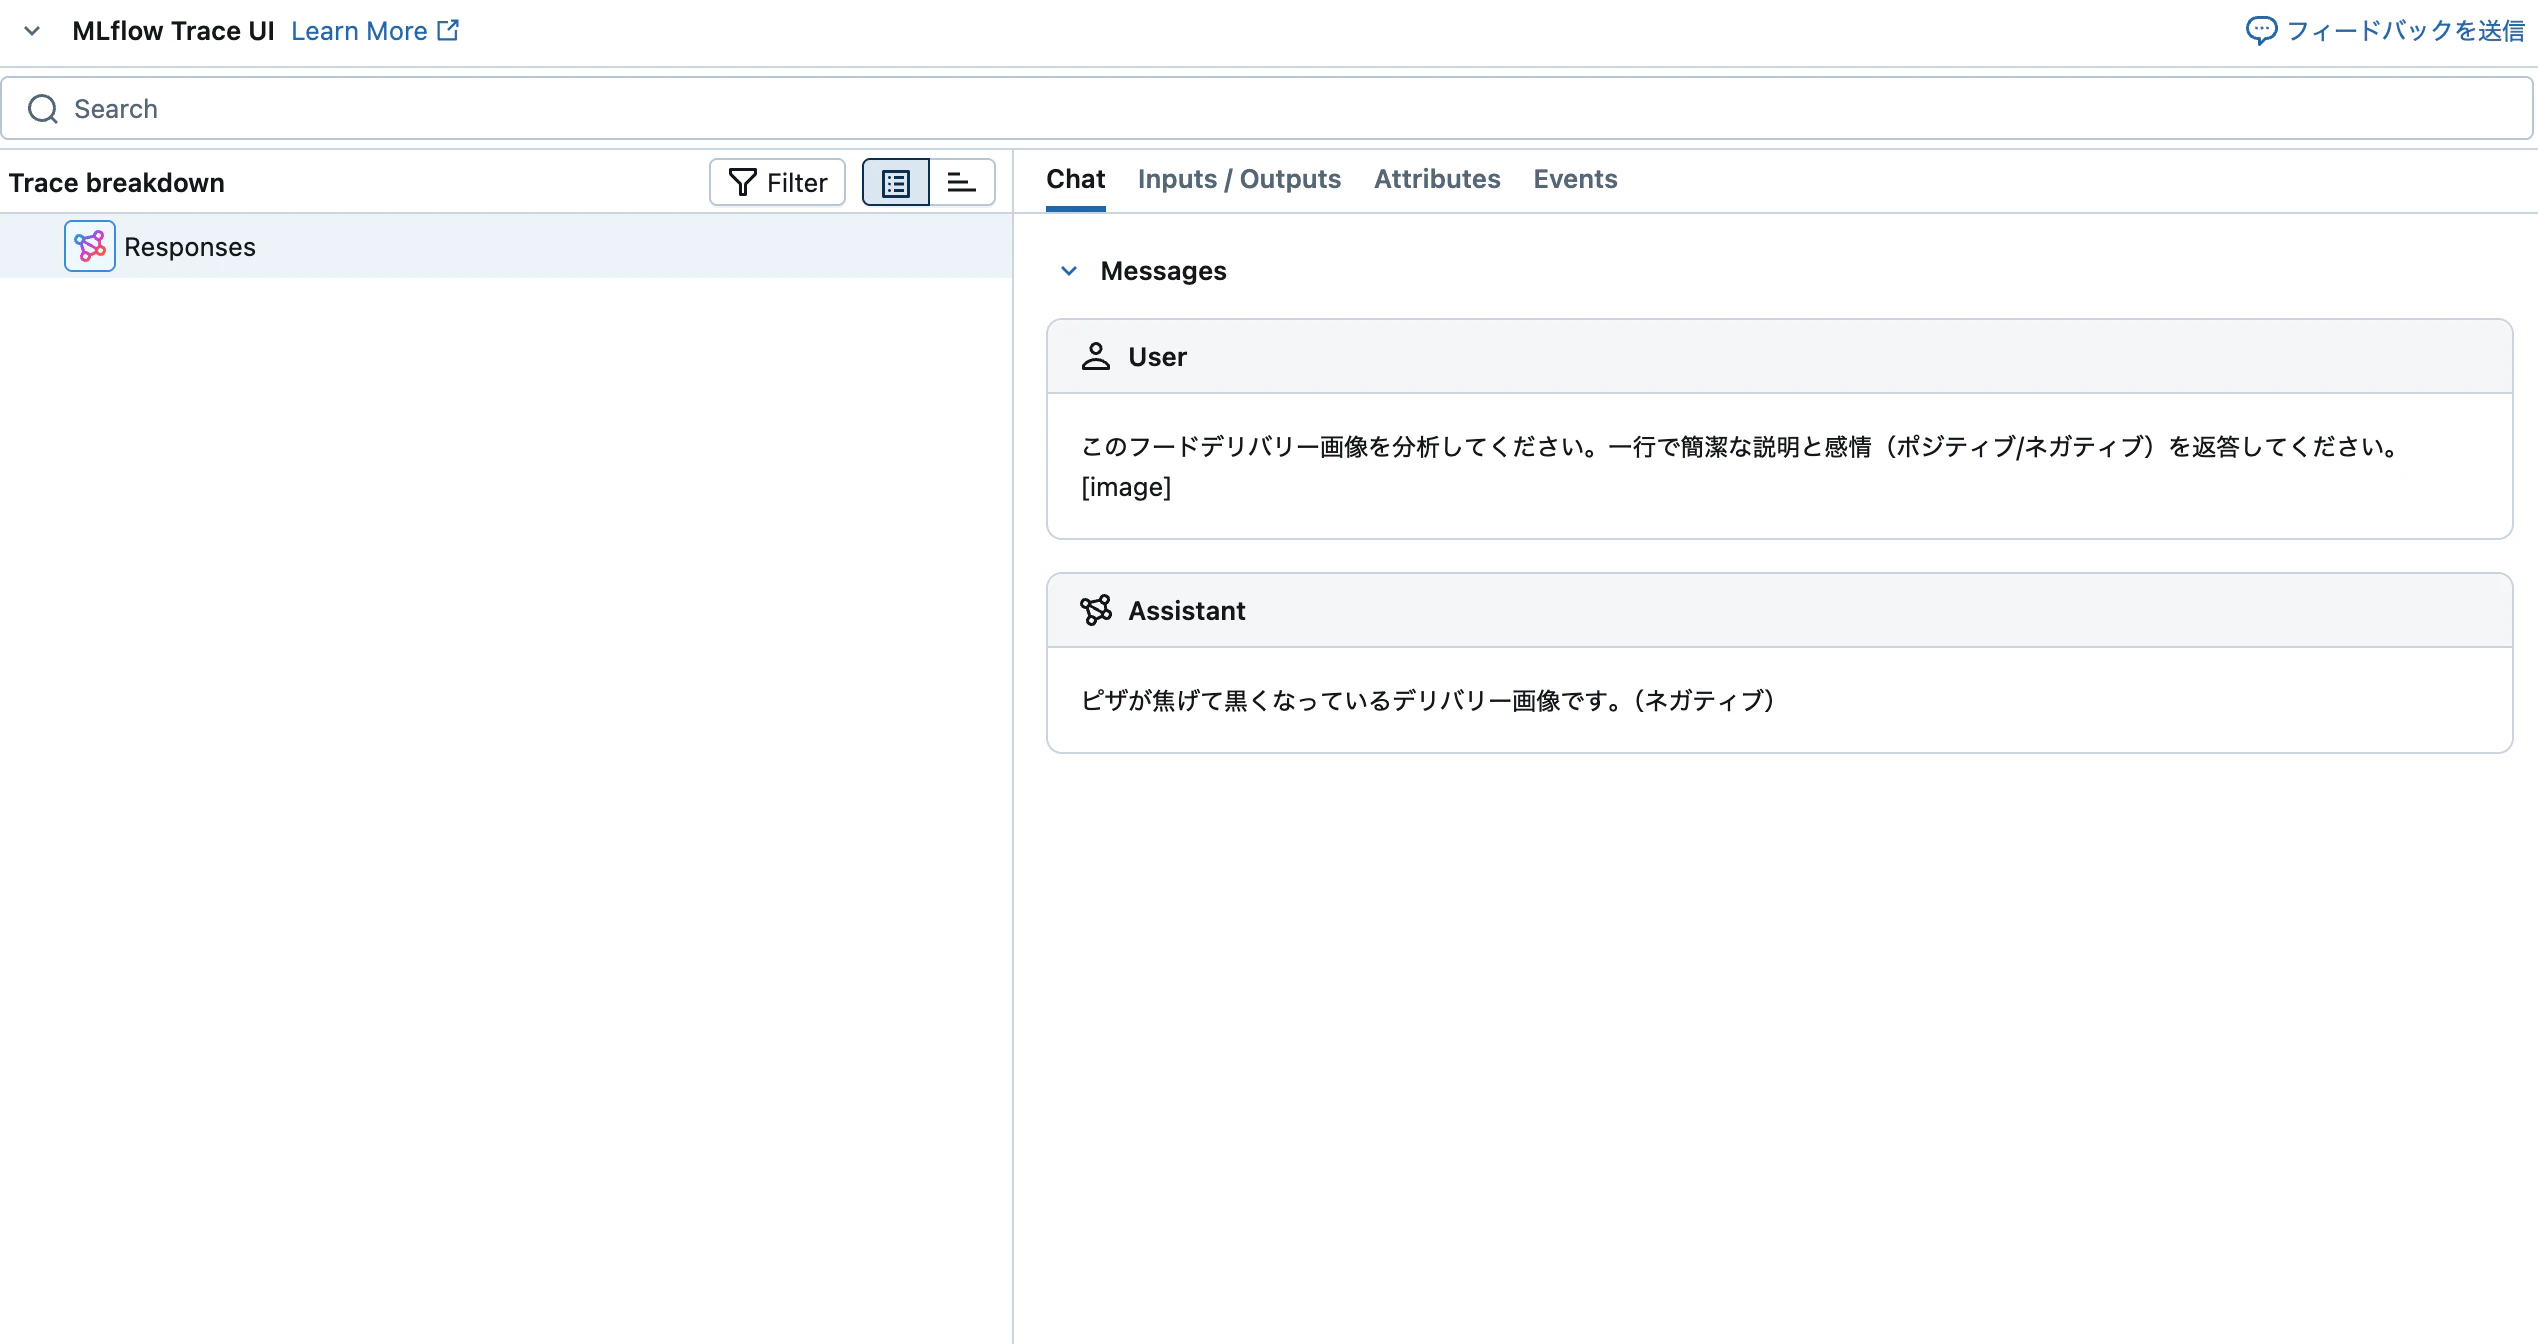
"text": "このフードデリバリー画像を分析してください。一行で簡潔な説明と感情(ポジティブ/ネガティブ)を返答してください。"
},
{
"type": "input_image",
"image_url": f"data:image/jpeg;base64,{base64_image}",
},
],
}],
max_output_tokens=50,
temperature=0.2
)
return response.output_text.strip()
df = pd.read_csv(".local_cache/df.csv")
cache_dir = Path(".local_cache")

for idx, row in df[~df['image_path'].isna()].iterrows():
    image_path = cache_dir / 'images' / row['image_path']
    sentiment = analyze_image_sentiment(str(image_path))
    df.at[idx, 'full_sentiment'] = f"{row['text']} {sentiment}" if pd.notna(row['text']) else sentiment
    print(f"Processed {row['image_path']}")

df['full_sentiment'] = df['full_sentiment'].fillna(df['text'])

output_path = cache_dir / "df_full_sentiment.csv"
df.to_csv(output_path, index=False)
print(f"\nSaved results to {output_path}")
ダウンロードした画像に対するレビューを生成します。

pd.set_option('display.max_colwidth', 100)  # デフォルト(50)から増やして、full_sentimentを全て表示
display(df.head())

ベクトルストアの構築
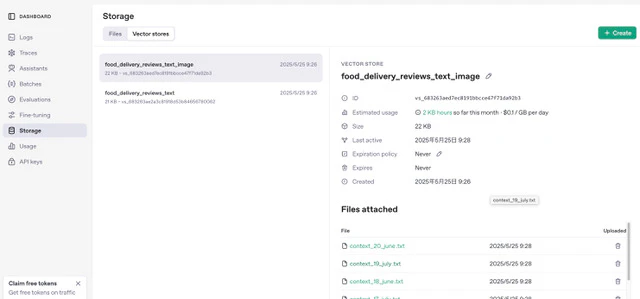
この例では、OpenAIの組み込みベクトルストアとファイル検索機能を使用して、顧客のフィードバックから視覚的およびテキストベースの両方のフィードバックを分析できるRAGシステムを構築します。比較のために、画像理解を含むベクトルストアと含まないベクトルストアの2つを作成します。
text_vector_store = client.vector_stores.create(
    name="food_delivery_reviews_text",
    metadata={
        "purpose": "text_understanding",
        "created_by": "notebook",
        "version": "1.0"
    }
)
text_vector_store_id = text_vector_store.id

text_image_vector_store = client.vector_stores.create(
    name="food_delivery_reviews_text_image",
    metadata={
        "purpose": "text_image_understanding",
        "created_by": "notebook",
        "version": "1.0"
    }
)
text_image_vector_store_id = text_image_vector_store.id

print("Vector Store IDs:")
print(f"  Text:       {text_vector_store_id}")
print(f"  Text+Image: {text_image_vector_store_id}")
Vector Store IDs:
  Text:       vs_683263ae2a3c81918d53b84656780062
  Text+Image: vs_683263aed7ec8191bbcce47f71da92b3
ファイルを登録します。
upload_files_to_vector_store(text_image_vector_store_id, df)
upload_files_to_vector_store(text_vector_store_id, df, column_name="text")
ベクトルストアが作成されます。画像ありとなしバージョンを作成しています。
検索とフィルタリング
ファイル検索を使用して自然言語クエリでデータセットを分析できます。テキストのみのデータセットでは、分析に役立つ情報が欠けていることがわかります。
7月のスパゲッティに対する唯一の肯定的なレビューには視覚的なフィードバックが含まれており、テキストベースのコンテキストのみを使用するRAGシステムは肯定的な詳細について不確かです。しかし、画像コンテキストが提供されると、2番目のRAGシステムはより正確な応答を提供できます。
# 7月のスパゲッティに関するコメントをベクターストアに問い合わせる
query = "スパゲッティに関するコメントはありましたか?"
print(f"🔍 クエリ: {query}\n")

# フィルタリングを使用して検索を実行
response = client.responses.create(
    model="gpt-4.1",
    input=query,
    tools=[{
        "type": "file_search",
        "vector_store_ids": [text_vector_store_id],
        "filters": {
            "type": "eq",
            "key": "month",
            "value": "july"
        }
    }]
)

# 結果を表示
print("📝 レスポンス:")
print("-" * 40)
print(response.output_text)
🔍 クエリ: スパゲッティに関するコメントはありましたか?

📝 レスポンス:
----------------------------------------
「スパゲッティ」という言葉そのもののコメントは見当たりませんでしたが、関連する「パスタ」に関するコメントがありました。

具体的には、「パスタは茹ですぎで、ガーリックブレッドは焦げていた。メニューフォトから想像したものとは違った。」という内容です。

他にも「麺類」「パスタ」「スパゲッティ」に直接言及したコメントはありませんでした。
画像を含むベクトルストアに問い合わせます。
query = "スパゲッティに関するコメントはありましたか?"
print(f"🔍 クエリ: {query}\n")

response = client.responses.create(
    model="gpt-4.1",
    input=query,
    tools=[{
        "type": "file_search",
        "vector_store_ids": [text_image_vector_store_id],
        "filters": {
            "type": "eq",
            "key": "month",
            "value": "july"
        }
    }]
)

print("📝 レスポンス:")
print("-" * 40)
print(response.output_text)
🔍 クエリ: スパゲッティに関するコメントはありましたか?

📝 レスポンス:
----------------------------------------
スパゲッティ(パスタ)に関するコメントがありました。

- [context_17_july.txt]には、「トマトソースのパスタとサラダ、ガーリックトーストが美味しそうに盛り付けられています。」というポジティブなコメントがあります。
- [context_9_july.txt]には、「Pasta was overcooked, and the garlic bread was burnt. Not what I expected based on the menu photos.」(パスタが茹ですぎで、ガーリックブレッドは焦げていた。メニュー写真と違って期待外れだった)というネガティブなコメントがあります。

これらがスパゲッティやパスタに関する記述です。
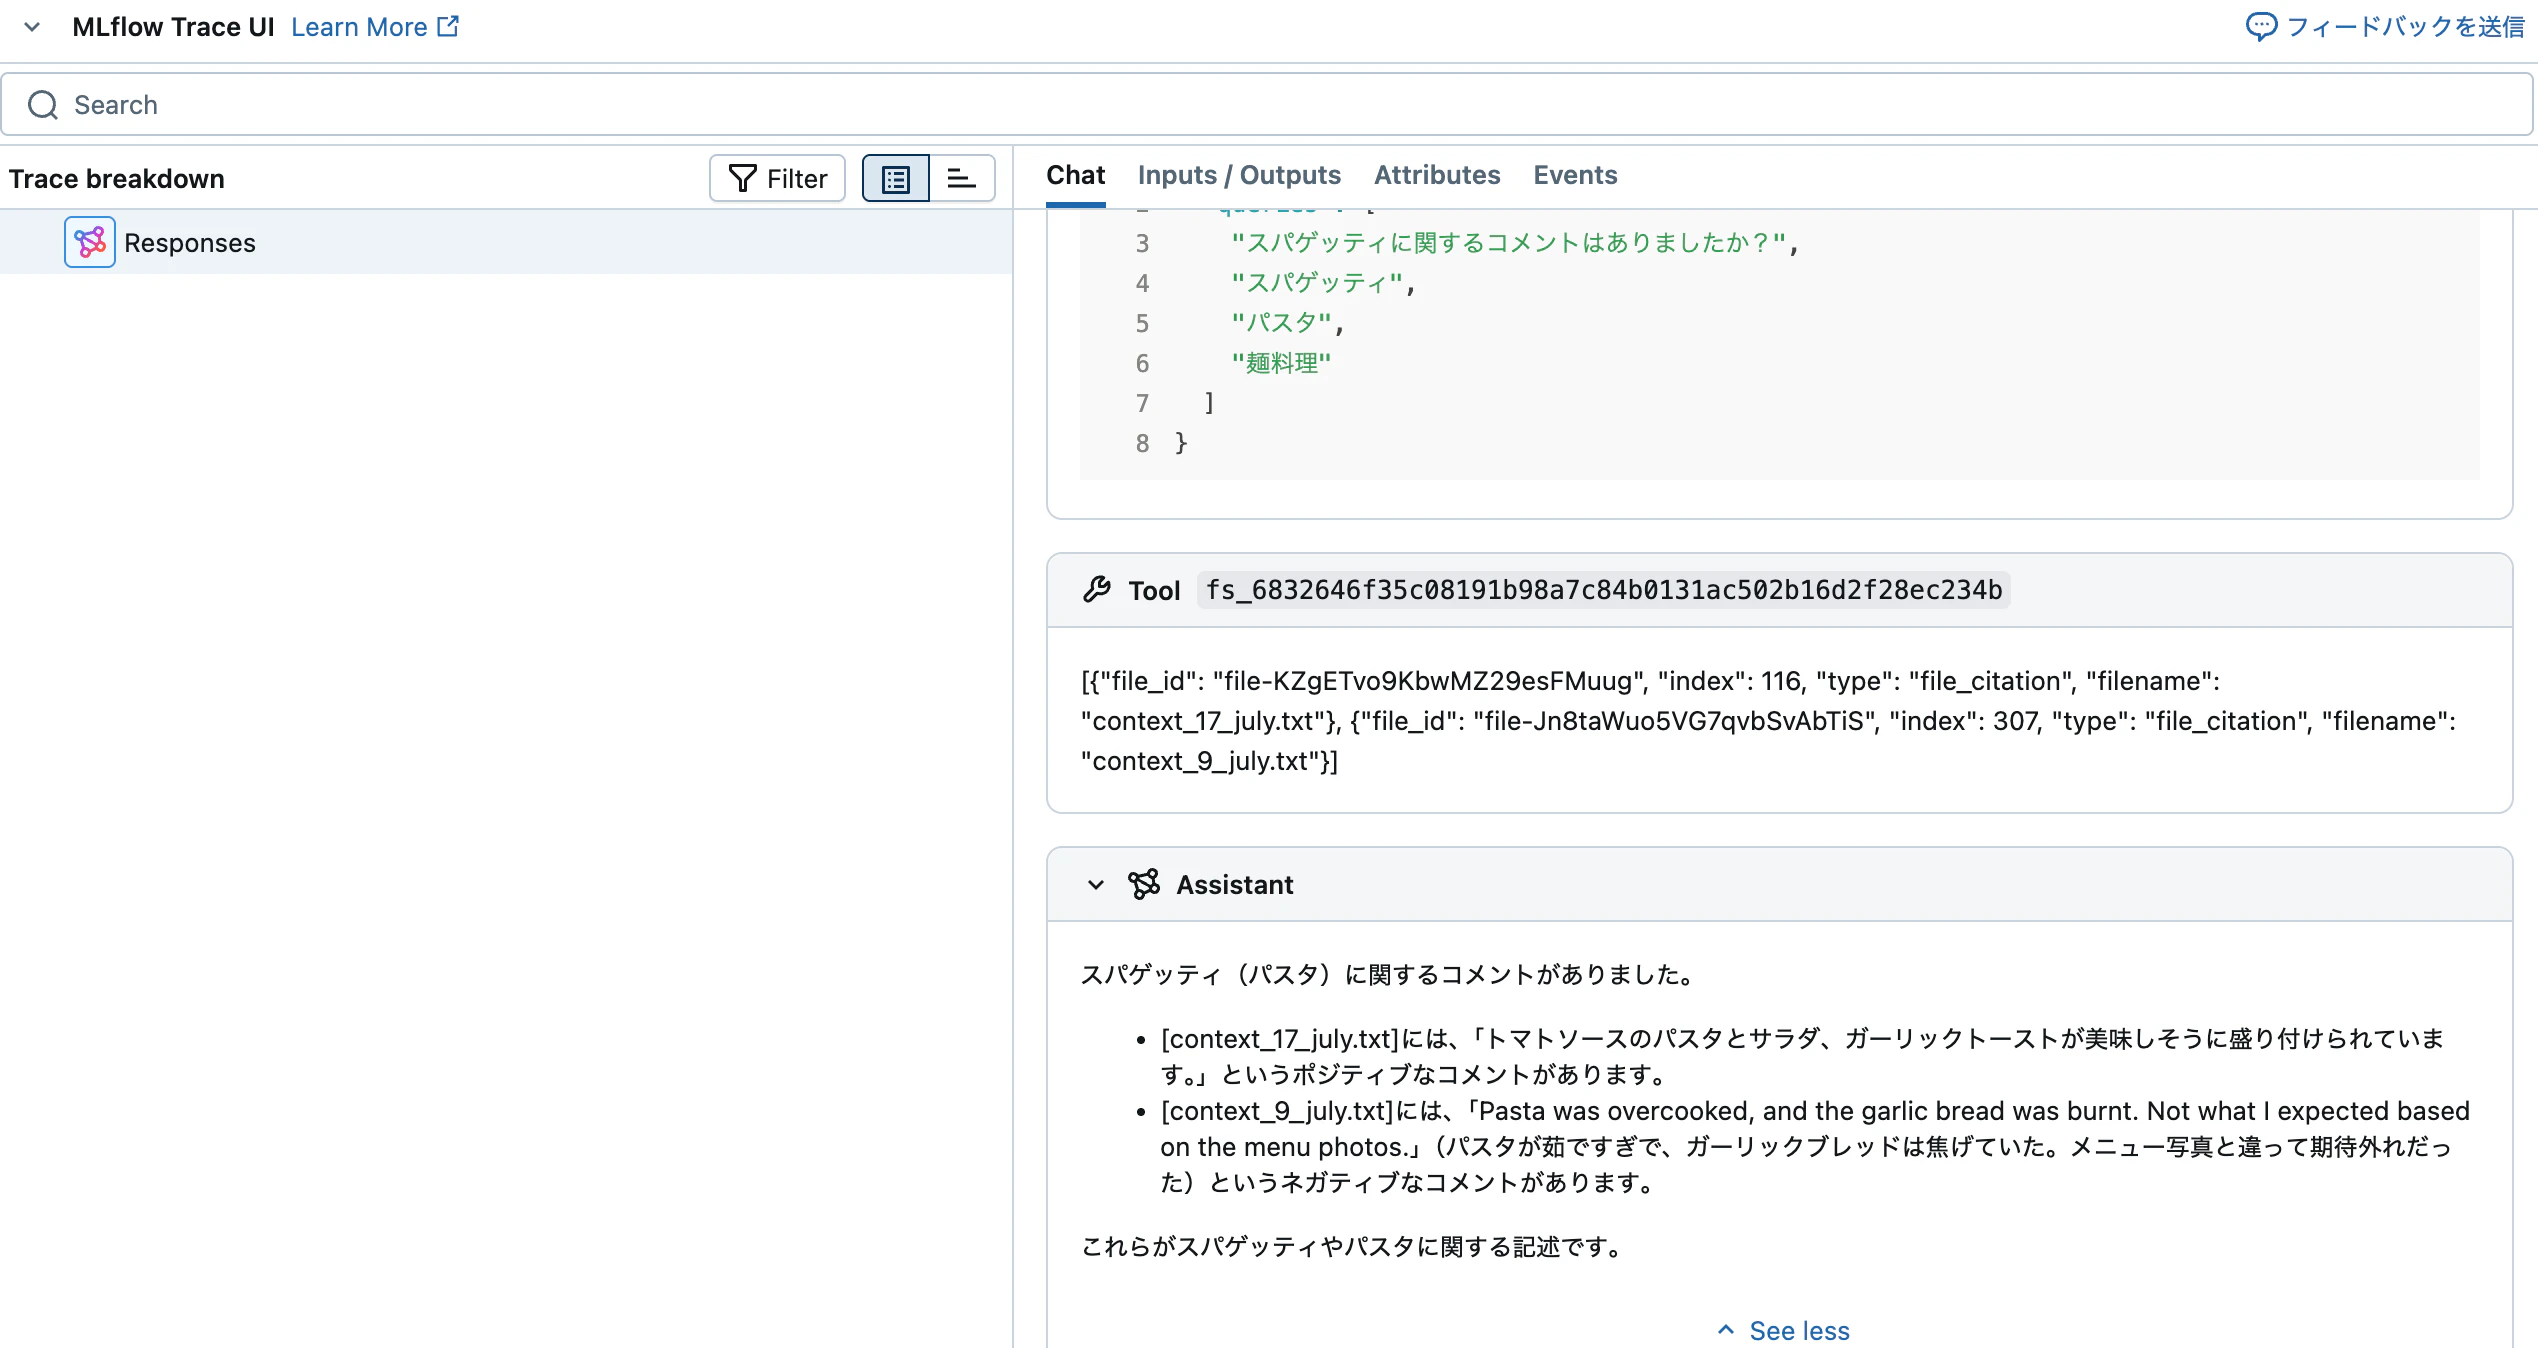
これが正しいかどうかは、取得した画像を確認することで確認できます。
IMAGE_ID_MAPPING = {
    f"context_{row['id']}_{row['month']}.txt": row["image_path"]
    for _, row in df[~df['image_path'].isna()].iterrows()
}

def display_retrieved_images(
    response,
    cache_dir: str = ".local_cache"
):
    """
    検索結果から画像を表示する。

    引数:
        response: 検索クエリのレスポンスオブジェクト
        cache_dir: 画像が保存されているディレクトリ

    戻り値:
        表示された画像のファイル名と画像パスの辞書
    """
    # レスポンスからアノテーションを取得
    try:
        annotations = response.output[1].content[0].annotations
        retrieved_files = {result.filename for result in annotations}
    except (AttributeError, IndexError):
        print("レスポンスに検索結果が見つかりませんでした。")
        return {}

    # 一致する画像を表示
    displayed_images = {}
    for file in retrieved_files:
        if file in IMAGE_ID_MAPPING and IMAGE_ID_MAPPING[file]:
            image_path = Path(cache_dir) / 'images' / IMAGE_ID_MAPPING[file]
            print(f"{file} の画像を表示中:")
            display(Image(str(image_path)))
            displayed_images[file] = str(image_path)

    return displayed_images

displayed = display_retrieved_images(response)
print(f"{len(displayed)} 枚の画像を表示しました")
context_17_july.txt の画像を表示中:
同様に、6月の焦げたピザに関する否定的なレビューについてもテストできます。
query = "ピザに対する否定的なレビューはありましたか?もしあれば、ピザは焦げていましたか?"
print(f"🔍 クエリ: {query}\n")

response = client.responses.create(
    model="gpt-4.1",
    input=query,
    tools=[{
        "type": "file_search",
        "vector_store_ids": [text_image_vector_store_id],
        "filters": {
            "type": "eq",
            "key": "month",
            "value": "june"
        }
    }]
)

print("📝 レスポンス:")
print("-" * 40)
print(response.output_text)
🔍 クエリ: ピザに対する否定的なレビューはありましたか?もしあれば、ピザは焦げていましたか?

📝 レスポンス:
----------------------------------------
はい、ピザに対する否定的なレビューがありました。具体的に「ピザが焦げて黒くなっているデリバリー画像です。(ネガティブ)」という内容があり、ピザが焦げていたことがわかります。

これが正しいかどうかは、取得した画像を確認することで確認できます。
displayed = display_retrieved_images(response)
print(f"Displayed {len(displayed)} images")
context_20_june.txt の画像を表示中:

評価と分析
私たちのデータセットは時間とともに進化する可能性があり、新しいモデルを評価したい場合、OpenAI評価APIを使用して感情分析システムのパフォーマンスを評価できます。この簡単な例では、string_check基準を使用して、出力が「ポジティブ」、「ネガティブ」、または「不明」の3つの可能な値のいずれかであるかどうかを確認しました。
def prepare_evaluation_data(df, text_col="full_sentiment", label_col="label"):
    """DataFrameから評価用データアイテムを準備する。"""
    return [{"item": {"input": str(row[text_col]), "ground_truth": row[label_col]}}
           for _, row in df.iterrows()]


def prepare_evaluation_data(
    df: pd.DataFrame,
    text_col: str = "full_sentiment",
    label_col: str = "label"
) -> list:
    """
    DataFrameから評価用データアイテムを準備する。

    引数:
        df: 入力のpandas DataFrame。
        text_col: 入力テキストを含むカラム。
        label_col: 正解ラベルを含むカラム。

    戻り値:
        評価用にフォーマットされた辞書のリスト。
    """
    return [
        {"item": {"input": str(row[text_col]), "ground_truth": row[label_col]}}
        for _, row in df.iterrows()
    ]

def create_eval_run(evaluation_data: list, eval_id: str) -> str:
    """
    評価ランを作成し、開始する。

    引数:
        evaluation_data: 評価アイテムのリスト。
        eval_id: 評価オブジェクトID。

    戻り値:
        ランIDを文字列として返す。
    """
    eval_config = {
        "type": "completions",
        "model": "gpt-4.1",
        "input_messages": {
            "type": "template",
            "template": [
                {
                    "type": "message",
                    "role": "user",
                    "content": {
                        "type": "input_text",
                        "text": (
                            "このフードデリバリーレビューの感情を分類してください: {{ item.input }}。 "
                            "リクエストを「positive」、「negative」、「unclear」のいずれかに分類してください。 "
                            "その単語の一つだけで応答してください。"
                        )
                    }
                }
            ]
        },
        "source": {
            "type": "file_content",
            "content": evaluation_data
        }
    }

    run = client.evals.runs.create(
        eval_id=eval_id,
        data_source=eval_config
    )
    print("✅ 評価ランが正常に作成されました")
    print(f"ランID: {run.id}")
    return run.id
eval_obj = client.evals.create(
    name="food-categorization-eval",
    data_source_config={
        "type": "custom",
        "item_schema": {
            "type": "object",
            "properties": {
                "input": {"type": "string"},
                "ground_truth": {"type": "string"}
            },
            "required": ["input", "ground_truth"]
        },
        "include_sample_schema": True
    },
    testing_criteria=[
        {
            "type": "string_check",
            "name": "Match output to human label",
            "input": "{{sample.output_text}}",
            "reference": "{{item.ground_truth}}",
            "operation": "eq"
        }
    ]
)
eval_id = eval_obj.id
eval_id
eval_683264a04db881909d0272e8fd42d800
# 評価ランを作成

evaluation_data = prepare_evaluation_data(df, text_col="text")
text_only_run_id = create_eval_run(evaluation_data, eval_id)

evaluation_data = prepare_evaluation_data(df)
text_image_run_id = create_eval_run(evaluation_data, eval_id)

# 両方のランURLを取得

text_only_run = client.evals.runs.retrieve(eval_id=eval_id, run_id=text_only_run_id)
print(text_only_run.to_dict()['report_url'])

text_image_run = client.evals.runs.retrieve(eval_id=eval_obj.id, run_id=text_image_run_id)
print(text_image_run.to_dict()['report_url'])
✅ 評価ランが正常に作成されました
ランID: evalrun_683264a4ba80819093b6495efc865f93
✅ 評価ランが正常に作成されました
ランID: evalrun_683264a5856c8190bf11d265dd9693e4
https://platform.openai.com/evaluations/eval_683264a04db881909d0272e8fd42d800?project_id=proj_DByFhCNXIbRODtPv82ezctKr&run_id=evalrun_683264a4ba80819093b6495efc865f93
https://platform.openai.com/evaluations/eval_683264a04db881909d0272e8fd42d800?project_id=proj_DByFhCNXIbRODtPv82ezctKr&run_id=evalrun_683264a5856c8190bf11d265dd9693e4
# 評価ランが完了するまで数秒待つ必要があるかもしれません

text_only_run_output_items = client.evals.runs.output_items.list(eval_id=eval_id, run_id=text_only_run_id)
text_image_run_output_items = client.evals.runs.output_items.list(eval_id=eval_id, run_id=text_image_run_id)
OpenAIの評価機能、初めて使いました。

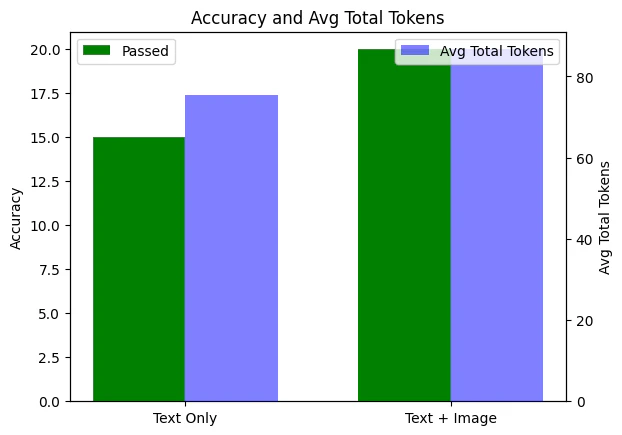
これらの評価実行の結果を取得し、ローカル分析を行うことができます。この場合、テキストのみの実行とテキスト+画像の実行のパフォーマンスを比較し、総トークン数を増やすこと(画像コンテキストの追加によって)がモデルの精度にどのように影響するかを評価します。また、失敗した例のモデル入力を分析することで、基本的なエラー分析を行うこともできます。
# text_only_runの合格数と合計を計算
text_only_data = text_only_run_output_items.to_dict()['data']
text_only_passed = sum(1 for output_item in text_only_data if output_item['results'][0]['passed'])
text_only_total = len(text_only_data)

# text_image_runの合格数と合計を計算
text_image_data = text_image_run_output_items.to_dict()['data']
text_image_passed = sum(1 for output_item in text_image_data if output_item['results'][0]['passed'])
text_image_total = len(text_image_data)

# 各ランのtotal_tokensの平均を計算
def avg_total_tokens(data):
    tokens = [item['sample']['usage']['total_tokens'] for item in data if 'usage' in item['sample']]
    return sum(tokens) / len(tokens) if tokens else 0

text_only_avg_tokens = avg_total_tokens(text_only_data)
text_image_avg_tokens = avg_total_tokens(text_image_data)

# プロット
labels = ['Text Only', 'Text + Image']
passed = [text_only_passed, text_image_passed]
avg_tokens = [text_only_avg_tokens, text_image_avg_tokens]

x = np.arange(len(labels))
width = 0.35

fig, ax1 = plt.subplots()

# 合格数のバー
bars1 = ax1.bar(x - width/2, passed, width, label='Passed', color='green')
ax1.set_ylabel('Accuracy')
ax1.set_xticks(x)
ax1.set_xticklabels(labels)
ax1.set_title('Accuracy and Avg Total Tokens')
ax1.legend(loc='upper left')

# 平均total_tokensのための第2のy軸
ax2 = ax1.twinx()
bars2 = ax2.bar(x + width/2, avg_tokens, width, label='Avg Total Tokens', color='blue', alpha=0.5)
ax2.set_ylabel('Avg Total Tokens')
ax2.legend(loc='upper right')

plt.show()
# 失敗したサンプルを抽出
failed_samples = [
    {
        "Input": sample['sample']['input'],
        "Model Output": sample['sample']['output']
    }
    for sample in text_only_run_output_items.to_dict()['data']
    if not sample['results'][0]['passed']
]

pd.set_option('display.max_colwidth', 150)  # 必要に応じて調整

failed_df = pd.DataFrame(failed_samples)
display(failed_df.style.set_properties(**{'text-align': 'left'}))

最後に、作成したリソースの一部をクリーンアップしましょう。
# ベクトルストアを削除
deleted_vector_store = client.vector_stores.delete(
  vector_store_id=text_vector_store_id
)
print(deleted_vector_store)

deleted_vector_store = client.vector_stores.delete(
  vector_store_id=text_image_vector_store_id
)
print(deleted_vector_store)
VectorStoreDeleted(id='vs_683263ae2a3c81918d53b84656780062', deleted=True, object='vector_store.deleted')
VectorStoreDeleted(id='vs_683263aed7ec8191bbcce47f71da92b3', deleted=True, object='vector_store.deleted')