メモ書き程度にしか記載していないためご了承下さい。
再度編集いたしますので、イメージだけでも掴んでいただきたいです。
今回も作成したアプリは、座った姿勢を改善することを目的としてしています。
mediapipeを用いることで、PC内蔵カメラから座った姿勢での鼻の座標を取得することができます。
そして、鼻の座標が連続で閾値(最初の3回の平均値)を超えた場合に
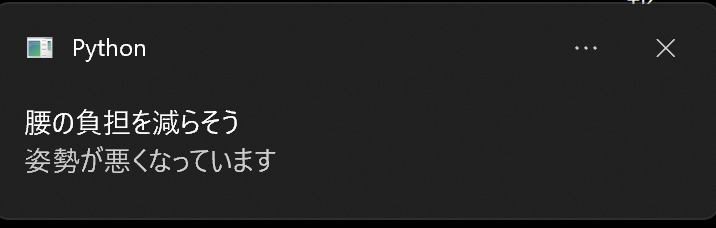
「姿勢が悪くなっています」とデスクトップ通知します。
以下は通知のイメージです。
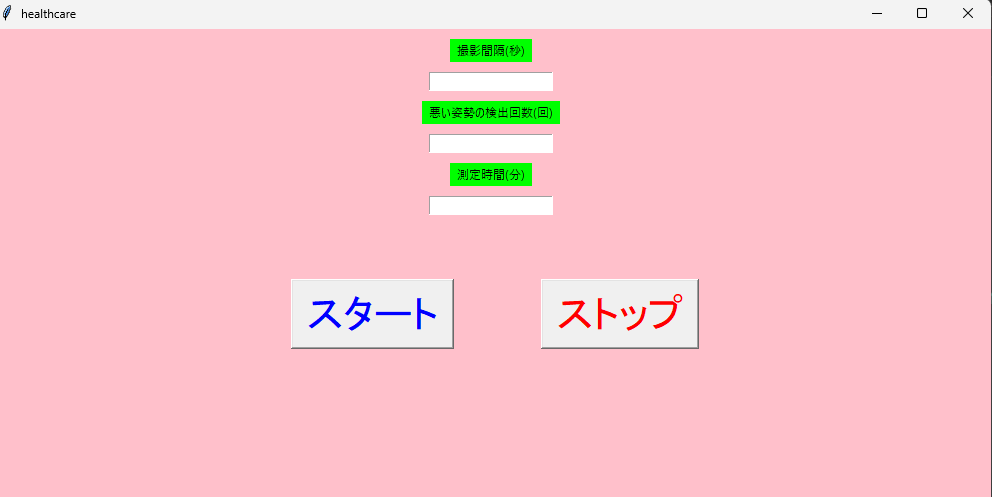
以下はTkinterで作成したデザインになります。
以下は使用方法になります。
1,撮影間隔(秒)※1、悪い姿勢の検出回数(回)※2、測定時間(分)を入力
※1:撮影間隔は1分以内がおすすめです。
長時間に設定すると、悪い姿勢の通知が遅れてしまいます。
※2:3~5回がおすすめです。
数回ですと、すぐに通知されてしまいます。
また、10回ぐらいになりますと、通知が遅れてしまいます。
以下は全体のソースコードになります。
qiita_20231126.py
# -*- coding:utf-8 -*-
import tkinter
import tkinter.font
import threading
import matplotlib.pyplot as plt
from matplotlib.backends.backend_tkagg import FigureCanvasTkAgg
import cv2
import numpy as np
import time
import mediapipe as mp
from plyer import notification
import sys

start_flag = False
quitting_flag = False

# 測定
def measurement():
    global start_flag
    global quitting_flag

    while not quitting_flag:
        if start_flag:
            shoot_interval = shoot_txt.get()
            shoot_interval = int(shoot_interval)
            print(f"撮影間隔:{shoot_interval}")

            notice_time = notice_txt.get()
            notice_time = int(notice_time)
            print(f"悪い姿勢の連続回数:{notice_time}")

            run_time = run_txt.get()
            run_time = int(run_time) * 60
            print(f"アプリ起動時間:{run_time}")
            print(f"{run_time/shoot_interval}")

            #部位の座標の取得
            def findPoint(landmark_num):
                parts_array = {"x":0, "y":0, "z":0,"v":0}
                if (results.pose_landmarks is None):
                    return None
                else:
                    parts_array["x"] = results.pose_landmarks.landmark[landmark_num].x
                    parts_array["y"] = results.pose_landmarks.landmark[landmark_num].y
                    body_array = [0,0]
                    body_array[0] = int(parts_array["x"] * width + 0.5)
                    body_array[1] = int(parts_array["y"] * height + 0.5)
                    return body_array

            #初期設定
            mp_pose = mp.solutions.pose

            cap = cv2.VideoCapture(0)
            count = 0
            bad_count = 0
            nose_y = []
            nose_y_all = []

            with mp_pose.Pose(
                min_detection_confidence=0.5,
                min_tracking_confidence=0.5) as pose:
                while cap.isOpened():
                    if start_flag == False:
                        print("ストップが押下されました")
                        break
                    if start_flag:
                        count += 1
                        print(count)
                        success, image = cap.read()
                        if not success:
                            print("Ignoring empty camera frame.")
                            continue
                        image.flags.writeable = False
                        image = cv2.cvtColor(image, cv2.COLOR_BGR2RGB)
                        results = pose.process(image)

                        image.flags.writeable = True
                        image = cv2.cvtColor(image, cv2.COLOR_RGB2BGR)
                        height,width = image.shape[0],image.shape[1]

                        #鼻の座標の取得
                        nose = findPoint(0)
                        if nose:
                            nose_y.append(nose[1])
                            nose_y_all.append(nose[1])

                        else:
                            print("鼻の座標を取得できませんでした")
                            break

                        print(f"鼻のy座標:{nose_y}")

                        #一定時間停止
                        time.sleep(shoot_interval)

                        #鼻のy座標の3回の平均
                        thre = [i for i in nose_y[:3]]
                        thre = np.mean(thre)
                        print("鼻の座標の平均 %d"% thre)


                        if count > 3:
                        # 閾値を超える鼻の座標
                            if nose[1] > thre:
                                bad_count += 1
                                print("bad posture")

                                #閾値を3回超えたらデクストップ通知する
                                if bad_count == notice_time:
                                    notification.notify(
                                                title="腰の負担を減らそう",
                                                message="姿勢が悪くなっています",
                                                timeout=10
                                            )
                                    bad_count = 0

                                    #鼻の座標をクリアする
                                    nose_y.clear()


                        #撮影の終了
                        if len(nose_y_all) == (run_time / shoot_interval):
                            print("要素数が基準を満たしました")
                            print(f"nose_yの要素数:{len(nose_y)},nose_y_allの要素数:{len(nose_y_all)}")
                            break

            print("撮影を終了します")
            cap.release()

# スタートボタンが押された時の処理
def start_button_click(event):
    global start_flag
    start_flag = True

# ストップボタンが押された時の処理
def stop_button_click(event):
    global start_flag
    start_flag = False


# 終了ボタンが押された時の処理
def quit_app():
    global quitting_flag
    global app
    global thread1

    quitting_flag = True

    # thread1終了まで待つ
    thread1.join()
    app.destroy()

'''以下からメイン処理'''

# メインウィンドウを作成
app = tkinter.Tk()
app.title("healthcare")
app.geometry("1000x1000")
app.configure(bg="pink")

# ボタンの作成と配置

message_shoot = tkinter.Message(app,text="撮影間隔(秒)",width=200,bg="#000fff000")
message_shoot.pack(pady=10)

shoot_txt =tkinter.Entry(app)
shoot_txt.pack()

message_notice = tkinter.Message(app,text="悪い姿勢の検出回数(回)",width=200,bg="#000fff000")
message_notice.pack(pady=10)

notice_txt = tkinter.Entry(app)
notice_txt.pack()

message_run = tkinter.Message(app,text="測定時間(分)",width=200,bg="#000fff000")
message_run.pack(pady=10)

run_txt = tkinter.Entry(app)
run_txt.pack()

start_button = tkinter.Button(app,text="スタート",fg="blue",font=("Menlo", 30))
start_button.place(x=300,y=250)

stop_button = tkinter.Button(app,text="ストップ",fg="red",font=("Menlo", 30))
stop_button.place(x=550,y=250)

# イベント処理の設定
start_button.bind("<ButtonPress>", start_button_click)
stop_button.bind("<ButtonPress>", stop_button_click)
app.protocol("WM_DELETE_WINDOW", quit_app)

# スレッドの生成と開始
thread1 = threading.Thread(target=measurement)
thread1.start()

# メインループ
app.mainloop()
前回は、測定中にストップボタンを押下してもストップしませんでした。
原因は、スレッドを1つしか立てていなかったためCPUのコアは1つしか
動作していなかったからです。
そのため今回は、非同期処理(マルチスレッド処理)を行い、
それぞれのスレッドを別のコアに実行させることで解決することができました。
Tkinterでのマルチスレッドの立て方の参考サイトになります。
https://daeudaeu.com/tkinter_mulithread/
このサイトでは、以下のようにしてスレッドの生成と開始をしています
threading.py
import threading

thread1 = threading.Thread(target=hogehoge) #hogehoge=関数名
thread1.start()
今後は、初期値の設定や、良い姿勢をキープできているときの通知等を
実装していきます。