本記事の内容
[初心者向け] ポートフォリオに愛犬管理アプリを作ってみた話[Ruby on Rails]の付属記事です。
ご覧になっていない方は、こちらからご覧ください。
devise_invitableの使い方だけ知りたい!という方は、このままご覧ください。
当記事は、Deviseの実装は一通り終わっていてサインインもサインアップも実装できている前提です。
まだ行っていない方は、こちらをまずはご覧ください。
開発環境
MacBook Air (M1, 2020)
Rails 6.1.6.1
ruby 3.0.1
yarn 1.22.19
導入手順
- devise_invitableの導入
- 招待用のカラムの追加
- 招待ページの生成
- ユーザー名の追加
- routing設定
- 導入確認
順にやっていきます
devise_invitableの導入
今回はdevise_invitableというGemを導入していきます。
まずはGemファイルに下記のコードを記載してください。
gem 'devise_invitable'
$ bundle exec rails g devise_invitable:install

  insert  config/initializers/devise.rb
  create  config/locales/devise_invitable.en.yml
上記コマンドの実行で、bundle installと、rails g devise_invitable:installを同時に実行してくれます。
招待用のカラムを追加する
情報をDBに保存できるよう、カラムを追加していきます。
下記のコマンドを実行で、Deviseと紐付いているモデルを指定してmigrationを自動生成してくれます。
$ bundle exec rails g devise_invitable User

  insert  app/models/user.rb
  create  db/migrate/20160323045302_devise_invitable_add_to_users.rb
※bundle execをつけることで、Gemfile.lockに書かれているバージョンのgemが動いてファイルを生成してくれます。
usersテーブルにinvitation用のカラムが追加されたカラムは以下になります。
change_table :users do |t|
  t.string     :invitation_token
  t.datetime   :invitation_created_at
  t.datetime   :invitation_sent_at
  t.datetime   :invitation_accepted_at
  t.integer    :invitation_limit
  t.references :invited_by, polymorphic: true
  t.integer    :invitations_count, default: 0
  t.index      :invitations_count
  t.index      :invitation_token, unique: true # for invitable
  t.index      :invited_by_id
end
追加が確認できたら、rails db:migrateをしましょう。
招待ページの生成
view生成用のジェネレートコマンドが用意されているのでそれを使いましょう。
viewファイルは app/views/devise 直下にdeviseとともにまとめられます。
$ bundle exec rails g devise_invitable:views

  invoke  DeviseInvitable::Generators::MailerViewsGenerator
   exist  app/views/devise/mailer
  create  app/views/devise/mailer/invitation_instructions.html.erb
  invoke  form_for
  create  app/views/devise/invitations
  create  app/views/devise/invitations/edit.html.erb
  create  app/views/devise/invitations/new.html.erb
end
ユーザー名の追加
devise_invitableはデフォルトではユーザー名の記入欄を持ちません。
ユーザー名を追加するための必要な手順は2つです。
①edit.html.erbに追記
②ストロングパラメーターの変更
順にやっていきましょう。
①edit.html.erbに追記
edit.html.erbを以下のように書き換えます。
edit.html.erbは、招待された人が自身のアカウントを作成するページです。
<h2><%= t "devise.invitations.edit.header" %></h2>

<%= form_for(resource, as: resource_name, url: invitation_path(resource_name), html: { method: :put }) do |f| %>
  <%= render "devise/shared/error_messages", resource: resource %>
  <%= f.hidden_field :invitation_token, readonly: true %>

  <% if f.object.class.require_password_on_accepting %>
    # ここから追記
    <div class="field">
      <%= f.label :name %><br />
      <%= f.text_field :name %>
    </div>
    # ここまで追記
    <div class="field">
      <%= f.label :password %><br />
      <%= f.password_field :password %>
    </div>

    <div class="field">
      <%= f.label :password_confirmation %><br />
      <%= f.password_field :password_confirmation %>
    </div>
  <% end %>

  <div class="actions">
    <%= f.submit t("devise.invitations.edit.submit_button") %>
  </div>
<% end %>
②ストロングパラメーターの変更
devise同様、現段階では、DBに保存されません。
devise_invitableの場合もconfigure_permitted_parametersメソッドが使用できます。
そのため、application_controller.rbに以下の内容を追記します。
class ApplicationController < ActionController::Base
    before_action :configure_permitted_parameters, if: :devise_controller?

    def configure_permitted_parameters
        devise_parameter_sanitizer.permit(:sign_up, keys: [:name])
        devise_parameter_sanitizer.for(:invite) { |u| u.permit(:email, :name) }
        devise_parameter_sanitizer.for(:accept_invitation) { |u| u.permit(:password, :password_confirmation, :invitation_token, :name) }
    end
end
.permitの中は、自身DBで受け取りたいカラム名を追記してください。
これで、devise_invitableの導入は完了です。
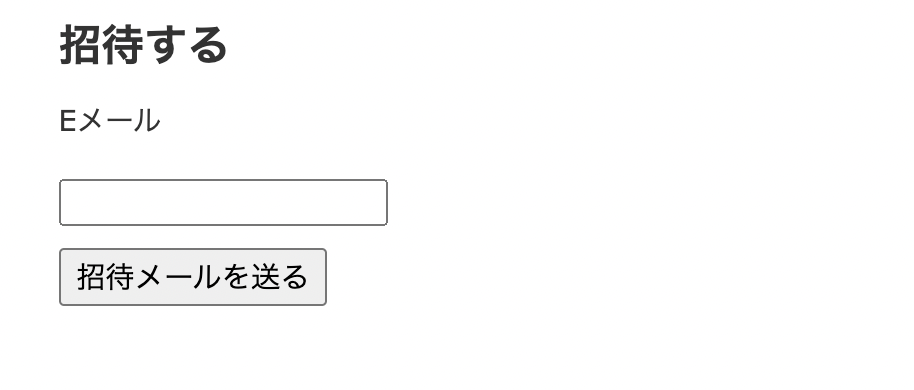
以下のリンクをクリックし、下記の写真のようになっていれば成功です。
http://localhost:3000/users/invitation/new

導入確認
招待したいユーザーに対してメールを送ることができるかどうかを確認します。
今回はgmailを使います。
工程は2つです。
①gmailの設定
②Rails側の設定
gmailの設定
gmailの設定に関しては詳しく解説しているサイトを見つけましたので、そちらをご覧ください。
下記にURLを添付しておきます。
https://senrenseyo.com/20210830/rails6-devisegmail/
Rails側の設定
  config.action_mailer.default_url_options = { host: 'localhost', port: 3000 }
#ここから追記
  config.action_mailer.raise_delivery_errors = true
  config.action_mailer.delivery_method = :smtp
  config.action_mailer.smtp_settings = {
    address:              'smtp.gmail.com',
    port:                  587,
    domain:               'gmail.com',
    user_name:            '先ほど設定したgmailアドレス',
    password:             '2段階認証したアカウントで発行したアプリパスワード',
    authentication:       'plain',
    enable_starttls_auto:  true
#ここまで追記
2つの設定を終えたら、あとは、招待メールを送るだけです。
実在するメールアドレスを記載し、確認してみましょう。
届いていれば完了です。
お疲れ様でした!!
おまけ
デフォルトでは、deviseの通知は英語で行われます。
日本語で通知が来るようにしましょう。
手順はめちゃめちゃ簡単!
devise_invitable.ja.ymlファイルを作成し、下記を記載するだけです。
ja:
  devise:
    failure:
      invited: 'アカウントを作成するには、保留中の招待を承認してください。'
    invitations:
      send_instructions: '招待メールが%{email}に送信されました。'
      invitation_token_invalid: '招待コードが不正です。'
      updated: 'パスワードが設定されました。お使いのアカウントでログインできます。'
      updated_not_active: 'パスワードが設定されました。'
      no_invitations_remaining: 'これ以上招待できません。'
      invitation_removed: '招待を取り消しました。'
      new:
        header: '招待する'
        submit_button: '招待メールを送る'
      edit:
        header: 'パスワードを設定する'
        submit_button: 'パスワードを設定する'
    mailer:
      invitation_instructions:
        subject: '招待を承認するには'
        hello: 'こんにちは、%{email}さん'
        someone_invited_you: '%{url}に招待されました。以下のリンクから承認できます。'
        accept: '招待を承認する'
        accept_until: 'この招待は%{due_date}まで有効です。'
        ignore: '招待を承認しない場合は、このメールを無視してください。<br />あなたのアカウントは上記のリンク先にアクセスしパスワードを設定するまでは作成されません。'
  time:
    formats:
      devise:
        mailer:
          invitation_instructions:
            accept_until_format: '%Y年%m月%d日%H時%M分'
招待メールを送った後の通知が日本語であれば成功です。
これにて作業は全部完了です!
お疲れ様でした〜!