本記事の内容
[初心者向け] ポートフォリオに愛犬管理アプリを作ってみた話 [Ruby on Rails]へのdevise導入編になります。
ご覧になっていない方は、こちらからご覧ください。
deviseの使い方が知りたい方は、この記事で完結させますので、このままご覧ください。
CRUD機能を持ったアプリケーション実装済みの方を対象にしていますので、まだの方は実装してから、ご覧ください。
開発環境
MacBook Air (M1, 2020)
Rails 6.1.6.1
ruby 3.0.1
yarn 1.22.19
本記事での実装機能
- deviseの導入
- 新規登録時に名前を入力できるようにする
- ユーザー画面作成
deviseの導入
deviseを導入するにあたって、やる工程は4つです。
①Gemfileに追記
②deviseの設定ファイルの作成
③Userモデルの作成
順に説明していきます。
①Gemfileに追記
早速アプリケーションにdeviseを導入します。まずはGemfileに下記を記載してください。
gem 'devise' # gemfileの一番下に記述
gemfileへの記述が完了したら、bundle installを行いアプリにgemをインストールします。
インストールが終わったらrails sをしてサーバーを立て直しましょう。
②deviseの設定ファイルの作成
ここが長い工程になるので、しっかりついてきてください!笑
diviseを利用するのに必要なファイルを作成します。下記のコマンドを入力してください。
$ rails g devise:install # deviseの設定ファイルを作成する
このコマンドはdeviseの設定ファイルを作成するdevise専用のコマンドです。
このコマンドを実行すると以下の文章がターミナルに出現します。
Depending on your application's configuration some manual setup may be required:

  1. Ensure you have defined default url options in your environments files. Here
     is an example of default_url_options appropriate for a development environment
     in config/environments/development.rb:

       config.action_mailer.default_url_options = { host: 'localhost', port: 3000 }

     In production, :host should be set to the actual host of your application.

     * Required for all applications. *

  2. Ensure you have defined root_url to *something* in your config/routes.rb.
     For example:

       root to: "home#index"

     * Not required for API-only Applications *

  3. Ensure you have flash messages in app/views/layouts/application.html.erb.
     For example:

       <p class="notice"><%= notice %></p>
       <p class="alert"><%= alert %></p>

     * Not required for API-only Applications *

  4. You can copy Devise views (for customization) to your app by running:

       rails g devise:views

     * Not required *
要は、下記の4つのことを実行してくださいということです。
- deviseのメール設定
- ルーティング設定
- フラッシュメッセージ設定
- viewsファイル設定
deviseのメール設定
パスワード再設定の際など、deviseがメールを送る際のホスト名を指定してあげる設定です。
Rails.application.configure do

  config.action_mailer.default_url_options = { host: 'localhost', port: 3000 }
end
この設定はどのようなアプリケーションにおいても必要ですので、developmentファイルに追加してください。
ルーティング設定
deviseはログイン後、表示させるページを指定してあげる設定です。
下記コードを追記してください。
Rails.application.routes.draw do
  root to: "tasks#index" #追記
  resources :tasks
end
ログインしたのちに接続したいページを記載してください。
自分の場合は、タスクのindexに接続したいので、上記を追記します。
ちなみに、APIのみのアプリケーションの場合は設定の必要はありません。
フラッシュメッセージ設定
何かwebアプリケーションで動作を行った場合に、どの動作が完了したかどうかを教えてくれるメッセージを追記するというものです。
application.html.erbに追記します。
  <body>
    <p class="notice"><%= notice %></p> #追記
    <%= yield %>
  </body>
scaffoldを実行した場合、自動的に作成されたindex.html.erbファイルにも記載されていますので、削除してください。
自分の場合は、tasks/index.html.erbのファイルの中に記載されています。
ちなみに、APIのみのアプリケーションの場合は必要ありません。
viewsファイル設定
DeviseのViewsファイルを作成してくれるものです。
このファイルを作成しないと新規登録画面・ログイン画面が作成されません。
$ rails g devise:views #ログイン機能に必要なビューファイルをまとめて作成
③Userモデルの作成
登録した情報を保存するテーブルが必要なため、モデルの作成も行います。
以下のコマンドを入力してください。
$ rails g devise user #ログイン機能用のモデルを作成
$ rails db:migrate #マイグレーションの実行
以上が完了したら、 サーバーを立ち上げ、http://localhost:3000/ に接続してみてください。


ログインしてみて、index.html.erbのページが表示されたら完了です。
新規登録時に名前を入力できるようにする
必要な工程は4つです。
①usersテーブルにnameカラムを追加する
②新規登録画面に名前を入力できる欄を追加する
③ストロングパラメータで名前を保存できるようにする
順にやっていきましょう!
①usersテーブルにnameカラムを追加する
$ rails g migration AddColumnsToUsers
マイグレーションファイルが作成されているはずです。見に行きましょう。
class AddColumnsToUsers < ActiveRecord::Migration[6.1]
  def change
    add_column :users, :name, :string, null: false, default: "" #追記
  end
end
default: ""と設定することで、空白状態で保存しても、空白としてDBに名前が保存されます。
上記のコードを追記したら、rails db:migrateを実行します。
これでusersテーブルにnameカラムが追加完了です。
②新規登録画面に名前を入力できる欄を追加する
新規登録画面のある app/views/devise/registrations/new.html.erbに名前を入力できる欄を追記します。
<h2>Sign up</h2>

<%= form_for(resource, as: resource_name, url: registration_path(resource_name)) do |f| %>
  <%= render "devise/shared/error_messages", resource: resource %>

<!-- ここから追加してください -->
  <div class="field">
    <%= f.label :name %> <br />
    <%= f.text_field :name %>
  </div>
<!-- ここまで追加してください -->

  <div class="field">
    <%= f.label :email %><br />
    <%= f.email_field :email, autofocus: true, autocomplete: "email" %>
  </div>

  <div class="field">
    <%= f.label :password %>
    <% if @minimum_password_length %>
    <em>(<%= @minimum_password_length %> characters minimum)</em>
    <% end %><br />
    <%= f.password_field :password, autocomplete: "new-password" %>
  </div>

  <div class="field">
    <%= f.label :password_confirmation %><br />
    <%= f.password_field :password_confirmation, autocomplete: "new-password" %>
  </div>

  <div class="actions">
    <%= f.submit "Sign up" %>
  </div>
<% end %>

<%= render "devise/shared/links" %>
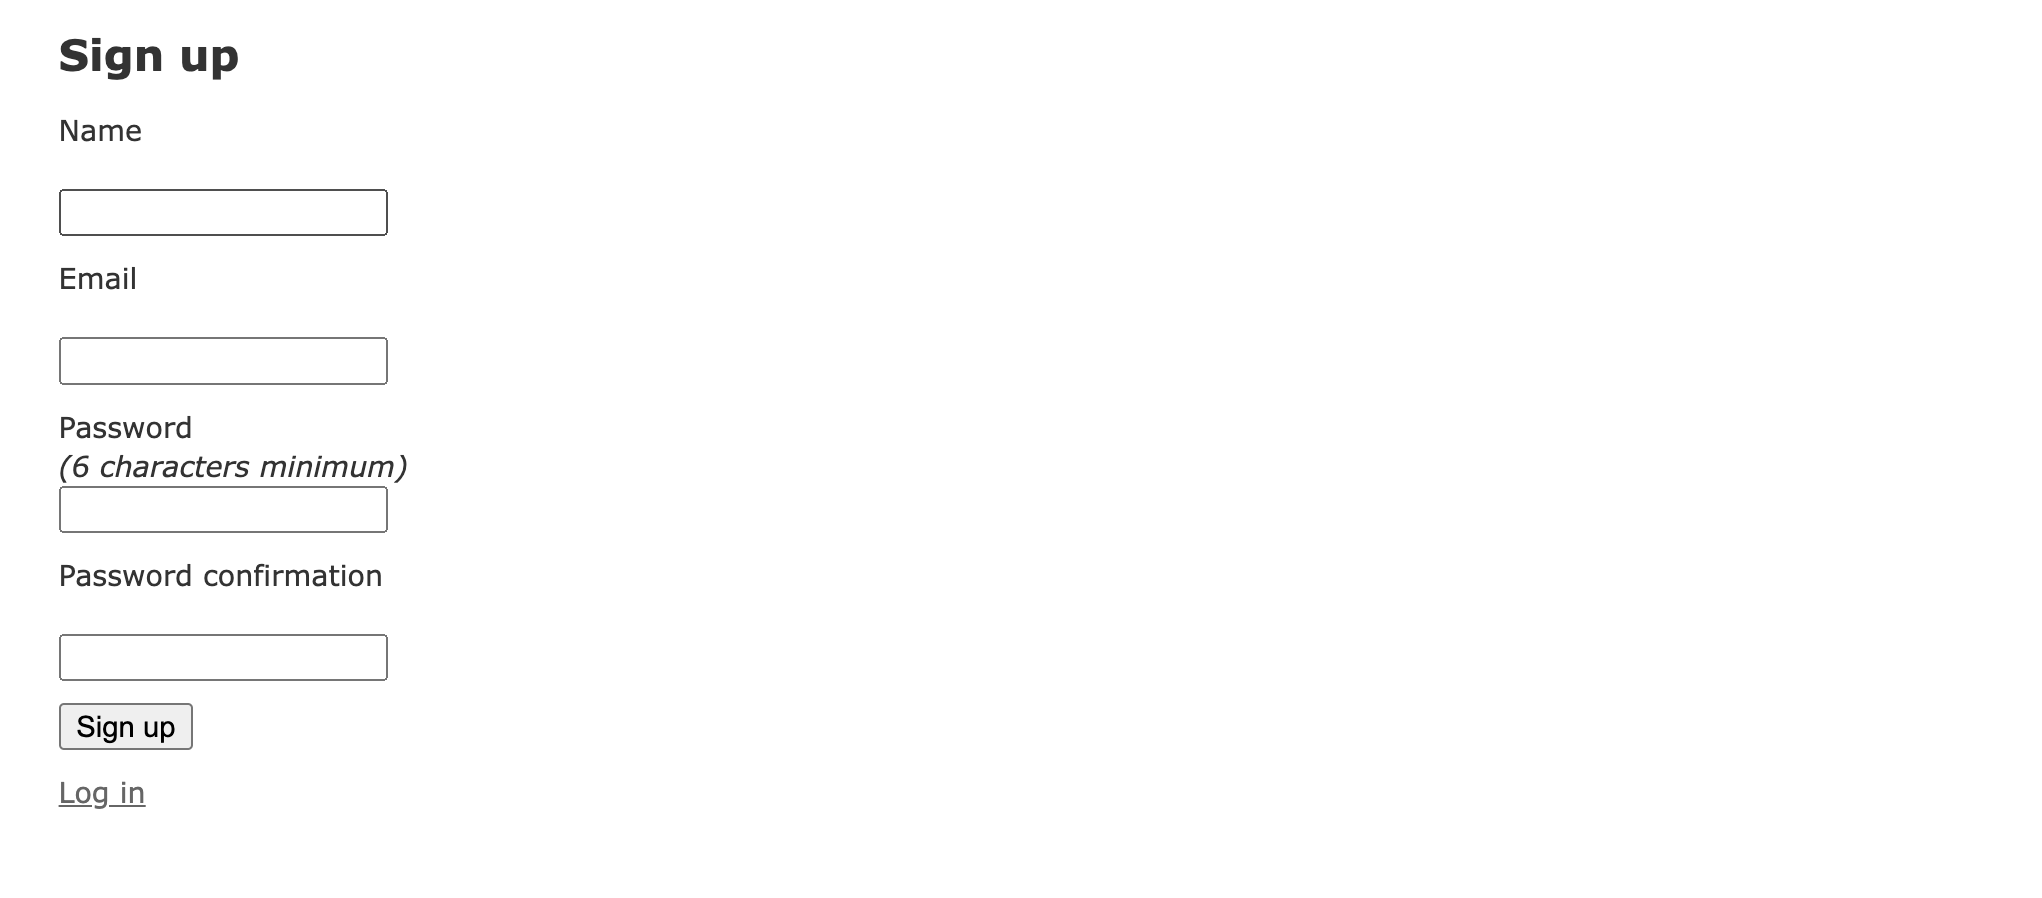
追記が完了したら、http://localhost:3000/users/sign_up に見に行きます。

Nameのフォームが追記されていたら成功です。
③ストロングパラメータで名前を保存できるようにする
現段階では、名前はDBに保存されません。
deviseでは、初期状態で、新規登録時に、メールアドレスとパスワードのみを受け取るように、ストロングパラメーターが設定してあるためです。
そのため、ストロングパラメーターに名前を追記して、名前もDBが受け取れるように設定したい。
しかし、deviseのパラメーターはdeviseのgem内に記載されているので、直接編集ができません。
そこで、deviseが提供しているconfigure_permitted_parametersメソッドを使用します。
このメソッドを使用することで、deviseのストロングパラメーターを追加できるようになるのです。
application_controllerに以下を追記します。
  # ここから追加
  before_action :configure_permitted_parameters, if: :devise_controller?

  def configure_permitted_parameters
    # 新規登録時(sign_up時)にnameというキーのパラメーターを追加で許可する
    devise_parameter_sanitizer.permit(:sign_up, keys: [:name])
  end
  # ここまで追加
ユーザー画面作成
最後に、ログインしているユーザーの情報を見ることができるページが欲しいので、ユーザーページを作成します。
工程は4つです。
①MVCの生成
③MVCの設定
③Routes設定
④PATH設定
①MVCの生成
下記のコマンドを実行しましょう。
$ rails g controller users show
users_controller.rbとapp/views/users/show.html.erbを作成してくれます。
②MVCの設定
- viewsファイルの設定
- controller.rbの設定
viewsファイルの設定
生成したhtmlファイルにユーザーの名前、emailが表示されるよう記述していきます。
<h2>Users</h2>
<hr />

<p>
    <strong>ユーザー名</strong>
    <%= @user.name %>
</p>
<p>
    <strong>e-mail</strong>
    <%= @user.email %>
</p>
hr /は水平線を引いてくれるタグです。
ちなみに、このままでは、nameのカラムに何も入っていないので、エラーが発生します。
名前を入れて、新しいユーザーを作ってあげてください。
controller.rbの設定
users_controller.rbを設定します。
class UsersController < ApplicationController
  def show
    @user = User.find(params[:id])
  end

  private

  def user_params
    #ストロングパラメータで、名前とメールを受け取ることができるように設定しておく。
    params.require(:user).permit(:name, :email)
  end
end
③Routes設定
resources :users, only: :show
今回はshowページしか作らないので、only: :showを追記します。
④PATH設定
userページを閲覧するたびにurlを打ち込むのは手間なので、PATHを設定してあげましょう。
application.html.erbに記載します。
  <body>
    <% if user_signed_in? %>
      <%= link_to "ユーザー", user_path(current_user)%> #追記

      <%= link_to 'ログアウト', destroy_user_session_path, method: :delete %>
    <% else %>
      <%= link_to 'ログイン', new_user_session_path %>
      <%= link_to 'サインアップ', new_user_registration_path %>
    <% end %>
    <p class="notice"><%= notice %></p>
    <hr />
    <%= yield %>
  </body>
current_userはdeviseでデフォルトで使えるヘルパーメソッドです。今ログインしているユーザーの情報を取ってきてくれます。
今作成したリンクをクリックすることで、controllerへとログインユーザーのidが引き渡され、今ログインしているユーザーの情報のページを開くことができるという形になっています。
上記の画面になっていたら成功です。
おまけ : deviseの日本語化
デフォルト状態だとフラッシュメッセージなどが英語です。
日本語に変更しましょう。
工程は下記の3つです。
①application.rbに追記
②devise.ja.ymlの作成
③ja.ymlの作成
順に実装していきます。
①application.rbに追記
config.i18n.default_locale = :ja
②devise.ja.ymlの作成
config/localesフォルダ内にdevise.ja.ymlというファイルを作成します。
下記に記載の内容をコピペしてください。
ja:
  errors:
    messages:
      not_found: "は見つかりませんでした"
#      not_found: "not found"
      already_confirmed: "は既に登録済みです"
#      already_confirmed: "was already confirmed"
      not_locked: "は凍結されていません"
#      not_locked: "was not locked"

  devise:
    failure:
      unauthenticated: 'ログインしてください。'
#      unauthenticated: 'You need to sign in or sign up before continuing.'
      unconfirmed: '本登録を行ってください。'
#      unconfirmed: 'You have to confirm your account before continuing.'
      locked: 'あなたのアカウントは凍結されています。'
#      locked: 'Your account is locked.'
      invalid: 'メールアドレスかパスワードが違います。'
#      invalid: 'Invalid email or password.'
      invalid_token: '認証キーが不正です。'
#      invalid_token: 'Invalid authentication token.'
      timeout: 'セッションがタイムアウトしました。もう一度ログインしてください。'
#      timeout: 'Your session expired, please sign in again to continue.'
      inactive: 'アカウントがアクティベートされていません。'
#      inactive: 'Your account was not activated yet.'
    sessions:
      signed_in: 'ログインしました。'
#      signed_in: 'Signed in successfully.'
      signed_out: 'ログアウトしました。'
#      signed_out: 'Signed out successfully.'
    passwords:
      send_instructions: 'パスワードのリセット方法を数分以内にメールでご連絡します。'
#      send_instructions: 'You will receive an email with instructions about how to reset your password in a few minutes.'
      updated: 'パスワードを変更しました。'
#      updated: 'Your password was changed successfully. You are now signed in.'
    confirmations:
      send_instructions: '登録方法を数分以内にメールでご連絡します。'
#      send_instructions: 'You will receive an email with instructions about how to confirm your account in a few minutes.'
      confirmed: 'アカウントを登録しました。'
#      confirmed: 'Your account was successfully confirmed. You are now signed in.'
    registrations:
      signed_up: 'アカウント登録を受け付けました。確認のメールをお送りします。'
#      signed_up: 'You have signed up successfully. If enabled, a confirmation was sent to your e-mail.'
      updated: 'アカウントを更新しました。'
#      updated: 'You updated your account successfully.'
      destroyed: 'アカウントを削除しました。またのご利用をお待ちしております。'
#      destroyed: 'Bye! Your account was successfully cancelled. We hope to see you again soon.'
    unlocks:
      send_instructions: 'アカウントの凍結解除方法を数分以内にメールでご連絡します。'
#      send_instructions: 'You will receive an email with instructions about how to unlock your account in a few minutes.'
      unlocked: 'アカウントを凍結解除しました。'
#      unlocked: 'Your account was successfully unlocked. You are now signed in.'
    mailer:
      confirmation_instructions:
        subject: 'アカウントの登録方法'
#        subject: 'Confirmation instructions'
      reset_password_instructions:
        subject: 'パスワードの再設定'
#        subject: 'Reset password instructions'
      unlock_instructions:
        subject: 'アカウントの凍結解除'
#        subject: 'Unlock Instructions'
③ja.ymlの作成
config/localesフォルダ内にja.ymlというファイルを作成しましょう。
ja:
  activerecord:
    attributes:
      user:
        confirmation_sent_at: パスワード確認送信時刻
        confirmation_token: パスワード確認用トークン
        confirmed_at: パスワード確認時刻
        created_at: 作成日
        current_password: 現在のパスワード
        current_sign_in_at: 現在のログイン時刻
        current_sign_in_ip: 現在のログインIPアドレス
        email: Eメール
        encrypted_password: 暗号化パスワード
        failed_attempts: 失敗したログイン試行回数
        last_sign_in_at: 最終ログイン時刻
        last_sign_in_ip: 最終ログインIPアドレス
        locked_at: ロック時刻
        password: パスワード
        password_confirmation: パスワード(確認用)
        remember_created_at: ログイン記憶時刻
        remember_me: ログインを記憶する
        reset_password_sent_at: パスワードリセット送信時刻
        reset_password_token: パスワードリセット用トークン
        sign_in_count: ログイン回数
        unconfirmed_email: 未確認Eメール
        unlock_token: ロック解除用トークン
        updated_at: 更新日
    models:
      user: ユーザー
  devise:
    confirmations:
      confirmed: メールアドレスが確認できました。
      new:
        resend_confirmation_instructions: アカウント確認メール再送
      send_instructions: アカウントの有効化について数分以内にメールでご連絡します。
      send_paranoid_instructions: メールアドレスが登録済みの場合、本人確認用のメールが数分以内に送信されます。
    failure:
      already_authenticated: すでにログインしています。
      inactive: アカウントが有効化されていません。メールに記載された手順にしたがって、アカウントを有効化してください。
      invalid: "%{authentication_keys}またはパスワードが違います。"
      last_attempt: もう一回誤るとアカウントがロックされます。
      locked: アカウントはロックされています。
      not_found_in_database: "%{authentication_keys}またはパスワードが違います。"
      timeout: セッションがタイムアウトしました。もう一度ログインしてください。
      unauthenticated: ログインもしくはアカウント登録してください。
      unconfirmed: メールアドレスの本人確認が必要です。
    mailer:
      confirmation_instructions:
        action: メールアドレスの確認
        greeting: "%{recipient}様"
        instruction: 以下のリンクをクリックし、メールアドレスの確認手続を完了させてください。
        subject: メールアドレス確認メール
      email_changed:
        greeting: こんにちは、%{recipient}様。
        message: メールアドレスの(%{email})変更が完了したため、メールを送信しています。
        message_unconfirmed: メールアドレスが(%{email})変更されたため、メールを送信しています。
        subject: メール変更完了
      password_change:
        greeting: "%{recipient}様"
        message: パスワードが再設定されました。
        subject: パスワードの変更について
      reset_password_instructions:
        action: パスワード変更
        greeting: "%{recipient}様"
        instruction: パスワード再設定の依頼を受けたため、メールを送信しています。下のリンクからパスワードの再設定ができます。
        instruction_2: パスワード再設定の依頼をしていない場合、このメールを無視してください。
        instruction_3: パスワードの再設定は、上のリンクから新しいパスワードを登録するまで完了しません。
        subject: パスワードの再設定について
      unlock_instructions:
        action: アカウントのロック解除
        greeting: "%{recipient}様"
        instruction: アカウントのロックを解除するには下のリンクをクリックしてください。
        message: ログイン失敗が繰り返されたため、アカウントはロックされています。
        subject: アカウントのロック解除について
    omniauth_callbacks:
      failure: "%{kind} アカウントによる認証に失敗しました。理由:(%{reason})"
      success: "%{kind} アカウントによる認証に成功しました。"
    passwords:
      edit:
        change_my_password: パスワードを変更する
        change_your_password: パスワードを変更
        confirm_new_password: 確認用新しいパスワード
        new_password: 新しいパスワード
      new:
        forgot_your_password: パスワードを忘れましたか?
        send_me_reset_password_instructions: パスワードの再設定方法を送信する
      no_token: このページにはアクセスできません。パスワード再設定メールのリンクからアクセスされた場合には、URL をご確認ください。
      send_instructions: パスワードの再設定について数分以内にメールでご連絡いたします。
      send_paranoid_instructions: メールアドレスが登録済みの場合、パスワード再設定用のメールが数分以内に送信されます。
      updated: パスワードが正しく変更されました。
      updated_not_active: パスワードが正しく変更されました。
    registrations:
      destroyed: アカウントを削除しました。またのご利用をお待ちしております。
      edit:
        are_you_sure: 本当によろしいですか?
        cancel_my_account: アカウント削除
        currently_waiting_confirmation_for_email: "%{email} の確認待ち"
        leave_blank_if_you_don_t_want_to_change_it: 空欄のままなら変更しません
        title: "%{resource}編集"
        unhappy: 気に入りません
        update: 更新
        we_need_your_current_password_to_confirm_your_changes: 変更を反映するには現在のパスワードを入力してください
      new:
        sign_up: アカウント登録
      signed_up: アカウント登録が完了しました。
      signed_up_but_inactive: ログインするためには、アカウントを有効化してください。
      signed_up_but_locked: アカウントがロックされているためログインできません。
      signed_up_but_unconfirmed: 本人確認用のメールを送信しました。メール内のリンクからアカウントを有効化させてください。
      update_needs_confirmation: アカウント情報を変更しました。変更されたメールアドレスの本人確認のため、本人確認用メールより確認処理をおこなってください。
      updated: アカウント情報を変更しました。
      updated_but_not_signed_in: あなたのアカウントは正常に更新されましたが、パスワードが変更されたため、再度ログインしてください。
    sessions:
      already_signed_out: 既にログアウト済みです。
      new:
        sign_in: ログイン
      signed_in: ログインしました。
      signed_out: ログアウトしました。
    shared:
      links:
        back: 戻る
        didn_t_receive_confirmation_instructions: アカウント確認のメールを受け取っていませんか?
        didn_t_receive_unlock_instructions: アカウントのロック解除方法のメールを受け取っていませんか?
        forgot_your_password: パスワードを忘れましたか?
        sign_in: ログイン
        sign_in_with_provider: "%{provider}でログイン"
        sign_up: アカウント登録
      minimum_password_length: "(%{count}字以上)"
    unlocks:
      new:
        resend_unlock_instructions: アカウントのロック解除方法を再送する
      send_instructions: アカウントのロック解除方法を数分以内にメールでご連絡します。
      send_paranoid_instructions: アカウントが見つかった場合、アカウントのロック解除方法を数分以内にメールでご連絡します。
      unlocked: アカウントをロック解除しました。
  errors:
    messages:
      already_confirmed: は既に登録済みです。ログインしてください。
      confirmation_period_expired: の期限が切れました。%{period} までに確認する必要があります。 新しくリクエストしてください。
      expired: の有効期限が切れました。新しくリクエストしてください。
      not_found: は見つかりませんでした。
      not_locked: はロックされていません。
      not_saved:
        one: エラーが発生したため %{resource} は保存されませんでした。
        other: "%{count} 件のエラーが発生したため %{resource} は保存されませんでした。"
終わりに
deviseの導入はこれで完了です。
part3では、devise_invitableというgemを使って、ユーザーの招待を行います。
興味がある方は、ぜひ次もご覧あれ!
