この記事はリンク情報システム(Facebookはこちら)が主催するイベント「Tech Connect! Autumn」のリレー記事です。「Tech Connect! Autumn」は engineer.hanzomon のグループメンバによってリレーされます。
2日目の本記事は、わたくし@taisuke3(たいすけさん)が執筆しました。どうぞよろしくお願いします。
きっかけ
巷ではAI、ディープラーニングと騒がれ続けている今日この頃、自分には敷居が高いと感じて敬遠していましたが、本イベント「Tech Connect! Autumn」(アドベントカレンダー オータム版)への参加をきっかけに、エンジニアの端くれとして軽くAIに触れてみることにしました。
つきましては、筆者はAIに関しては完全な素人系エンジニアであるがゆえ、本記事にはベストプラクティスではない部分も多数あるかと存じますが、ご容赦いただければ幸いです。
やりたいこと
記事のネタを探してAI関連のニュースを調べたところ、2018年8月にTensorFlowがラズパイ(Raspbian Stretch)で正式サポートされたとの情報をキャッチしました。これまでもラズパイでTensorFlowを動かすことは出来ていたらしいのですが、正式サポートにより導入が非常に楽になったとのこと。
また、TensorFlowで何か簡単に面白いことができないかと、日々の業務で磨き上げた検索スキルを活かしてTensorflow オレ 面白いとググってみると、Object Detection APIを使えば、読んで字のごとくObject(物体)をDetection(検出)できるとの情報もキャッチ。

従いまして、ほぼチュートリアル通りで大変恐縮ではございますが、どちらのご家庭にもあるラズパイとラズパイカメラだけを使って人数を検出する実験をやってみましたので、この場をお借りしてご紹介いたします。
使ったもの
筆者の実験環境で利用したものです。
- むかしAmazonで買ったRaspberry Pi 3 Model B
- むかし秋葉原のaitendoで買ったラズパイカメラ(Rev 1.3)
- いつのまにか家にあったmicroUSB電源
- 最近Amazonで買ったノーブランドのMicroSDHCカード(32GB)
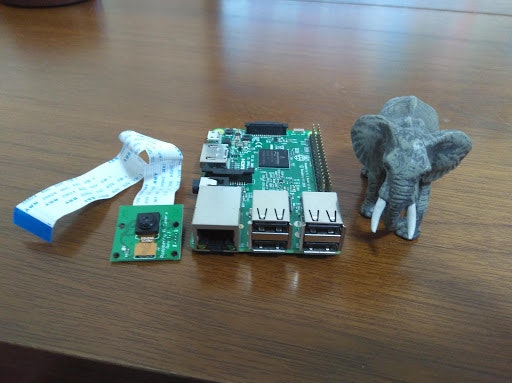
※写真に写りこんでいるアフリカ象は、サイズ比較のためのものであり、本編とは無関係です。
ラズパイ3はModel Bを利用しましたが、Model B+でも動作するはずです。ただし、性能は必要なのでラズパイ2やZeroでは少々ストレスフルかと思われます。
ラズパイカメラもV1.3と古いものを利用しましたが、V2やUSBカメラなどでも実現可能でしょう。
Raspbianインストール
Raspbianのインストールはググればたくさんの情報があるのでカットします。なお、TensorFlowが正式サポートしているRaspbian Stretchをインストールするよう注意してください。筆者はDesktop版を利用しましたが、Lite版でも問題ないかと思います。Raspbianをインストールしたら、カメラを有効にしておいてください。
TensorFlowインストール
公式チュートリアルに記載されている通りで、たったこれだけになります。
sudo apt install libatlas-base-dev
pip3 install tensorflow
インストールが完了したら、Python(python3コマンド)を起動して以下のプログラムを試してみましょう。Hello, TensorFlow!と出力されればインストール成功です。
import tensorflow as tf
hello = tf.constant('Hello, TensorFlow!')
sess = tf.Session()
print(sess.run(hello))
pi@raspberrypi:~/my_data $ python3
Python 3.5.3 (default, Jan 19 2017, 14:11:04)
[GCC 6.3.0 20170124] on linux
Type "help", "copyright", "credits" or "license" for more information.
>>> import tensorflow as tf
/usr/lib/python3.5/importlib/_bootstrap.py:222: RuntimeWarning: compiletime version 3.4 of module 'tensorflow.python.framework.fast_tensor_util' does not match runtime version 3.5
  return f(*args, **kwds)
/usr/lib/python3.5/importlib/_bootstrap.py:222: RuntimeWarning: builtins.type size changed, may indicate binary incompatibility. Expected 432, got 412
  return f(*args, **kwds)
/usr/lib/python3.5/importlib/_bootstrap.py:222: RuntimeWarning: numpy.dtype size changed, may indicate binary incompatibility. Expected 56, got 52
  return f(*args, **kwds)
>>> hello = tf.constant('Hello, TensorFlow!')
>>> sess = tf.Session()
>>> print(sess.run(hello))
b'Hello, TensorFlow!'
いきなりimport tensorflow as tfでワーニングが出て悲しい気持ちになりましたが、公式チュートリアルにも以下の記載があり、要は***警告でるけど気にすんな!***とのことなので放置することにしました。
If you're running with Python 3.5, you may see a warning when you first import TensorFlow. This is not an error, and TensorFlow should continue to run with no problems, despite the log message.
Object Detection APIインストール
こちらも、公式チュートリアルを参考にしながら導入しましょう。
依存モジュールインストール
まずは、依存関係のあるPythonモジュールからインストールします。
pip3 install --user Cython
pip3 install --user contextlib2
pip3 install --user pillow
pip3 install --user lxml
pip3 install --user jupyter
pip3 install --user matplotlib
筆者の環境では、jupyterのインストールがうまくいきませんでしたが、sudoをつけて再度試したところうまくいきました。
sudo pip3 install jupyter
続いて、protobuf-compilerをインストールしてください。筆者の環境では以下のコマンドで3.0.0がインストールされました。
sudo apt-get install protobuf-compiler
Object Detection APIのダウンロード
Object Detection APIの本体は、GitHubの「tensorflow/models」リポジトリ内に含まれています。任意のディレクトリにクローンしましょう。
git clone https://github.com/tensorflow/models.git
Protobufライブラリのコンパイル
これ以降はチュートリアル通りです。先ほどクローンしたリポジトリのmodels/researchディレクトリに移動して、Protobufライブラリのコンパイルを実行します。
cd models/research/
protoc object_detection/protos/*.proto --python_out=.
PYTHONPATHへの追加
/models/researchと/models/research/slimをPYTHONPATHに追加する必要があるとのこと。models/researchにて以下のコマンドを実行してください。
export PYTHONPATH=$PYTHONPATH:`pwd`:`pwd`/slim
※これは、ターミナル起動時に毎度実行する必要があるので、それがいやなら.bashrcファイルに絶対パスで書いちゃってください。
インストールの検証
models/research/object_detection/builders/model_builder_test.pyを実行してください。最後にOKと出力されれば正しくインストールされているとのこと。
python3 object_detection/builders/model_builder_test.py
pi@raspberrypi:~/my_data/models/research $ python3 object_detection/builders/mod
el_builder_test.py
/usr/lib/python3.5/importlib/_bootstrap.py:222: RuntimeWarning: compiletime version 3.4 of module 'tensorflow.python.framework.fast_tensor_util' does not match runtime version 3.5
  return f(*args, **kwds)
/usr/lib/python3.5/importlib/_bootstrap.py:222: RuntimeWarning: builtins.type size changed, may indicate binary incompatibility. Expected 432, got 412
  return f(*args, **kwds)
/usr/lib/python3.5/importlib/_bootstrap.py:222: RuntimeWarning: numpy.dtype size changed, may indicate binary incompatibility. Expected 56, got 52
  return f(*args, **kwds)
..................
----------------------------------------------------------------------
Ran 18 tests in 0.788s

OK
相変わらず警告が邪魔ですが、とりあえずObject Detection APIのインストールも無事成功しました。
物体認識の検証
またもやチュートリアルを参考に、ラズパイカメラで写真を撮影→物体認識するプログラムを作成し、筆者がまっとうな人間として検出されるか試してみました。
学習済みモデルのダウンロード
ディープラーニングのプロセスは、大きく学習と推論(検出)に分けられるそうです。今回は学習をさぼって、COCOが提供する学習済みモデルを利用します。チュートリアルでは、Pythonプログラムの中で学習済みモデルをダウンロードしていますが、今回は、あらかじめダウンロードしたものを利用するようにします。
とりあえずはチュートリアルでも使われている(ssd_mobilenet_v1_coco)を利用しますが、他の学習済みモデルを使ってみたい場合は、このページに一覧でまとめてありますので、いろいろと試してみてください。
# ssd_mobilenet_v1_cocoのダウンロードと展開
wget http://download.tensorflow.org/models/object_detection/ssd_mobilenet_v1_coco_2018_01_28.tar.gz
tar -xvf ssd_mobilenet_v1_coco_2018_01_28.tar.gz
検証プログラムの実行
検証用に作成したプログラムです。実行するとラズパイカメラで撮影した写真がpicture.jpgという名前で保存され、物体認識した結果がoutput.jpgという名前で保存されます。また、検出された人間の数が標準出力されるようにしています。
import warnings
warnings.filterwarnings('ignore')

import time
import picamera

import numpy as np
import os
import sys
import tensorflow as tf

from collections import defaultdict
from io import StringIO
from PIL import Image

from object_detection.utils import label_map_util
from object_detection.utils import visualization_utils as vis_util

detection_graph = tf.Graph()
with detection_graph.as_default():
  od_graph_def = tf.GraphDef()
  with tf.gfile.GFile('ssd_mobilenet_v1_coco_2018_01_28/frozen_inference_graph.pb', 'rb') as fid:
    serialized_graph = fid.read()
    od_graph_def.ParseFromString(serialized_graph)
    tf.import_graph_def(od_graph_def, name='')

label_map = label_map_util.load_labelmap('mscoco_label_map.pbtxt')
categories = label_map_util.convert_label_map_to_categories(label_map, max_num_classes=90, use_display_name=True)
category_index = label_map_util.create_category_index(categories)

def load_image_into_numpy_array(image):
  (im_width, im_height) = image.size
  return np.array(image.getdata()).reshape(
      (im_height, im_width, 3)).astype(np.uint8)

def run_inference_for_single_image(image, graph):
  with graph.as_default():
    with tf.Session() as sess:
      # Get handles to input and output tensors
      ops = tf.get_default_graph().get_operations()
      all_tensor_names = {output.name for op in ops for output in op.outputs}
      tensor_dict = {}
      for key in [
          'num_detections', 'detection_boxes', 'detection_scores',
          'detection_classes', 'detection_masks'
      ]:
        tensor_name = key + ':0'
        if tensor_name in all_tensor_names:
          tensor_dict[key] = tf.get_default_graph().get_tensor_by_name(
              tensor_name)
      if 'detection_masks' in tensor_dict:
        # The following processing is only for single image
        detection_boxes = tf.squeeze(tensor_dict['detection_boxes'], [0])
        detection_masks = tf.squeeze(tensor_dict['detection_masks'], [0])
        # Reframe is required to translate mask from box coordinates to image coordinates and fit the image size.
        real_num_detection = tf.cast(tensor_dict['num_detections'][0], tf.int32)
        detection_boxes = tf.slice(detection_boxes, [0, 0], [real_num_detection, -1])
        detection_masks = tf.slice(detection_masks, [0, 0, 0], [real_num_detection, -1, -1])
        detection_masks_reframed = utils_ops.reframe_box_masks_to_image_masks(
            detection_masks, detection_boxes, image.shape[0], image.shape[1])
        detection_masks_reframed = tf.cast(
            tf.greater(detection_masks_reframed, 0.5), tf.uint8)
        # Follow the convention by adding back the batch dimension
        tensor_dict['detection_masks'] = tf.expand_dims(
            detection_masks_reframed, 0)
      image_tensor = tf.get_default_graph().get_tensor_by_name('image_tensor:0')

      # Run inference
      output_dict = sess.run(tensor_dict,
                             feed_dict={image_tensor: np.expand_dims(image, 0)})

      # all outputs are float32 numpy arrays, so convert types as appropriate
      output_dict['num_detections'] = int(output_dict['num_detections'][0])
      output_dict['detection_classes'] = output_dict[
          'detection_classes'][0].astype(np.uint8)
      output_dict['detection_boxes'] = output_dict['detection_boxes'][0]
      output_dict['detection_scores'] = output_dict['detection_scores'][0]
      if 'detection_masks' in output_dict:
        output_dict['detection_masks'] = output_dict['detection_masks'][0]
  return output_dict

with picamera.PiCamera() as camera:
  camera.resolution = (1024, 768)
  camera.capture('picture.jpg')

image = Image.open('picture.jpg')
image_np = load_image_into_numpy_array(image)
image_np_expanded = np.expand_dims(image_np, axis=0)
output_dict = run_inference_for_single_image(image_np, detection_graph)

person_index = np.where(np.array(output_dict['detection_classes']) == 1)
pscore_array = np.array(output_dict['detection_scores'])[person_index]
congestion = len(np.where(pscore_array >= 0.5)[0])
print(congestion)

vis_util.visualize_boxes_and_labels_on_image_array(
      image_np,
      output_dict['detection_boxes'],
      output_dict['detection_classes'],
      output_dict['detection_scores'],
      category_index,
      instance_masks=output_dict.get('detection_masks'),
      use_normalized_coordinates=True,
      line_thickness=8)
Image.fromarray(image_np).save('output.jpg')
ポイント1(警告非表示)
警告は、ありがとう迷惑なので非表示にしました。
import warnings
warnings.filterwarnings('ignore')
ポイント2(学習済みモデルの読み込み)
上記でダウンロードした学習済みモデルが読み込まれるよう、パスに注意してファイルを指定してください。
with tf.gfile.GFile('ssd_mobilenet_v1_coco_2018_01_28/frozen_inference_graph.pb', 'rb') as fid:
  serialized_graph = fid.read()
ポイント3(ラズパイカメラで撮影)
ラズパイカメラで写真を撮影して、picture.jpgの名前で保存します。USBカメラを使う場合は、OpenCVライブラリを利用すると簡単にできるかと思います。
with picamera.PiCamera() as camera:
  camera.resolution = (1024, 768)
  camera.capture('picture.jpg')
ポイント4(結果画像の保存)
物体検知した結果画像をoutput.jpgという名前で保存します。
Image.fromarray(image_np).save('output.jpg')
ポイント5(人間の数を計算)
検出した物体IDとそのスコアは、それぞれoutput_dict['detection_classes']とoutput_dict['detection_scores']に格納されるようです。なお、物体IDが何を示すのかはこのファイルに記載されています。
[1 63 1 1 1 ...]
[0.9565869 0.8102428 0 0 0 ...]
上記の場合だと、人間(95%)とカウチソファー(81%)が検出されたことになります。NumPyでごにょごにょすると、検出した物体の数も簡単に取り出せますね。以下では検出した人間(スコア50%以上)の数を標準出力しています。
person_index = np.where(np.array(output_dict['detection_classes']) == 1)
pscore_array = np.array(output_dict['detection_scores'])[person_index]
congestion = len(np.where(pscore_array >= 0.5)[0])
print(congestion)
実行結果
python3 congestion_out3.py
1
人間がひとつ検出されたようです。
Object Detection APIからは以下の結果画像が出力されました。
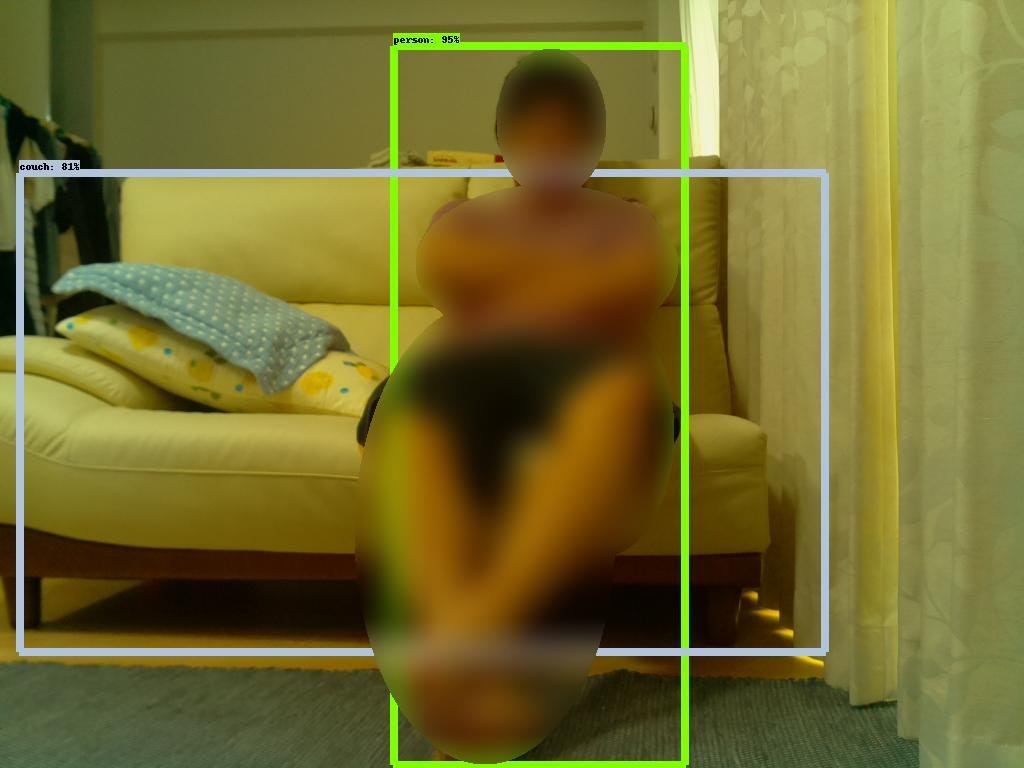
お分かりいただけただろうか。。画面中央、ソファーに座った筆者とおぼしき男性が、95点の人間として検出されているのだが、、、まさか、AIがそこにいる者の人格をも映し出し、筆者のスペックを数値化してしまった、、、とでもいうのだろうか。。
はい、すみません。結果としては見事、筆者がスコア95%で人間として検出されました。カウチソファーもスコア81%で検出されています。
※休日の短パンとTシャツにおけるワンシーンなので、画像の一部に加工を施しております。
おまけ
実用化に向けて
なんとなくですが、以下のような応用ができそうです。
- レストランや共有スペースの混雑状況把握
- 盗難や農作物の荒らし防止に、人や動物を検知したらアラームをならすやつ
- イベント会場や店舗の来客数把握&マーケティング
個人的には、会社の喫煙所の混雑状況(利用人数)を事前把握したく、実用化に向けてWebブラウザで確認できるところまで実装してみました。今回の構成は以下のような感じです。(手書きですみません)
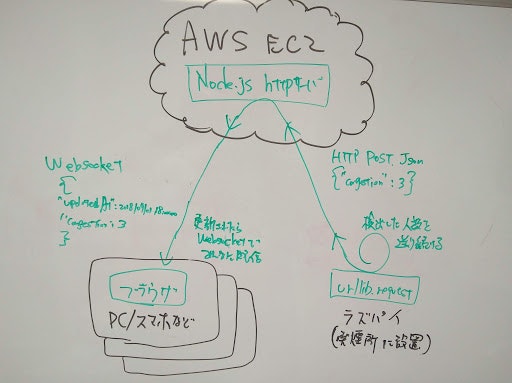
筆者は、WebサーバにAWSの無料枠で動かしているEC2インスタンスを利用してますが、読者のネット環境によってはラズパイをWebサーバにするのもありでしょう。
※筆者のインターネット環境は、マンション管理のNAT配下で動作するため、サーバを立てること(NAT越え)ができないのです。
サーバプログラム
EC2で動作させるWebサーバプログラムです。今回はNode.jsで書きました。ただ単に、混雑状況をJSONで受け付けるエンドポイントがあり、ラズパイからPOSTリクエストを受けると、Websocket接続されているクライアントに転送するだけの簡単なお仕事です。
var express = require('express');
var app = express();
var http = require('http').Server(app);
var io = require('socket.io')(http);
var bodyParser = require('body-parser');

app.use(bodyParser.urlencoded({ extended: true }));
app.use(bodyParser.json());

var congestion = {
  "congestion" : -1,
  "updatedAt" : new Date()
}

app.get('/', function(req, res){
 res.sendFile(__dirname + '/index.html');
});

app.post('/congestions', function(req, res) {
  console.log(req.body);
  congestion["congestion"] = req.body["congestion"];
  congestion["updatedAt"] = new Date();
  console.log(congestion);
  res.header('Content-Type', 'application/json; charset=utf-8')
  res.end( JSON.stringify(congestion));
  io.emit("congestion", JSON.stringify(congestion))
})

io.sockets.on('connection', function(socket){
  console.log('a user connected');
  socket.emit('congestion', JSON.stringify(congestion));
});

http.listen(80, function(){
  console.log('listening on *:80');
});
以下はブラウザで実行されるHTMLです。単純にWebsocketで受け取った混雑状況を表示するだけのシンプルな画面です。
<!doctype html>
<html>
<head>
<meta charset="UTF-8">
<script src="/socket.io/socket.io.js"></script>
<title>混雑情報</title>

<style type="text/css">
# congestion {
  position: absolute;
  top: 0px;
  right: 0px;
  bottom: 0px;
  left: 0px;
  margin: auto;

  width: 400px;
  height: 200px;
  text-align: center;
}
# latest_val {
  font-size: 5vw;
}
# updated_at {
  font-size: 2vw;
}
</style>

<script type="text/javascript">
  var socket = io.connect();
  socket.on('congestion', function(json) {
   var data = JSON.parse(json);
   document.getElementById('latest_val').innerHTML = data.congestion;
   document.getElementById('updated_at').innerHTML = new Date(data.updatedAt).toLocaleString();
  });
</script>

</head>
<body>
  <div id="congestion">
    <div id='latest_val'></div>
    <div id='updated_at'></div>
  </div>
</body>
</html>
ラズパイのHTTP送信部分プログラム
本編のPythonスクリプトに混ぜてご利用ください。HTTPクライアントとして混雑状況をサーバにPOSTするだけです。今回はurllib.requestを利用しましたが、Requests等でも簡単に実装できるかと思います。ラズパイカメラで撮影してからHTTP送信する部分までをメインループとして繰り返し実行されるようにしてください。
import json
import urllib.request

while True:
  try :
    # 中略(撮影~検出)

    url = 'http://*****.com/congestions/'
    headers = {'Content-Type': 'application/json'}
    data = {'congestion':congestion}
    req = urllib.request.Request(url, json.dumps(data).encode(), headers)
    with urllib.request.urlopen(req) as res:
    body = res.read()
  except Exception as e:
    print(str(e))
    pass
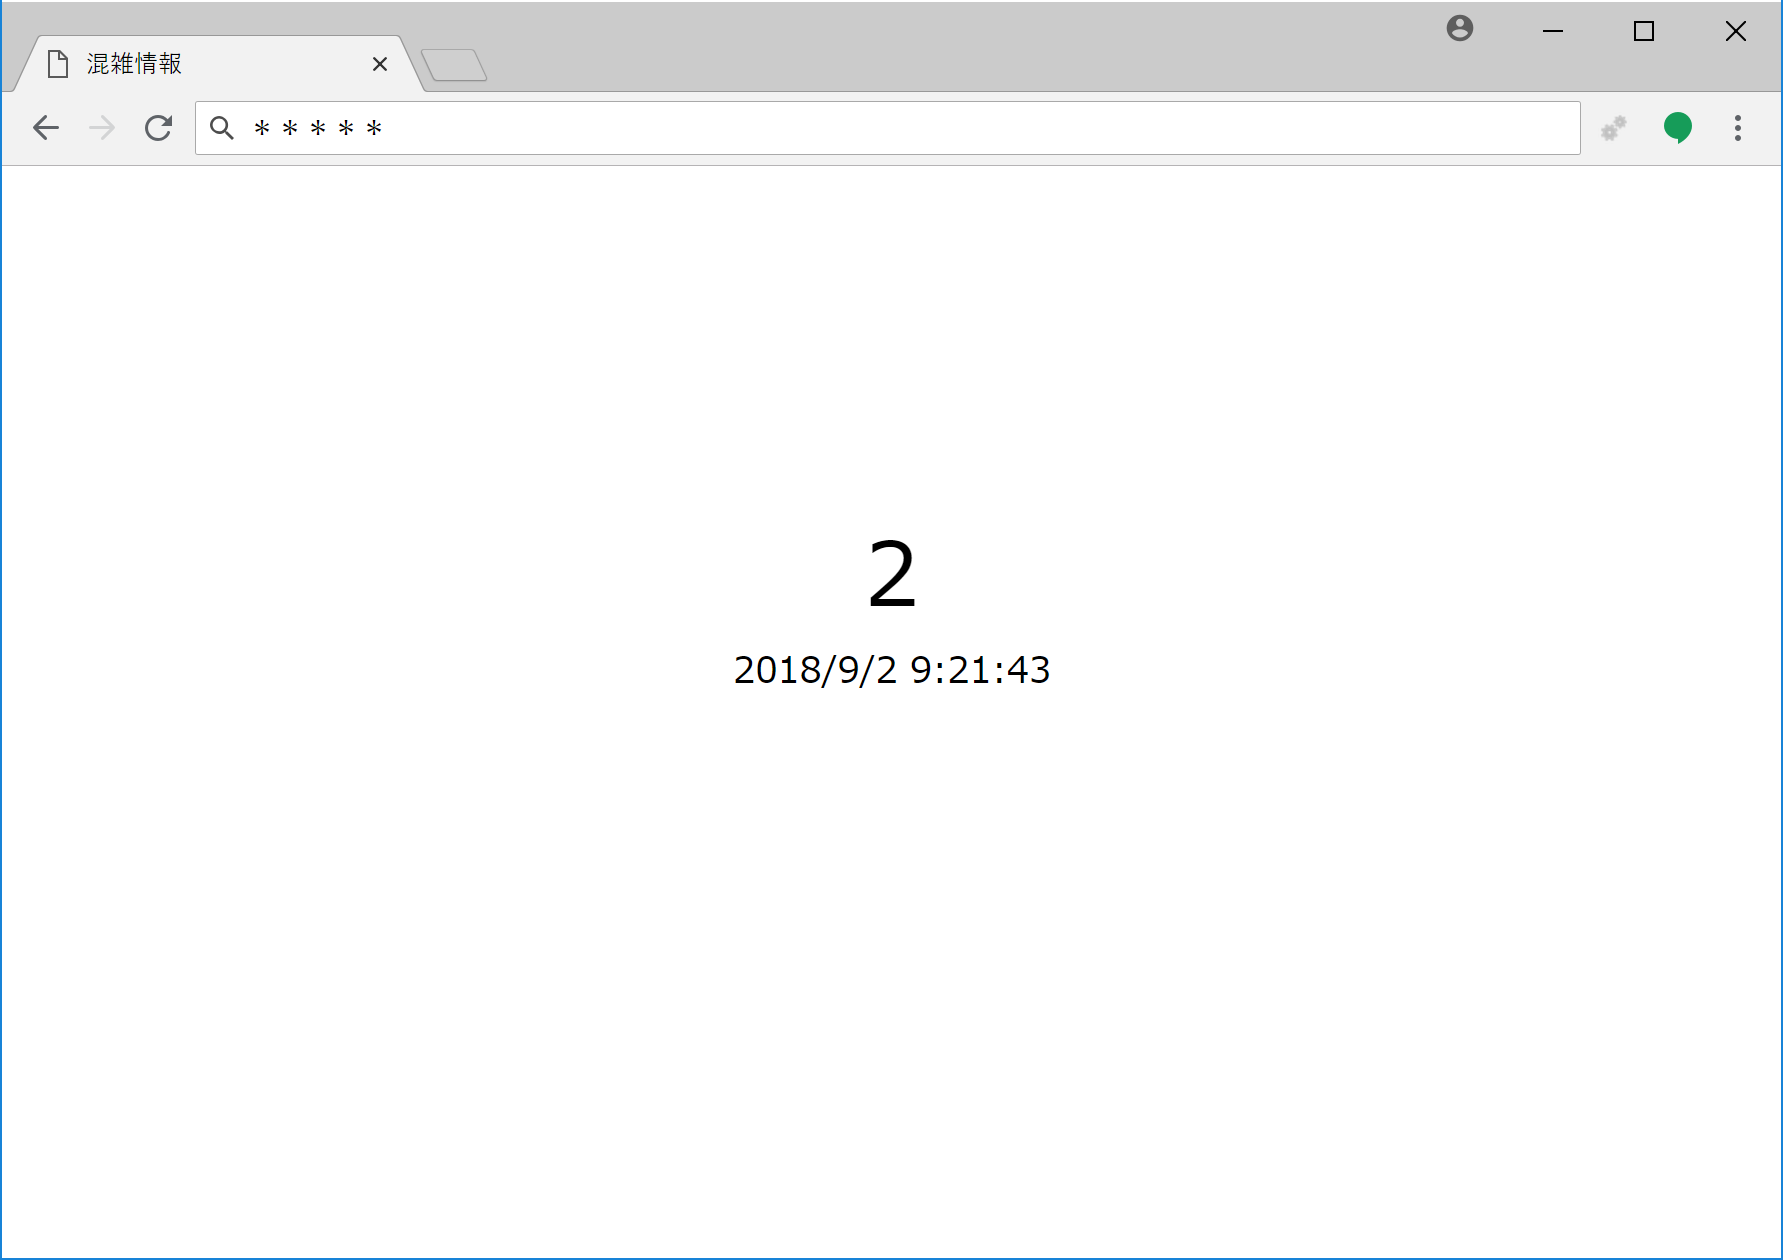
実験結果
Webブラウザからアクセスすると、シンプルイズベストと言わんばかりの画面に検出した人数が表示されます。
課題(遅い!!!)
筆者の環境では、一度の検出に25秒程度の時間を要します。つまり、人が現れてからWebブラウザの画面上に反映されるまでに、25秒~50秒ほどを要する計算となります。ラズパイの限界なのかもしれませんが、喫煙所の混雑把握に利用するのであれば、5秒以内には反映させたいですね。
もっとリアルタイムに検出できる方法をご存知の方は、ご教授いただければ幸いです。
筆者調べでは、以下の方法で速度改善できるかもとのことです。今後、気が向いたらチャレンジしたいと思います。
- Movidius Neural Compute Stick(ディープラーニング用USBプロセッサ)を利用する
- DarknetのARM最適化版でTiny-YOLOの学習済みモデルを利用する
以上です。ご査収のほど、何卒よろしくお願いいたします。