はじめに
本記事は、reactjs-interview-questionsを日本語に翻訳することを目的とします。そのため、筆者自身の意見や知見は扱いません。
reactjs-interview-questionsとは
技術面接などでReactに関して聞かれるであろう質問とその回答がまとめられています。「Reactとは?」というざっくりした質問だけでなく「Reactのデータフローについて」などコアな質問が用意されているため、転職活動をしていない方でも学びになる点が多くあります。
全部で333問の質問とその回答が用意されています。この記事では1〜111の問題を翻訳します。翻訳が不慣れな点がありましても暖かい目で見ていただけると幸いです<_>
1. What is React?
React is an open-source front-end JavaScript library that is used for building user interfaces, especially for single-page applications. It is used for handling view layer for web and mobile apps. React was created by Jordan Walke, a software engineer working for Facebook. React was first deployed on Facebook's News Feed in 2011 and on Instagram in 2012.
Reactは、オープンソースのフロントエンドJavaScriptライブラリで、特にSPA(single page application)のユーザーインターフェイスを構築することができ、WebアプリケーションやMobileアプリケーションのViewレイヤーを処理するために使用されます。Reactは、Facebookに勤務するソフトウェアエンジニアのJordan Walke氏によって作成されました。また、Reactは2011年にFacebookのニュースフィードに、2012年にはInstagramにデプロイされました。
2. What are the major features of React?
The major features of React are:
- Uses JSX syntax, a syntax extension of JS that allows developers to write HTML in their JS code.
- It uses VirtualDOM instead of RealDOM considering that RealDOM manipulations are expensive.
- Supports server-side rendering.
- Follows Unidirectional data flow or data binding.
- Uses reusable/composable UI components to develop the view.
Reactの主な特徴は以下の通りです。
- JSX構文を採用していること
- JSXとはJSの構文拡張でJSのコード内にHTMLを記述できるようにしたもの
- RealDOMではなくVirtualDOMを採用していること
- SSRをサポートしていること
- 一方向のデータフロー、データバインディングになっていること
- Viewの開発のために、再利用可能なUIコンポーネントを使っていること
3. What is JSX?
JSX is a XML-like syntax extension to ECMAScript (the acronym stands for JavaScript XML). Basically it just provides syntactic sugar for the React.createElement() function, giving us expressiveness of JavaScript along with HTML like template syntax.
In the example below text inside<h1>tag is returned as JavaScript function to the render function.
JSXはECMAScriptのXMLライクな構文拡張です。基本的には、React.CreateElement関数のシンタックスシュガーで、JSの表現力とHTMLのテンプレート構文を扱うことができます。
以下の例では、<h1>タグ内のテキストが JSの関数としてrender関数に返されています。
export default function App() {
  return (
    <div>
      <h1>{"Welcome to React world!"}</h1>
    </div>
  );
}
4. What is the difference between Element and Component?
An Element is a plain object describing what you want to appear on the screen in terms of the DOM nodes or other components. Elements can contain other Elements in their props. Creating a React element is cheap. Once an element is created, it is never mutated.
The object representation of React Element would be as follows:
Elementは、画面に表示させたいものをDOMノードや他のコンポーネントで記述したプレーンなオブジェクトです。propsには他のElementを含むことができます。React Elementを作成するのは簡単ですが、一度作成されたら決して変更することはできません。
React Elementオブジェクトの表現は以下のようになります。
const element = React.createElement("div", { id: "login-btn" }, "Login");

// The above React.createElement() function returns an object:
{
  type: 'div',
  props: {
    children: 'Login',
    id: 'login-btn'
  }
}

// And finally it renders to the DOM using ReactDOM.render():
<div id="login-btn">Login</div>
Whereas a component can be declared in several different ways. It can be a class with a render() method or it can be defined as a function. In either case, it takes props as an input, and returns a JSX tree as the output:
一方でComponentはいくつかの異なる方法で宣言することができます。クラスのrenderメソッドや、関数で定義されたりします。どちらの場合も、propsを受け取りJSX treeを返します。
const Button = ({ onLogin }) => (
  <div id={"login-btn"} onClick={onLogin}>
    Login
  </div>
);

// Then JSX gets transpiled to a React.createElement() function tree:
const Button = ({ onLogin }) =>
  React.createElement(
    "div",
    { id: "login-btn", onClick: onLogin },
    "Login"
  );
5. How to create components in React?
There are two possible ways to create a component.
Function Components: This is the simplest way to create a component. Those are pure JavaScript functions that accept props object as the first parameter and return React elements:
Componentを作成するには、二つの方法があります。
関数コンポーネント。これは、コンポーネントを作成する上で最も簡単な方法です。純粋なJS関数としてpropsを受け取り、React Elementを返します。
function Greeting({ message }) {
  return <h1>{`Hello, ${message}`}</h1>;
}
Class Components: You can also use ES6 class to define a component. The above function component can be written as:
クラスコンポーネント。ES6のクラスを使用することもできます。
class Greeting extends React.Component {
  render() {
    return <h1>{`Hello, ${this.props.message}`}</h1>;
  }
}
6. When to use a Class Component over a Function Component?
If the component needs state or lifecycle methods then use class component otherwise use function component.
However, from React 16.8 with the addition of Hooks, you could use state , lifecycle methods and other features that were only available in class component right in your function component. So, it is always recommended to use Function components, unless you need a React functionality whose Function component equivalent is not present yet, like Error Boundaries.
もしコンポーネントにライフサイクルメソッドが必要な場合は、Classコンポーネントを使用します。
しかし、React16.8からHooksが追加されClassコンポーネントでしかできなかったライフサイクルメソッドの機能が関数コンポーネントでもできるようになりました。そのため、Error Boundariesのような関数コンポーネントと同等の機能が存在しない場合を除いて関数コンポーネントを使うことが推奨されています。
7. What are Pure Components?
React.PureComponent is exactly the same as React.Component except that it handles the shouldComponentUpdate() method for you. When props or state changes, PureComponent will do a shallow comparison on both props and state. Component on the other hand won't compare current props and state to next out of the box. Thus, the component will re-render by default whenever shouldComponentUpdate is called. In functional componenets we use React.memo() API. React.memo() is a higher-order component. It takes a React component as its first argument and returns a special type of React component that allows the renderer to render the component while memoizing the output. Therefore, if the component’s props are shallowly equal, the React.memo() component will bail out the updates.
React.PureComponentは、shouldComponentUpdateメソッドを処理すること以外はReact.Componentと全く同じです。propsやstateが変更されると、PureComponentはpropsとstateの両方についてshallow比較を行います。一方、Componentは、現在のpropsとstateをshallow比較することはありません。したがって、shouldComponentUpdateが呼ばれるたびに、コンポーネントはデフォルトで再レンダリングされます。関数コンポーネントでは、React.memo() APIを使用します。これは、高階コンポーネントでありReactコンポーネントを第一引数で受け取り、出力をメモしながらレンダリングできるようにする特殊なReactコンポーネントを返します。これによって、propsがshollow比較して正の場合、更新を避けてくれます。
8. What is state in React?
State of a component is an object that holds some information that may change over the lifetime of the component. We should always try to make our state as simple as possible and minimize the number of stateful components.
Let's create a user component with message state,
コンポーネントのStateはコンポーネントのライフサイクルに渡って変化する情報を保有するオブジェクトのことです。私たちは常にこのStateを簡潔に保ち、StateFulなコンポーネントを最小限にするよう努めなくてはなりません。
import React, { useState } from 'react';

function User() {
  const [message, setMessage] = useState("Welcome to React world");

  return (
      <div>
        <h1>{this.message}</h1>
      </div>
  );
}
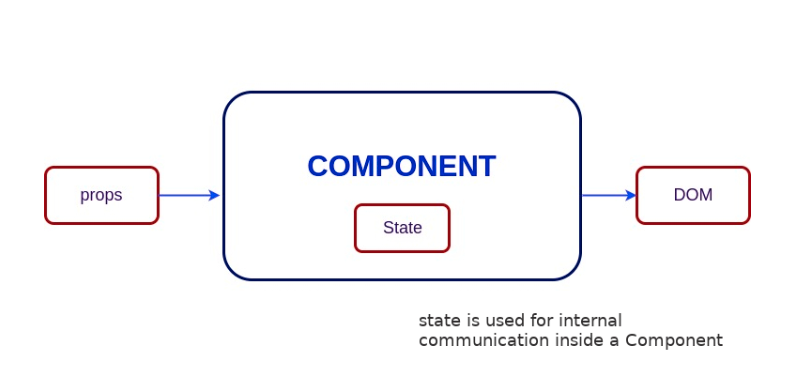
State is similar to props, but it is private and fully controlled by the component ,i.e., it is not accessible to any other component till the owner component decides to pass it.
Stateはpropsと似ていますが、プライベートでコンポーネントによって完全に制御されている点において異なります。つまり、管理しているコンポーネントが他のコンポーネントに渡すことを決めるまで他からアクセスすることはできません。
9. What are props in React?
Props are inputs to components. They are single values or objects containing a set of values that are passed to components on creation using a naming convention similar to HTML-tag attributes. They are data passed down from a parent component to a child component.
The primary purpose of props in React is to provide following component functionality:
- Pass custom data to your component.
- Trigger state changes.
- Use via this.props.reactProp inside component's render() method.
For example, let us create an element with reactProp property:
Propsはコンポーネントへの入力のことです。単一の値や複数の値を含むオブジェクトでありHTMLタグの属性ににた命名規則を使ってコンポーネントに渡されます。また、これらは親コンポーネントからこコンポーネントに渡されるデータであります。propsの主な役割は以下のようにあります。
- カスタムデータをコンポーネントに渡す
- stateを更新する
- コンポーネントのrenderメソッドでthis.props.reactPropを介して使用する
reactPropプロパティを持つ要素を作ってみましょう。
<Element reactProp={"1"} />
This reactProp (or whatever you came up with) name then becomes a property attached to React's native props object which originally already exists on all components created using React library.
このreactPropという名前は、Reactのnative props objectにつけられるもので、Reactを使用して作成されたコンポーネントに元々存在するものです。
10. What is the difference between state and props?
Both props and state are plain JavaScript objects. While both of them hold information that influences the output of render, they are different in their functionality with respect to component. Props get passed to the component similar to function parameters whereas state is managed within the component similar to variables declared within a function.
propsもstateもどちらもプレーンなJSオブジェクトです。どちらもrenderの出力に影響を与える情報を持っていますが、コンポーネントに対する機能は異なります。propsは関数のパラメータと同じようにコンポーネントに渡されるのに対して、stateは関数内で宣言された変数と同じようにコンポーネント内で管理されます。
11. Why should we not update the state directly?
If you try to update the state directly then it won't re-render the component.
Instead use setState() method. It schedules an update to a component's state object. When state changes, the component responds by re-rendering.
もし直接stateを更新した場合、再レンダリングは発生しません。
代わりにsetStateメソッドを使います。これはコンポーネントのstateの更新を予約して、stateが更新されるとコンポーネントは再レンダリングによって反応します。
//Wrong
this.state.message = "Hello world";

//Correct
this.setState({ message: "Hello World" });
12. What is the purpose of callback function as an argument of setState()?
The callback function is invoked when setState finished and the component gets rendered. Since setState() is asynchronous the callback function is used for any post action.
setStateが終了し、コンポーネントがレンダリングされると、コールバック関数が呼び出されます。setState関数は非同期なので、コールバック関数はあらゆるpost actionに使用されます。
setState({ name: "John" }, () =>
  console.log("The name has updated and component re-rendered")
);
13. What is the difference between HTML and React event handling?
Below are some of the main differences between HTML and React event handling,
以下はHTMLとReactのイベントハンドリングの違いです。
// In HTML, the event name usually represents in lowercase as a convention:
<button onclick="activateLasers()"></button>

// Whereas in React it follows camelCase convention:
<button onClick={activateLasers}>
// In HTML, you can return false to prevent default behavior:
<a
  href="#"
  onclick='console.log("The link was clicked."); return false;'
/>

// Whereas in React you must call preventDefault() explicitly:
function handleClick(event) {
  event.preventDefault();
  console.log("The link was clicked.");
}
In HTML, you need to invoke the function by appending () Whereas in react you should not append () with the function name. (refer "activateLasers" function in the first point for example)
HTMLでは関数を呼び出す際に()で閉じる必要があるが、Reactでは関数に()をつけてはいけない。
14. How to bind methods or event handlers in JSX callbacks?
Binding in Constructor: In JavaScript classes, the methods are not bound by default. The same thing applies for React event handlers defined as class methods. Normally we bind them in constructor.
コンストラクタでのbinding。JSのクラスではメソッドがbindされていません。これはClassで定義されたReactのイベントハンドラも同じです。
class Foo extends Component {
  constructor(props) {
    super(props);
    this.handleClick = this.handleClick.bind(this);
  }
  handleClick() {
    console.log("Click happened");
  }
  render() {
    return <button onClick={this.handleClick}>Click Me</button>;
  }
}
Public class fields syntax: If you don't like to use bind approach then public class fields syntax can be used to correctly bind callbacks.
Publicクラスフィールド構文。bindを使いたくない際には、この構文を使用して正しくコールバックをbindすることができます。
handleClick = () => {
  console.log("this is:", this);
};
Arrow functions in callbacks: You can use arrow functions directly in the callbacks.
コールバック内のアロー関数。アロー関数をコールバック内で直接使うことができます。
handleClick() {
    console.log('Click happened');
}
render() {
    return <button onClick={() => this.handleClick()}>Click Me</button>;
}
15. How to pass a parameter to an event handler or callback?
You can use an arrow function to wrap around an event handler and pass parameters:
アロー関数イベントハンドラで囲み、パラメータを渡すことができます。
<button onClick={() => this.handleClick(id)} />
This is an equivalent to calling .bind:
.bindを使うとこのようになります。
<button onClick={this.handleClick.bind(this, id)} />
Apart from these two approaches, you can also pass arguments to a function which is defined as arrow function
これら二つの他にもアロー関数として定義された関数に引数を渡すこともできます。
<button onClick={this.handleClick(id)} />;
handleClick = (id) => () => {
  console.log("Hello, your ticket number is", id);
};
16. What are synthetic events in React?
SyntheticEvent is a cross-browser wrapper around the browser's native event. Its API is same as the browser's native event, including stopPropagation() and preventDefault(), except the events work identically across all browsers.
SyntheticEventとは、ブラウザのネイティブイベントをクロスブラウザで包むものです。そのAPIはstopPropagationやpreventDefaultと同じですが、イベントが全てブラウザで同じように動作する点が異なります。
17. What are inline conditional expressions?
You can use either if statements or ternary expressions which are available from JS to conditionally render expressions. Apart from these approaches, you can also embed any expressions in JSX by wrapping them in curly braces and then followed by JS logical operator &&.
条件付きで式を表示するには、JSのif文や三項演算子を使うことができます。また、中括弧で囲み論理演算子&&を続けることで任意の式をJSXに埋め込むことができます。
<h1>Hello!</h1>;
{
  messages.length > 0 && !isLogin ? (
    <h2>You have {messages.length} unread messages.</h2>
  ) : (
    <h2>You don't have unread messages.</h2>
  );
}
18. What is "key" prop and what is the benefit of using it in arrays of elements?
A key is a special string attribute you should include when creating arrays of elements. Key prop helps React identify which items have changed, are added, or are removed.
keyは要素の配列を作成する際に含めるべき特別な文字列です。key propはreactがどの項目が変更されたのか、追加されたのか、削除されたのかを識別するのに役に立ちます。
// Most often we use ID from our data as key:
const todoItems = todos.map((todo) => <li key={todo.id}>{todo.text}</li>);

// When you don't have stable IDs for rendered items, you may use the item index as a key as a last resort:
const todoItems = todos.map((todo, index) => (
  <li key={index}>{todo.text}</li>
));
Using indexes for keys is not recommended if the order of items may change. This can negatively impact performance and may cause issues with component state.
If you extract list item as separate component then apply keys on list component instead of li tag.
There will be a warning message in the console if the key prop is not present on list items.
keyにindexを使用することは、項目の順番が変わることを考慮して推奨されていません。これはパフォーマンスに影響を及ぼし、コンポーネンtののstateに問題を起こす可能性があります。
list itemを別のコンポーネントとして抽出する場合は、<li>タグの代わりにリストコンポーネントにキーを適用します。
list itemにkey propが存在しない場合、コンソールに警告メッセージが表示されます。
19. What is the use of refs?
The ref is used to return a reference to the element. They should be avoided in most cases, however, they can be useful when you need a direct access to the DOM element or an instance of a component.
refは要素への参照を返すために使用されます。ほとんどの場合はrefの使用は避けるべきです。しかし、DOM要素やコンポーネントのインスタンスに直接アクセスする場合には便利です。
20. How to create refs?
This is a recently added approach. Refs are created using React.createRef() method and attached to React elements via the ref attribute. In order to use refs throughout the component, just assign the ref to the instance property within constructor.
これは最近追加された方法です。これは最近追加された手法です。React.createRef()メソッドでRefを作成し、ref属性でReact要素にアタッチします。コンポーネント全体でRefを使用するには、コンストラクタ内のインスタンスプロパティにrefを代入するだけです。
class MyComponent extends React.Component {
  constructor(props) {
    super(props);
    this.myRef = React.createRef();
  }
  render() {
    return <div ref={this.myRef} />;
  }
}
You can also use ref callbacks approach regardless of React version. For example, the search bar component's input element is accessed as follows,
Reactのバージョンに関係なく、refのコールバック方式を使うことができます。
class SearchBar extends Component {
  constructor(props) {
    super(props);
    this.txtSearch = null;
    this.state = { term: "" };
    this.setInputSearchRef = (e) => {
      this.txtSearch = e;
    };
  }
  onInputChange(event) {
    this.setState({ term: this.txtSearch.value });
  }
  render() {
    return (
      <input
        value={this.state.term}
        onChange={this.onInputChange.bind(this)}
        ref={this.setInputSearchRef}
      />
    );
  }
}
21. What are forward refs?
Ref forwarding is a feature that lets some components take a ref they receive, and pass it further down to a child.
Refのforwardingはあるコンポーネントが受け取ったrefを子コンポーネントに渡すことができる機能です。
const ButtonElement = React.forwardRef((props, ref) => (
  <button ref={ref} className="CustomButton">
    {props.children}
  </button>
));

// Create ref to the DOM button:
const ref = React.createRef();
<ButtonElement ref={ref}>{"Forward Ref"}</ButtonElement>;
22. Which is preferred option with in callback refs and findDOMNode()?
It is preferred to use callback refs over findDOMNode() API. Because findDOMNode() prevents certain improvements in React in the future.
findDOMNode() APIよりもcallback refsを使用することが望ましいです。なぜなら、findDOMNode()は将来的なReactの改良を妨げるからです。
// The legacy approach of using findDOMNode:
class MyComponent extends Component {
  componentDidMount() {
    findDOMNode(this).scrollIntoView();
  }

  render() {
    return <div />;
  }
}
// The recommended approach is:
class MyComponent extends Component {
  constructor(props) {
    super(props);
    this.node = createRef();
  }
  componentDidMount() {
    this.node.current.scrollIntoView();
  }

  render() {
    return <div ref={this.node} />;
  }
}
23. Why are String Refs legacy?
If you worked with React before, you might be familiar with an older API where the ref attribute is a string, like ref={'textInput'}, and the DOM node is accessed as this.refs.textInput. We advise against it because string refs have below issues, and are considered legacy. String refs were removed in React v16.
Reactを使ったことがある人なら、ref属性がref={'textInput'}のような文字列で、DOMノードがthis.refs.textInputとしてアクセスできる古いAPIに慣れているかもしれません。しかし、文字列のrefには以下のような問題があり、React16以降で削除されました。
- They force React to keep track of currently executing component. This is problematic because it makes react module stateful, and thus causes weird errors when react module is duplicated in the bundle.
- They are not composable — if a library puts a ref on the passed child, the user can't put another ref on it. Callback refs are perfectly composable.
- They don't work with static analysis like Flow. Flow can't guess the magic that framework does to make the string ref appear on this.refs, as well as its type (which could be different). Callback refs are friendlier to static analysis.
- It doesn't work as most people would expect with the "render callback" pattern (e.g. )
- これは、Reactに現在実行中のコンポーネントを追跡させるものです。Reactがstateフルでいるためにバンドル内でReactモジュールが複製されたときに奇妙なエラーを起こす可能性があります。
- ライブラリが渡されたrefをこコンポーネントに渡すと、別のrefを扱うことができなくなる。それに対して、callbackのrefは完全に互換性があります。
- Flowのような静的解析ツールでうまく動きません。コールバックのrefは、静的解析と相性がいいです。
- render callbackにて期待挙動になりません。
class MyComponent extends Component {
  renderRow = (index) => {
    // This won't work. Ref will get attached to DataTable rather than MyComponent:
    return <input ref={"input-" + index} />;

    // This would work though! Callback refs are awesome.
    return <input ref={(input) => (this["input-" + index] = input)} />;
  };

  render() {
    return (
      <DataTable data={this.props.data} renderRow={this.renderRow} />
    );
  }
}
24. What is Virtual DOM?
The Virtual DOM (VDOM) is an in-memory representation of Real DOM. The representation of a UI is kept in memory and synced with the "real" DOM. It's a step that happens between the render function being called and the displaying of elements on the screen. This entire process is called reconciliation.
Virtual DOMはReal DOMをメモリ内に表現したものです。UIの表現はメモリ内に保持され、Real DOMと同期されます。これは、render関数が呼び出されてから画面に要素が表示されるまでの間に発生するステップです。このプロセス全体を「reconciliation」と呼びます。
25. How Virtual DOM works?
Whenever any underlying data changes, the entire UI is re-rendered in Virtual DOM representation.
基礎となるデータが変更されるたびに、UI全体がVirtual DOMで再レンダリングされます。
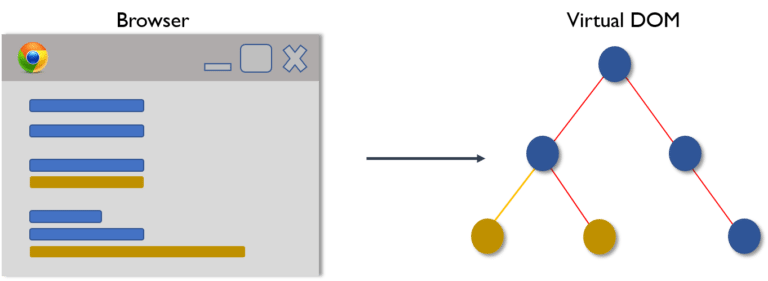
Then the difference between the previous DOM representation and the new one is calculated.
そして、以前のDOMと新しいDOMの差分を算出します。

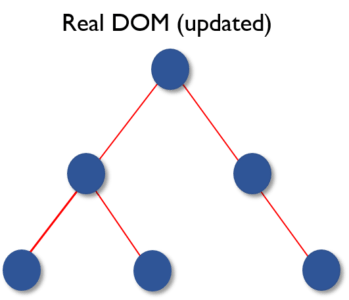
Once the calculations are done, the real DOM will be updated with only the things that have actually changed.
計算が終わると、Real DOMは実際に変更されたものだけが更新されます。
26. What is the difference between Shadow DOM and Virtual DOM?
The Shadow DOM is a browser technology designed primarily for scoping variables and CSS in web components. The Virtual DOM is a concept implemented by libraries in JavaScript on top of browser APIs.
Shadow DOMはwebコンポーネントの変数とCSSをスコープするためのブラウザ技術です。一方、Virtual DOMはブラウザのAPIの上にJSのライブラリで実装された概念です。
27. What is React Fiber?
Fiber is the new reconciliation engine or reimplementation of core algorithm in React v16. The goal of React Fiber is to increase its suitability for areas like animation, layout, gestures, ability to pause, abort, or reuse work and assign priority to different types of updates; and new concurrency primitives.
FiberはReact16からの新しいreconclitationエンジン、またはコアアルゴリズムの再実装をしたものです。React Fiberの目標は、アニメーション、レイアウト、ジェスチャー、作業の一時停止、中断、再利用、異なる種類の更新に優先順位を割り当てる機能、新しい並行処理プリミティブといった分野への適性を高めることです。
28. What is the main goal of React Fiber?
The goal of React Fiber is to increase its suitability for areas like animation, layout, and gestures. Its headline feature is incremental rendering: the ability to split rendering work into chunks and spread it out over multiple frames.
- Ability to split interruptible work in chunks.
- Ability to prioritize, rebase and reuse work in progress.
- Ability to yield back and forth between parents and children to support layout in React.
- Ability to return multiple elements from render().
- Better support for error boundaries.
React Fiberの目的は、アニメーション、レイアウト、ジェスチャーなどの分野での適性を高めることです。主要な機能はincremental renderingで、レンダリング作業をチャンクに分割し、複数のフレームに分散させることができる機能です。
- 中断可能な作業をチャンクで分割する
- 進行中の作業の優先順位付け、rebase、再利用
- Reactのレイアウトをサポートするために親子での行き来をする
- renderから複数の要素を返す
- error boundariesのサポート強化
29. What are controlled components?
A component that controls the input elements within the forms on subsequent user input is called Controlled Component, i.e, every state mutation will have an associated handler function.
form内の入力要素をその後のユーザの入力によって制御するコンポーネントをControlled Componentと呼びます。すなわち、全てのstate更新がハンドラ関数に結びついています。
handleChange(event) {
  this.setState({value: event.target.value.toUpperCase()})
}
30. What are uncontrolled components?
The Uncontrolled Components are the ones that store their own state internally, and you query the DOM using a ref to find its current value when you need it. This is a bit more like traditional HTML.
Uncontrolled Componentは、内部で自身の状態を保存しているもので、必要なときにrefを使用してDOMに問い合わせ、値にアクセスすることができるものです。これは、従来のHTMLに少し似ています。
class UserProfile extends React.Component {
  constructor(props) {
    super(props);
    this.handleSubmit = this.handleSubmit.bind(this);
    this.input = React.createRef();
  }

  handleSubmit(event) {
    alert("A name was submitted: " + this.input.current.value);
    event.preventDefault();
  }

  render() {
    return (
      <form onSubmit={this.handleSubmit}>
        <label>
          {"Name:"}
          <input type="text" ref={this.input} />
        </label>
        <input type="submit" value="Submit" />
      </form>
    );
  }
}
In most cases, it's recommend to use controlled components to implement forms. In a controlled component, form data is handled by a React component. The alternative is uncontrolled components, where form data is handled by the DOM itself.
多くの場合、フォームの実装にはcontrolled componentsを使用することが推奨されます。controlled componentでは、Reactコンポーネントによってフォームのdataが処理される一方でuncontrolled componentsではDOM自身によって処理される違いがあります。
31. What is the difference between createElement and cloneElement?
JSX elements will be transpiled to React.createElement() functions to create React elements which are going to be used for the object representation of UI. Whereas cloneElement is used to clone an element and pass it new props.
JSX要素はReact.createElement()関数にトランスパイルされ、UIのオブジェクト表現に使われるReact要素が作成されます。一方、cloneElementは要素のクローンを作成し、新しいpropを渡すために使用されます。
32. What is Lifting State Up in React?
When several components need to share the same changing data then it is recommended to lift the shared state up to their closest common ancestor. That means if two child components share the same data from its parent, then move the state to parent instead of maintaining local state in both of the child components.
複数のコンポーネントが同じ変更データを共有する必要がある場合、共有するstateを最も近い共通の祖先まで持ち上げることが推奨されます。つまり、2つの子コンポーネントが親コンポーネントから同じデータを共有している場合、両方の子コンポーネントでローカルstateを維持するのではなく、親コンポーネントにstateを移動させるということです。
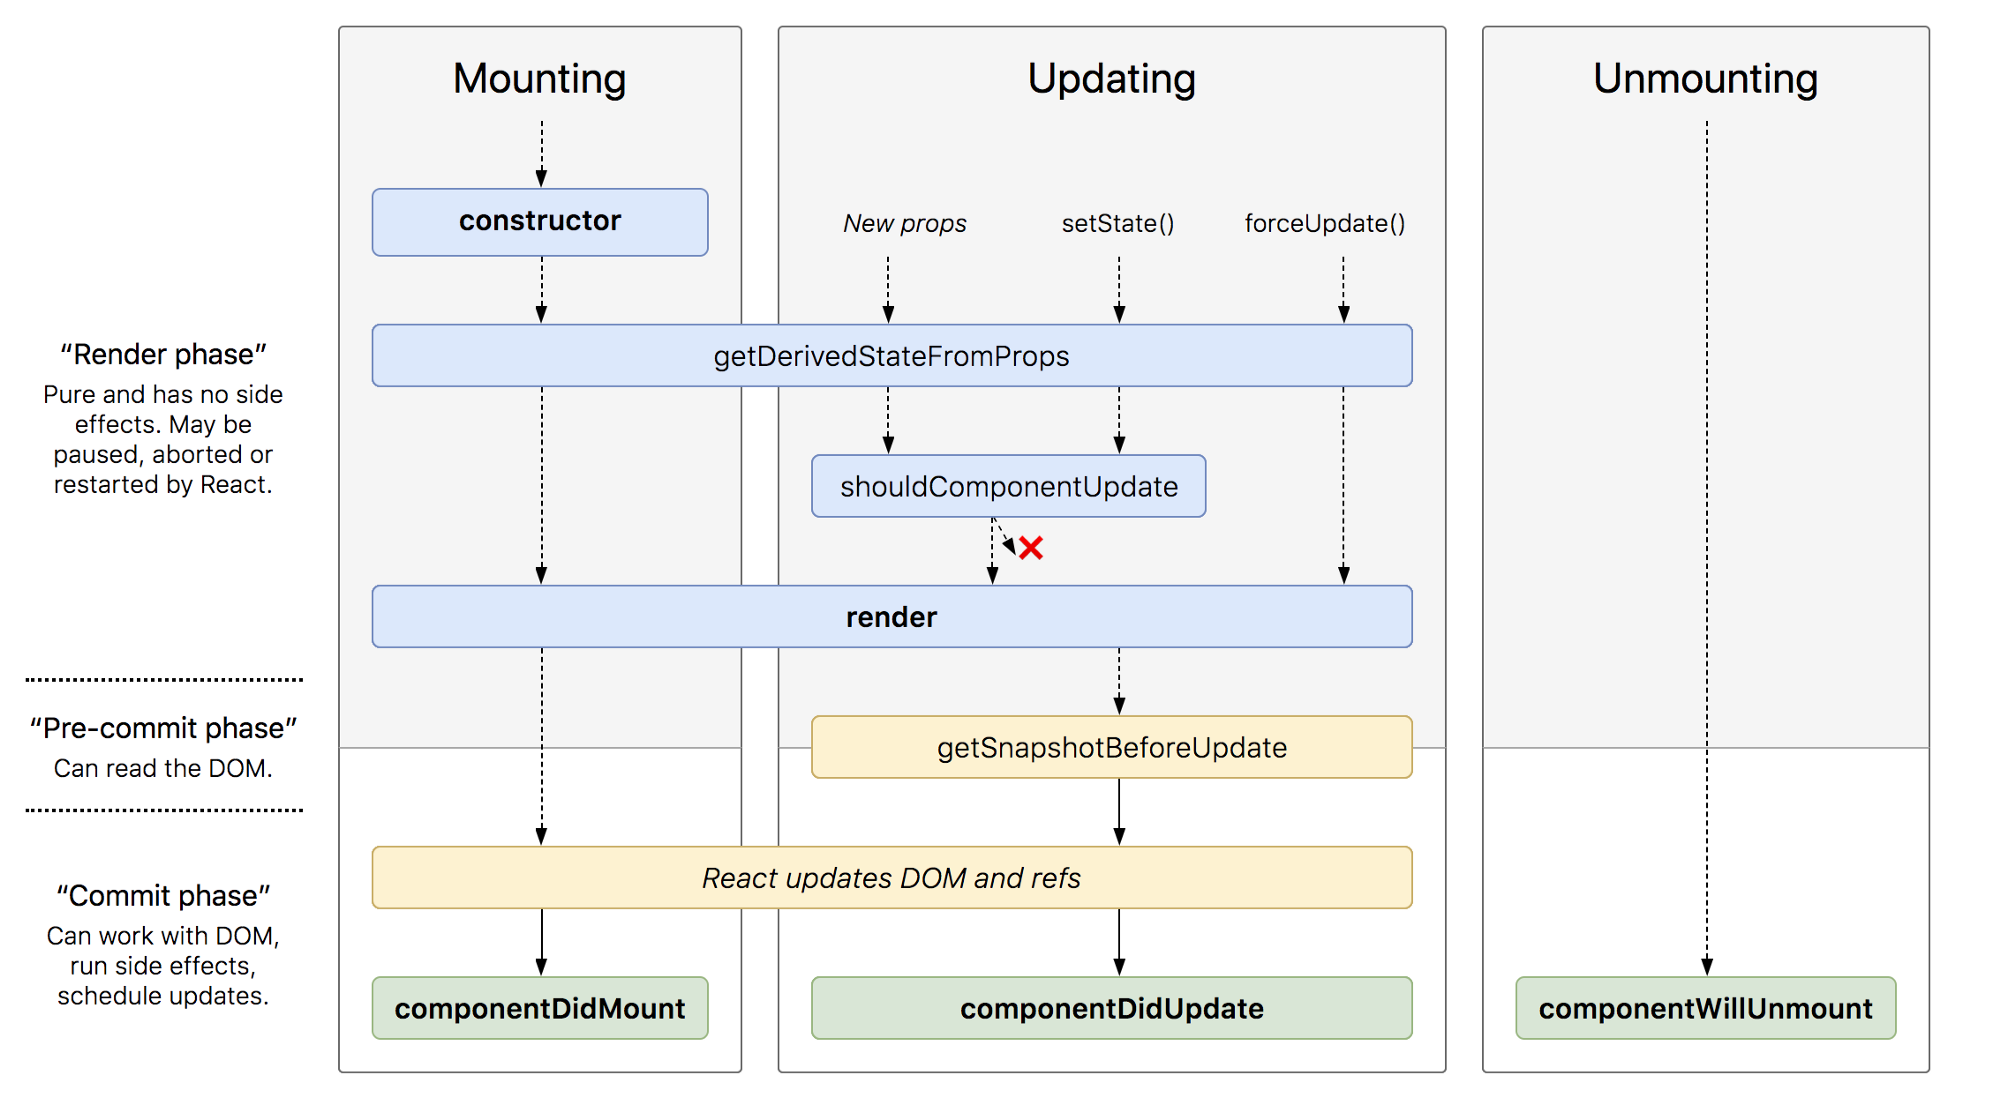
33. What are the different phases of component lifecycle?
The component lifecycle has three distinct lifecycle phases:
- Mounting: The component is ready to mount in the browser DOM. This phase covers initialization from constructor(), getDerivedStateFromProps(), render(), and componentDidMount() lifecycle methods.
- Updating: In this phase, the component gets updated in two ways, sending the new props and updating the state either from setState() or forceUpdate(). This phase covers getDerivedStateFromProps(), shouldComponentUpdate(), render(), getSnapshotBeforeUpdate() and componentDidUpdate() lifecycle methods.
- Unmounting: In this last phase, the component is not needed and gets unmounted from the browser DOM. This phase includes componentWillUnmount() lifecycle method.
コンポーネントのライフサイクルには、3つの明確な段階があります。
- マウント。コンポーネントはブラウザDOMにマウントする準備ができています。このフェーズにはconstructor(), getDerivedStateFromProps(), render(), componentDidMount()といったライフサイクルメソッドによる初期化が含まれます。
- 更新。このフェーズでは、コンポーネントは2つの方法で更新されます。新しいpropsの送信と、setState() または forceUpdate() による状態の更新があります。このフェーズには、getDerivedStateFromProps(), shouldComponentUpdate(), render(), getSnapshotBeforeUpdate(), componentDidUpdate()といったライフサイクルメソッドが含まれます。
- アンマウント。この最後のフェーズでは、コンポーネントは不要になり、ブラウザDOMからアンマウントされます。このフェーズには、componentWillUnmount()ライフサイクルメソッドが含まれます。
It's worth mentioning that React internally has a concept of phases when applying changes to the DOM. They are separated as follows
- Render The component will render without any side effects. This applies to Pure components and in this phase, React can pause, abort, or restart the render.
- Pre-commit Before the component actually applies the changes to the DOM, there is a moment that allows React to read from the DOM through the getSnapshotBeforeUpdate().
- Commit React works with the DOM and executes the final lifecycles respectively componentDidMount() for mounting, componentDidUpdate() for updating, and componentWillUnmount() for unmounting.
なお、Reactは内部的にDOMに変更を加える際にフェーズの概念を持っています。それらは以下のように分けられています。
- レンダリング。副作用なしにコンポーネントがレンダリングされます。これはPureComponentに適用され、このフェーズでは、Reactはレンダリングを一時停止、中断、または再開することができます。
- プレコミット。コンポーネントが実際に DOM に変更を適用する前に、getSnapshotBeforeUpdate()を通してReactがDOMから読み込めるようにする瞬間があります。
- コミット。ReactがDOMと連携し、マウントのためのcomponentDidMount()、アップデートのためのcomponentDidUpdate()、アンマウントのためのcomponentWillUnmount()をそれぞれを実行します。
React 16.3+ Phases
Before React 16.3
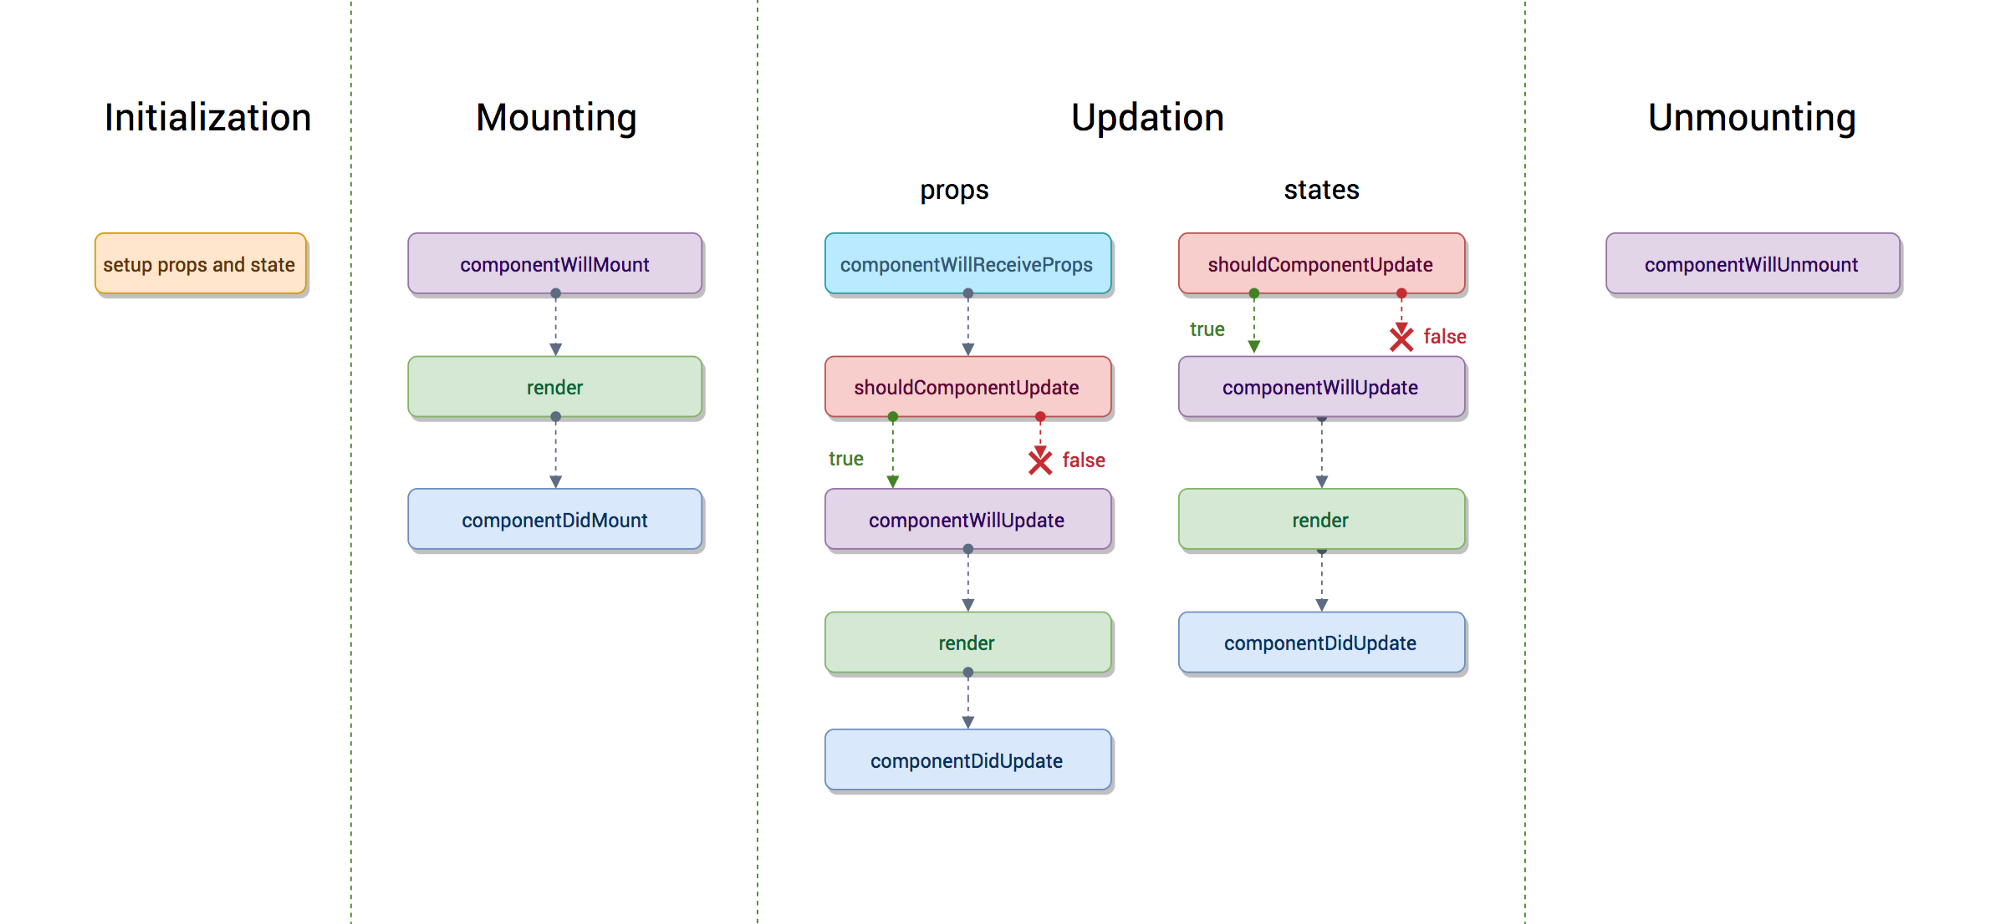
34. What are the lifecycle methods of React?
Before React 16.3
- componentWillMount: Executed before rendering and is used for App level configuration in your root component.
- componentDidMount: Executed after first rendering and here all AJAX requests, DOM or state updates, and set up event listeners should occur.
- componentWillReceiveProps: Executed when particular prop updates to trigger state transitions.
- shouldComponentUpdate: Determines if the component will be updated or not. By default it returns true. If you are sure that the component doesn't need to render after state or props are updated, you can return false value. It is a great place to improve performance as it allows you to prevent a re-render if component receives new prop.
- componentWillUpdate: Executed before re-rendering the component when there are props & state changes confirmed by shouldComponentUpdate() which returns true.
- componentDidUpdate: Mostly it is used to update the DOM in response to prop or state changes.
- componentWillUnmount: It will be used to cancel any outgoing network requests, or remove all event listeners associated with the component.
- componentWillMount: レンダリングの前に実行され、ルートコンポーネントのAppレベルの設定に使用されます。
- componentDidMount: 最初のレンダリングの後に実行されます。最初のレンダリングの後に実行され、ここですべてのAJAXリクエスト、DOMまたは状態の更新、およびイベントリスナーの設定が行われます。
- componentWillReceiveProps。特定のpropsが更新され、状態遷移を引き起こすときに実行されます。
- shouldComponentUpdate: コンポーネントが更新されるかどうかを決定します。デフォルトではtrueを返します。stateやpropsが更新された後にコンポーネントをレンダリングする必要がないことが確かであれば、false値を返すことができます。コンポーネントが新しいpropsを受け取った場合に再レンダリングを防ぐことができるので、パフォーマンスを向上させるのに最適な場所です。
- componentWillUpdate: コンポーネントを再レンダリングする前に実行され、propsとstateの変更がshouldComponentUpdate()によって確認され、trueを返します。
- componentDidUpdate: 主に、propsやstateの変更に応じてDOMを更新するために使用されます。
- componentWillUnmount: 発信するネットワークリクエストをキャンセルしたり、コンポーネントに関連するすべてのイベントリスナーを削除するために使用されます。
React 16.3+
- getDerivedStateFromProps: Invoked right before calling render() and is invoked on every render. This exists for rare use cases where you need a derived state. Worth reading if you need derived state.
- componentDidMount: Executed after first rendering and where all AJAX requests, DOM or state updates, and set up event listeners should occur.
- shouldComponentUpdate: Determines if the component will be updated or not. By default, it returns true. If you are sure that the component doesn't need to render after the state or props are updated, you can return a false value. It is a great place to improve performance as it allows you to prevent a re-render if component receives a new prop.
- getSnapshotBeforeUpdate: Executed right before rendered output is committed to the DOM. Any value returned by this will be passed into componentDidUpdate(). This is useful to capture information from the DOM i.e. scroll position.
- componentDidUpdate: Mostly it is used to update the DOM in response to prop or state changes. This will not fire if shouldComponentUpdate() returns false.
- componentWillUnmount It will be used to cancel any outgoing network requests, or remove all event listeners associated with the component.
- getDerivedStateFromProps: render()を呼び出す直前に呼び出され、レンダリングのたびに呼び出される。これは、派生状態が必要な稀なユースケースのために存在します。派生状態が必要な場合は、読む価値がある。
- componentDidMount: 最初のレンダリングの後に実行され、すべてのAJAXリクエスト、DOMまたはステートの更新、およびイベントリスナーの設定が行われる必要があります。
- shouldComponentUpdate: コンポーネントが更新されるかどうかを決定します。デフォルトでは、trueを返します。状態やプロップが更新された後、コンポーネントがレンダリングする必要がないことが確かであれば、false値を返すことができます。コンポーネントが新しいプロップを受け取った場合に再レンダリングを防ぐことができるので、パフォーマンスを向上させるには最適な場所です。
- getSnapshotBeforeUpdate: レンダリングされた出力がDOMにコミットされる直前に実行されます。これによって返された値は、すべてcomponentDidUpdate()に渡されます。これはDOMからの情報(スクロール位置など)を取得するのに便利です。
- componentDidUpdate: 主に、propsやstateの変更に対応してDOMを更新するために使用されます。shouldComponentUpdate()がfalseを返した場合、これは発生しません。
- componentWillUnmount: 発信されたネットワーク要求をキャンセルしたり、コンポーネントに関連するすべてのイベントリスナーを削除するために使用されます。
35. What are Higher-Order Components?
A higher-order component (HOC) is a function that takes a component and returns a new component. Basically, it's a pattern that is derived from React's compositional nature.
We call them pure components because they can accept any dynamically provided child component but they won't modify or copy any behavior from their input components.
高階コンポーネントとは、コンポーネントを受け取って、新しいコンポーネントを返す関数です。基本的には、Reactの性質から派生したパターンです。
動的に任意の子コンポーネントを受け取ることができますが、動作を変更したりコピーしたりすることはないため、Pure Componentと呼んでいます。
const EnhancedComponent = higherOrderComponent(WrappedComponent);
HOC can be used for many use cases:
- Code reuse, logic and bootstrap abstraction.
- Render hijacking.
- State abstraction and manipulation.
- Props manipulation.
HOCは多くのユースケースに使用することができます。
- コードの再利用、ロジックの抽象化。
- レンダリングハイジャック
- stateの抽象化と操作
- propsの操作
36. How to create props proxy for HOC component?
You can add/edit props passed to the component using props proxy pattern like this:
コンポーネントに渡されたpropsはprops proxyパターンを使って次のように追加、編集ができます。
function HOC(WrappedComponent) {
  return class Test extends Component {
    render() {
      const newProps = {
        title: "New Header",
        footer: false,
        showFeatureX: false,
        showFeatureY: true,
      };

      return <WrappedComponent {...this.props} {...newProps} />;
    }
  };
}
37. What is context?
Context provides a way to pass data through the component tree without having to pass props down manually at every level.
For example, authenticated users, locale preferences, UI themes need to be accessed in the application by many components.
Contextは各レベルで手動でpropsを渡すことなく、コンポーネントツリーで共通してデータを渡す方法です。
例えば、認証されたユーザ、設定、UI themeなどが多くのコンポーネントでアクセスしたい例です。
const { Provider, Consumer } = React.createContext(defaultValue);
38. What is children prop?
Children is a prop (this.props.children) that allows you to pass components as data to other components, just like any other prop you use. Component tree put between component's opening and closing tag will be passed to that component as children prop.
There are several methods available in the React API to work with this prop. These include React.Children.map, React.Children.forEach, React.Children.count, React.Children.only, React.Children.toArray.
Childrenは、他のpropsと同じように、コンポーネントをデータとして他のコンポーネントに渡すことができるprops(this.props.children)です。コンポーネントの開始タグと終了タグの間に置かれたコンポーネントツリーは、children propsとしてそのコンポーネントに渡されます。
このpropを操作するために、React APIではいくつかのメソッドが用意されています。React.Children.map, React.Children.forEach, React.Children.count, React.Children.only, React.Children.toArrayなどです。
const MyDiv = React.createClass({
  render: function () {
    return <div>{this.props.children}</div>;
  },
});

ReactDOM.render(
  <MyDiv>
    <span>{"Hello"}</span>
    <span>{"World"}</span>
  </MyDiv>,
  node
);
39. How to write comments in React?
The comments in React/JSX are similar to JavaScript Multiline comments but are wrapped in curly braces.
ReactとJSXのコメントはJSのMultilineコメントと似ていますが、中括弧で囲われます。
// Single-line comments:
<div>
  {/* Single-line comments(In vanilla JavaScript, the single-line comments are represented by double slash(//)) */}
  {`Welcome ${user}, let's play React`}
</div>

// Multi-line comments:
<div>
  {/* Multi-line comments for more than
   one line */}
  {`Welcome ${user}, let's play React`}
</div>
40. What is the purpose of using super constructor with props argument?
A child class constructor cannot make use of this reference until the super() method has been called. The same applies to ES6 sub-classes as well. The main reason for passing props parameter to super() call is to access this.props in your child constructors.
子クラスのコンストラクタは、super()メソッドが呼ばれるまで、この参照を利用することができません。これはES6のサブクラスにも同じことが当てはまります。super()呼び出しにpropsパラメータを渡す主な理由は、子コンストラクタでthis.propsにアクセスできるようにするためです。
// Passing props:
class MyComponent extends React.Component {
  constructor(props) {
    super(props);

    console.log(this.props); // prints { name: 'John', age: 42 }
  }
}

// Not passing props:
class MyComponent extends React.Component {
  constructor(props) {
    super();

    console.log(this.props); // prints undefined

    // but props parameter is still available
    console.log(props); // prints { name: 'John', age: 42 }
  }

  render() {
    // no difference outside constructor
    console.log(this.props); // prints { name: 'John', age: 42 }
  }
}
41. What is reconciliation?
When a component's props or state change, React decides whether an actual DOM update is necessary by comparing the newly returned element with the previously rendered one. When they are not equal, React will update the DOM. This process is called reconciliation.
コンポーネントのpropsやstateが変化したとき、Reactは新しく返された要素と以前にレンダリングされた要素を比較して、実際のDOM更新が必要かどうかを判断します。両者が等しくない場合、ReactはDOMを更新します。この処理を「reconciliation」と呼びます。
42. How to set state with a dynamic key name?
If you are using ES6 or the Babel transpiler to transform your JSX code then you can accomplish this with computed property names.
ES6またはBabelトランスパイラを使用してJSXコードを変換している場合、計算されたプロパティ名でこれを実行することができます。
handleInputChange(event) {
  this.setState({ [event.target.id]: event.target.value })
}
43. What would be the common mistake of function being called every time the component renders?
You need to make sure that function is not being called while passing the function as a parameter.
関数をパラメータとして渡していると、その関数が呼び出されないことを確認する必要があります。
render() {
  // Wrong: handleClick is called instead of passed as a reference!
  return <button onClick={this.handleClick()}>{'Click Me'}</button>
}

// Instead, pass the function itself without parenthesis:
render() {
  // Correct: handleClick is passed as a reference!
  return <button onClick={this.handleClick}>{'Click Me'}</button>
}
44. Is lazy function supports named exports?
No, currently React.lazy function supports default exports only. If you would like to import modules which are named exports, you can create an intermediate module that reexports it as the default. It also ensures that tree shaking keeps working and don’t pull unused components. Let's take a component file which exports multiple named components,
いいえ。現在現在React.lazyの機能は、default exportsのみをサポートしています。もしもnamed exportsのモジュールをimportしたい場合は、中間モジュールを作成し、それをdefault exportする必要があります。これにより、tree shakingの動作が保証され、未使用のコンポーネントが引き出されることがなくなります。いくつかのnamed exportされたコンポーネントを見てみましょう。
// MoreComponents.js
export const SomeComponent = /* ... */;
export const UnusedComponent = /* ... */;

// and reexport MoreComponents.js components in an intermediate file IntermediateComponent.js
// IntermediateComponent.js
export { SomeComponent as default } from "./MoreComponents.js";

// Now you can import the module using lazy function as below,
import React, { lazy } from "react";
const SomeComponent = lazy(() => import("./IntermediateComponent.js"));
45. Why React uses className over class attribute?
class is a keyword in JavaScript, and JSX is an extension of JavaScript. That's the principal reason why React uses className instead of class. Pass a string as the className prop.
classはJSのキーワードであり、JSXはJSの拡張であります。これがReactがclassではなくclassNameを使う主な理由です。classNameのプロパティに文字列を渡します。
render() {
  return <span className={'menu navigation-menu'}>{'Menu'}</span>
}
46. What are fragments?
It's a common pattern in React which is used for a component to return multiple elements. Fragments let you group a list of children without adding extra nodes to the DOM.
Reactではよくあるパターンで、コンポーネントが複数の要素を返すために使われます。フラグメントを使用すると、DOMに余分なノードを追加することなく、子要素のリストをグループ化することができます。
render() {
  return (
    <React.Fragment>
      <ChildA />
      <ChildB />
      <ChildC />
    </React.Fragment>
  )
}

// There is also a shorter syntax, but it's not supported in many tools:
render() {
  return (
    <>
      <ChildA />
      <ChildB />
      <ChildC />
    </>
  )
}
47. Why fragments are better than container divs?
Below are the list of reasons,
- Fragments are a bit faster and use less memory by not creating an extra DOM node. This only has a real benefit on very large and deep trees.
- Some CSS mechanisms like Flexbox and CSS Grid have a special parent-child relationships, and adding divs in the middle makes it hard to keep the desired layout.
- The DOM Inspector is less cluttered.
- フラグメントは、余分な DOM ノードを作成しないので、少し速く、より少ないメモリを使用します。これは、非常に大きく深いツリーでこそ真価を発揮します。
- Flexbox や CSS Grid などの CSS の仕組みには、特殊な親子関係があり、途中に div を追加すると、望ましいレイアウトを維持するのが難しくなります。
- DOMインスペクタが乱雑にならずに済みます。
48. What are portals in React?
Portal is a recommended way to render children into a DOM node that exists outside the DOM hierarchy of the parent component.
Portalは、親コンポーネントのDOM階層外に存在するDOMノードに子コンポーネントをレンダリングするための推奨されている方法です。
ReactDOM.createPortal(child, container);
The first argument is any render-able React child, such as an element, string, or fragment. The second argument is a DOM element.
第一引数には、要素、文字列、フラグメントなど、レンダリング可能なReactの子要素を指定します。第2引数はDOM要素を指定します。
49. What are stateless components?
If the behaviour of a component is independent of its state then it can be a stateless component. You can use either a function or a class for creating stateless components. But unless you need to use a lifecycle hook in your components, you should go for function components. There are a lot of benefits if you decide to use function components here; they are easy to write, understand, and test, a little faster, and you can avoid the this keyword altogether.
もしもコンポーネントの挙動がstateに依存しないならばそれは、stateless componentsです。stateless componentの作成には関数とクラスのどちらも使用することができます。しかし、ライフサイクルHooksを使用することがない限りは関数コンポーネントを使用することを勧めます。関数型コンポーネントを使用すると、記述、理解、テストが容易で、速度も少し速くなり、thisキーワードを完全に避けることができるなど、多くの利点があります。
50. What are stateful components?
If the behaviour of a component is dependent on the state of the component then it can be termed as stateful component. These stateful components are always class components and have a state that gets initialized in the constructor.
React 16.8 Update:
Hooks let you use state and other React features without writing classes.
コンポーネントの挙動がstateに依存する場合は、stateful componentです。このようなコンポーネントはクラスコンポーネントを使用して、コンストラクタで初期化される状態を持ちます。
React16.8のupdateにて、クラスを使わずともstateを利用することができるようになりました。
class App extends Component {
  constructor(props) {
    super(props);
    this.state = { count: 0 };
  }

  render() {
    // ...
  }
}

// The Equivalent Functional Component
import React, {useState} from 'react';

const App = (props) => {
const [count, setCount] = useState(0);

return (
    // JSX
  )
}
51. How to apply validation on props in React?
When the application is running in development mode, React will automatically check all props that we set on components to make sure they have correct type. If the type is incorrect, React will generate warning messages in the console. It's disabled in production mode due to performance impact. The mandatory props are defined with isRequired.
アプリケーションが開発モードで動作しているとき、Reactはコンポーネントに設定したすべてのpropが正しい型を持っているかどうかを自動的にチェックします。型が正しくない場合、Reactはコンソールに警告メッセージを生成します。パフォーマンスへの影響から、プロダクションモードでは無効化されています。必須プロップはisRequiredで定義します。
The set of predefined prop types:
- PropTypes.number
- PropTypes.string
- PropTypes.array
- PropTypes.object
- PropTypes.func
- PropTypes.node
- PropTypes.element
- PropTypes.bool
- PropTypes.symbol
- PropTypes.any
import React from "react";
import PropTypes from "prop-types";

class User extends React.Component {
  static propTypes = {
    name: PropTypes.string.isRequired,
    age: PropTypes.number.isRequired,
  };

  render() {
    return (
      <>
        <h1>{`Welcome, ${this.props.name}`}</h1>
        <h2>{`Age, ${this.props.age}`}</h2>
      </>
    );
  }
}

// The Equivalent Functional Component
import React from "react";
import PropTypes from "prop-types";

function User({ name, age }) {
  return (
    <>
      <h1>{`Welcome, ${name}`}</h1>
      <h2>{`Age, ${age}`}</h2>
    </>
  );
}

User.propTypes = {
  name: PropTypes.string.isRequired,
  age: PropTypes.number.isRequired,
};
52. What are the advantages of React?
Below are the list of main advantages of React,
- Increases the application's performance with Virtual DOM.
- JSX makes code easy to read and write.
- It renders both on client and server side (SSR).
- Easy to integrate with frameworks (Angular, Backbone) since it is only a view library.
- Easy to write unit and integration tests with tools such as Jest.
- Virtual DOMでアプリケーションのパフォーマンスを向上させる。
- JSXにより、コードの読み書きが容易になる。
- クライアントサイドとサーバーサイドの両方でレンダリングする(SSR)。
- Viewライブラリなので、フレームワーク(Angular、Backbone)との統合が容易。
- Jestなどのツールで単体テストや結合テストが書きやすい。
53. What are the limitations of React?
Apart from the advantages, there are few limitations of React too,
- React is just a view library, not a full framework.
- There is a learning curve for beginners who are new to web development.
- Integrating React into a traditional MVC framework requires some additional configuration.
- The code complexity increases with inline templating and JSX.
- Too many smaller components leading to over engineering or boilerplate.
- Reactは単なるViewライブラリであり、完全なフレームワークではありません。
- Reactは単なるViewライブラリであり、完全なフレームワークではないため、Web開発を始めたばかりの初心者には学習曲線があります。
- 従来のMVCフレームワークにReactを組み込むには、いくつかの追加設定が必要です。
- インラインテンプレートやJSXにより、コードが複雑になる。
- 小さなコンポーネントが多すぎるため、オーバーエンジニアリングや定型的な記述になる。
54. What are error boundaries in React v16?
Error boundaries are components that catch JavaScript errors anywhere in their child component tree, log those errors, and display a fallback UI instead of the component tree that crashed.
A class component becomes an error boundary if it defines a new lifecycle method called componentDidCatch(error, info) or static getDerivedStateFromError() :
Error boundary は、子コンポーネントツリーの任意の場所で JavaScript エラーをキャッチし、それらのエラーをログに記録し、クラッシュしたコンポーネントツリーの代わりにフォールバック UI を表示するコンポーネントです。
componentDidCatch(error, info) または static getDerivedStateFromError() と呼ばれる新しいライフサイクルメソッドを定義すると、Error Boundaryになります。
class ErrorBoundary extends React.Component {
  constructor(props) {
    super(props);
    this.state = { hasError: false };
  }

  componentDidCatch(error, info) {
    // You can also log the error to an error reporting service
    logErrorToMyService(error, info);
  }

  static getDerivedStateFromError(error) {
    // Update state so the next render will show the fallback UI.
    return { hasError: true };
  }

  render() {
    if (this.state.hasError) {
      // You can render any custom fallback UI
      return <h1>{"Something went wrong."}</h1>;
    }
    return this.props.children;
  }
}

// After that use it as a regular component:
<ErrorBoundary>
  <MyWidget />
</ErrorBoundary>
55. How are error boundaries handled in React v15?
React v15 provided very basic support for error boundaries using unstable_handleError method. It has been renamed to componentDidCatch in React v16.
React v15では、unstable_handleErrorメソッドによるerror boundariesの非常に基本的なサポートが提供されました。これはReact v16でcomponentDidCatchに改名されました。
56. What are the recommended ways for static type checking?
Normally we use PropTypes library (React.PropTypes moved to a prop-types package since React v15.5) for type checking in the React applications. For large code bases, it is recommended to use static type checkers such as Flow or TypeScript, that perform type checking at compile time and provide auto-completion features.
通常、Reactアプリケーションの型チェックにはPropTypesライブラリ(React.PropTypesはReact v15.5からprop-typesパッケージへ移行)を使用します。大規模なコードベースでは、コンパイル時に型チェックを行い、自動補完機能を提供するFlowやTypeScriptなどの静的型チェッカーを使用することが推奨されます。
57. What is the use of react-dom package?
The react-dom package provides DOM-specific methods that can be used at the top level of your app. Most of the components are not required to use this module. Some of the methods of this package are:
react-domパッケージは、アプリのトップレベルで使用できるDOM固有のメソッドを提供します。ほとんどのコンポーネントは、このモジュールを使用する必要はありません。このパッケージのメソッドの一部を紹介します。
- render()
- hydrate()
- unmountComponentAtNode()
- findDOMNode()
- createPortal()
58. What is the purpose of render method of react-dom?
This method is used to render a React element into the DOM in the supplied container and return a reference to the component. If the React element was previously rendered into container, it will perform an update on it and only mutate the DOM as necessary to reflect the latest changes.
このメソッドは、指定されたコンテナ内の DOM に React 要素をレンダリングし、そのコンポーネントへの参照を返すために使用されます。React 要素が以前にコンテナにレンダリングされていた場合は、それに対して更新を行い、最新の変更を反映させるために必要な DOM のみを変更します。
ReactDOM.render(element, container, [callback])
If the optional callback is provided, it will be executed after the component is rendered or updated.
オプションのコールバックが指定されている場合、コンポーネントのレンダリングまたは更新後に実行されます。
59. What is ReactDOMServer?
The ReactDOMServer object enables you to render components to static markup (typically used on node server). This object is mainly used for server-side rendering (SSR). The following methods can be used in both the server and browser environments:
ReactDOMServer オブジェクトを使用すると、静的なマークアップにコンポーネントをレンダリングできます(通常はノードサーバで使用されます)。このオブジェクトは、主にサーバーサイドレンダリング(SSR)に使用されます。以下のメソッドは、サーバー環境とブラウザ環境の両方で使用できます。
- renderToString()
- renderToStaticMarkup()
例えば、一般的に Express、Hapi、Koa などの Node ベースの Web サーバを実行し、renderToString を呼び出してルートコンポーネントを文字列にレンダリングし、それをレスポンスとして送信します。
// using Express
import { renderToString } from "react-dom/server";
import MyPage from "./MyPage";

app.get("/", (req, res) => {
  res.write(
    "<!DOCTYPE html><html><head><title>My Page</title></head><body>"
  );
  res.write('<div id="content">');
  res.write(renderToString(<MyPage />));
  res.write("</div></body></html>");
  res.end();
});
60. How to use innerHTML in React?
The dangerouslySetInnerHTML attribute is React's replacement for using innerHTML in the browser DOM. Just like innerHTML, it is risky to use this attribute considering cross-site scripting (XSS) attacks. You just need to pass a __html object as key and HTML text as value.
dangerouslySetInnerHTML属性は、ReactがブラウザのDOMでinnerHTMLを使用する代わりに使用する属性です。innerHTMLと同様に、クロスサイトスクリプティング(XSS)攻撃を考慮すると、この属性を使用するのは危険です。キーとして__htmlオブジェクトを、値としてHTMLテキストを渡せば使用できます。
function createMarkup() {
  return { __html: "First · Second" };
}

function MyComponent() {
  return <div dangerouslySetInnerHTML={createMarkup()} />;
}
62. How to use styles in React?
The style attribute accepts a JavaScript object with camelCased properties rather than a CSS string. This is consistent with the DOM style JavaScript property, is more efficient, and prevents XSS security holes.
style 属性は、CSS文字列ではなく、camelCasedプロパティを持つJavaScriptオブジェクトを受け付けます。これは、DOM style JavaScriptプロパティと一致し、より効率的で、XSSを防止します。
const divStyle = {
  color: "blue",
  backgroundImage: "url(" + imgUrl + ")",
};

function HelloWorldComponent() {
  return <div style={divStyle}>Hello World!</div>;
}
Style keys are camelCased in order to be consistent with accessing the properties on DOM nodes in JavaScript (e.g. node.style.backgroundImage).
スタイルキーは、JavaScriptでDOMノード上のプロパティ(例:node.style.backgroundImage)にアクセスする際に一貫性を持たせるため、キャメルケース(camelcase)で表記しています。
62. How events are different in React?
Handling events in React elements has some syntactic differences:
- React event handlers are named using camelCase, rather than lowercase.
- With JSX you pass a function as the event handler, rather than a string.
React要素でのイベント処理には、いくつかの構文の違いがあります。
- Reactのイベントハンドラは、lowercaseではなくcamelCaseを使用して命名されます。
- JSXでは、イベントハンドラとして、文字列ではなく、関数を渡します。
63. What will happen if you use setState() in constructor?
When you use setState(), then apart from assigning to the object state React also re-renders the component and all its children. You would get error like this: Can only update a mounted or mounting component. So we need to use this.state to initialize variables inside constructor.
setState()を使用すると、オブジェクトのstateを代入する以外に、Reactはコンポーネントとそのすべての子コンポーネントを再レンダリングします。するとこのようなエラーが発生します。Can only update a mounted or mounting component. そこで、コンストラクタ内の変数を初期化するために this.state を使用する必要があります。
64. What is the impact of indexes as keys?
Keys should be stable, predictable, and unique so that React can keep track of elements.
In the below code snippet each element's key will be based on ordering, rather than tied to the data that is being represented. This limits the optimizations that React can do.
Reactが要素を追跡できるように、キーは安定していて、予測可能で、ユニークであるべきです。
以下のコードでは、各要素のキーは、表現されるデータに結びついたものではなく、順序に基づいたものとなっています。このため、Reactが行える最適化には限界があります。
{
  todos.map((todo, index) => <Todo {...todo} key={index} />);
}
If you use element data for unique key, assuming todo.id is unique to this list and stable, React would be able to reorder elements without needing to reevaluate them as much.
要素データをユニークキーにした場合、todo.idがこのリストにユニークで安定していると仮定すれば、Reactは要素をそれほど再評価する必要がなく、並び替えができるようになります。
{
  todos.map((todo) => <Todo {...todo} key={todo.id} />);
}
65. Is it good to use setState() in componentWillMount() method?
Yes, it is safe to use setState() inside componentWillMount() method. But at the same it is recommended to avoid async initialization in componentWillMount() lifecycle method. componentWillMount() is invoked immediately before mounting occurs. It is called before render(), therefore setting state in this method will not trigger a re-render. Avoid introducing any side-effects or subscriptions in this method. We need to make sure async calls for component initialization happened in componentDidMount() instead of componentWillMount().
はい、componentWillMount()メソッド内でsetState()を使用することは安全です。しかし、同時に、componentWillMount() ライフサイクルメソッドでの非同期の初期化を避けることが推奨されます。 componentWillMount() は、マウントが発生する直前に呼び出されます。render()の前に呼び出されるため、このメソッドで状態を設定しても、再レンダリングは発生しません。このメソッドで副作用やサブスクリプションを導入しないようにします。コンポーネント初期化のための非同期呼び出しが、componentWillMount() の代わりに componentDidMount() で起こったことを確認する必要があります。
componentDidMount() {
  axios.get(`api/todos`)
    .then((result) => {
      this.setState({
        messages: [...result.data]
      })
    })
}
66. What will happen if you use props in initial state?
If the props on the component are changed without the component being refreshed, the new prop value will never be displayed because the constructor function will never update the current state of the component. The initialization of state from props only runs when the component is first created.
コンポーネントがリフレッシュされないままpropsが変更された場合、コンストラクタ関数がコンポーネントの現在のstateを更新しないため、新しいpropsの値が表示されることはありません。propsからのstateの初期化は、コンポーネントが最初に作成されたときにのみ実行されます。
// The below component won't display the updated input value:
class MyComponent extends React.Component {
  constructor(props) {
    super(props);

    this.state = {
      records: [],
      inputValue: this.props.inputValue,
    };
  }

  render() {
    return <div>{this.state.inputValue}</div>;
  }
}

// Using props inside render method will update the value:
class MyComponent extends React.Component {
  constructor(props) {
    super(props);

    this.state = {
      record: [],
    };
  }

  render() {
    return <div>{this.props.inputValue}</div>;
  }
}
67. How do you conditionally render components?
In some cases you want to render different components depending on some state. JSX does not render false or undefined, so you can use conditional short-circuiting to render a given part of your component only if a certain condition is true.
場合によっては、ある状態に応じて異なるコンポーネントをレンダリングしたいことがあります。JSXはfalseやundefinedをレンダリングしないので、条件付き短絡処理を使用して、ある条件が真の場合にのみ、コンポーネントのある部分をレンダリングすることができます。
const MyComponent = ({ name, address }) => (
  <div>
    <h2>{name}</h2>
    {address && <p>{address}</p>}
  </div>
);

// If you need an if-else condition then use ternary operator.
const MyComponent = ({ name, address }) => (
  <div>
    <h2>{name}</h2>
    {address ? <p>{address}</p> : <p>{"Address is not available"}</p>}
  </div>
);
68. Why we need to be careful when spreading props on DOM elements?
When we spread props we run into the risk of adding unknown HTML attributes, which is a bad practice. Instead we can use prop destructuring with ...rest operator, so it will add only required props.
propを分散させると、未知のHTML属性が追加される危険性があり、これはバッドプラクティスです。その代わりに、...rest演算子でプロップの再構築を行うことで、必要なプロップのみを追加することができます。
const ComponentA = () => (
  <ComponentB isDisplay={true} className={"componentStyle"} />
);

const ComponentB = ({ isDisplay, ...domProps }) => (
  <div {...domProps}>{"ComponentB"}</div>
);
69. How you use decorators in React?
You can decorate your class components, which is the same as passing the component into a function. Decorators are flexible and readable way of modifying component functionality.
クラスコンポーネントを装飾することができます。これは、コンポーネントを関数に渡すのと同じことです。デコレータは、コンポーネントの機能を変更するための柔軟で読みやすい方法です。
@setTitle("Profile")
class Profile extends React.Component {
  //....
}

/*
  title is a string that will be set as a document title
  WrappedComponent is what our decorator will receive when
  put directly above a component class as seen in the example above
*/
const setTitle = (title) => (WrappedComponent) => {
  return class extends React.Component {
    componentDidMount() {
      document.title = title;
    }

    render() {
      return <WrappedComponent {...this.props} />;
    }
  };
};
70. How do you memoize a component?
Since React v16.6.0, we have a React.memo. It provides a higher order component which memoizes component unless the props change. To use it, simply wrap the component using React.memo before you use it.
React v16.6.0以降では、 React.memoというコンポーネントが用意されています。これは、propsが変化しない限り、コンポーネントをメモする高階コンポーネントを提供します。使い方は、コンポーネントを使う前にReact.memoでラップするだけです。
const MemoComponent = React.memo(function MemoComponent(props) {
  /* render using props */
});
OR;
export default React.memo(MyFunctionComponent);
71. How you implement Server Side Rendering or SSR?
React is already equipped to handle rendering on Node servers. A special version of the DOM renderer is available, which follows the same pattern as on the client side.
This method will output the regular HTML as a string, which can be then placed inside a page body as part of the server response. On the client side, React detects the pre-rendered content and seamlessly picks up where it left off.
React は、Node サーバーでのレンダリングを処理するための機能をすでに備えています。DOM レンダラーの特別なバージョンが用意されており、クライアント側と同じパターンに従います。このメソッドは、通常の HTML を文字列として出力し、サーバーレスポンスの一部としてページ本文に配置することができます。クライアント側では、React がプリレンダリングされたコンテンツを検出し、中断された部分をシームレスに拾います。
import ReactDOMServer from "react-dom/server";
import App from "./App";

ReactDOMServer.renderToString(<App />);
72. How to enable production mode in React?
You should use Webpack's DefinePlugin method to set NODE_ENV to production, by which it strip out things like propType validation and extra warnings. Apart from this, if you minify the code, for example, Uglify's dead-code elimination to strip out development only code and comments, it will drastically reduce the size of your bundle.
WebpackのDefinePluginメソッドでNODE_ENVをproductionに設定すると、propTypeのバリデーションや余計な警告が取り除かれます。これとは別に、例えばUglifyのdead-code eliminationで開発専用のコードやコメントを取り除いてminifyすると、バンドルのサイズが劇的に減ります。
73. What is CRA and its benefits?
The create-react-app CLI tool allows you to quickly create & run React applications with no configuration step.
create-react-app CLIツールは、設定ステップなしでReactアプリケーションを素早く作成・実行することができるツールです。
# Installation
$ npm install -g create-react-app

# Create new project
$ create-react-app todo-app
$ cd todo-app

# Build, test and run
$ npm run build
$ npm run test
$ npm start
- React, JSX, ES6, and Flow syntax support.
- Language extras beyond ES6 like the object spread operator.
- Autoprefixed CSS, so you don’t need -webkit- or other prefixes.
- A fast interactive unit test runner with built-in support for coverage reporting.
- A live development server that warns about common mistakes.
- A build script to bundle JS, CSS, and images for production, with hashes and sourcemaps.
- React、JSX、ES6、Flow構文に対応している。
- オブジェクトスプレッド演算子など、ES6を以上の言語機能を備えている。
- CSSの自動接頭辞により、-webkit-などの接頭辞は必要ない。
- カバレッジレポートを内蔵した高速な対話型ユニットテストランナーをもっている。
- よくあるミスを警告するライブ開発サーバー。
- JS、CSS、画像をハッシュとソースマップ付きでバンドルするビルドスクリプト。
74. What is the lifecycle methods order in mounting?
The lifecycle methods are called in the following order when an instance of a component is being created and inserted into the DOM.
ライフサイクルメソッドは、コンポーネントのインスタンスが生成され、DOMに挿入されるときに、次の順序で呼び出されます。
- constructor()
- static getDerivedStateFromProps()
- render()
- componentDidMount()
75. What are the lifecycle methods going to be deprecated in React v16?
The following lifecycle methods going to be unsafe coding practices and will be more problematic with async rendering.
以下のライフサイクルメソッドは、安全でないコーディングプラクティスとなり、非同期レンダリングでより問題が発生することになります。
- componentWillMount()
- componentWillReceiveProps()
- componentWillUpdate()
76. What is the purpose of getDerivedStateFromProps() lifecycle method?
The new static getDerivedStateFromProps() lifecycle method is invoked after a component is instantiated as well as before it is re-rendered. It can return an object to update state, or null to indicate that the new props do not require any state updates.
新しい静的メソッド getDerivedStateFromProps() ライフサイクルメソッドは、コンポーネントのインスタンス化の後と、再レンダリングの前に呼び出されます。これは、stateを更新するオブジェクトを返すか、または新しいpropsがstateの更新を必要としないことを示すnullを返すことができます。
class MyComponent extends React.Component {
  static getDerivedStateFromProps(props, state) {
    // ...
  }
}
77. What is the purpose of getSnapshotBeforeUpdate() lifecycle method?
The new getSnapshotBeforeUpdate() lifecycle method is called right before DOM updates. The return value from this method will be passed as the third parameter to componentDidUpdate().
新しい getSnapshotBeforeUpdate() ライフサイクルメソッドは、DOM更新の直前に呼び出されます。このメソッドの戻り値は、componentDidUpdate()の3番目のパラメータとして渡されます。
class MyComponent extends React.Component {
  getSnapshotBeforeUpdate(prevProps, prevState) {
    // ...
  }
}
78. Do Hooks replace render props and higher order components?
Both render props and higher-order components render only a single child but in most of the cases Hooks are a simpler way to serve this by reducing nesting in your tree.
render propsと高階のコンポーネントは、どちらも単一の子をレンダリングしますが、ほとんどの場合、Hooksはツリーのネストを減らすことでこれを提供する、よりシンプルな方法です。
79. What is the recommended way for naming components?
It is recommended to name the component by reference instead of using displayName.
displayNameを使用する代わりに、コンポーネントに参照名を付けることを推奨します。
// Using displayName for naming component:

export default React.createClass({
  displayName: "TodoApp",
  // ...
});

// The recommended approach:
export default class TodoApp extends React.Component {
  // ...
}

// also
const TodoApp = () => {
  //...
};
export default TodoApp;
80. What is the recommended ordering of methods in component class?
Recommended ordering of methods from mounting to render stage:
マウントからレンダリングまでの推奨順序を紹介します。
- static methods
- constructor()
- getChildContext()
- componentWillMount()
- componentDidMount()
- componentWillReceiveProps()
- shouldComponentUpdate()
- componentWillUpdate()
- componentDidUpdate()
- componentWillUnmount()
- click handlers or event handlers like onClickSubmit() or onChangeDescription()
- getter methods for render like getSelectReason() or getFooterContent()
- optional render methods like renderNavigation() or renderProfilePicture()
- render()
81. What is a switching component?
A switching component is a component that renders one of many components. We need to use object to map prop values to components.
スイッチング・コンポーネントは、多数のコンポーネントのうちの1つをレンダリングするコンポーネントです。propの値をコンポーネントにマッピングするために、オブジェクトを使用する必要があります。
import HomePage from "./HomePage";
import AboutPage from "./AboutPage";
import ServicesPage from "./ServicesPage";
import ContactPage from "./ContactPage";

const PAGES = {
  home: HomePage,
  about: AboutPage,
  services: ServicesPage,
  contact: ContactPage,
};

const Page = (props) => {
  const Handler = PAGES[props.page] || ContactPage;

  return <Handler {...props} />;
};

// The keys of the PAGES object can be used in the prop types to catch dev-time errors.
Page.propTypes = {
  page: PropTypes.oneOf(Object.keys(PAGES)).isRequired,
};
82. Why we need to pass a function to setState()?
The reason behind for this is that setState() is an asynchronous operation. React batches state changes for performance reasons, so the state may not change immediately after setState() is called. That means you should not rely on the current state when calling setState() since you can't be sure what that state will be. The solution is to pass a function to setState(), with the previous state as an argument. By doing this you can avoid issues with the user getting the old state value on access due to the asynchronous nature of setState().
この背景には、setState()が非同期処理であることがあります。Reactはパフォーマンス上の理由からstateの変更をバッチ処理するので、setState()が呼ばれた後すぐに状態が変化するとは限りません。つまり、setState()を呼び出す際に、現在のstateがどうなるかは分からないので、現在の状態に依存してはいけないということです。解決策としては、setState()に関数を渡し、引数として以前の状態を渡します。こうすることで、setState()の非同期性により、アクセス時にユーザーが古いstateの値を取得する問題を回避することができます。
// assuming this.state.count === 0
this.setState({ count: this.state.count + 1 });
this.setState({ count: this.state.count + 1 });
this.setState({ count: this.state.count + 1 });
// this.state.count === 1, not 3

// If we pass a function to setState(), the count gets incremented correctly.
this.setState((prevState, props) => ({
  count: prevState.count + props.increment,
}));
// this.state.count === 3 as expected
React may batch multiple setState() calls into a single update for performance. Because this.props and this.state may be updated asynchronously, you should not rely on their values for calculating the next state.
Reactは、パフォーマンスのために、複数のsetState()コールを1回の更新にまとめてしまうことがあります。this.propsとthis.stateは非同期に更新される可能性があるので、次のstateを計算するためにそれらの値に依存してはいけません。
// Wrong
this.setState({
  counter: this.state.counter + this.props.increment,
});
The preferred approach is to call setState() with function rather than object. That function will receive the previous state as the first argument, and the props at the time the update is applied as the second argument.
望ましい方法は、オブジェクトではなく関数で setState() を呼び出すことです。この関数は、最初の引数として以前の状態を受け取り、2番目の引数として更新が適用される時点のpropを受け取ります。
// Correct
this.setState((prevState, props) => ({
  counter: prevState.counter + props.increment,
}));
83. What is strict mode in React?
React.StrictMode is a useful component for highlighting potential problems in an application. Just like
<Fragment>,<StrictMode>does not render any extra DOM elements. It activates additional checks and warnings for its descendants. These checks apply for development mode only.
React.StrictModeは、アプリケーションの潜在的な問題を強調するのに便利なコンポーネントです。<Fragment> のように、<StrictMode> は余分な DOM 要素をレンダリングしません。これは、その子孫のための追加のチェックと警告をアクティブにします。これらのチェックは、開発モードのみに適用されます。
import React from "react";

function ExampleApplication() {
  return (
    <div>
      <Header />
      <React.StrictMode>
        <div>
          <ComponentOne />
          <ComponentTwo />
        </div>
      </React.StrictMode>
      <Header />
    </div>
  );
}

// In the example above, the strict mode checks apply to <ComponentOne> and <ComponentTwo> components only.
84. What are React Mixins?
Mixins are a way to totally separate components to have a common functionality. Mixins should not be used and can be replaced with higher-order components or decorators.
One of the most commonly used mixins is PureRenderMixin. You might be using it in some components to prevent unnecessary re-renders when the props and state are shallowly equal to the previous props and state:
Mixin は、全く別のコンポーネントに共通の機能を持たせるための方法です。Mixinは使用しない方がよく、高階コンポーネントやデコレータで置き換えることができます。最もよく使われる Mixin のひとつに PureRenderMixin があります。propsやstateが以前のpropsやstateと浅く等しい場合に、不要な再レンダリングを防ぐために、いくつかのコンポーネントで使用されます。
const PureRenderMixin = require("react-addons-pure-render-mixin");

const Button = React.createClass({
  mixins: [PureRenderMixin],
  // ...
});
85. Why is isMounted() an anti-pattern and what is the proper solution?
The primary use case for isMounted() is to avoid calling setState() after a component has been unmounted, because it will emit a warning.
isMounted() の主な使用目的は、コンポーネントがアンマウントされた後に setState() を呼び出すと警告が発生するので、それを避けるためです。
if (this.isMounted()) {
  this.setState({...})
}
Checking isMounted() before calling setState() does eliminate the warning, but it also defeats the purpose of the warning. Using isMounted() is a code smell because the only reason you would check is because you think you might be holding a reference after the component has unmounted.
An optimal solution would be to find places where setState() might be called after a component has unmounted, and fix them. Such situations most commonly occur due to callbacks, when a component is waiting for some data and gets unmounted before the data arrives. Ideally, any callbacks should be canceled in componentWillUnmount(), prior to unmounting.
setState() をコールする前に isMounted() をチェックすると警告は出なくなりますが、 警告の目的から外れてしまいます。isMounted() を使用するのはcode smellであり、チェックする唯一の理由は、コンポーネントがアンマウントされた後に参照を保持する可能性があると考えられるからです。
最適な解決策は、コンポーネントがアンマウントされた後に setState() が呼ばれる可能性がある場所を見つけ、それを修正することです。このような状況は、最も一般的にはコールバックが原因で発生します。コンポーネントが何らかのデータを待っているときに、データが到着する前にアンマウントされる場合です。理想的には、アンマウントする前に componentWillUnmount() でコールバックがキャンセルされるようにすべきです。
86. What are the Pointer Events supported in React?
Pointer Events provide a unified way of handling all input events. In the old days we had a mouse and respective event listeners to handle them but nowadays we have many devices which don't correlate to having a mouse, like phones with touch surface or pens. We need to remember that these events will only work in browsers that support the Pointer Events specification.
ポインターイベントは、すべての入力イベントを処理するための統一された方法を提供します。昔はマウスとそれを処理するそれぞれのイベントリスナーがありましたが、最近ではタッチサーフェス付きの電話やペンなど、マウスを持つことと関連性のないデバイスが多くなっています。これらのイベントは、Pointer Events 仕様をサポートするブラウザでのみ動作することを覚えておく必要があります。
- onPointerDown
- onPointerMove
- onPointerUp
- onPointerCancel
- onGotPointerCapture
- onLostPointerCapture
- onPointerEnter
- onPointerLeave
- onPointerOver
- onPointerOut
87. Why should component names start with capital letter?
If you are rendering your component using JSX, the name of that component has to begin with a capital letter otherwise React will throw an error as an unrecognized tag. This convention is because only HTML elements and SVG tags can begin with a lowercase letter.
JSXを使ってコンポーネントをレンダリングする場合、コンポーネント名は大文字で始めないと、Reactは認識できないタグとしてエラーを投げます。これは、小文字で始められるのはHTML要素とSVGタグだけであるため、このような慣習になっています。
class SomeComponent extends Component {
  // Code goes here
}
What are the exceptions on React component naming?
The component names should start with an uppercase letter but there are few exceptions to this convention. The lowercase tag names with a dot (property accessors) are still considered as valid component names. For example, the below tag can be compiled to a valid component,
Reactコンポーネントの命名に関する例外は?
コンポーネント名は大文字で始まるのが原則ですが、例外もあります。小文字のタグにドットをつけたもの(プロパティアクセサ)は、有効なコンポーネント名として扱われます。例えば、以下のようなタグは有効なコンポーネントとしてコンパイルされます。
     render() {
          return (
            <obj.component/> // `React.createElement(obj.component)`
          )
    }
88. Are custom DOM attributes supported in React v16?
Yes. In the past, React used to ignore unknown DOM attributes. If you wrote JSX with an attribute that React doesn't recognize, React would just skip it.
以前は、Reactは未知のDOM属性を無視することができました。Reactが認識できない属性でJSXを書いた場合、Reactはそれをスキップするだけでした。
// For example, let's take a look at the below attribute:
<div mycustomattribute={"something"} />

// Would render an empty div to the DOM with React v15:
<div />

// In React v16 any unknown attributes will end up in the DOM:
// React v16では、未知の属性はDOMに残ってしまいます。
<div mycustomattribute="something" />
89. What is the difference between constructor and getInitialState?
You should initialize state in the constructor when using ES6 classes, and getInitialState() method when using React.createClass().
ES6クラスを使用する場合はコンストラクタで、React.createClass()を使用する場合はgetInitialState()メソッドで状態を初期化する必要があります。
Using ES6 classes:
class MyComponent extends React.Component {
  constructor(props) {
    super(props);
    this.state = {
      /* initial state */
    };
  }
}
Using React.createClass():
const MyComponent = React.createClass({
  getInitialState() {
    return {
      /* initial state */
    };
  },
});
90. Can you force a component to re-render without calling setState?
By default, when your component's state or props change, your component will re-render. If your render() method depends on some other data, you can tell React that the component needs re-rendering by calling forceUpdate().
デフォルトでは、コンポーネントのstateやpropsが変更されると、コンポーネントは再レンダリングされます。render()メソッドが他のデータに依存している場合、forceUpdate()を呼び出すことで、コンポーネントの再レンダリングが必要であることをReactに伝えることができます。
component.forceUpdate(callback);
It is recommended to avoid all uses of forceUpdate() and only read from this.props and this.state in render().
forceUpdate() の使用をすべて避け、render() の中で this.props と this.state からだけ読み取ることをお勧めします。
91. What is the difference between super() and super(props) in React using ES6 classes?
When you want to access this.props in constructor() then you should pass props to super() method.
constructor() で this.props にアクセスしたい場合は、super() メソッドに props を渡します。
Using super(props):
class MyComponent extends React.Component {
  constructor(props) {
    super(props);
    console.log(this.props); // { name: 'John', ... }
  }
}
Using super():
class MyComponent extends React.Component {
  constructor(props) {
    super();
    console.log(this.props); // undefined
  }
}
92. How to loop inside JSX?
You can simply use Array.prototype.map with ES6 arrow function syntax.
For example, the items array of objects is mapped into an array of components:
Array.prototype.mapをES6のarrow関数構文で簡単に使用することができます。
例えば、オブジェクトの配列itemsは、コンポーネントの配列にマップされます。
<tbody>
  {items.map((item) => (
    <SomeComponent key={item.id} name={item.name} />
  ))}
</tbody>

// But you can't iterate using for loop:
<tbody>
  for (let i = 0; i < items.length; i++) {
    <SomeComponent key={items[i].id} name={items[i].name} />
  }
</tbody>
This is because JSX tags are transpiled into function calls, and you can't use statements inside expressions.
これは、JSXタグが関数呼び出しに変換され、式の中で文を使うことができないからです。
93. How do you access props in attribute quotes?
React (or JSX) doesn't support variable interpolation inside an attribute value. The below representation won't work:
React(またはJSX)は、属性値内の変数補間をサポートしていません。以下のような表現ではうまくいきません。
<img className="image" src="images/{this.props.image}" />
But you can put any JS expression inside curly braces as the entire attribute value. So the below expression works:
しかし、中括弧の中に任意のJS式を入れれば、属性値全体として扱うことができます。つまり、以下のような表現が使えます。
<img className="image" src={"images/" + this.props.image} />

// Using template strings will also work:
<img className="image" src={`images/${this.props.image}`} />
94. What is React proptype array with shape?
If you want to pass an array of objects to a component with a particular shape then use React.PropTypes.shape() as an argument to React.PropTypes.arrayOf().
特定の形状を持つコンポーネントにオブジェクトの配列を渡したい場合は、React.PropTypes.arrayOf()の引数としてReact.PropTypes.shape()を使用することができます。
ReactComponent.propTypes = {
  arrayWithShape: React.PropTypes.arrayOf(
    React.PropTypes.shape({
      color: React.PropTypes.string.isRequired,
      fontSize: React.PropTypes.number.isRequired,
    })
  ).isRequired,
};
95. How to conditionally apply class attributes?
You shouldn't use curly braces inside quotes because it is going to be evaluated as a string.
文字列として評価されるから、引用符の中に中括弧を使うべきではないです。
<div className="btn-panel {this.props.visible ? 'show' : 'hidden'}">
Instead you need to move curly braces outside (don't forget to include spaces between class names):
その代わり、中括弧を外側に移動させる必要があります(クラス名の間にスペースを入れることを忘れないでください)。
<div className={'btn-panel ' + (this.props.visible ? 'show' : 'hidden')}>


// Template strings will also work:
<div className={`btn-panel ${this.props.visible ? 'show' : 'hidden'}`}>
96. What is the difference between React and ReactDOM?
The react package contains React.createElement(), React.Component, React.Children, and other helpers related to elements and component classes. You can think of these as the isomorphic or universal helpers that you need to build components. The react-dom package contains ReactDOM.render(), and in react-dom/server we have server-side rendering support with ReactDOMServer.renderToString() and ReactDOMServer.renderToStaticMarkup().
reactパッケージには、React.createElement()、React.Component、React.Children、その他要素やコンポーネントクラスに関連するヘルパーが含まれています。これらは、コンポーネントを構築するために必要な同型または普遍的なヘルパーと考えることができます。react-domパッケージにはReactDOM.render()、react-dom/serverにはReactDOMServer.renderToString()とReactDOMServer.renderToStaticMarkup()でサーバサイドレンダリングをサポートしています。
97. Why ReactDOM is separated from React?
The React team worked on extracting all DOM-related features into a separate library called ReactDOM. React v0.14 is the first release in which the libraries are split. By looking at some of the packages, react-native, react-art, react-canvas, and react-three, it has become clear that the beauty and essence of React has nothing to do with browsers or the DOM.
To build more environments that React can render to, React team planned to split the main React package into two: react and react-dom. This paves the way to writing components that can be shared between the web version of React and React Native.
Reactチームは、すべてのDOM関連機能をReactDOMという別のライブラリに抽出することに取り組みました。React v0.14は、ライブラリが分割された最初のリリースです。react-native、react-art、react-canvas、react-threeといういくつかのパッケージを見ることで、Reactの美しさと本質は、ブラウザやDOMとは無関係であることが明らかになります。
Reactがレンダリングできる環境をより多く構築するために、ReactチームはメインのReactパッケージをreactとreact-domの2つに分割することを計画しました。これにより、Web版のReactとReact Nativeの間で共有できるコンポーネントを書く道が開かれました。
98. How to use React label element?
If you try to render a
<label>element bound to a text input using the standard for attribute, then it produces HTML missing that attribute and prints a warning to the console.
テキスト入力にバインドされた要素を標準のfor属性でレンダリングしようとすると、その属性がないHTMLが生成され、コンソールに警告が表示されます。
<label for={'user'}>{'User'}</label>
<input type={'text'} id={'user'} />

// Since for is a reserved keyword in JavaScript, use htmlFor instead.
<label htmlFor={'user'}>{'User'}</label>
<input type={'text'} id={'user'} />
99. How to combine multiple inline style objects?
// You can use spread operator in regular React:
<button style={{ ...styles.panel.button, ...styles.panel.submitButton }}>
  {"Submit"}
</button>

// If you're using React Native then you can use the array notation:
<button style={[styles.panel.button, styles.panel.submitButton]}>
  {"Submit"}
</button>
100. How to re-render the view when the browser is resized?
You can listen to the resize event in componentDidMount() and then update the dimensions (width and height). You should remove the listener in componentWillUnmount() method.
componentDidMount()でresizeイベントをリスニングし、寸法(widthとheight)を更新することができます。componentWillUnmount()メソッドでリスナーを削除する必要があります。
class WindowDimensions extends React.Component {
  constructor(props) {
    super(props);
    this.updateDimensions = this.updateDimensions.bind(this);
  }

  componentWillMount() {
    this.updateDimensions();
  }

  componentDidMount() {
    window.addEventListener("resize", this.updateDimensions);
  }

  componentWillUnmount() {
    window.removeEventListener("resize", this.updateDimensions);
  }

  updateDimensions() {
    this.setState({
      width: window.innerWidth,
      height: window.innerHeight,
    });
  }

  render() {
    return (
      <span>
        {this.state.width} x {this.state.height}
      </span>
    );
  }
}
101. What is the difference between setState() and replaceState() methods?
When you use setState() the current and previous states are merged. replaceState() throws out the current state, and replaces it with only what you provide. Usually setState() is used unless you really need to remove all previous keys for some reason. You can also set state to false/null in setState() instead of using replaceState().
setState() を使用すると、現在の状態と以前の状態が統合されます。 replaceState() は、現在の状態を破棄し、指定したものだけに置き換えます。何らかの理由で以前のキーをすべて削除する必要がある場合を除き、 通常は setState() を使用します。replaceState() のかわりに setState() で状態を false/null に設定することもできます。
102. How to listen to state changes?
The componentDidUpdate lifecycle method will be called when state changes. You can compare provided state and props values with current state and props to determine if something meaningful changed.
componentDidUpdateライフサイクルメソッドは、stateが変更されたときに呼び出されます。提供されたstateとpropsの値を現在のstateとpropsと比較して、何か意味のある変化があったかどうかを判断することができます。
componentDidUpdate(object prevProps, object prevState)
103. What is the recommended approach of removing an array element in React state?
The better approach is to use Array.prototype.filter() method.
For example, let's create a removeItem() method for updating the state.
より良い方法は、Array.prototype.filter()メソッドを使用することです。
例えば、stateを更新するためのremoveItem()メソッドを作ってみましょう。
removeItem(index) {
  this.setState({
    data: this.state.data.filter((item, i) => i !== index)
  })
}
104. Is it possible to use React without rendering HTML?
// It is possible. Below are the possible options:
render() {
  return false
}
render() {
  return true
}
render() {
  return null
}

// React version >=16.0.0:
render() {
  return []
}
render() {
  return ""
}

// React version >=16.2.0:
render() {
  return <React.Fragment></React.Fragment>
}
render() {
  return <></>
}

// React version >=18.0.0:
render() {
  return undefined
}
105. How to pretty print JSON with React?
We can use
<pre>tag so that the formatting of the JSON.stringify() is retained:
JSON.stringify()での書式を保持するために、<pre>タグを使用することができます。
const data = { name: "John", age: 42 };

class User extends React.Component {
  render() {
    return <pre>{JSON.stringify(data, null, 2)}</pre>;
  }
}

React.render(<User />, document.getElementById("container"));
106. Why you can't update props in React?
The React philosophy is that props should be immutable and top-down. This means that a parent can send any prop values to a child, but the child can't modify received props.
Reactの哲学は、propは不変であり、トップダウンであるべきだということです。つまり、親は任意のprop値を子に送ることができますが、子は受け取ったpropを修正することはできません。
107. How to focus an input element on page load?
// You can do it by creating ref for input element and using it in componentDidMount():
class App extends React.Component {
  componentDidMount() {
    this.nameInput.focus();
  }

  render() {
    return (
      <div>
        <input defaultValue={"Won't focus"} />
        <input
          ref={(input) => (this.nameInput = input)}
          defaultValue={"Will focus"}
        />
      </div>
    );
  }
}

ReactDOM.render(<App />, document.getElementById("app"));

// Also in Functional component (react 16.08 and above)
import React, { useEffect, useRef } from "react";

const App = () => {
  const inputElRef = useRef(null);

  useEffect(() => {
    inputElRef.current.focus();
  }, []);

  return (
    <div>
      <input defaultValue={"Won't focus"} />
      <input ref={inputElRef} defaultValue={"Will focus"} />
    </div>
  );
};

ReactDOM.render(<App />, document.getElementById("app"));
108. What are the possible ways of updating objects in state?
- Calling setState() with an object to merge with state:
// Using Object.assign() to create a copy of the object:
const user = Object.assign({}, this.state.user, { age: 42 });
this.setState({ user });

// Using spread operator:
const user = { ...this.state.user, age: 42 };
this.setState({ user });
- Calling setState() with a function:
this.setState((prevState) => ({
  user: {
    ...prevState.user,
    age: 42,
  },
}));
110. How can we find the version of React at runtime in the browser?
You can use React.version to get the version.
React.versionを使って、バージョンを取得することができます。
const REACT_VERSION = React.version;

ReactDOM.render(
  <div>{`React version: ${REACT_VERSION}`}</div>,
  document.getElementById("app")
);
111. What are the approaches to include polyfills in your create-react-app?
There are approaches to include polyfills in create-react-app,
create-react-appにpolyfillを組み込む方法があります。
- Manual import from core-js:
Create a file called (something like) polyfills.js and import it into root index.js file. Run npm install core-js or yarn add core-js and import your specific required features.
polyfills.js というファイルを作成し、ルートの index.js ファイルにインポートします。npm install core-js または yarn add core-js を実行し、特定の必要な機能をインポートします。
import "core-js/fn/array/find";
import "core-js/fn/array/includes";
import "core-js/fn/number/is-nan";
- Using Polyfill service:
Use the polyfill.io CDN to retrieve custom, browser-specific polyfills by adding this line to index.html:
polyfill.io CDN を利用して、ブラウザ固有のカスタムポリフィルを取得します。index.html に次の行を追加します。
<script src="https://cdn.polyfill.io/v2/polyfill.min.js features=default,Array.prototype.includes"></script>
In the above script we had to explicitly request the Array.prototype.includes feature as it is not included in the default feature set.
上記のスクリプトでは、Array.prototype.includesの機能がデフォルトの機能セットに含まれていないため、明示的にリクエストする必要がありました。
終わりに
以上1~111問の項目を翻訳しました。
この記事が少しでも多くの人のReact学習に役立てれば幸いです!