RubyでWebフレームワークを自作する
動機
Webフレームワークを使ってアプリケーションを作成することは良くあるが、実際にその中身やどういった動きをするのか知りたい。
今回は、RailsライクなMVCフレームワークを自作します。
Rackで作成していく
ディレクトリを作成して、 bundle init でGemfileを作成します。
❯ mkdir my_framework
❯ bundle init
rackをインストールします。
また、デバッグしやすくするために pry もインストールします。
# frozen_string_literal: true

source "https://rubygems.org"

git_source(:github) {|/repo_name/| "https://github.com/#{/repo_name/}" }

gem 'rack'
gem 'pry'
❯ bundle install
Rackとは
一言で言うと、RackはRubyで作られているWebサーバーを立ち上げるためのインターフェースです。
昔のWebアプリケーションフレームワークの実装は、特定のWebサーバーに依存しているものが多く、使用したいフレームワークのために環境が制限されたり、その逆にフレームワークが縛られることがありました。そこで、Pythonでは、WSGIという両者間の標準インターフェースが作られWSGIに対応しているフレームワークと、WSGIを介して連携できるWebサーバとを好みの組み合わせで使用できるようになりました。
RackはWSGIに影響して開発されたWebサーバとWebアプリケーション/フレームワーク間の標準インターフェースを定める「仕様」です。
Rackアプリケーションとして最低限必要なもの
- callというメソッドを持っていること
- callメソッドの引数としてWebサーバからのリクエストを受けること
- callメソッドは,次の要素を含むレスポンスを返すること
- ステータスコード
- レスポンスヘッダ(Hash)
- レスポンスボディ(Array)
Hello Worldを表示させる
class App
  def call(env)
    [200, {}, [‘Hello World’]]
  end
end
ここでは、ステータスコードに200、レスポンスヘッダは空の{}、レスポンスボディに Hello world を設定しいます。
envはCGI環境変数であり、以下のような値と使用しているアプリケーションサーバーのインスタンスを取得することができます。localhost:9292/posts にアクセスした際のenvの値を設定します。
[1] pry(#<App>)> env
=> {"rack.version"=>[1, 3],
 "rack.errors"=>#<Rack::Lint::ErrorWrapper:0x00007f8ed1b65f00 @error=#<IO:<STDERR>>>,
 "rack.multithread"=>true,
 "rack.multiprocess"=>false,
 "rack.run_once"=>false,
 "SCRIPT_NAME"=>"",
 "QUERY_STRING"=>"",
 "SERVER_PROTOCOL"=>"HTTP/1.1",
 "SERVER_SOFTWARE"=>"puma 4.2.1 Distant Airhorns",
 "GATEWAY_INTERFACE"=>"CGI/1.2",
 "REQUEST_METHOD"=>"GET",
 "REQUEST_PATH"=>"/posts",
 "REQUEST_URI"=>"/posts",
 "HTTP_VERSION"=>"HTTP/1.1",
 "HTTP_HOST"=>"localhost:9292",
 "HTTP_CONNECTION"=>"keep-alive",
 "HTTP_CACHE_CONTROL"=>"max-age=0",
 "HTTP_UPGRADE_INSECURE_REQUESTS"=>"1",
 "HTTP_USER_AGENT"=>"Mozilla/5.0 (Macintosh; Intel Mac OS X 10_15_0) AppleWebKit/537.36 (KHTML, like Gecko) Chrome/78.0.3904.70 Safari/537.36",
 "HTTP_SEC_FETCH_USER"=>"?1",
 "HTTP_ACCEPT"=>"text/html,application/xhtml+xml,application/xml;q=0.9,image/webp,image/apng,*/*;q=0.8,application/signed-exchange;v=b3",
 "HTTP_SEC_FETCH_SITE"=>"none",
 "HTTP_SEC_FETCH_MODE"=>"navigate",
 "HTTP_ACCEPT_ENCODING"=>"gzip, deflate, br",
 "HTTP_ACCEPT_LANGUAGE"=>"ja,en-US;q=0.9,en;q=0.8,zh-CN;q=0.7,zh-HK;q=0.6,zh;q=0.5",
 "HTTP_COOKIE"=> … 略
require 'rubygems'
require 'bundler'
Bundler.require

require "./app"

run App.new
Rackのuse と run について
use: 後述のRackアプリケーションを指定する
run: 後述のRackミドルウェアを指定する
❯ bundle exec rackup
[2019-11-02 01:20:02] INFO  WEBrick 1.4.2
[2019-11-02 01:20:02] INFO  ruby 2.6.3 (2019-04-16) [universal.x86_64-darwin19]
[2019-11-02 01:20:02] INFO  WEBrick::HTTPServer#start: pid=4316 port=9292
このコマンドを実行後 localhost:9292 にアクセスします。
Hello world という文言が表示されると思います。
WEBrickの代わりにpumaを利用する(おまけ)
Gemfileにpumaをインストールして、WEBrickからpumaにアプリケーションサーバーを変更します。
gem 'puma'
WEBrickはシングルスレッドなのに対して、pumaはマルチスレッドとして実行することができるためWEBrickより速度が速い場合が多いです。
GitHub - ruby/webrick: HTTP server toolkit
GitHub - puma/puma: A Ruby/Rack web server built for concurrency
rubyの標準ライブラリにbenchmarkというライブラリがあるのでそれで測ってみました。
https://docs.ruby-lang.org/ja/2.6.0/library/benchmark.html
                 user     system      total        real
WEBrick      0.000006   0.000002   0.000008 (  0.000004)
puma         0.000006   0.000001   0.000007 (  0.000003)
pumaのほうが少し速い。これちゃんと測定できているのか??
ルーティングを作成する
‘/‘: ‘main#index’
‘/hello’: ‘main#hello’
‘/posts’: ‘posts#index’
左がURLのパスで、右がコントローラ名#アクション名です。
パスとコントローラ#アクションの対応させるハッシュを後に作成するためです。
class Router
  attr_reader :routes

  def initialize(routes)
    @routes = routes
  end

  def resolve(env)
    path = env[‘REQUEST_PATH’]
    if routes.key?(path)
      ctrl(routes[path]).call
    else
      Controller.new.not_found
    end
  rescue Exception => error
    puts error.message
    puts error.backtrace
    Controller.new.internal_error
  end

  private

  def ctrl(string)
    ctrl_name, action_name = string.split(‘#’)
    klass = Object.const_get “#{ctrl_name.capitalize}Controller”
    klass.new(name: ctrl_name, action: action_name.to_sym)
  end
end
env['REQUEST_PATH']はアクセスしたURLのパスを取得することができます。このパスによって、404 not foundにするかコントローラのアクションを実行するかを判断します。
それ以外のサーバーエラーの場合は500 errorを出すようにします。
require 'yaml'
ROUTES = YAML.load(File.read(File.join(File.dirname(__FILE__), 'app', 'routes.yml')))

require './lib/router'

class App
  attr_reader :router

  def initialize
    @router = Router.new(ROUTES)
  end

  def call(env)
    result = router.resolve(env)
    # [200, {}, [‘Hello world’]]
    [result.status, result.headers, result.content]
  end
end
ここでは、コントローラ指定されたステータス、ヘッダー、コンテンツを指定できるようにします。
コントローラを作成する
Controllerの親クラスを作成します。
コントラクタでは、controllerの名前とアクションを初期化します。
class Controller
  attr_reader :name, :action
  attr_accessor :status, :headers, :content

  def initialize(name: nil, action: nil)
    @name = name
    @action = action
  end

  def call
    send(action)
    self.status = 200
    self.headers = {"Content-Type" => "text/html"}
    self.content = ["Hello world"]
    self
  end

  def not_found
    self.status = 404
    self.headers = {}
    self.content = ["Nothing found"]
    self
  end

  def internal_error
    self.status = 500
    self.headers = {}
    self.content = ["Internal error"]
    self
  end
end
ここまで実装すると、localhost:9292 以下のURLにアクセスするとHello Worldを表示します。
ルーティングに対応するコントローラを作成する
MainController.rb, PostsController.rb を作成します。
class MainController < Controller
  def index
    @title = 'MainController#index'
    @arr = %w(one two three)
  end

  def hello
    @hello = 'hello'
  end
end
indexアクションには、インスタンス変数 @titleに文字列、@arrには[‘one’, ’two’, ‘three’] という配列を入れます。
同様 hello アクションには @helloに文字列を入れます。
class PostsController < Controller
  def index

  end
end
前述したControllerクラスを継承することで、例外などに対応することができます。
Dir[File.join(File.dirname(__FILE__), 'lib', '*.rb')].each {|file| require file }
Dir[File.join(File.dirname(__FILE__), 'app', '**', '*.rb')].each {|file| require file }
...
app.rbからコントローラがわかるようにパスを指定します。
ビューファイルを作成する
今回はslimを利用します。
gem 'slim'
以下を追加します。
def call
    send(action)
    self.status = 200
    self.headers = {"Content-Type" => "text/html"}
-      self.content = ['Hello world']
+    self.content = [template.render(self)]
    self
  end

+  def template
+    Slim::Template.new(File.join(App.root, 'app', 'views', "#{self.name}", "#{self.action}.slim"))
+  end
テンプレートエンジンにslimテンプレートを指定します。
また、コントローラ#アクションに応じたビューファイルがレンダリングされるようになります。
つまり、main#indexに対応するビューファイルは views/main/index.slim となります。
…
class App
…
  def self.root
    File.dirname(__FILE__)
  end
end
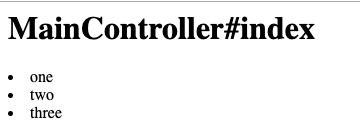
h1 = @title
- @arr.each do |elem|
  li = elem
ここで、同様に bundle exec rackup でサーバーを起動し、 localhost:9292にアクセスすると以下のように表示されます。存在しないルーティングでは Nothing found
localhost:9292/hello では Internal errorが表示されます。これはルーティングとアクションがあるにも関わらずビューファイルがないためですね。
モデルを作成する
DBを使用しやすくするためにORMであるsequelgemを使用します。
https://github.com/jeremyevans/sequel
gem 'sequel'
モデルクラスを作成していきます。 Sequel::Model を継承していきます。
post.rb

class Post < Sequel::Model(DB)

end
class PostsController < Controller
  def index
+    @posts = Post.all
  end
end
Postモデルの全データを@postsに格納します。
ビューファイルも作成しておきます。
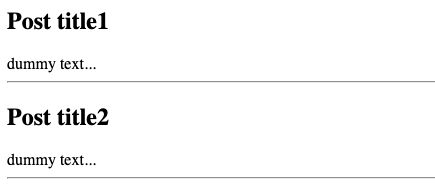
- @posts.each do |post|
  h2 = post.title
  div = post.content
  hr
DBを用意します
DBとしてsqlite3を用います。
gem 'sqlite3'
Database.ymlにDBの設定を記述します。使用するDBのパスを書きます。
adapter: sqlite
database: ‘./app/db/development.sqlite3’
DB = Sequel.connect(config) で database.ymlの設定を読み込みDBへ接続します。
db_config_file = File.join(File.dirname(__FILE__), ‘app’, ‘database.yml’)
if File.exist?(db_config_file)
  config = YAML.load(File.read(db_config_file))
  DB = Sequel.connect(config)
  Sequel.extension :migration
end

Dir[File.join(File.dirname(__FILE__), ‘lib', '*.rb’)].each{ |file| require file }

if DB
  Sequel::Migrator.run(DB, File.join(File.dirname(__FILE__), 'app', 'db', 'migrations'))
end

Dir[File.join(File.dirname(__FILE__), ‘app’, ‘**’,’*.rb’)].each{ |file| require file }
…
Sequel::Migrator.run(DB, File.join(File.dirname(__FILE__), 'app', 'db', 'migrations')) で app/db/migrations/ のマイグレーションファイルを実行し、テーブルを作成します。
マイグレーションファイルを作成し、postsテーブルを作成します。
class CreateTablePosts< Sequel::Migration
  def up
    create_table :posts do
      primary_key :id
      column :title, :text
      String :content
      index :title
    end
  end

  def down
    drop_table :posts
  end
end
このままでは、データがないので、seedファイルも作成します。
Post.create(
    title: 'Post title1',
    content: 'dummy text…'
)

Post.create(
    title: 'Post title2',
    content: 'dummy text…'
)
こうすることで、 bundle exec rackup をした際に、テーブルとダミーデータが作成されます。
ディレクトリ構成
ここまで簡易的なRailsライクなWebフレームワークを作成してきました。
最後にディレクトリ構成を記載します。
app/
├── controllers
│   ├── main_controller.rb
│   └── posts_controller.rb
├── database.yml
├── db
│   ├── development.sqlite3
│   ├── migrations
│   │   └── 001_create_table_posts.rb
│   └── seeds
│       └── posts.rb
├── models
│   └── post.rb
├── routes.yml
└── views
    ├── main
    │   └── index.slim
    └── posts
        └── index.slim
lib/
├── controller.rb
└── router.rb

app.rb
config.ru
Gemfile
Gemfile.lock
Githubリポジトリ
また、最終的なリポジトリです。
参考資料
GitHub - rack/rack: a modular Ruby webserver interface
GitHub - jeremyevans/sequel: Sequel: The Database Toolkit for Ruby
How to write an MVC framework in Ruby | articles about programming on mkdev
Rack解説 - Rackの構造とRack DSL - Qiita
第23回 Rackとは何か(1)Rackの生まれた背景:Ruby Freaks Lounge|gihyo.jp … 技術評論社
Ruby でベンチマークを取る方法 - Qiita
【ruby小ネタ】$: や File.dirname(FILE) が何なのかさっぱり分からなかった件 - 東京伊勢海老通信