この記事はシスコの有志による Cisco Systems Japan Advent Calendar 2021 1枚目の 11 日目として投稿しています。
2021年版: https://qiita.com/advent-calendar/2021/cisco (<<<)
2021年版(2枚目): https://https://qiita.com/advent-calendar/2021/cisco2
2020年版: https://qiita.com/advent-calendar/2020/cisco
2020年版(2枚目): https://qiita.com/advent-calendar/2020/cisco2
2019年版: https://qiita.com/advent-calendar/2019/cisco
2018年版: https://qiita.com/advent-calendar/2018/cisco
2017年版: https://qiita.com/advent-calendar/2017/cisco
はじめに
pyATS 開発チームに所属する東村(@tahigash3)です。シスコジャパンではなく、シスコカナダで働いております。今回は Cisco が開発しているネットワーク自動化ツール pyATSが提供している機能が多いため、どのようなことができるか理解が難しい部分があるかと思い、今からでも遅くない pyATS ネットワーク自動化入門 として pyATS の知っておくと便利な点や機能を簡単な説明と共に一気にシェアしたいと思います。これだけ見れば、pyATS を知っている感が出せること間違いなしです!w
過去の記事でも pyATS について書いているので、こちらも合わせて参照ください。
- DevNet Sandbox を使って pyATS/XPRESSO を CML2 と始めよう
- pyATS と Python辞書/JSON が楽しくなる Dq(Data Query) を極める!!
- pyATS|Genieの隠れ必殺技Blitzを用いて高速自動化テスト作成
- pyATS/GenieとRobot Framework で簡単にマルチベンダーネットワークをチェックする
また同僚が今年のアドベントカレンダーで書いてくれている記事もあるので、こちらも是非!
pyATS とは?
pyATS とはシスコシステムズが社内向けに開発をしたテスト自動化ツールとなります。現在ではDevNetを通じて外部へ無料ツールとして公開されており、テストに限らずネットワーク自動化を行うにあたって社内外で活用されています。
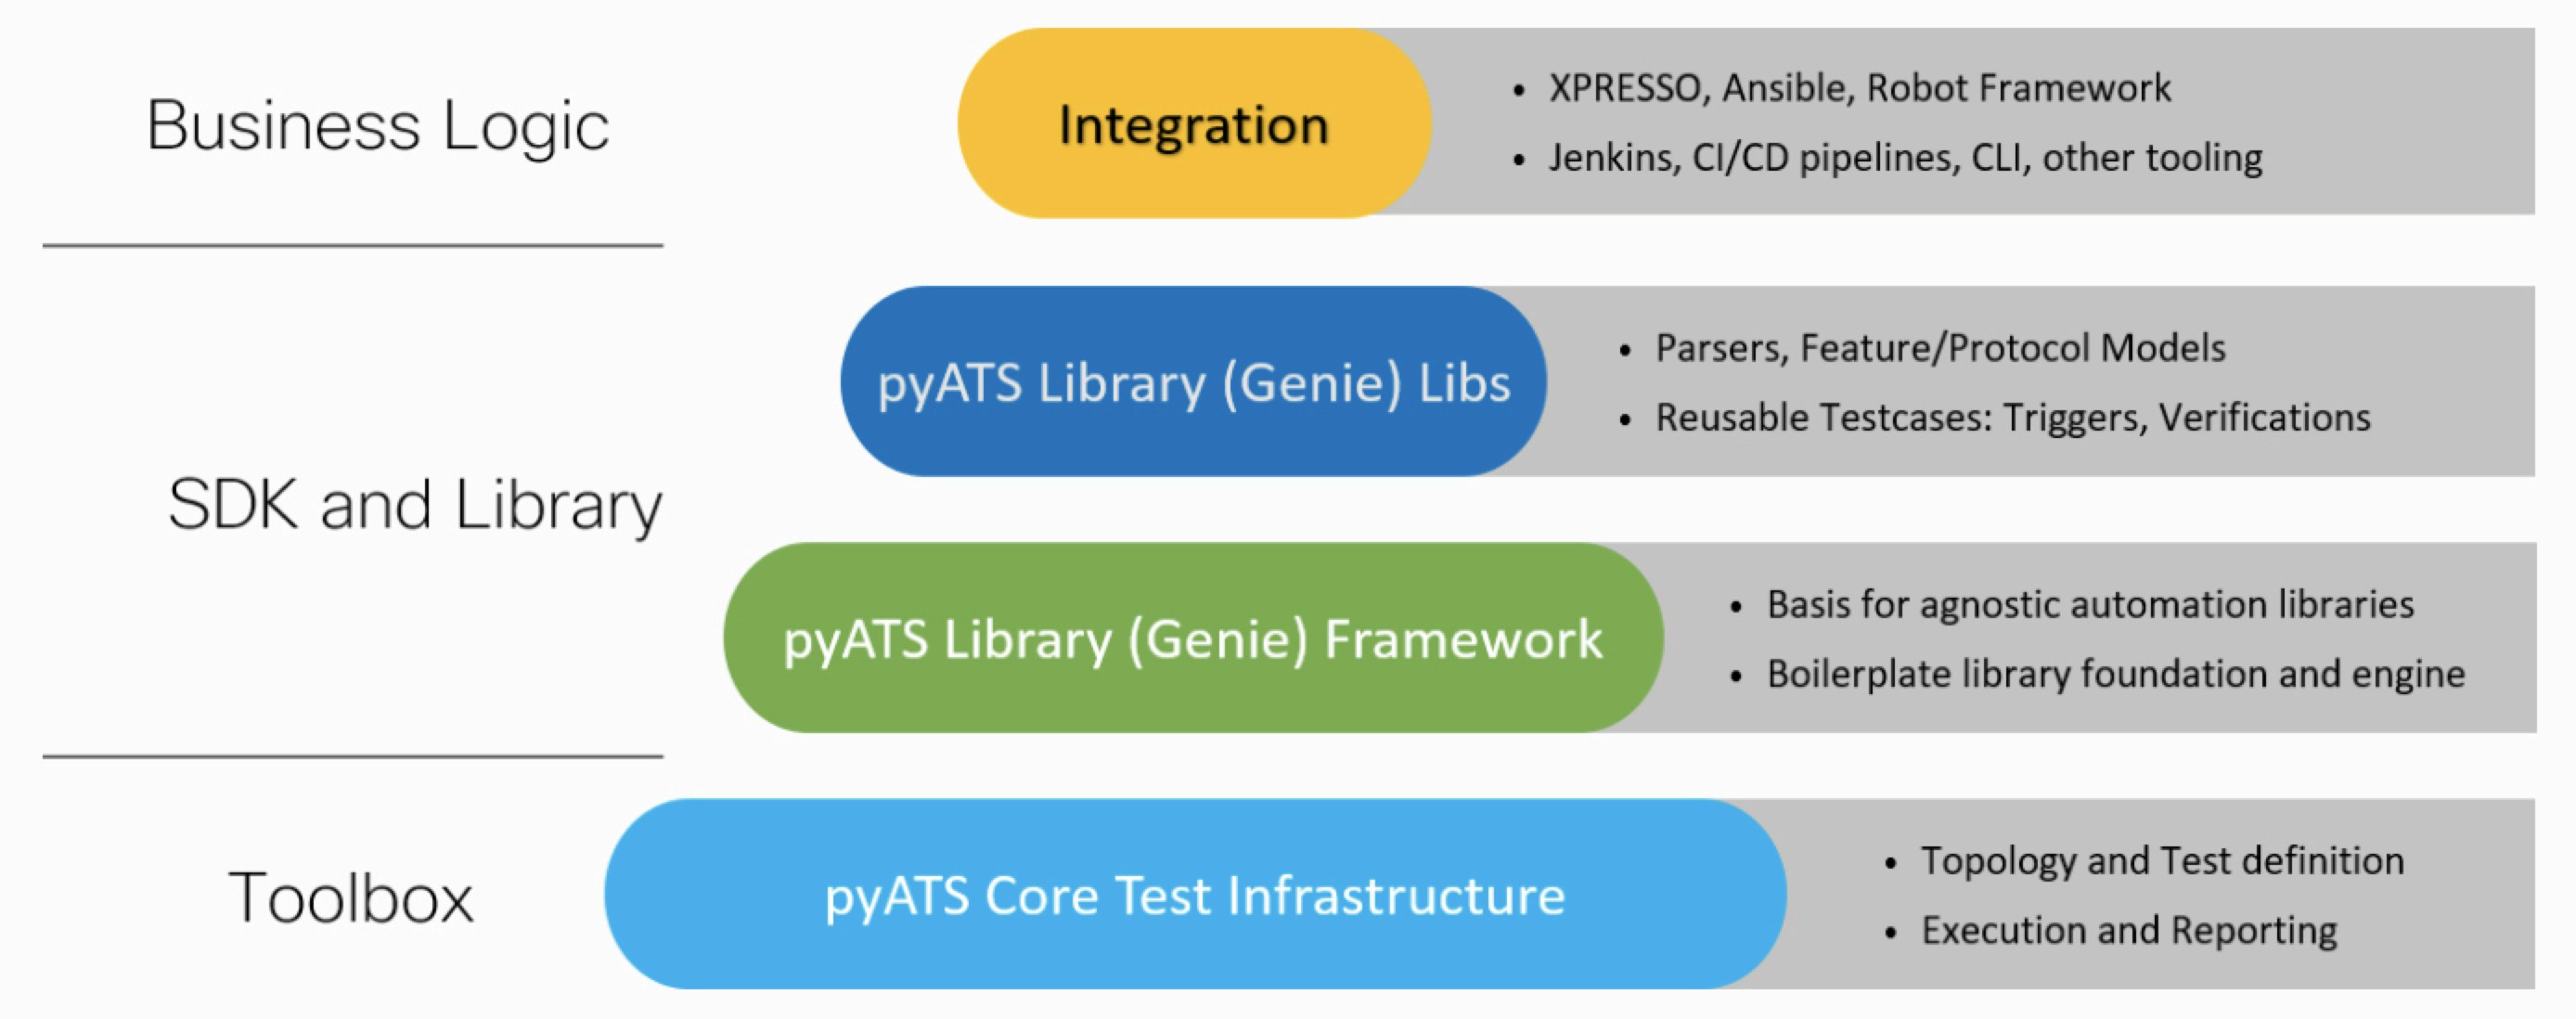
pyATS が自動化のためのフレームワークとなり、その上に Genie という機能ライブラリがあります。ネットワーク機器へ接続するコネクタライブラリは SSH/Telnet では Unicon というものが標準で使われます。
機能ライブラリの多くはオープンソースになっており、GitHub からソースコードを見ることができ、もちろんコードを貢献することもできます。
どのようにインストールできるの?
Python に馴染みがある方であれば簡単です。pip コマンド一発でインストールができます。
(pyats) $pip install 'pyats[full]'
Linux や MacOSX であれば python3(python3.6/3.7/3.8/3.9) がインストールされていれば、ご使用いただけます。
virtualenv を使うことを推奨していますが、使わなくても大丈夫です。
残念ながら Windows はサポートしておりません。下記 Docker イメージか WSL 上でご利用ください。
どのように始めればいいの?
英語になってしまいますが、下記 Getting started ガイドがお勧めです。
とりあえず試したい!という方は私の下記の記事を参考にしていただき、DevNet Sandbox を使って試してみてください。
どこで使用例やサンプルを見つけられるの?
もちろんドキュメントの中でも見つけれられますが、GitHub にレポジトリがあり、こちらから色々な例が見つけられます。
また無料ツールということもあり、パワーユーザーな方がブログで記事にしてくれていたり、YouTube ビデオを作成してくれていたりするので、インターネット上で検索しても情報が見つけられるかと思います。
テストベッドファイル(testbed.yaml)とは?
pyATS で必須となるテストベッドファイルとは、ネットワークの構成情報を記載する YAML ファイルとなります。
自動化を行うには、当然ネットワーク機器へ接続する必要がありますので、接続のためのIPアドレスやポート番号、認証情報(ユーザ名/パスワード)を記載するファイルとなります。
devices:
  R1_xe:
    os: iosxe
    type: router
    platform: csr1000v
    credentials:
      default:
        username: admin
        password: "%ENC{gAAAAABhsqgp4MpDRY-zl7lj4rHxFiLhOB8n-mlCqcY9L5kyzJhMAJuXCh92ITUj-qvo_ui3S24ffrlUbPfZSuFn6cnOkHrb5g==}"
    connections:
      defaults:
        class: unicon.Unicon
        via: cli
      a:
        protocol: telnet
        proxy: terminal_server
        command: open /4cdc95/n0/0
      cli:
        protocol: ssh
        proxy: jumphost
        ip: 192.168.255.173
testbed.yaml や tb.yaml と例で見かけることが多いのですが、ファイル名は任意のもので構いません。また認証情報のパスワードは上記のように暗号化することが可能で、シークレットキーを知っている人しか見れないようにセキュアに保存することが可能です。
テストベッドファイルの全体像は下記からご確認ください。topology セクションでネットワーク機器同士のコネクション情報を持つこともできます。
testbed.yaml
testbed:
  name: TB1 general_xe_xr_nx.virl
devices:
  terminal_server:
    os: linux
    type: linux
    credentials:
      default:
        username: tahigash
        password: "%ENC{gAAAAABhfQwuIPD_jHwrOzloFBOeeI-4M2hxj2TnhniVrSncv2xhWxr9xwOCdu5L9gewpaCNNyTCXFJIKrYWbwkl4-ZAeKqleA==}"
    connections:
      cli:
        protocol: ssh
        ip: 172.25.192.153
  jumphost:
    os: linux
    type: linux
    credentials:
      default:
        username: sysadmin
        password: "%ENC{gAAAAABhfSW6Eu-g6AVVcVm5MDUzf3gujBtXRflkbIjFpEo_Jq3Au8sSX2iGo4exoWv8CznYAF-XwT6NWZBDc-94FMiIZjvuiw==}"
    connections:
      cli:
        protocol: ssh
        ip: 172.25.192.153
        port: 1122
  R1_xe:
    os: iosxe
    type: router
    platform: csr1000v
    credentials:
      default:
        username: admin
        password: "%ENC{gAAAAABhsqgp4MpDRY-zl7lj4rHxFiLhOB8n-mlCqcY9L5kyzJhMAJuXCh92ITUj-qvo_ui3S24ffrlUbPfZSuFn6cnOkHrb5g==}"
    connections:
      defaults:
        class: unicon.Unicon
        via: cli
      a:
        protocol: telnet
        proxy: terminal_server
        command: open /4cdc95/n0/0
      cli:
        protocol: ssh
        proxy: jumphost
        ip: 192.168.255.173
  R2_xr:
    os: iosxr
    type: router
    platform: iosxrv9k
    credentials:
      default:
        username: admin
        password: "%ENC{gAAAAABhsqgp4MpDRY-zl7lj4rHxFiLhOB8n-mlCqcY9L5kyzJhMAJuXCh92ITUj-qvo_ui3S24ffrlUbPfZSuFn6cnOkHrb5g==}"
    connections:
      defaults:
        class: unicon.Unicon
        via: cli
      a:
        protocol: telnet
        proxy: terminal_server
        command: open /4cdc95/n1/0
      cli:
        protocol: ssh
        proxy: jumphost
        ip: 192.168.255.208
  R3_nx:
    os: nxos
    type: switch
    platform: n9k
    credentials:
      default:
        username: admin
        password: "%ENC{gAAAAABhsqgp4MpDRY-zl7lj4rHxFiLhOB8n-mlCqcY9L5kyzJhMAJuXCh92ITUj-qvo_ui3S24ffrlUbPfZSuFn6cnOkHrb5g==}"
    connections:
      defaults:
        class: unicon.Unicon
        via: cli
      a:
        protocol: telnet
        proxy: terminal_server
        command: open /4cdc95/n2/0
      cli:
        protocol: ssh
        proxy: jumphost
        ip: 192.168.255.61
topology:
  R1_xe:
    interfaces:
      GigabitEthernet1:
        link: l12
        type: ethernet
      GigabitEthernet2:
        link: l0
        type: ethernet
      GigabitEthernet3:
        link: l2
        type: ethernet
      GigabitEthernet4:
        link: l3
        type: ethernet
      GigabitEthernet5:
        link: l4
        type: ethernet
      GigabitEthernet6:
        link: l7
        type: ethernet
      GigabitEthernet7:
        link: l8
        type: ethernet
  R2_xr:
    interfaces:
      MgmtEth0/RP0/CPU0/0:
        link: l10
        type: ethernet
      donotuse1:
        type: ethernet
      donotuse2:
        type: ethernet
      GigabitEthernet0/0/0/0:
        link: l0
        type: ethernet
      GigabitEthernet0/0/0/1:
        link: l1
        type: ethernet
      GigabitEthernet0/0/0/2:
        link: l3
        type: ethernet
      GigabitEthernet0/0/0/3:
        link: l4
        type: ethernet
      GigabitEthernet0/0/0/4:
        link: l5
        type: ethernet
      GigabitEthernet0/0/0/5:
        link: l6
        type: ethernet
  R3_nx:
    interfaces:
      mgmt0:
        link: l11
        type: ethernet
      Ethernet1/1:
        link: l1
        type: ethernet
      Ethernet1/2:
        link: l2
        type: ethernet
      Ethernet1/3:
        link: l5
        type: ethernet
      Ethernet1/4:
        link: l6
        type: ethernet
      Ethernet1/5:
        link: l7
        type: ethernet
      Ethernet1/6:
        link: l8
        type: ethernet
ネットワーク機器へ接続するのに踏み台サーバーを使っているのですが。。。
問題ありません。pyATS のテストベッドファイルで proxy フィールドを使って、踏み台サーバーまたは踏み台デバイスを指定することで、指定されたデバイスを踏み台にして対象のネットワーク機器へ接続する事が可能です。上の例のテストベッドファイルでも使っているので、少し戻って見てみて下さい。
pyATSが動いているサーバ又はラップトップ -(ssh)-> 踏み台サーバ -(ssh)-> ネットワーク機器
ターミナルサーバ経由で2段階で認証がかかるのですが。その場合は無理ですよね。。?
もちろん pyATS ではサポートとしています。credentials に2つの認証情報を設定し、コネクション情報の下で login_creds に順番に必要となる認証情報を書くことで、それぞれの認証を使って機器に入るという事が可能になります。
R3_nx:
    os: nxos
    type: switch
    platform: n9k
    credentials:
      ts_cred:
        username: lab
        password: "%ENC{gAAAAABhsqgp4MpDRY-zl7lj4rHxFiLhOB8n-mlCqcY9L5kyzJhMAJuXCh92ITUj-qvo_ui3S24ffrlUbPfZSuFn6cnOkHrb5g==}"
      default:
        username: admin
        password: "%ENC{gAAAAABhsqgp4MpDRY-zl7lj4rHxFiLhOB8n-mlCqcY9L5kyzJhMAJuXCh92ITUj-qvo_ui3S24ffrlUbPfZSuFn6cnOkHrb5g==}"
    connections:
      defaults:
        class: unicon.Unicon
        via: cli
      a:
        protocol: telnet
        proxy: terminal_server
        command: open /4cdc95/n2/0
      cli:
        protocol: ssh
        proxy: jumphost
        ip: 192.168.255.61
        login_creds: [ts_cred, default] # <<<<< ココ
Python 勉強しないと使えないの?
pyATS では Python の知識がなくとも使える方法があります。
1. pyATS CLI を使う
pyats parse 'show ip interface brief' --testbed-file testbed.yaml --device R1_xe といった CLI コマンドで自動的にネットワーク機器へ接続し、ログの取得、show コマンドの出力から生成された構造化データのファイル保存が行えます。また、pyats diff コマンドで構造化データを元に差分チェックまで行うことができます。
実際にユーザー様でバージョンアップや作業前後に pyATS CLI を使って差分チェックを行っていただいていたりするユースケースがあります。
(以前は genie learn と genie コマンドでした。現在も使えますが、pyats コマンドに統一するようにしています。)
pyats parse コマンド出力例
(pyats)$ pyats parse 'show ip interface brief' --testbed-file cml_tb1.yaml --devices R1_xe
  0%|                                                                                                                                                                                                                  | 0/1 [00:00<?, ?it/s]{
  "interface": {
    "GigabitEthernet1": {
      "interface_is_ok": "YES",
      "ip_address": "192.168.255.173",
      "method": "DHCP",
      "protocol": "up",
      "status": "up"
    },
    "GigabitEthernet2": {
      "interface_is_ok": "YES",
      "ip_address": "unassigned",
      "method": "unset",
      "protocol": "up",
      "status": "up"
    },
    "GigabitEthernet2.110": {
      "interface_is_ok": "YES",
      "ip_address": "10.12.110.1",
      "method": "TFTP",
      "protocol": "up",
      "status": "up"
    },
    "GigabitEthernet2.115": {
      "interface_is_ok": "YES",
      "ip_address": "10.12.115.1",
      "method": "TFTP",
      "protocol": "up",
      "status": "up"
    },
    "GigabitEthernet2.120": {
      "interface_is_ok": "YES",
      "ip_address": "10.12.120.1",
      "method": "TFTP",
      "protocol": "up",
      "status": "up"
    },
    "GigabitEthernet2.390": {
      "interface_is_ok": "YES",
      "ip_address": "10.12.90.1",
      "method": "TFTP",
      "protocol": "up",
      "status": "up"
    },
    "GigabitEthernet2.410": {
      "interface_is_ok": "YES",
      "ip_address": "10.12.110.1",
      "method": "TFTP",
      "protocol": "up",
      "status": "up"
    },
    "GigabitEthernet2.415": {
      "interface_is_ok": "YES",
      "ip_address": "10.12.115.1",
      "method": "TFTP",
      "protocol": "up",
      "status": "up"
    },
    "GigabitEthernet2.420": {
      "interface_is_ok": "YES",
      "ip_address": "10.12.120.1",
      "method": "TFTP",
      "protocol": "up",
      "status": "up"
    },
    "GigabitEthernet2.90": {
      "interface_is_ok": "YES",
      "ip_address": "10.12.90.1",
      "method": "TFTP",
      "protocol": "up",
      "status": "up"
    },
    "GigabitEthernet3": {
      "interface_is_ok": "YES",
      "ip_address": "unassigned",
      "method": "unset",
      "protocol": "up",
      "status": "up"
    },
    "GigabitEthernet3.110": {
      "interface_is_ok": "YES",
      "ip_address": "10.13.110.1",
      "method": "TFTP",
      "protocol": "up",
      "status": "up"
    },
    "GigabitEthernet3.115": {
      "interface_is_ok": "YES",
      "ip_address": "10.13.115.1",
      "method": "TFTP",
      "protocol": "up",
      "status": "up"
    },
    "GigabitEthernet3.120": {
      "interface_is_ok": "YES",
      "ip_address": "10.13.120.1",
      "method": "TFTP",
      "protocol": "up",
      "status": "up"
    },
    "GigabitEthernet3.390": {
      "interface_is_ok": "YES",
      "ip_address": "10.13.90.1",
      "method": "TFTP",
      "protocol": "up",
      "status": "up"
    },
    "GigabitEthernet3.410": {
      "interface_is_ok": "YES",
      "ip_address": "10.13.110.1",
      "method": "TFTP",
      "protocol": "up",
      "status": "up"
    },
    "GigabitEthernet3.415": {
      "interface_is_ok": "YES",
      "ip_address": "10.13.115.1",
      "method": "TFTP",
      "protocol": "up",
      "status": "up"
    },
    "GigabitEthernet3.420": {
      "interface_is_ok": "YES",
      "ip_address": "10.13.120.1",
      "method": "TFTP",
      "protocol": "up",
      "status": "up"
    },
    "GigabitEthernet3.90": {
      "interface_is_ok": "YES",
      "ip_address": "10.13.90.1",
      "method": "TFTP",
      "protocol": "up",
      "status": "up"
    },
    "GigabitEthernet4": {
      "interface_is_ok": "YES",
      "ip_address": "unassigned",
      "method": "unset",
      "protocol": "up",
      "status": "up"
    },
    "GigabitEthernet5": {
      "interface_is_ok": "YES",
      "ip_address": "unassigned",
      "method": "unset",
      "protocol": "up",
      "status": "up"
    },
    "GigabitEthernet6": {
      "interface_is_ok": "YES",
      "ip_address": "unassigned",
      "method": "unset",
      "protocol": "up",
      "status": "up"
    },
    "GigabitEthernet7": {
      "interface_is_ok": "YES",
      "ip_address": "unassigned",
      "method": "unset",
      "protocol": "up",
      "status": "up"
    },
    "Loopback0": {
      "interface_is_ok": "YES",
      "ip_address": "1.1.1.1",
      "method": "TFTP",
      "protocol": "up",
      "status": "up"
    },
    "Loopback300": {
      "interface_is_ok": "YES",
      "ip_address": "1.1.1.1",
      "method": "TFTP",
      "protocol": "up",
      "status": "up"
    },
    "Port-channel12": {
      "interface_is_ok": "YES",
      "ip_address": "unassigned",
      "method": "unset",
      "protocol": "down",
      "status": "down"
    },
    "Port-channel13": {
      "interface_is_ok": "YES",
      "ip_address": "unassigned",
      "method": "unset",
      "protocol": "down",
      "status": "down"
    },
    "Tunnel0": {
      "interface_is_ok": "YES",
      "ip_address": "unassigned",
      "method": "unset",
      "protocol": "up",
      "status": "up"
    },
    "Tunnel1": {
      "interface_is_ok": "YES",
      "ip_address": "unassigned",
      "method": "unset",
      "protocol": "up",
      "status": "up"
    },
    "Tunnel2": {
      "interface_is_ok": "YES",
      "ip_address": "1.1.1.1",
      "method": "unset",
      "protocol": "down",
      "status": "up"
    },
    "Tunnel3": {
      "interface_is_ok": "YES",
      "ip_address": "1.1.1.1",
      "method": "unset",
      "protocol": "up",
      "status": "up"
    },
    "Tunnel4": {
      "interface_is_ok": "YES",
      "ip_address": "1.1.1.1",
      "method": "unset",
      "protocol": "up",
      "status": "up"
    },
    "Tunnel5": {
      "interface_is_ok": "YES",
      "ip_address": "1.1.1.1",
      "method": "unset",
      "protocol": "down",
      "status": "up"
    },
    "Tunnel6": {
      "interface_is_ok": "YES",
      "ip_address": "1.1.1.1",
      "method": "unset",
      "protocol": "up",
      "status": "up"
    },
    "Tunnel7": {
      "interface_is_ok": "YES",
      "ip_address": "1.1.1.1",
      "method": "unset",
      "protocol": "up",
      "status": "up"
    },
    "Tunnel8": {
      "interface_is_ok": "YES",
      "ip_address": "unassigned",
      "method": "unset",
      "protocol": "down",
      "status": "up"
    },
    "Tunnel9": {
      "interface_is_ok": "YES",
      "ip_address": "unassigned",
      "method": "unset",
      "protocol": "down",
      "status": "up"
    }
  }
}
100%|██████████████████████████████████████████████████████████████████████████████████████████████████████████████████████████████████████████████████████████████████████████████████████████████████████████| 1/1 [00:01<00:00,  1.77s/it]
2. Blitz YAML で自動化ステップを記載する
YAML フォーマットで自動化ステップを下記にように書ける Blitz という方法が用意されています。
これであれば、Python の知識がなくとも書き方を覚えてしまえば、比較的簡単に自動化ができてしまいます。
variables:
  device: R1_xe
  interfaces:
    - GigabitEthernet2
    - GigabitEthernet3
  description: configured by pyATS

config_interface:
  groups: ["all", "config", "interface"]
  source:
    pkg: genie.libs.sdk
    class: triggers.blitz.blitz.Blitz
  test_sections:
    - default_interfaces:
        - loop:
            loop_variable_name: intfs
            value: "%{variables.interfaces}"
            actions:
              - configure:
                  device: "%{variables.device}"
                  command: |
                    default interface %VARIABLES{intfs}
    - configure_interfaces:
        - loop:
            loop_variable_name: intfs
            value: "%{variables.interfaces}"
            actions:
              - configure:
                  device: "%{variables.device}"
                  command: |
                    interface %VARIABLES{intfs}
                     description %{variables.description}
    - verify_configuration:
        - loop:
            loop_variable_name: intfs
            value: "%{variables.interfaces}"
            actions:
              - parse:
                  device: "%{variables.device}"
                  command: show interfaces description
                  include:
                    - contains("%VARIABLES{intfs}").contains_key_value('description', "%{variables.description}")
上記 Blitz YAML は下記の使用例から抜粋したものになります。詳細は下記を見てみてください。
Blitz 記述のドキュメント↓
Python 知っているので Python で書きたいのですが。
そんなあなたには pyATS を使ってバリバリと Python でネットワーク自動化を書くことができます。
できることの限界は Python で実現できるかどうかです。Python で実現できることは、ほぼ pyATS を使って実現できます。
Python を知っていれば、pyATS を使う必要は無いと思っていますか?はい。使う必要は無いかもしれませんが、pyATS が持つパーサーやライブラリ、機能を活用することでコーディングが遥かに楽になるのは間違いありませんので、ぜひお試しください。
Pythonで書いた場合のコード例
#!/bin/env python

# To get a logger for the script
import logging
import json
# To build the table at the end
from tabulate import tabulate

# Needed for aetest script
from pyats import aetest
from pyats.log.utils import banner

# Genie Imports
from genie.conf import Genie
from genie.abstract import Lookup

# import the genie libs
from genie.libs import ops # noqa

# Get your logger for your script
log = logging.getLogger(__name__)


###################################################################
#                  COMMON SETUP SECTION                           #
###################################################################

class common_setup(aetest.CommonSetup):
    """ Common Setup section """

    # CommonSetup have subsection.
    # You can have 1 to as many subsection as wanted

    # Connect to each device in the testbed
    @aetest.subsection
    def connect(self, testbed):
        genie_testbed = Genie.init(testbed)
        self.parent.parameters['testbed'] = genie_testbed
        device_list = []
        for device in genie_testbed.devices.values():
            log.info(banner(
                "Connect to device '{d}'".format(d=device.name)))
            try:
                device.connect()
            except Exception as e:
                self.failed("Failed to establish connection to '{}'".format(
                    device.name))

            device_list.append(device)

        # Pass list of devices the to testcases
        self.parent.parameters.update(dev=device_list)


###################################################################
#                     TESTCASES SECTION                           #
###################################################################


class BGP_Neighbors_Established(aetest.Testcase):
    """ This is user Testcases section """

    # First test section
    @ aetest.test
    def learn_bgp(self):
        """ Sample test section. Only print """

        self.all_bgp_sessions = {}
        for dev in self.parent.parameters['dev']:
            log.info(banner("Gathering BGP Information from {}".format(
                dev.name)))
            abstract = Lookup.from_device(dev)
            bgp = abstract.ops.bgp.bgp.Bgp(dev)
            bgp.learn()
            if hasattr(bgp, 'info'):
                self.all_bgp_sessions[dev.name] = bgp.info
            else:
                self.failed("Failed to learn BGP info from device %s" % dev.name,
                            goto=['common_cleanup'])

    @ aetest.test
    def check_bgp(self):
        """ Sample test section. Only print """

        failed_dict = {}
        mega_tabular = []
        for device, bgp in self.all_bgp_sessions.items():

            # may need to change based on BGP config
            vrfs_dict = bgp['instance']['default']['vrf']

            for vrf_name, vrf_dict in vrfs_dict.items():

                # If no neighbor for default VRF, then set the neighbors value to {}
                neighbors = vrf_dict.get('neighbor', {})
                for nbr, props in neighbors.items():
                    state = props.get('session_state')
                    if state:
                        tr = []
                        tr.append(vrf_name)
                        tr.append(nbr)
                        tr.append(state)
                        if state.lower() == 'established':
                            tr.append('Passed')
                        else:
                            failed_dict[device] = {}
                            failed_dict[device][nbr] = props
                            tr.append('Failed')

                        mega_tabular.append(tr)

                log.info("Device {d} Table:\n".format(d=device))
                log.info(tabulate(mega_tabular,
                                  headers=['VRF', 'Peer',
                                           'State', 'Pass/Fail'],
                                  tablefmt='orgtbl'))

        if failed_dict:
            log.error(json.dumps(failed_dict, indent=3))
            self.failed("Testbed has BGP Neighbors that are not established")

        else:
            self.passed("All BGP Neighbors are established")

# #####################################################################
# ####                       COMMON CLEANUP SECTION                 ###
# #####################################################################


# This is how to create a CommonCleanup
# You can have 0 , or 1 CommonCleanup.
# CommonCleanup can be named whatever you want :)
class common_cleanup(aetest.CommonCleanup):
    """ Common Cleanup for Sample Test """

    # CommonCleanup follow exactly the same rule as CommonSetup regarding
    # subsection
    # You can have 1 to as many subsections as wanted
    # here is an example of 1 subsection

    @aetest.subsection
    def clean_everything(self):
        """ Common Cleanup Subsection """
        log.info("Aetest Common Cleanup ")


if __name__ == '__main__':  # pragma: no cover
    aetest.main()
Hank Preston の下記の YouTube も Python で pyATS を使う方法を分かりやすく解説してくれているので、こちらも良かったら参照ください。
Python の勉強を初めようと思っているのですが、Pythonを学習してからpyATSをやった方がいいでしょうか。
私自身がネットワークエンジニアからPythonエンジニアに転身したので、非常に分かるのですが、私は pyATS と一緒に Python を学習するのをお勧めします。
ネットワークエンジニアの方がPythonのアルゴリズムなどを書いて試しても楽しいとは思うのですが、普段慣れているネットワーク機器を使って Python が勉強できるなら最高じゃないですか?
前述したテストベッドファイル(testbed.yaml)を作成すれば、pyats shell コマンドでテストベッドファイルを指定することで、python interpreter 上で pyATS の機能を簡単に試すことができます。
(pyats)$ pyats shell --testbed-file testbed.yaml
Welcome to pyATS Interactive Shell
==================================
Python 3.9.6 (default, Jul 29 2021, 21:33:33)
[Clang 12.0.5 (clang-1205.0.22.11)]

>>> from pyats.topology.loader import load
>>> testbed = load('testbed.yaml')
-------------------------------------------------------------------------------
In [1]: device = testbed.devices['R1_xe']
In [2]: device.connect()
(snip)
In [3]: device.parse('show version')
(snip)
In [4]: device.configure(['ntp server 192.168.1.1', 'ntp server 192.168.2.2'])
(snip)
上記のフル出力はこちらからご確認ください
(pyats)$ pyats shell --testbed-file testbed.yaml
Welcome to pyATS Interactive Shell
==================================
Python 3.9.6 (default, Jul 29 2021, 21:33:33)
[Clang 12.0.5 (clang-1205.0.22.11)]

>>> from pyats.topology.loader import load
>>> testbed = load('testbed.yaml')
-------------------------------------------------------------------------------
In [1]: device = testbed.devices['R1_xe']

In [2]: device.connect()

2021-12-09 20:58:04,659: %UNICON-INFO: +++ R1_xe logfile /tmp/R1_xe-cli-20211209T205804659.log +++

2021-12-09 20:58:04,660: %UNICON-INFO: +++ Unicon plugin iosxe/csr1000v +++

2021-12-09 20:58:04,662: %UNICON-INFO: connection via proxy terminal_server

2021-12-09 20:58:04,667: %UNICON-INFO: +++ connection to spawn: ssh -l tahigash 172.25.192.153, id: 4760513216 +++

2021-12-09 20:58:04,668: %UNICON-INFO: connection to terminal_server
tahigash@172.25.192.153's password:

****
CML2 Console Server
Copyright (c) 2020, 2021 Cisco Systems, Inc. and/or its affiliates
****

tab completion works
list available nodes and node labels / IDs with "list"
it's also possible to do a "open /lab_1/n0/0" command

consoles>

2021-12-09 20:58:06,116: %UNICON-INFO: +++ initializing handle +++

2021-12-09 20:58:06,183: %UNICON-INFO: connection to R1_xe
consoles> open /4cdc95/n0/0
Connecting to console for R1_xe
Connected to terminalserver.
Escape character is '^]'.

R1_xe#

2021-12-09 20:58:07,071: %UNICON-INFO: +++ initializing handle +++

2021-12-09 20:58:07,222: %UNICON-INFO: +++ R1_xe with via 'a': executing command 'term length 0' +++
term length 0
R1_xe#

2021-12-09 20:58:07,668: %UNICON-INFO: +++ R1_xe with via 'a': executing command 'term width 0' +++
term width 0
R1_xe#

2021-12-09 20:58:08,067: %UNICON-INFO: +++ R1_xe with via 'a': executing command 'show version' +++
show version
Cisco IOS XE Software, Version 17.03.01a
Cisco IOS Software [Amsterdam], Virtual XE Software (X86_64_LINUX_IOSD-UNIVERSALK9-M), Version 17.3.1a, RELEASE SOFTWARE (fc3)
Technical Support: http://www.cisco.com/techsupport
Copyright (c) 1986-2020 by Cisco Systems, Inc.
Compiled Wed 12-Aug-20 00:16 by mcpre


Cisco IOS-XE software, Copyright (c) 2005-2020 by cisco Systems, Inc.
All rights reserved.  Certain components of Cisco IOS-XE software are
licensed under the GNU General Public License ("GPL") Version 2.0.  The
software code licensed under GPL Version 2.0 is free software that comes
with ABSOLUTELY NO WARRANTY.  You can redistribute and/or modify such
GPL code under the terms of GPL Version 2.0.  For more details, see the
documentation or "License Notice" file accompanying the IOS-XE software,
or the applicable URL provided on the flyer accompanying the IOS-XE
software.


ROM: IOS-XE ROMMON

R1_xe uptime is 5 weeks, 5 days, 16 hours, 1 minute
Uptime for this control processor is 5 weeks, 5 days, 16 hours, 4 minutes
System returned to ROM by reload
System image file is "bootflash:packages.conf"
Last reload reason: factory-reset


This product contains cryptographic features and is subject to United
States and local country laws governing import, export, transfer and
use. Delivery of Cisco cryptographic products does not imply
third-party authority to import, export, distribute or use encryption.
Importers, exporters, distributors and users are responsible for
compliance with U.S. and local country laws. By using this product you
agree to comply with applicable laws and regulations. If you are unable
to comply with U.S. and local laws, return this product immediately.

A summary of U.S. laws governing Cisco cryptographic products may be found at:
http://www.cisco.com/wwl/export/crypto/tool/stqrg.html

If you require further assistance please contact us by sending email to
export@cisco.com.

License Level: ax
License Type: N/A(Smart License Enabled)
Next reload license Level: ax

The current throughput level is 1000 kbps


Smart Licensing Status: UNREGISTERED/No Licenses in Use

cisco CSR1000V (VXE) processor (revision VXE) with 715705K/3075K bytes of memory.
Processor board ID 9I6BNR7U96Y
Router operating mode: Autonomous
7 Gigabit Ethernet interfaces
32768K bytes of non-volatile configuration memory.
3012224K bytes of physical memory.
6188032K bytes of virtual hard disk at bootflash:.

Configuration register is 0x2102

R1_xe#

2021-12-09 20:58:08,837: %UNICON-INFO: +++ R1_xe with via 'a': configure +++
config term
Enter configuration commands, one per line.  End with CNTL/Z.
R1_xe(config)#no logging console
R1_xe(config)#line console 0
R1_xe(config-line)#exec-timeout 0
R1_xe(config-line)#end
R1_xe#
Out[2]: '\rtahigash@172.25.192.153\'s password: \r\n\r\n****\r\nCML2 Console Server\r\nCopyright (c) 2020, 2021 Cisco Systems, Inc. and/or its affiliates\r\n****\r\n\r\ntab completion works\r\nlist available nodes and node labels / IDs with "list"\r\nit\'s also possible to do a "open /lab_1/n0/0" command\r\n\r\n\x1b[J\x1b[2K\rconsoles> \n\x1b[J\x1b[2K\rconsoles> o\x1b[J\x1b[2K\rconsoles> op\x1b[J\x1b[2K\rconsoles> ope\x1b[J\x1b[2K\rconsoles> open\x1b[J\x1b[2K\rconsoles> open \x1b[J\x1b[2K\rconsoles> open /\x1b[J\x1b[2K\rconsoles> open /4\x1b[J\x1b[2K\rconsoles> open /4c\x1b[J\x1b[2K\rconsoles> open /4cd\x1b[J\x1b[2K\rconsoles> open /4cdc\x1b[J\x1b[2K\rconsoles> open /4cdc9\x1b[J\x1b[2K\rconsoles> open /4cdc95\x1b[J\x1b[2K\rconsoles> open /4cdc95/\x1b[J\x1b[2K\rconsoles> open /4cdc95/n\x1b[J\x1b[2K\rconsoles> open /4cdc95/n0\x1b[J\x1b[2K\rconsoles> open /4cdc95/n0/\x1b[J\x1b[2K\rconsoles> open /4cdc95/n0/0\x1b[J\x1b[2K\rconsoles> open /4cdc95/n0/0\x1b[J\x1b[2K\rconsoles> open /4cdc95/n0/0\r\nConnecting to console for R1_xe\r\nConnected to terminalserver.\r\nEscape character is \'^]\'.\r\n\r\nR1_xe#\nterm length 0\r\nR1_xe#\nterm width 0\r\nR1_xe#\nshow version\r\nCisco IOS XE Software, Version 17.03.01a\r\nCisco IOS Software [Amsterdam], Virtual XE Software (X86_64_LINUX_IOSD-UNIVERSALK9-M), Version 17.3.1a, RELEASE SOFTWARE (fc3)\r\nTechnical Support: http://www.cisco.com/techsupport\r\nCopyright (c) 1986-2020 by Cisco Systems, Inc.\r\nCompiled Wed 12-Aug-20 00:16 by mcpre\r\n\r\n\r\nCisco IOS-XE software, Copyright (c) 2005-2020 by cisco Systems, Inc.\r\nAll rights reserved.  Certain components of Cisco IOS-XE software are\r\nlicensed under the GNU General Public License ("GPL") Version 2.0.  The\r\nsoftware code licensed under GPL Version 2.0 is free software that comes\r\nwith ABSOLUTELY NO WARRANTY.  You can redistribute and/or modify such\r\nGPL code under the terms of GPL Version 2.0.  For more details, see the\r\ndocumentation or "License Notice" file accompanying the IOS-XE software,\r\nor the applicable URL provided on the flyer accompanying the IOS-XE\r\nsoftware.\r\n\r\n\r\nROM: IOS-XE ROMMON\r\n\r\nR1_xe uptime is 5 weeks, 5 days, 16 hours, 1 minute\r\nUptime for this control processor is 5 weeks, 5 days, 16 hours, 4 minutes\r\nSystem returned to ROM by reload\r\nSystem image file is "bootflash:packages.conf"\r\nLast reload reason: factory-reset\r\n\r\n\r\n\r\nThis product contains cryptographic features and is subject to United\r\nStates and local country laws governing import, export, transfer and\r\nuse. Delivery of Cisco cryptographic products does not imply\r\nthird-party authority to import, export, distribute or use encryption.\r\nImporters, exporters, distributors and users are responsible for\r\ncompliance with U.S. and local country laws. By using this product you\r\nagree to comply with applicable laws and regulations. If you are unable\r\nto comply with U.S. and local laws, return this product immediately.\r\n\r\nA summary of U.S. laws governing Cisco cryptographic products may be found at:\r\nhttp://www.cisco.com/wwl/export/crypto/tool/stqrg.html\r\n\r\nIf you require further assistance please contact us by sending email to\r\nexport@cisco.com.\r\n\r\nLicense Level: ax\r\nLicense Type: N/A(Smart License Enabled)\r\nNext reload license Level: ax\r\n\r\nThe current throughput level is 1000 kbps \r\n\r\n\r\nSmart Licensing Status: UNREGISTERED/No Licenses in Use\r\n\r\ncisco CSR1000V (VXE) processor (revision VXE) with 715705K/3075K bytes of memory.\r\nProcessor board ID 9I6BNR7U96Y\r\nRouter operating mode: Autonomous\r\n7 Gigabit Ethernet interfaces\r\n32768K bytes of non-volatile configuration memory.\r\n3012224K bytes of physical memory.\r\n6188032K bytes of virtual hard disk at bootflash:.\r\n\r\nConfiguration register is 0x2102\r\n\r\nR1_xe#\nconfig term\r\nEnter configuration commands, one per line.  End with CNTL/Z.\r\nR1_xe(config)#no logging console\r\nR1_xe(config)#line console 0\r\nR1_xe(config-line)#exec-timeout 0\r\nR1_xe(config-line)#end\r\nR1_xe#\n'

In [3]: device.parse('show version')

2021-12-09 20:58:27,946: %UNICON-INFO: +++ R1_xe with via 'a': executing command 'show version' +++
show version
Cisco IOS XE Software, Version 17.03.01a
Cisco IOS Software [Amsterdam], Virtual XE Software (X86_64_LINUX_IOSD-UNIVERSALK9-M), Version 17.3.1a, RELEASE SOFTWARE (fc3)
Technical Support: http://www.cisco.com/techsupport
Copyright (c) 1986-2020 by Cisco Systems, Inc.
Compiled Wed 12-Aug-20 00:16 by mcpre


Cisco IOS-XE software, Copyright (c) 2005-2020 by cisco Systems, Inc.
All rights reserved.  Certain components of Cisco IOS-XE software are
licensed under the GNU General Public License ("GPL") Version 2.0.  The
software code licensed under GPL Version 2.0 is free software that comes
with ABSOLUTELY NO WARRANTY.  You can redistribute and/or modify such
GPL code under the terms of GPL Version 2.0.  For more details, see the
documentation or "License Notice" file accompanying the IOS-XE software,
or the applicable URL provided on the flyer accompanying the IOS-XE
software.


ROM: IOS-XE ROMMON

R1_xe uptime is 5 weeks, 5 days, 16 hours, 1 minute
Uptime for this control processor is 5 weeks, 5 days, 16 hours, 4 minutes
System returned to ROM by reload
System image file is "bootflash:packages.conf"
Last reload reason: factory-reset


This product contains cryptographic features and is subject to United
States and local country laws governing import, export, transfer and
use. Delivery of Cisco cryptographic products does not imply
third-party authority to import, export, distribute or use encryption.
Importers, exporters, distributors and users are responsible for
compliance with U.S. and local country laws. By using this product you
agree to comply with applicable laws and regulations. If you are unable
to comply with U.S. and local laws, return this product immediately.

A summary of U.S. laws governing Cisco cryptographic products may be found at:
http://www.cisco.com/wwl/export/crypto/tool/stqrg.html

If you require further assistance please contact us by sending email to
export@cisco.com.

License Level: ax
License Type: N/A(Smart License Enabled)
Next reload license Level: ax

The current throughput level is 1000 kbps


Smart Licensing Status: UNREGISTERED/No Licenses in Use

cisco CSR1000V (VXE) processor (revision VXE) with 715705K/3075K bytes of memory.
Processor board ID 9I6BNR7U96Y
Router operating mode: Autonomous
7 Gigabit Ethernet interfaces
32768K bytes of non-volatile configuration memory.
3012224K bytes of physical memory.
6188032K bytes of virtual hard disk at bootflash:.

Configuration register is 0x2102

R1_xe#
Out[3]:
{'version': {'xe_version': '17.03.01a',
  'version_short': '17.3',
  'platform': 'Virtual XE',
  'version': '17.3.1a',
  'image_id': 'X86_64_LINUX_IOSD-UNIVERSALK9-M',
  'label': 'RELEASE SOFTWARE (fc3)',
  'os': 'IOS-XE',
  'image_type': 'production image',
  'compiled_date': 'Wed 12-Aug-20 00:16',
  'compiled_by': 'mcpre',
  'rom': 'IOS-XE ROMMON',
  'hostname': 'R1_xe',
  'uptime': '5 weeks, 5 days, 16 hours, 1 minute',
  'uptime_this_cp': '5 weeks, 5 days, 16 hours, 4 minutes',
  'returned_to_rom_by': 'reload',
  'system_image': 'bootflash:packages.conf',
  'last_reload_reason': 'factory-reset',
  'license_level': 'ax',
  'license_type': 'N/A(Smart License Enabled)',
  'next_reload_license_level': 'ax',
  'chassis': 'CSR1000V',
  'main_mem': '715705',
  'processor_type': 'VXE',
  'rtr_type': 'CSR1000V',
  'chassis_sn': '9I6BNR7U96Y',
  'router_operating_mode': 'Autonomous',
  'number_of_intfs': {'Gigabit Ethernet': '7'},
  'mem_size': {'non-volatile configuration': '32768', 'physical': '3012224'},
  'disks': {'bootflash:.': {'disk_size': '6188032',
    'type_of_disk': 'virtual hard disk'}},
  'curr_config_register': '0x2102'}}

In [4]: device.configure(['ntp server 192.168.1.1', 'ntp server 192.168.2.2'])

2021-12-09 20:59:20,807: %UNICON-INFO: +++ R1_xe with via 'a': configure +++
config term
Enter configuration commands, one per line.  End with CNTL/Z.
R1_xe(config)#ntp server 192.168.1.1
R1_xe(config)#ntp server 192.168.2.2
R1_xe(config)#end
R1_xe#
Out[4]: 'ntp server 192.168.1.1\r\nntp server 192.168.2.2\r\n'

In [5]:
device というネットワークデバイスのオブジェクトを基に .connect(), .parse(), .configure() といった pyATS が用意しているメソッドを利用して複雑なPythonコードを書く必要なく、簡単にネットワーク機器を Python から操作することが可能です。
上記のようなシンプルなものから、Python の for や if を組み合わせてループや条件分岐を行ったり、前述の Python で書く pyATS のコードを書く方法を少しずつ試したりすることで、次第に pyATS の知識と共に Python スキルも向上していくと思います。
今年のデブサミ2021夏で下記セッションをさせていただきました。pyATS とどうインフラエンジニアがプログラミングを始めていけるかというのを話をさせていただきましたので、興味のある方はご覧ください。動画はちょっと恥ずかしいのですが、せっかくですので貼っておきますね。XD
pyATS を実行してみました。結果がコンソールに表示されるだけで見た目が寂しいのですが。
下記のような見た目のことですね。。
(pyats)$ pyats run job job.py --testbed-file testbed.yaml
(snip)
2021-12-09T22:34:18: %EASYPY-INFO: +------------------------------------------------------------------------------+
2021-12-09T22:34:18: %EASYPY-INFO: |                                Easypy Report                                 |
2021-12-09T22:34:18: %EASYPY-INFO: +------------------------------------------------------------------------------+
2021-12-09T22:34:18: %EASYPY-INFO: pyATS Instance   : /Users/tahigash/.pyenv/versions/pyats_dev_2110
2021-12-09T22:34:18: %EASYPY-INFO: Python Version   : cpython-3.9.6 (64bit)
2021-12-09T22:34:18: %EASYPY-INFO: CLI Arguments    : /Users/tahigash/.pyenv/versions/pyats_dev_2110/bin/pyats run job job.py --testbed-file /Users/tahigash/.pyenv/versions/3.9.6/envs/pyats_dev_2110/cml_tb1.yaml --health-checks cpu memory logging core
2021-12-09T22:34:18: %EASYPY-INFO: User             : tahigash
2021-12-09T22:34:18: %EASYPY-INFO: Host Server      : TAHIGASH-M-XXXX
2021-12-09T22:34:18: %EASYPY-INFO: Host OS Version  : Mac OSX 11.6.1 (x86_64)
2021-12-09T22:34:18: %EASYPY-INFO:
2021-12-09T22:34:18: %EASYPY-INFO: Job Information
2021-12-09T22:34:18: %EASYPY-INFO:     Name         : job
2021-12-09T22:34:18: %EASYPY-INFO:     Start time   : 2021-12-09 22:32:51.048889
2021-12-09T22:34:18: %EASYPY-INFO:     Stop time    : 2021-12-09 22:34:11.645882
2021-12-09T22:34:18: %EASYPY-INFO:     Elapsed time : 80.596993
2021-12-09T22:34:18: %EASYPY-INFO:     Archive      : /Users/tahigash/.pyenv/versions/pyats_dev_2110/users/tahigash/archive/21-12/job.2021Dec09_22:32:46.535841.zip
2021-12-09T22:34:18: %EASYPY-INFO:
2021-12-09T22:34:18: %EASYPY-INFO: Total Tasks    : 1
2021-12-09T22:34:18: %EASYPY-INFO:
2021-12-09T22:34:18: %EASYPY-INFO: Overall Stats
2021-12-09T22:34:18: %EASYPY-INFO:     Passed     : 3
2021-12-09T22:34:18: %EASYPY-INFO:     Passx      : 0
2021-12-09T22:34:18: %EASYPY-INFO:     Failed     : 0
2021-12-09T22:34:18: %EASYPY-INFO:     Aborted    : 0
2021-12-09T22:34:18: %EASYPY-INFO:     Blocked    : 0
2021-12-09T22:34:18: %EASYPY-INFO:     Skipped    : 0
2021-12-09T22:34:18: %EASYPY-INFO:     Errored    : 0
2021-12-09T22:34:18: %EASYPY-INFO:
2021-12-09T22:34:18: %EASYPY-INFO:     TOTAL      : 3
2021-12-09T22:34:18: %EASYPY-INFO:
2021-12-09T22:34:18: %EASYPY-INFO: Success Rate   : 100.00 %
2021-12-09T22:34:18: %EASYPY-INFO:
2021-12-09T22:34:18: %EASYPY-INFO: +------------------------------------------------------------------------------+
2021-12-09T22:34:18: %EASYPY-INFO: |                             Task Result Summary                              |
2021-12-09T22:34:18: %EASYPY-INFO: +------------------------------------------------------------------------------+
2021-12-09T22:34:18: %EASYPY-INFO: Task-1: genie_testscript.common_setup                                     PASSED
2021-12-09T22:34:18: %EASYPY-INFO: Task-1: genie_testscript.config_interface.R1_xe                           PASSED
2021-12-09T22:34:18: %EASYPY-INFO: Task-1: genie_testscript.common_cleanup                                   PASSED
2021-12-09T22:34:18: %EASYPY-INFO:
2021-12-09T22:34:18: %EASYPY-INFO: +------------------------------------------------------------------------------+
2021-12-09T22:34:18: %EASYPY-INFO: |                             Task Result Details                              |
2021-12-09T22:34:18: %EASYPY-INFO: +------------------------------------------------------------------------------+
2021-12-09T22:34:18: %EASYPY-INFO: Task-1: genie_testscript
2021-12-09T22:34:18: %EASYPY-INFO: |-- common_setup                                                          PASSED
2021-12-09T22:34:18: %EASYPY-INFO: |   `-- connect                                                           PASSED
2021-12-09T22:34:18: %EASYPY-INFO: |-- config_interface.R1_xe                                                PASSED
2021-12-09T22:34:18: %EASYPY-INFO: |   |-- PreProcessor-1                                                    PASSED
2021-12-09T22:34:18: %EASYPY-INFO: |   |-- default_interfaces                                                PASSED
2021-12-09T22:34:18: %EASYPY-INFO: |   |   |-- STEP 1: Executing actions in a loop                           PASSED
2021-12-09T22:34:18: %EASYPY-INFO: |   |   |-- STEP 1.1: Starting action configure on device 'R1_xe'         PASSED
2021-12-09T22:34:18: %EASYPY-INFO: |   |   |-- STEP 1.1.1: Configuring 'R1_xe'                               PASSED
2021-12-09T22:34:18: %EASYPY-INFO: |   |   |-- STEP 1.2: Starting action configure on device 'R1_xe'         PASSED
2021-12-09T22:34:18: %EASYPY-INFO: |   |   `-- STEP 1.2.1: Configuring 'R1_xe'                               PASSED
2021-12-09T22:34:18: %EASYPY-INFO: |   |-- configure_interfaces                                              PASSED
2021-12-09T22:34:18: %EASYPY-INFO: |   |   |-- STEP 1: Executing actions in a loop                           PASSED
2021-12-09T22:34:18: %EASYPY-INFO: |   |   |-- STEP 1.1: Starting action configure on device 'R1_xe'         PASSED
2021-12-09T22:34:18: %EASYPY-INFO: |   |   |-- STEP 1.1.1: Configuring 'R1_xe'                               PASSED
2021-12-09T22:34:18: %EASYPY-INFO: |   |   |-- STEP 1.2: Starting action configure on device 'R1_xe'         PASSED
2021-12-09T22:34:18: %EASYPY-INFO: |   |   `-- STEP 1.2.1: Configuring 'R1_xe'                               PASSED
2021-12-09T22:34:18: %EASYPY-INFO: |   |-- verify_configuration                                              PASSED
2021-12-09T22:34:18: %EASYPY-INFO: |   |   |-- STEP 1: Executing actions in a loop                           PASSED
2021-12-09T22:34:18: %EASYPY-INFO: |   |   |-- STEP 1.1: Starting action parse on device 'R1_xe'             PASSED
2021-12-09T22:34:18: %EASYPY-INFO: |   |   |-- STEP 1.1.1: Parsing 'show interfaces description' on 'R...    PASSED
2021-12-09T22:34:18: %EASYPY-INFO: |   |   |-- STEP 1.1.1.1: Verify that 'contains("GigabitEthernet2")...    PASSED
2021-12-09T22:34:18: %EASYPY-INFO: |   |   |-- STEP 1.2: Starting action parse on device 'R1_xe'             PASSED
2021-12-09T22:34:18: %EASYPY-INFO: |   |   |-- STEP 1.2.1: Parsing 'show interfaces description' on 'R...    PASSED
2021-12-09T22:34:18: %EASYPY-INFO: |   |   `-- STEP 1.2.1.1: Verify that 'contains("GigabitEthernet3")...    PASSED
2021-12-09T22:34:18: %EASYPY-INFO: |   |-- PostContextProcessor-3                                            PASSED
2021-12-09T22:34:18: %EASYPY-INFO: |   |-- PostContextProcessor-4                                            PASSED
2021-12-09T22:34:18: %EASYPY-INFO: |   |-- PostContextProcessor-5                                            PASSED
2021-12-09T22:34:18: %EASYPY-INFO: |   |-- PostContextProcessor-6                                            PASSED
2021-12-09T22:34:18: %EASYPY-INFO: |   `-- PostProcessor-1                                                   PASSED
2021-12-09T22:34:18: %EASYPY-INFO: `-- common_cleanup                                                        PASSED
2021-12-09T22:34:18: %EASYPY-INFO: Sending report email...
2021-12-09T22:34:20: %EASYPY-INFO: Done!
(snip)
私のようなCLI好きの方のためにコンソールで見れるようになっております。
というのは冗談として、もちろん pyATS はログビューワーを備えております。
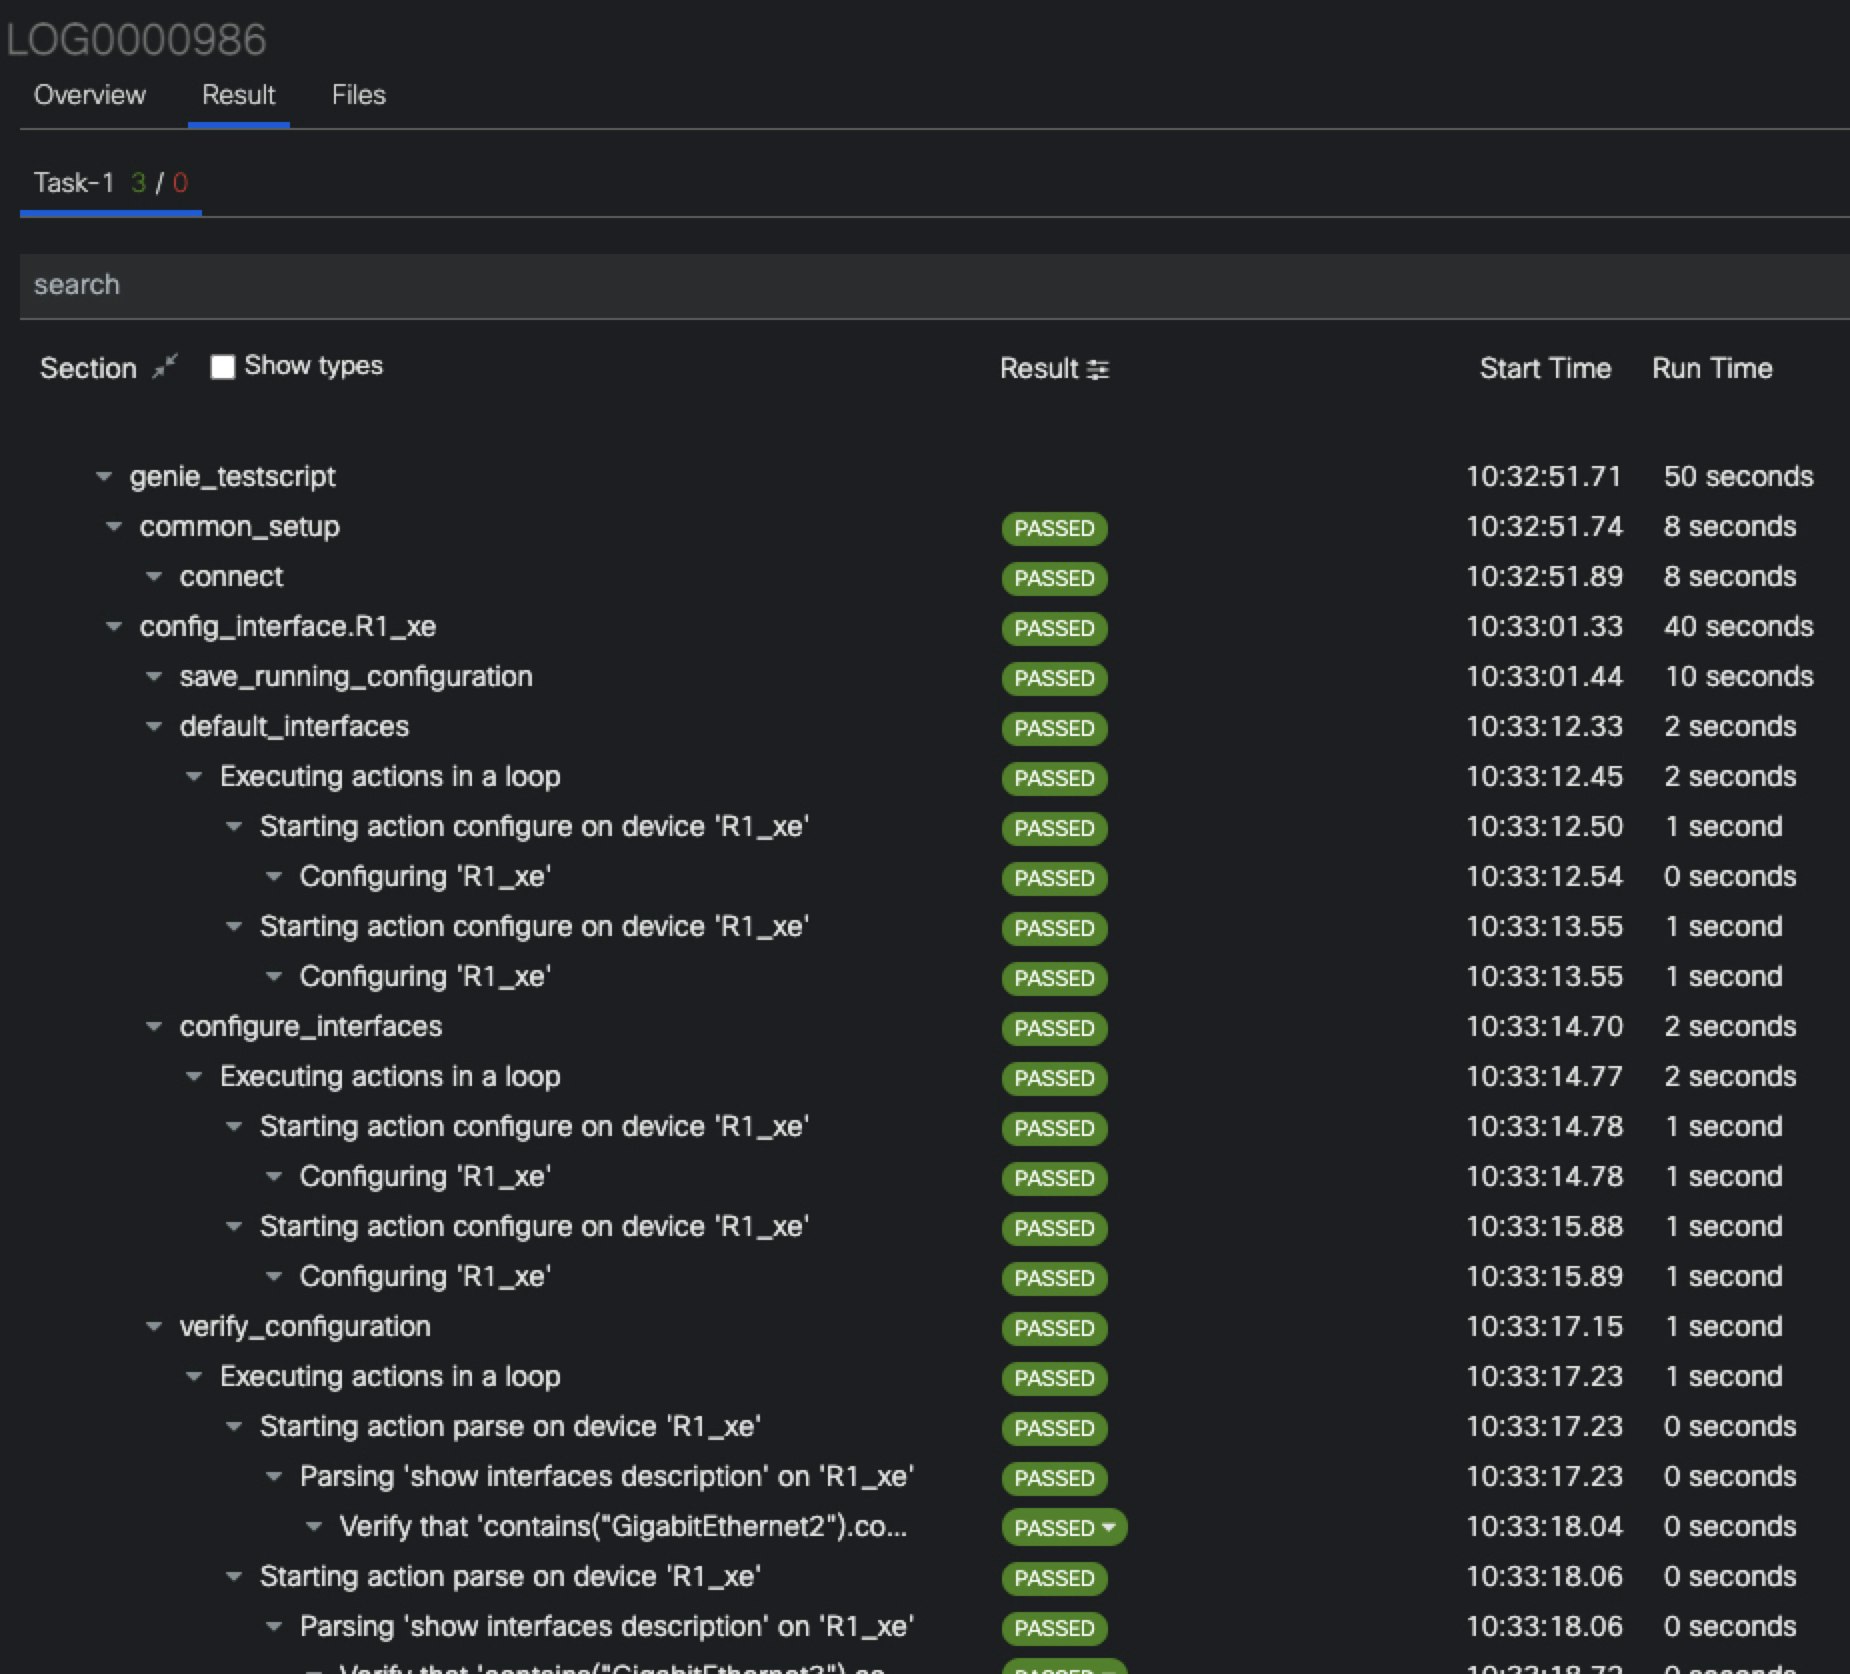
pyats logs view と入力していただくと、自動的にブラウザ上にログの一覧が表示されるので、該当するログ(主にタイムスタンプから)をクリックしていただくと、綺麗なGUIでログが確認できます。
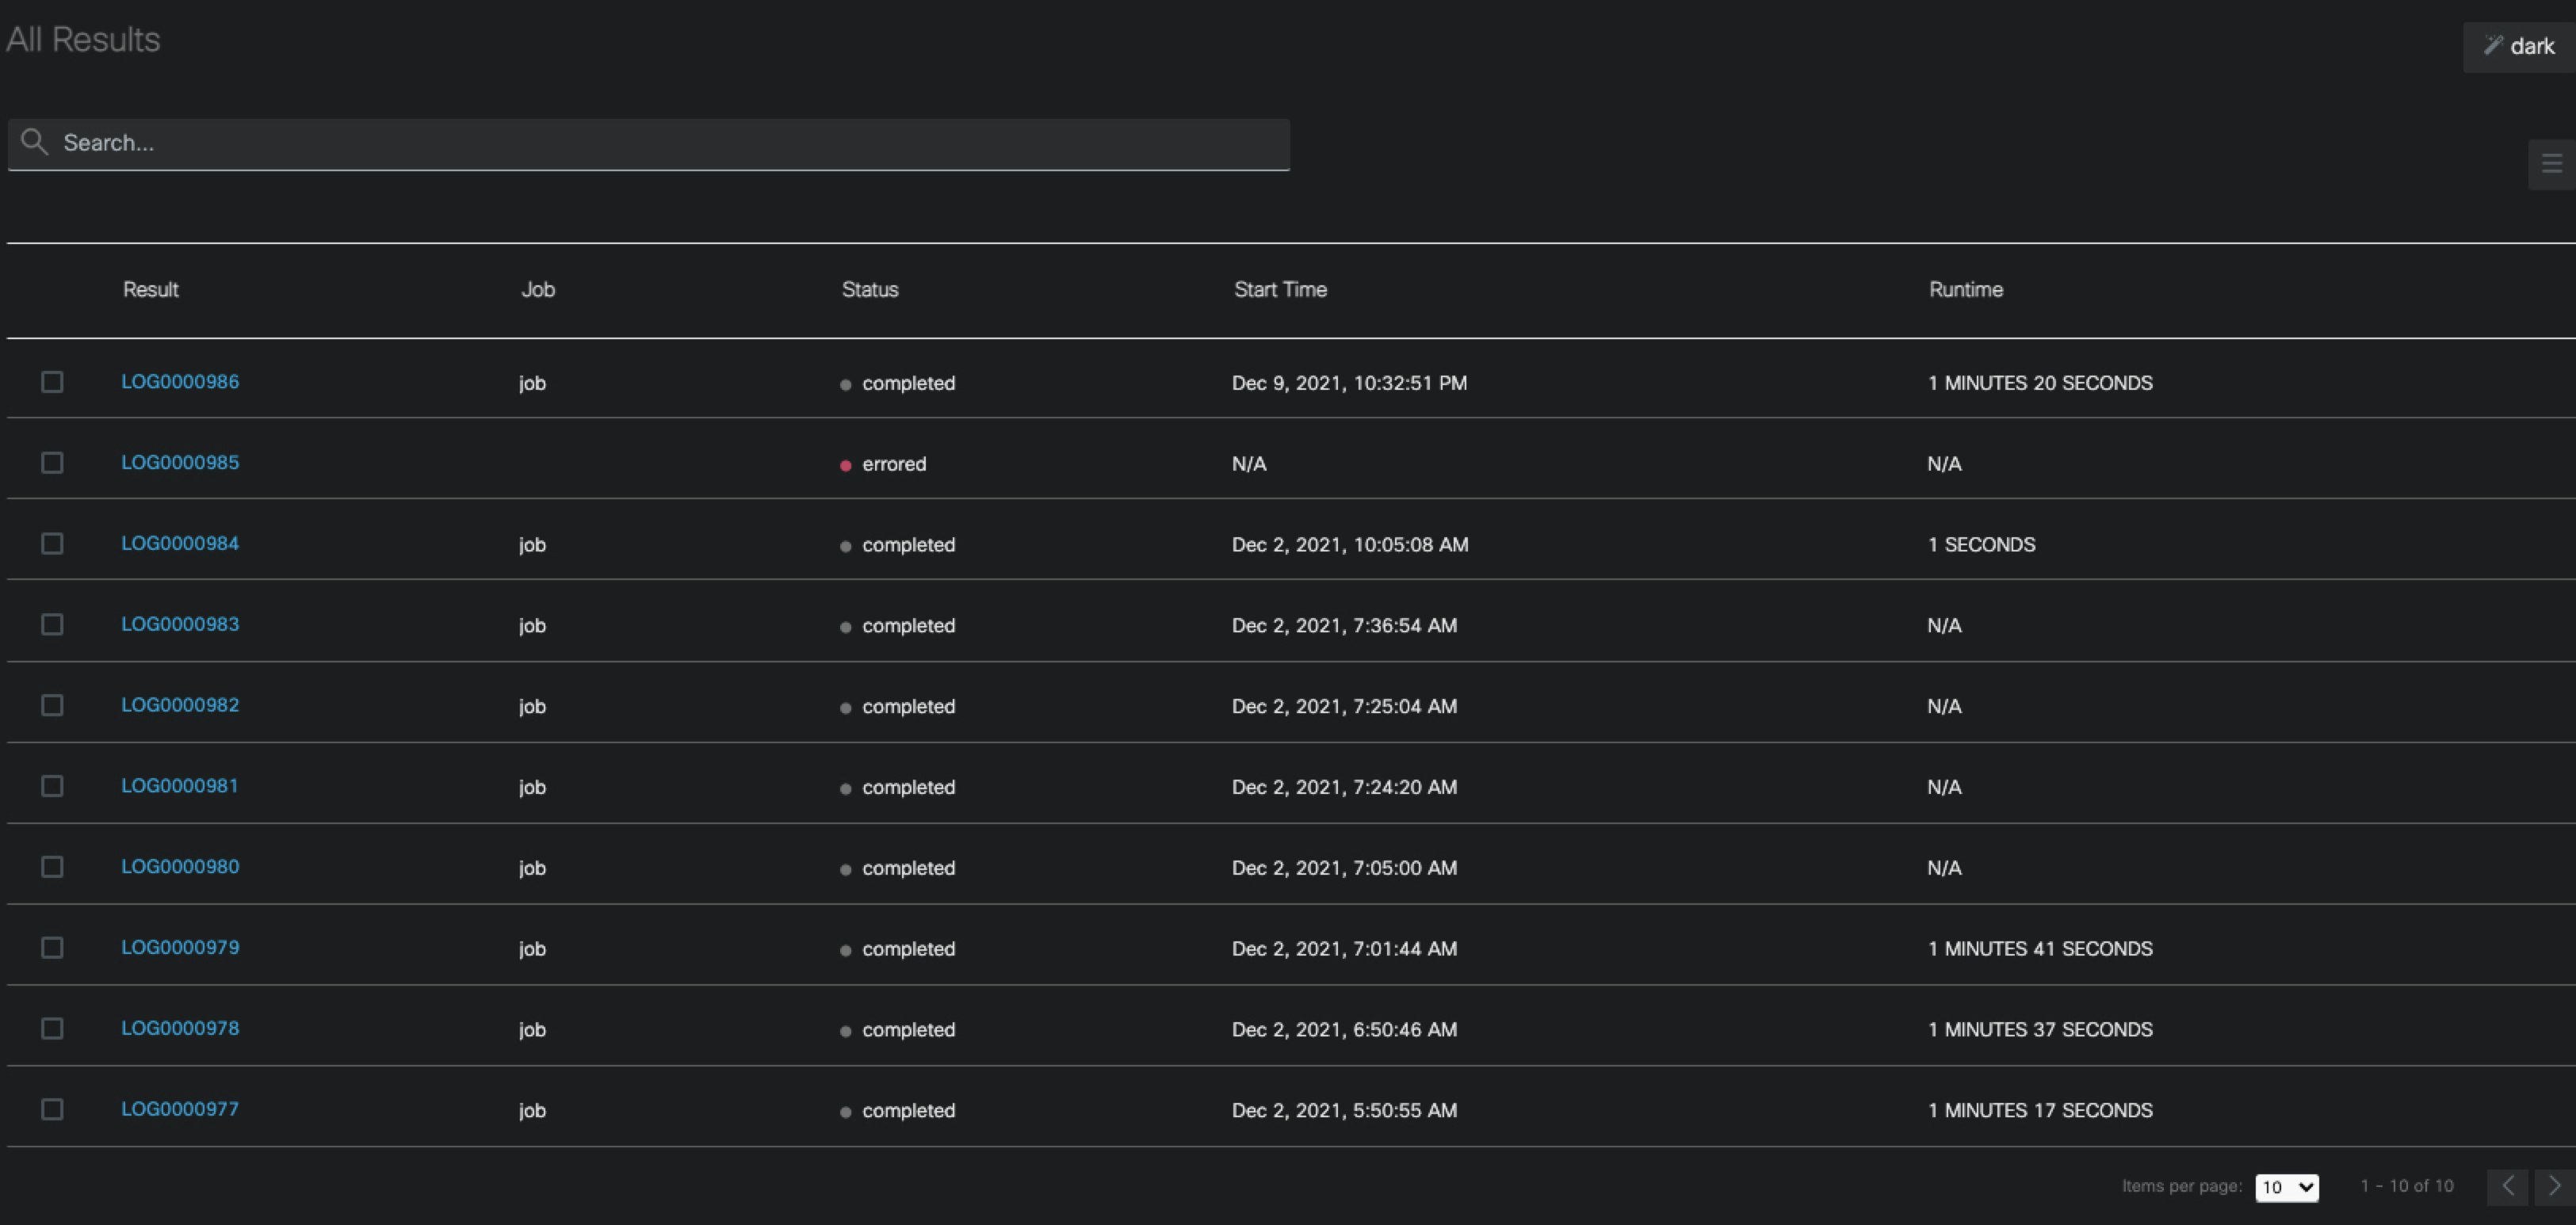
上の画像のように最新バージョンでは、ダークモードが採用されています。
自動化ジョブの定期実行やテストベッドの管理をしたいのですが。
定期実行は cron で行い、テストベッドの管理は YAML をフォルダ分けして。。
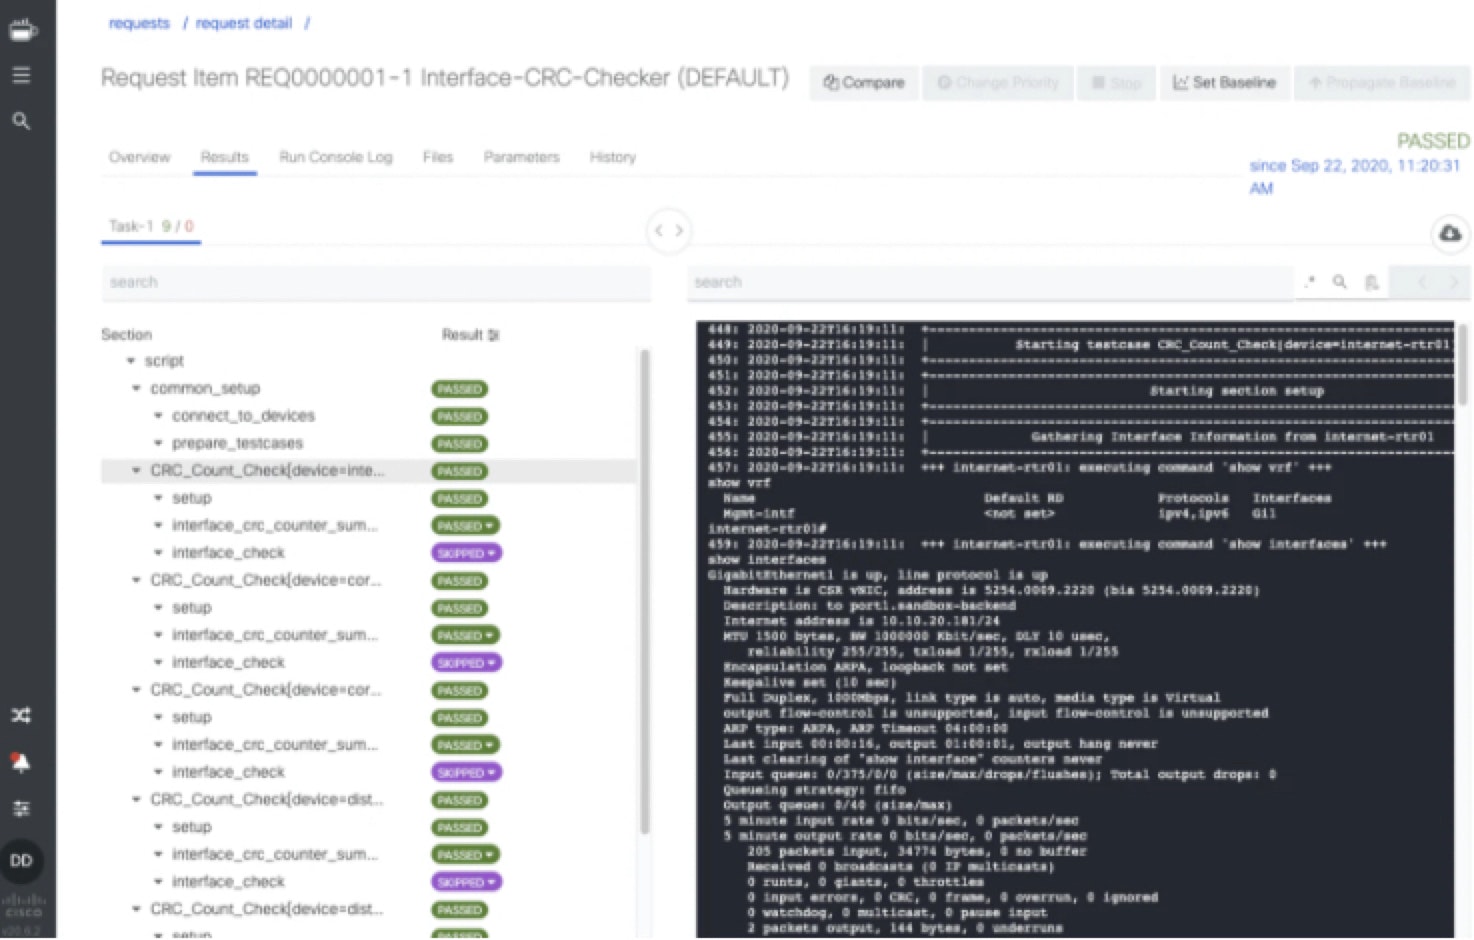
なんて事でも回避は可能かもしれませんが、pyATS Dashboard (XPRESSO) があります!
見た目は pyats logs view に似ていますが、下記のような機能を持っています。
- pyATS Job ファイルの実行及び結果の表示
- Job のプロファイル作成(同一Jobに対して異なる条件での実行を定義できる)
- 実行Python環境の切替
- Jenkins or Docker での pyATS Job 実行
- テストベッド環境のマネージメント及キューイング(Job実行時は使用中となり、他のJobが該当テストベッドを使えない)
- Job のスケジュール実行
- ユーザ/グループによるアクセス権限
- XPRESSO REST API (pyATS Job 実行結果、テストベッド情報の取得など)
- 実行結果間での差分表示(Diff)
こんなに機能があっても無料!ほんと赤字ですよ。。。というのは冗談で社内のテストで使っているものを外部向けに提供しているだけなので、全く赤字でありません。
Cisco社内でも活用され、外部でも活用されれば本当に嬉しい限りです。
ラボの機器が接続できない状態だったりして、自動化がうまく動かない場合があるのですが。
分かります。。。例えば、同僚がコンソールを使っていて、解放し忘れていて占有されたままになっているとか。。
誰かがイメージを誤って削除してしまい、bootflash: にイメージが無く rommon モードになってしまっているとか。。。
そんな方に朗報です!pyATS Clean という機能があります。pyATS Clean は自動化テストの前に行われ、下記のようなことを行ってくれます。
- 指定したイメージをリモートサーバから読み込んで機器を起動
- 接続できない場合には、ターミナルサーバコネクションの切断
- さらに接続できない場合(rommonなど)は、パワーサイクラー(電源OFF/ON)を使ってネットワーク機器の再起動
デバイスを意図しない状態からリカバリーする時のフロー図↓

pyATS Clean を使って、ターミナルサーバセッションのクリア、機器の電源ON/OFFを行うには、下記のようにターミナルサーバおよびパワーサイクラーの追加情報を testbed.yaml に記載する必要がありますが、これができるとマニュアルでやっている機器の復旧を自動でできると思うと非常に便利じゃないですか?
pyATS Clean を使うとラボ機器で検証作業の自動化を行う際に、毎回ラボの機器のセットアップまで自動化する事ができるようになり、同じ状況下で試験ができるようになります。
(snip)
    peripherals:
      terminal_server:
        the-terminal-server: [41]
      power_cycler:
        type: dualcomm
        connection_type: snmp
        host: yaml
        read_community: public
        write_community: public
        outlets: [1, 2]
(snip)
pyATS Clean の手順自体は YAML で書けるようになっています。
clean.yamlの中身はこんな感じ
cleaners:
  DeviceClean:
    module: genie.libs.clean
    devices: [asr1000]

devices:
  asr1000:
    images:
      - /auto/release/path/vmlinux.bin

    device_recovery:
      break_count: 5
      console_activity_pattern: "\\.\\.\\.\\."
      timeout: 600
      recovery_password: "%ENC{w5zDmsOD}"
      golden_image:
        - bootflash:/golden_image.bin

    connect:

    ping_server:
      server: the-tftp-server
      vrf: Mgmt-intf

    copy_to_linux:
      destination:
        directory: /auto/path/images/
      overwrite: True
      copy_attempts: 3
      append_hostname: True

    copy_to_device:
      origin:
        hostname: the-tftp-server
      destination:
        directory: 'harddisk:/'
      protocol: ftp
      overwrite: True
      verify_num_images: False
      check_file_stability: True
      min_free_space_percent: 50

    change_boot_variable:

    write_erase:

    reload:

    apply_configuration:
      configuration: |
        hostname asr1000
        enable password banana
        interface GigabitEthernet0
          ip address X.X.X.X 255.255.255.0
          no shut
        line console 0
          exec-timeout 0 0
          logging synchronous
        line vty 0 4
          password lab
      config_timeout: 30
      config_stable_time: 120

    verify_running_image:

    order:
      - 'connect'
      - 'ping_server'
      - 'copy_to_linux'
      - 'copy_to_device'
      - 'change_boot_variable'
      - 'write_erase'
      - 'reload'
      - 'apply_configuration'
      - 'verify_running_image'
pyATS Clean のドキュメント↓
pyATS Clean のサンプル例↓
テスト自動化中の機器の状況をチェックしたいのですが。簡単にできますか?
では pyATS Health Check の出番ですね。2021 年に追加された新機能です。
なんと! pyats run job コマンドに --health-checks cpu memory logging core と追加するだけ!
コマンド例:
(pyats)$ pyats run job job.py --testbed-file testbed.yaml --health-checks cpu memory logging core
事前定義された情報によって、下記のような情報をチェックしてくれます。
| チェック | 内容 |
|---|---|
| cpu | CPU 使用率の平均値 90%以下 |
| memory | Memory 使用率の平均値 90%以下 |
| logging | Traceback 出力の有無 |
| core | Core ファイル生成の有無 |
CPU/Memoryチェックの閾値を超えた場合や、traceback や core ファイルが検知された場合は該当のテスト項目は FAILED とマークされるため、異変が起きた事に気付く事ができ、Traceback や Core ファイルは調査/解析のために Cisco TAC へ送付するのにも使えます。
traceback とは機器が意図しない状況になった際に出力されるログ
core は機器上のプロセスが意図しない状況下でプロセスがクラッシュした際などに生成されるファイル
logging は show logging をチェックしており、ログの検知パターンは変更可能です。
core はデフォルトで core ファイル生成有無の検出のみですが、追加オプションで検出と同時にリモートサーバへ保存する事も可能です。
また、--health-checks の事前定義されたチェックではなく、pyATS Clean のようにカスタマイズした Health Check を作成して実行することも可能です。
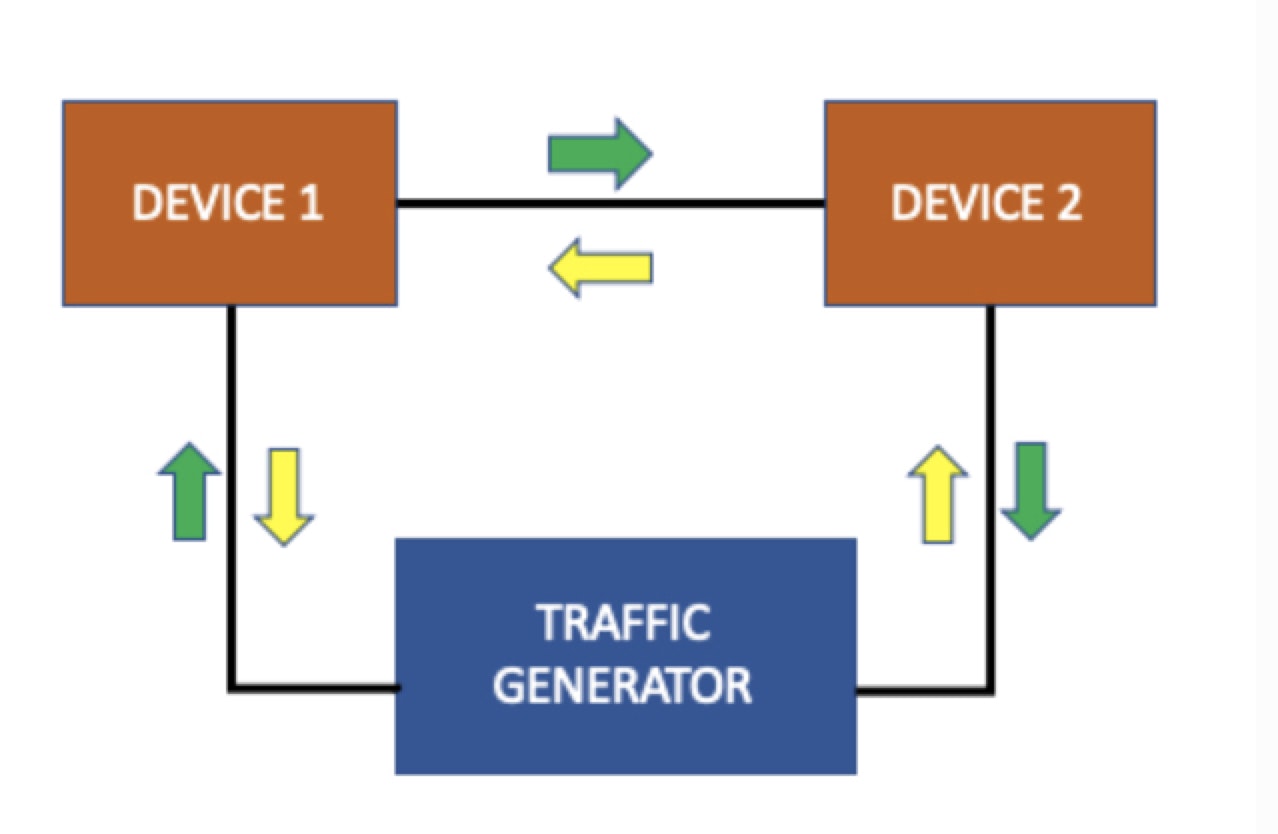
トラフィックジェネレータを使ったネットワーク自動化のテストを行えますか?
トラフィックジェネレータですか。。。いえいえ、もちろんできますよ!
genie.trafficgen というライブラリで可能になっております。しかしながら、事実上サポートしているのは、IXIA のみとなっております。
Pythonから使う場合の例↓
# Import loader
>> from genie.testbed import load

# Load testbed YAML containing Ixia device
>> testbed = load('/path/to/testbed_with_tgn.yaml')

>>> testbed
<Testbed object 'GENIE-TESTBED1' at 0x7fcddcfbe390>

# Specify the Ixia
>> dev = testbed.devices['IXIA']

# Device with name 'IXIA' selected from testbed YAML
>>> dev
<Device IXIA at 0x7fcde02e0ac8>

# Connect to Ixia
>>> dev.connect(via='tgn')
+===========================================+
| Ixia Chassis Details                      |
+===========================================+
| IxNetwork API Server: 172.25.195.91       |
|-------------------------------------------|
| IxNetwork API Server Platform: Windows    |
|-------------------------------------------|
| IxNetwork Version: 8.10                   |
|-------------------------------------------|
| Ixia Chassis: 172.27.101.96               |
|-------------------------------------------|
| Ixia License Server: 172.27.101.96        |
|-------------------------------------------|
| Ixnetwork TCL Port: 8012                  |
|-------------------------------------------|

+------------------------------------------------------------------------------+
|                              Connecting to IXIA                              |
+------------------------------------------------------------------------------+
WARNING: IxNetwork Python library version 9.00.1915.16 is not matching the IxNetwork client version 8.10.1046.6
Connected to IxNetwork API server on TCL port '8012'
できることとしては下記のようなものがあります。
- トラフィックの開始/停止
- プロトコルの開始/停止
- 統計のクリア
- トラフィックロスのチェック (閾値設定可能)
- パケットキャプチャの開始/停止/保存
- 転送レート、パケットサイズの変更
- などなど。
genie.trafficgen のドキュメント↓
IXIA は Keysight Technologies Inc. の製品です。
実はドキュメントがまだ用意されていないのですが、Trex(Ciscoが開発/提供しているトラフィックジェネレータ)用のコードが存在します。まだ pyATS 経由ではIXIAの方ができることが多いのですがPythonコードが読めるパワーユーザーは下記 GitHub からコードが確認できます。
genie.trafficgen TRex の実装コード↓
pyATS を CML2 上のデバイスに対して実行できますか?
何回も紹介して恐縮ですが、下記私の過去記事では CML2 上のデバイスへアクセスしている例となるため、問題ありません。
また、CML2 は標準で pyATS のテストベッドが生成できる API が用意されているので、そういう意味でも CML2 との親和性は高いと言えるかと思います。
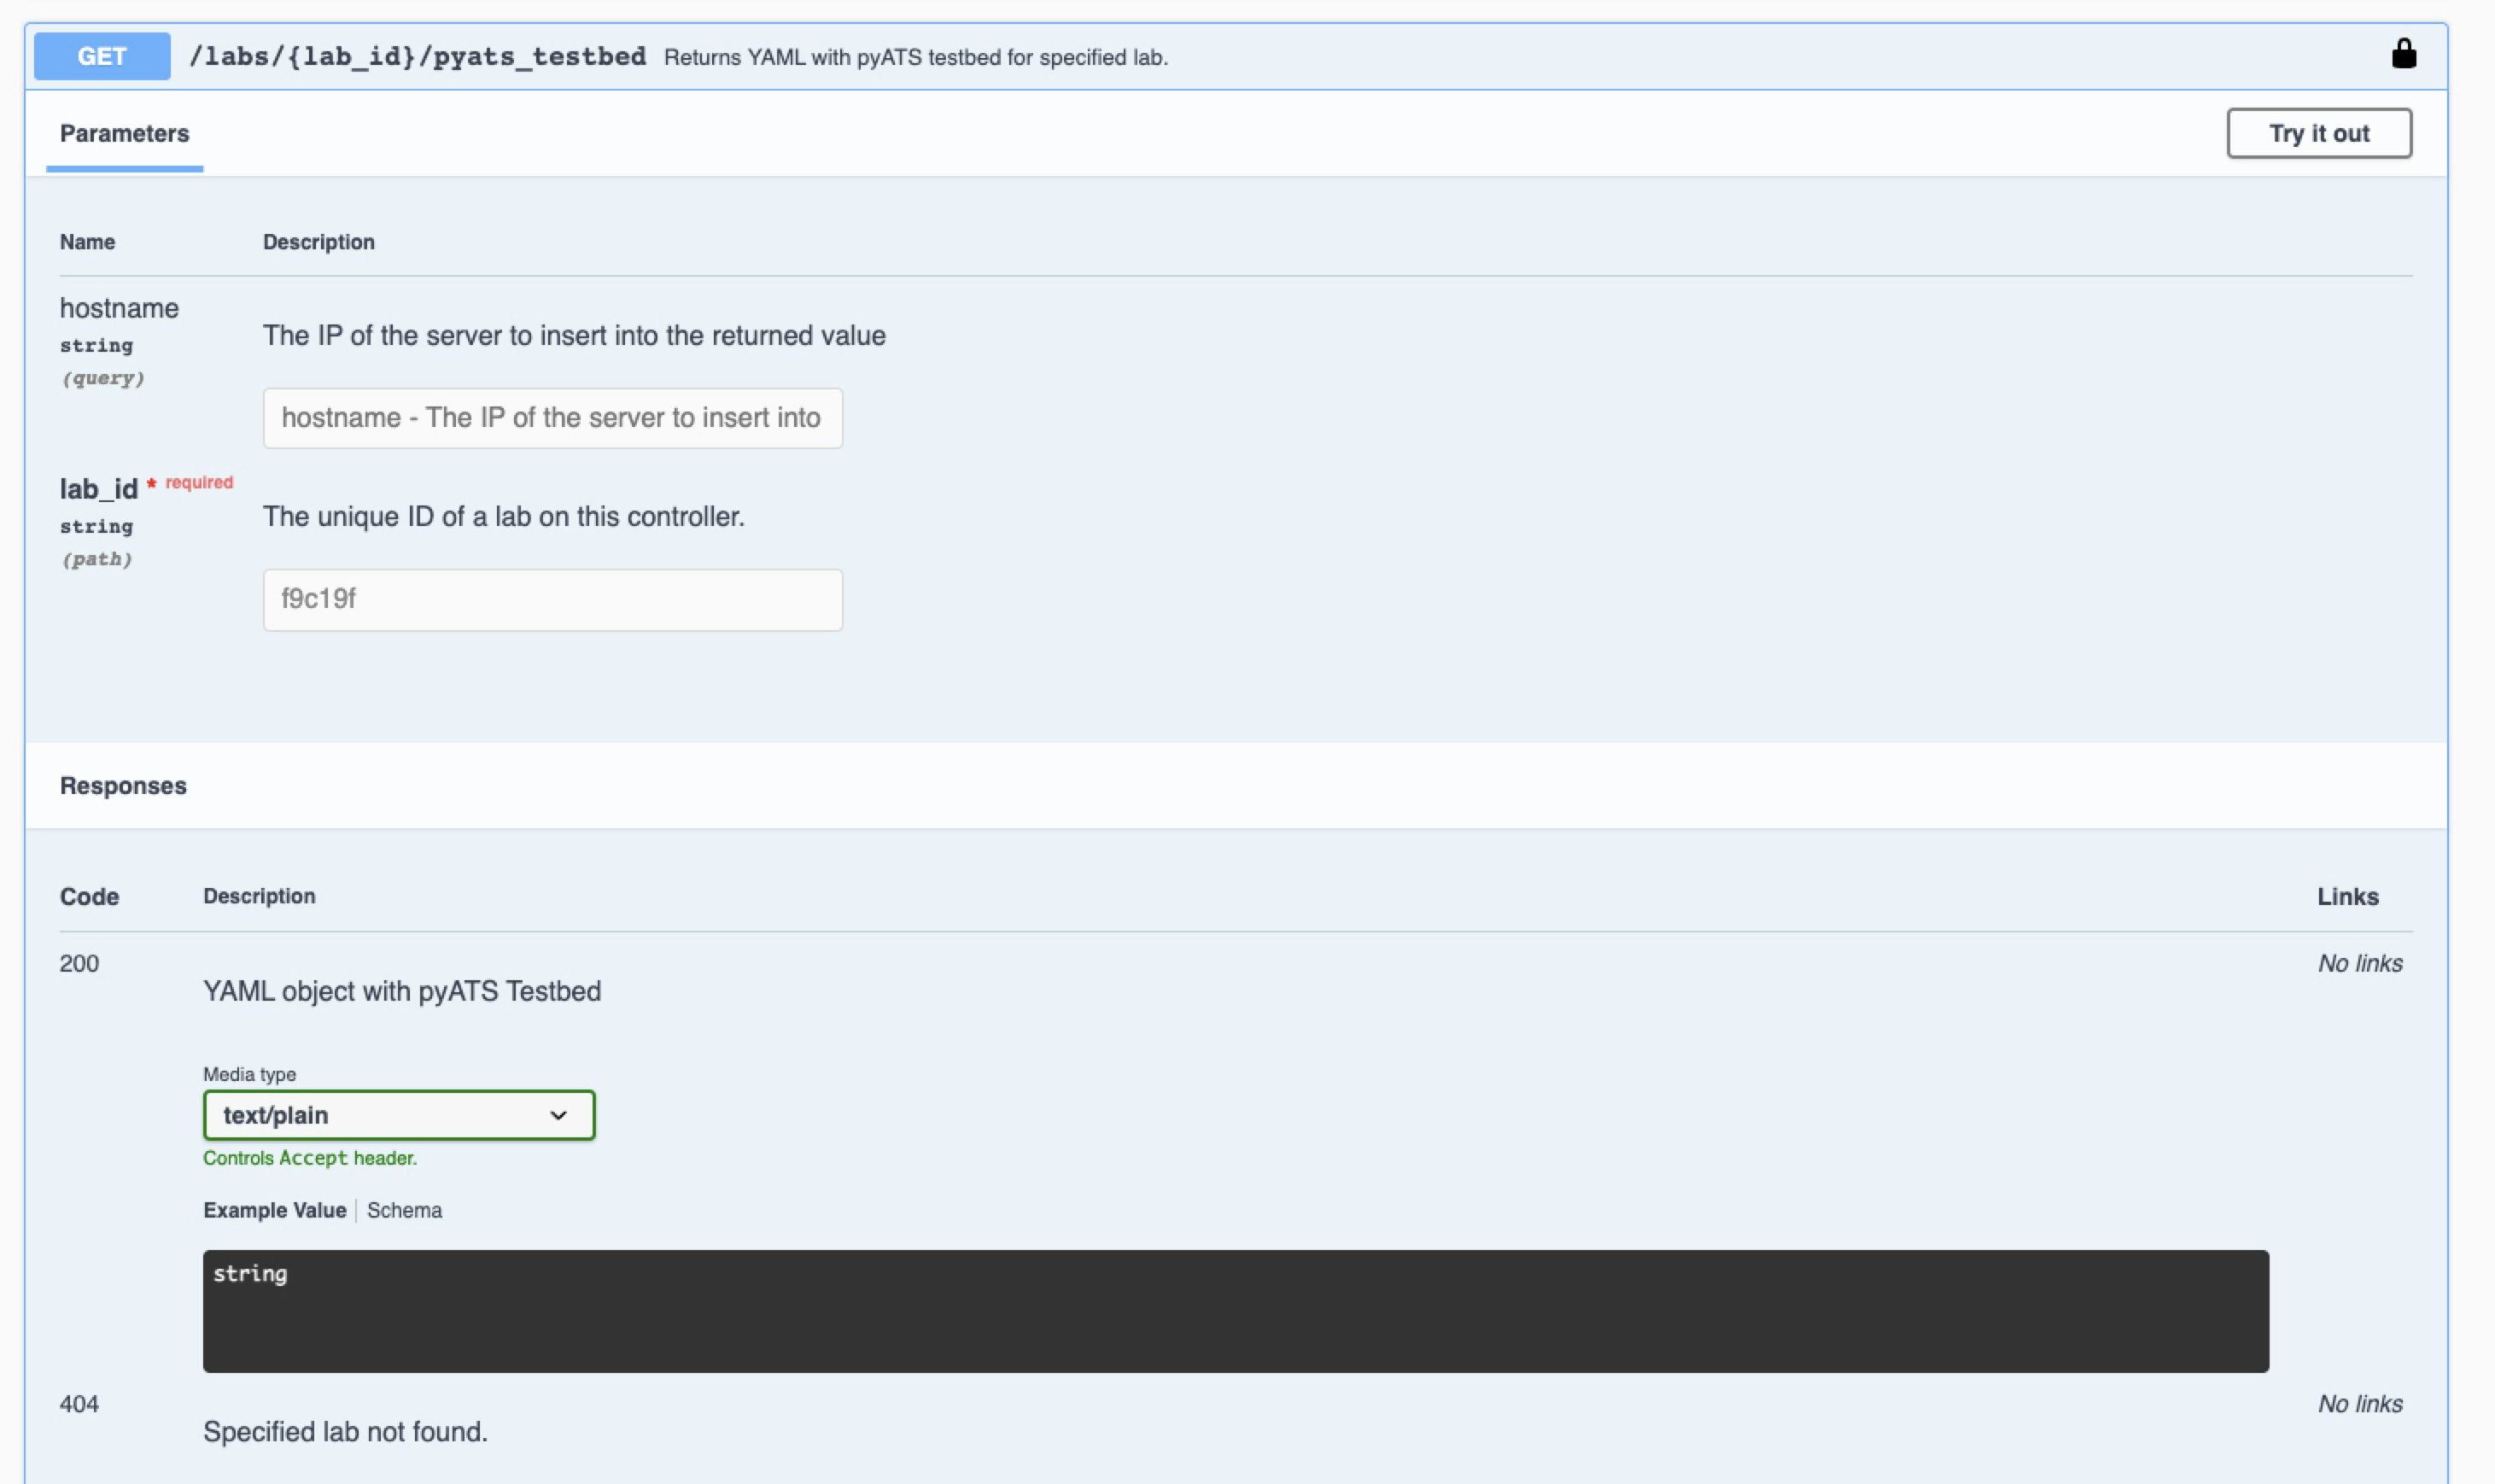
CML2 上でトポロジを作成し、上記 API で pyATS テストベッドを作成し、すぐさま pyATS から操作するということが可能です!
Ansible のインベントリファイルや Netbox のデバイス情報からテストベッドファイルを生成できたりしないでしょうか?
既にユーザーから要望を受け、実装しております。:D
pyats create コマンドを使って pyATS テストベッドファイルへコンバートすることが可能です。
Ansible inventory.ini -> pyATS testbed.yaml
(pyats)$ pyats create testbed ansible --output testbed.yaml --inventory-name inventory.ini
NetBox -> pyATS testbed.yaml
(pyats)$ pyats create testbed netbox --output testbed.yaml --netbox-url=<netbox url> --user-token=<token>
また、上記以外にも Excel/CSV ファイルからのコンバートや、インタラクティブに問い合わせ方式で入力してテストベッドファイルを生成する方法も用意されていますので、詳細は上記のドキュメントを参照ください。
pyATS Parser や API は豊富にあると聞くのですが、どこで確認できるのでしょうか?
Feature Browser から確認できます↓

パーサーやAPIが一覧で確認でき、またキーワードでの絞り込みや OS (IOSXE, IOSXR など) でフィルタすることも可能です。
欲しいパーサーが存在しないのですが。。。
pyATS チームはユーザへコードの貢献を促しています。パーサー既存のコードを見れば、ほぼ正規表現がメインとなっており、開発は思っているよりも難しくないかもしれないので、パーサー開発にチャレンジしてみはどうでしょうか?
pyATS Doc にはパーサーを書くためのデベロッパー向け情報も用意しています↓
おまけとして オープンソースプロジェクト への貢献といったネットワークエンジニアからプログラミングの世界へ一歩踏み出す良いきっかけにもなるかと思います。
パーサー開発でつまずいてしまった場合は、後述のサポートへ問い合わせください。
Ansible から pyATS Parser を使いたいのですが。
cli_parse モジュールから pyATS Parser を使うことが可能です。詳細は下記 Ansible のドキュメントを参照ください。
Ansible Playbook の例:
- name: "parse by using pyATS parser"
  ansible.utils.cli_parse:
    command: show ip interface brief
    parser:
      name: ansible.netcommon.pyats
    set_fact: interfaces
pyATS は Python ライブラリとなるため、上記のように他のツールから再利用することもできるのも利点ですね。
上記 cli_parse モジュールは pyATS チームが開発したものではないため、問い合わせは Ansible Community へお願いします。pyATS Parser 自体に問題がある場合は後述の pyATS のサポートへご連絡ください。
CLI ではなく Yang Model を使った自動化はできますか?
はい。もちろんです。タイプ毎にコネクションライブラリが用意されており、NETCONF, RESTCONF, gNMI が使えます。
| ライブラリ | コネクションタイプ |
|---|---|
| Unicon | SSH, Telnet |
| yang.connector | NETCONF, gNMI |
| rest.connector | REST, RESTCONF |
rest.connector では APIC(ACI), DNAC, Nexus Dashboard などもサポートしているため、REST API で制御できるのであれば、コントローラーの自動化を pyATS 経由で行うことも可能です。
CLI, RESTCONF, NETCONF, gNMI を使った Blitz の例はこちら↓
pyATS 関連の問い合わせはどこにすれば良いでしょうか?
pyATS の問い合わせ先は下記のメールアドレスまたは Cisco Webex Teams Space(下記のリンクから参加) になります。
- メール: pyats-support-ext(at)cisco.com
- pyATS community : https://eurl.io/#r18UzrQVr
また、特定のコンポーネント(pyATS, Genie, Genie Parser, Genie Libs, Unicon)が把握できている場合は、GitHub の Issue を該当のレポジトリでオープンしてもらう形でも問題ありません。
問い合わせは現状では英語のみとなっております。
サポートはコミュニティでというのが前提ですがpyATSチームは積極的に直接サポートを行なっています。ただし、無料ツールとなっているため、SLA などは無いことにご注意ください。
日本語のサポートは現時点では用意されていませんが、Twitter で呟いていただくと、私のアカウント @tahigash3 が反応するかもしれません。
まとめ
今回は pyATS 入門として、素朴な質問に答えるような形で pyATS で何ができるのかを整理してみました。
pyATS では豊富な機能をたくさん提供しているため、多すぎて理解が追いつかないところもあるかもしれないと思い、今回の総まとめを作ってみました。少しでも多くの皆さんに pyATS を使っていただく機会になれば開発者の一人として幸いです。
参考リンク
免責事項
本サイトおよび対応するコメントにおいて表明される意見は、投稿者本人の個人的意見であり、シスコの意見ではありません。本サイトの内容は、情報の提供のみを目的として掲載されており、シスコや他の関係者による推奨や表明を目的としたものではありません。各利用者は、本Webサイトへの掲載により、投稿、リンクその他の方法でアップロードした全ての情報の内容に対して全責任を負い、本Web サイトの利用に関するあらゆる責任からシスコを免責することに同意したものとします。