はじめに
今回は、Laravel11での依存性の注入(DI)を、3層アーキテクチャを採用して行ってみたのでその備忘録です。
環境
- Windows10
- Ubuntu
- Laravel11
また、フロント側は別アプリケーションにしているので、APIを用いての開発を行います。
今回用いたアーキテクチャ
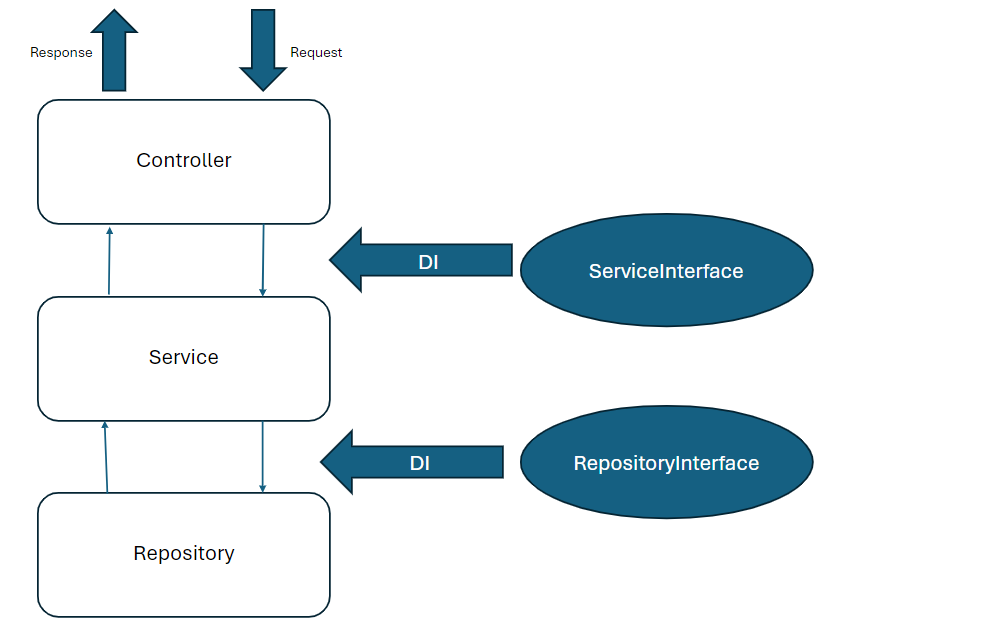
今回は3層アーキテクチャを採用しています。
(Controller、Service、Repository)
まずリクエストがきたら、ルーティングの設定を通じて、適切なコントローラメソッドを呼び出します。
-
Controller層
- ユーザーからの入力を受け取り、サービス層に処理を依頼する
- リクエストの検証やレスポンスの生成を行う
-
Service層
- 業務ロジックを担当する
- ビジネスルールの適用やデータの加工を行う
- リポジトリ層からデータを取得し、必要な処理を行ってコントローラ層に結果を返す
-
Repository層
- データアクセスロジックを担当する
- データベースや外部サービスとの通信を行う
- データの永続化や検索処理を行い、サービス層にデータを提供する
今回の目的
上記で記載した3層の依存関係を疎結合にしたいので、依存性の注入(DI)を行います。
それぞれの層の間にインターフェイスを挟む形で行いました。
大体下記のような形です。
実装内容
今回は、学校の先生が使うサービスの想定です。
生徒名簿が登録してあるテーブルから、ある生徒の個人情報を取得したいときの一連の流れを見てみます。
- Controller
- Service
- Repository
Controller
ユーザーからのリクエスト受付をする場所です。
まずは、ルーティングの作成から
<?php

use App\Http\Controllers\StudentController;
use Illuminate\Http\Request;
use Illuminate\Support\Facades\Route;

Route::get('/user', function (Request $request) {
    return $request->user();
})->middleware('auth:sanctum');

// 生徒の情報をidをもとに取得するエンドポイント
Route::get('/students/{id}', [StudentController::class, 'show'])->name('getStudentById');
続いてコントローラ
<?php

namespace App\Http\Controllers;

use Illuminate\Http\Request;
use App\Services\StudentServiceInterface;

class StudentController extends Controller
{
    protected $studentService;

    public function __construct(StudentServiceInterface $studentService)
    {
        $this->studentService = $studentService;
    }

    /**
     * @param $request
     * @return
     */
    public function getStudentById(Request $request)
    {
        $studentId = $request->input('studentId');
        $student = $this->studentService->getStudentById($studentId);

        return response()->json($student);
    }
}
通常のコントローラ作成と特に変わりはありませんが、ここでは、リクエストを受け付けて適切な処理をサービス層にお願いするだけです。余計なことをしてはいけません。
また、コンストラクタに注目してみると、StudentServiceInterface を依存注入しています。直接サービスクラスを指定していません。ここが重要なポイントです。
インターフェイスを介すことで、サービス層とコントローラ層の直接の関係を切り離しています。
最後に取得した学生情報を JSON 形式でレスポンスとして返します。
Service
インターフェイスの記述から
<?php

namespace App\Services;

interface StudentServiceInterface
{
    /**
     * @param int $studentId
     * @return array
     */
    public function getStudentById(int $studentId): array;
}
interface キーワードを使用して、StudentServiceInterface インターフェースを宣言しています。
インターフェースは、該当のサービスクラスが実装するべきメソッドを定義します。
次に、実際のサービスクラスのメソッドを実装します。
<?php

namespace App\Services;

use App\Repositories\Student\StudentRepositoryInterface;

class StudentService implements StudentServiceInterface
{
    protected $studentRepository;

    public function __construct(StudentRepositoryInterface $studentRepository) {
        $this->studentRepository = $studentRepository;
    }

    /**
     * @param int $studentId
     * @return array
     */
    public function getStudentById(int $studentId): array
    {
        // リポジトリを使用して学生情報を取得
        $student = $this->studentRepository->getStudentById($studentId);

        // ここにビジネスロジックを追加する
        // 例:学生が退学などを理由に在籍していない場合は、非アクティブとしてマークする、等

        // 学生情報を配列として返す
        return $student->toArray();
    }
}
ここでは、ビジネスロジックを含ませています。
実装はしてませんが、いれるとしたらこういうの、みたいな例だけコメントで残しています。
このようなロジックがサービス層に含まれることで、コントローラーはリクエストのハンドリングのみに集中することができるし、リポジトリはデータの取得のみに集中できる状態になります。
Repository
リポジトリ層です。
ここもインターフェイスの定義からです。
また、返り値として、Studentモデルを指定します。
※モデルの役割について
モデルは、データベースのテーブルに対応するオブジェクトであり、データベース操作を行うためのメソッドを提供します。Laravelでは、Eloquentモデルとして定義されます。
<?php

namespace App\Repositories\Student;

use App\Models\Student;

interface StudentRepositoryInterface
{
    /**
     * @param int $studentId
     * @return Student
     */
    public function getStudentById(int $studentId): Student;
}
このインターフェースを実装するリポジトリクラスは、実際のデータベース操作を行います。「学生情報を取得する」という処理の具体的な実装の定義ですね。
<?php

namespace App\Repositories\Student;

use App\Models\Student;

class StudentRepository implements StudentRepositoryInterface
{
    /**
     * @param int $studentId
     * @return Student
     */
    public function getStudentById(int $studentId): Student
    {
        return Student::find($studentId);
    }
}
idで指定するだけのシンプルな作りですが、このような感じでクエリ文はここに書きます。
一応モデルの内容も記載しておきます。
<?php

namespace App\Models;

use Illuminate\Database\Eloquent\Factories\HasFactory;
use Illuminate\Database\Eloquent\Model;

class Student extends Model
{
    use HasFactory;

    protected $fillable = [
        'name',
        'date_of_birth',
        'email',
        'phone',
        'address'
    ];
}
特に変わったところはありません。
Laravelにおけるシンプルなモデルの例です。
以上までで、3層構造での実装を行ってきましたが、
ここで、「Interfaceを通して依存関係を切り離しているけど、どうやってInterfaceのメソッドと実際のクラスのメソッドを結び付けているの??」
という疑問が残ります。
Laravelでは、「サービスコンテナ・サービスプロバイダ」を使用するだけでこれを達成できます。
まずは、Student関連のサービスプロバイダの作成を行います。
artisanコマンドを用います。
php artisan make:provider StudentServiceProvider
app/Providersディレクトリ配下に「StudentServiceProvider.php」ができるのでこの中の、registerメソッド内に、インターフェイスと実装クラスのバインディングを記述します。
<?php

namespace App\Providers;

use Illuminate\Support\ServiceProvider;

class StudentServiceProvider extends ServiceProvider
{
    /**
     * Register services.
     */
    public function register(): void
    {
        // インターフェースと実装クラスのバインディング
        $this->app->bind(
            \App\Repositories\Student\StudentRepositoryInterface::class,
            \App\Repositories\Student\StudentRepository::class
        );

        $this->app->bind(
            \App\Services\StudentServiceInterface::class,
            \App\Services\StudentService::class
        );
    }

    /**
     * Bootstrap services.
     */
    public function boot(): void
    {
        // ここには特になにも記載しない
    }
}
続いて、新しく作成したStudentServiceProviderを登録する必要があります。
そのためには、config/app.php内のproviders配列にStudentServiceProviderを追加するだけで行えます。
'providers' => [
    // その他のサービスプロバイダー

    App\Providers\StudentServiceProvider::class,
],
以上、「Laravelで行う3層アーキテクチャにおける依存性の注入方法」の紹介でした。
終わりに
今回は、軽めの実装だったため、「わざわざ依存性の注入おこなっても記述量だけ増えてめんどくさくない?」と思う気持ちもわかります。私もこの重要性に気付くまではそう思ってました。しかし、依存関係の分離と、それぞれの層の役割を明確化させることのメリットは、開発が進んでいき、コードや機能の量が大量に増えてくると出てきます。
また、テスト容易性が向上したりするので、興味ある方はこの構成でテストコードを実装したりしてみてください。
私もチャレンジしてみようと思います。
今後はもう少しこの辺りの実装を深ぼっていくことと、個人的には難解に感じる「オブジェクト指向」の勉強もしていこうと思っています。
参照
