この記事の目的
ESP32やM5Stack系のデバイスで、認証コードを比較してペアリングを行った上でBLESerialを行えるようにする。
BLESerial
ESP32にはbluetoothserial.cppを用いてBluetooth同士でシリアル通信を行うサンプルスケッチSerialToSerialBTがあります。
しかし、サンプルスケッチではセキュリティに関する設定は存在せず、Non-Secureモードでシリアル通信を行います。
今回の記事ではbluetoothserial.cppを参考にしながら認証コードを比較(Numeric Comparison)することによってペアリングしてから、シリアル通信ができるようにするコードを作成しました。
コード
サンプルスケッチSerialToSerialBTのコードをベースにしています。
# include "BluetoothSerial.h"
# include "esp_gap_bt_api.h"

static void gap_callback(esp_bt_gap_cb_event_t event, esp_bt_gap_cb_param_t *param);

BluetoothSerial SerialBT;

void setup() {
  Serial.begin(115200);
  SerialBT.begin("ESP32test"); //Bluetooth device name
  esp_bt_gap_register_callback (gap_callback);
  /* Secure Simple Pairing のときの認証方法を指定*/
  esp_bt_sp_param_t param_type = ESP_BT_SP_IOCAP_MODE;
  esp_bt_io_cap_t iocap = ESP_BT_IO_CAP_IO; //PINの表示と接続可否の入力が可能
  esp_bt_gap_set_security_param(param_type, &iocap, sizeof(uint8_t));
  /* Legacy pairingのときの認証方法を指定*/
  esp_bt_pin_type_t pin_type = ESP_BT_PIN_TYPE_VARIABLE; //ランダムなPIN(接続時に動的に生成)
  esp_bt_pin_code_t pin_code;
  esp_bt_gap_set_pin(pin_type, 0, pin_code);

  Serial.println("The device started, now you can pair it with bluetooth!");

}

void loop() {
  if (Serial.available()) {
    SerialBT.write(Serial.read());
  }
  if (SerialBT.available()) {
    Serial.write(SerialBT.read());
  }
  delay(20);
}


static void gap_callback(esp_bt_gap_cb_event_t event, esp_bt_gap_cb_param_t *param)
{
  switch (event) {
    case ESP_BT_GAP_AUTH_CMPL_EVT:
      if (param->auth_cmpl.stat == ESP_BT_STATUS_SUCCESS) {
        Serial.printf("authentication success: %s\n", param->auth_cmpl.device_name); //認証に成功
      } else {
        Serial.printf("authentication failed, status:%d\n", param->auth_cmpl.stat); //認証に失敗
      }
      break;

    case ESP_BT_GAP_PIN_REQ_EVT:
      // default pairing pins
      if (param->pin_req.min_16_digit) { //PINが16桁以上必要なとき
        Serial.println("Input pin code: 0000 0000 0000 0000");
        esp_bt_pin_code_t pin_code;
        memset(pin_code, '0', ESP_BT_PIN_CODE_LEN); //実際には1234に固定するのではなく動的に生成しユーザに提示する
        esp_bt_gap_pin_reply(param->pin_req.bda, true, 16, pin_code);
      } else {
        Serial.println("Input pin code: 1234");
        esp_bt_pin_code_t pin_code;
        memcpy(pin_code, "1234", 4); //実際には1234に固定するのではなく動的に生成しユーザに提示する
        esp_bt_gap_pin_reply(param->pin_req.bda, true, 4, pin_code);
      }
      break;

    case ESP_BT_GAP_CFM_REQ_EVT:
      Serial.printf("ESP_BT_GAP_CFM_REQ_EVT Please compare the numeric value: %d\n", param->cfm_req.num_val);

      esp_bt_gap_ssp_confirm_reply(param->cfm_req.bda, true);  //接続を許可
      //esp_bt_gap_ssp_confirm_reply(param->cfm_req.bda, false); //接続を拒否
      break;

    case ESP_BT_GAP_KEY_NOTIF_EVT:
      Serial.printf("ESP_BT_GAP_KEY_NOTIF_EVT passkey:%d\n", param->key_notif.passkey);
      break;
    default:
      break;
  }
}
動作確認
- M5StickC Plus
- Windows10 64bit (Bluetooth5.1 接続対応)
で動作確認を行っています。
-
プログラムを書き込んだ後、Windows10でデバイスの追加を行う画面の表示。

-
今回は
ESP32testというデバイス名にしているので、このデバイスを選ぶと以下のような画面になる。

-
M5StickC Plus側ではシリアル上で以下のような出力が行われる。

-
PINが一致していることを確認し、Windows側で接続を行う。
-
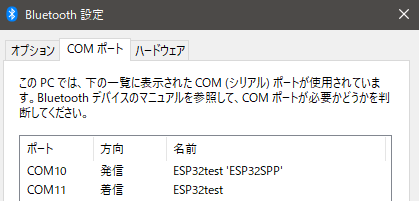
ペアリングが完了する。同時にBluetooth仮想COMポートが追加される1。


ただし先に示したコードのesp_bt_gap_ssp_confirm_replyにおいて、第3引数をFalseにした場合は接続に失敗する。失敗と同時にM5StickC Plus側ではシリアル上で以下のような出力が行われる2。

動作確認(Legacy Pairingの場合)
Legacy PairingはNumeric Comparisonとは異なり、PINコードを入力することによって認証を行う方式で、バージョンの古いBluetoothデバイスで接続した際にこの方式で認証されるようです。
今回は検証に必要な端末を持っていないため、検証していません。
恐らくLegacy Pairingの際は先ほど示したコードの以下の部分が生きてくると思います。
case ESP_BT_GAP_PIN_REQ_EVT:
      // default pairing pins
      if (param->pin_req.min_16_digit) { //PINが16桁以上必要なとき
        Serial.println("Input pin code: 0000 0000 0000 0000");
        esp_bt_pin_code_t pin_code;
        memset(pin_code, '0', ESP_BT_PIN_CODE_LEN); //実際には1234に固定するのではなく動的に生成しユーザに提示する
        esp_bt_gap_pin_reply(param->pin_req.bda, true, 16, pin_code);
      } else {
        Serial.println("Input pin code: 1234");
        esp_bt_pin_code_t pin_code;
        memcpy(pin_code, "1234", 4); //実際には1234に固定するのではなく動的に生成しユーザに提示する
        esp_bt_gap_pin_reply(param->pin_req.bda, true, 4, pin_code);
      }
      break;
コードではparam->pin_req.min_16_digitがFalseのときは、1234がPINになります。ただ実際にはPINをランダムで生成する方が安全です。
参考文献
以下のページを参考にして本記事を執筆しています。
Bluetoothのセキュリティのはなし|Wireless・のおと|サイレックス・テクノロジー株式会社
http://www.silex.jp/blog/wireless/2015/09/bluetooth.html
CLASSIC BLUETOOTH GAP API - ESP32 - — ESP-IDF Programming Guide latest documentation
https://docs.espressif.com/projects/esp-idf/en/latest/esp32/api-reference/bluetooth/esp_gap_bt.html
BluetoothSerial.cpp
https://github.com/espressif/arduino-esp32/blob/master/libraries/BluetoothSerial/src/BluetoothSerial.cpp
SerialToSerialBT.ino
https://github.com/espressif/arduino-esp32/blob/master/libraries/BluetoothSerial/examples/SerialToSerialBT/SerialToSerialBT.ino