はじめに
今回は k8s 上に glusterfs 環境を構築します。
k8s を使っている際には、PersistentVolume をどの製品を使って実装するのか悩みどころかと思います。
【参考】k8s で定義できる PersistentVolume タイプ
https://kubernetes.io/docs/concepts/storage/persistent-volumes/#types-of-persistent-volumes
glusterfs は k8s の PersistentVolumeClaim から動的に PersistentVolume を定義することができます。
また、分散ファイルシステムであるため、複数ストレージにレプリケーションすることもできます。
今回は github にも公開されている手順を参考に構築していきます。
【参考】gluster-kubernetes
https://github.com/gluster/gluster-kubernetes
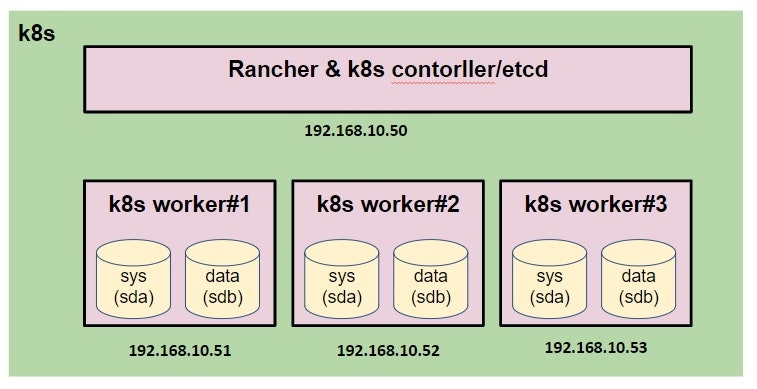
環境構成
ホストマシン
- Windows 10
- VirtualBox:6.0.8
ゲストマシン
- CentOS:7.6
- docker-ce:18.09
- kubernetes:1.14.3
- Rancher:2.2.6
- Rancher & k8s controller/etcd x1台、k8s worker x3台
| Rancher role | servers | CPU | Memory | Storage |
|---|---|---|---|---|
| Rancher & controller/etcd |
x 1 | 4 Core | 8 GB | sda:15GB |
| worker | x 3 | 2 Core | 4 GB | sda:15GB / sdb20GB |
※ゲストマシンのネットワークはブリッジとして、固定 IP を 設定しています
※k8s worker にはシステム領域とは別にデータストレージ(sdb)を追加しています
※sda(システム領域) / sdb(glusterfs用データストレージ) のサイズは参考程度に
※以下、仮想マシンの構成図です
k8s 準備
各種無効化
◆ SELinux 無効化
# vi /etc/selinux/config

・・・
SELINUX=disabled
・・・

◆ swap 無効化
# swapoff -a
# vi /etc/fstab
・・・
# /dev/mapper/centos-swap swap                    swap    defaults        0 0 ★コメントアウト
・・・

◆ firewalld 無効化
# systemctl stop firewalld
# systemctl disable firewalld
各パッケージインストール
※必要に応じて追加してください
# yum makecache fast
# yum install epel-release
# yum install vim yum-utils device-mapper-persistent-data lvm2 git bash-completion
docker インストール
※対象 k8s のバージョンに合わせた docker をインストールしてください
# sudo yum-config-manager --add-repo https://download.docker.com/linux/centos/docker-ce.repo
# yum install docker-ce-18.09.7-3.el7
# systemctl enable docker
# systemctl start docker
※ここまで4台ともに実施
Rancher 起動
※Rancher(k8s controller/etcd)で実施
# docker run -d --restart=unless-stopped -p 10080:80 -p 10443:443 rancher/rancher
※ポートは適宜変更してください。
※今回は 10443 ポートで Rancher の管理画面にアクセスします。
起動後に Rancher の管理画面にアクセス(https://192.168.10.50:10443/)。
Rancher から k8s 構築は簡易的に説明します。
- 管理コンソール画面にアクセス
- 新規クラスターの追加 ⇒ Custom で作成
・k8s のバージョン:1.14.3
・ネットワークプロバイダー:Calico - ノードロールで etcd / control の二つを選択し、表示されたコマンドを Rancher( controller / etcd ) サーバで実行
- ノードロールで worker のみ選択し、表示されたコマンドを worker サーバで実行
- クラスタが構築されるのを待つ
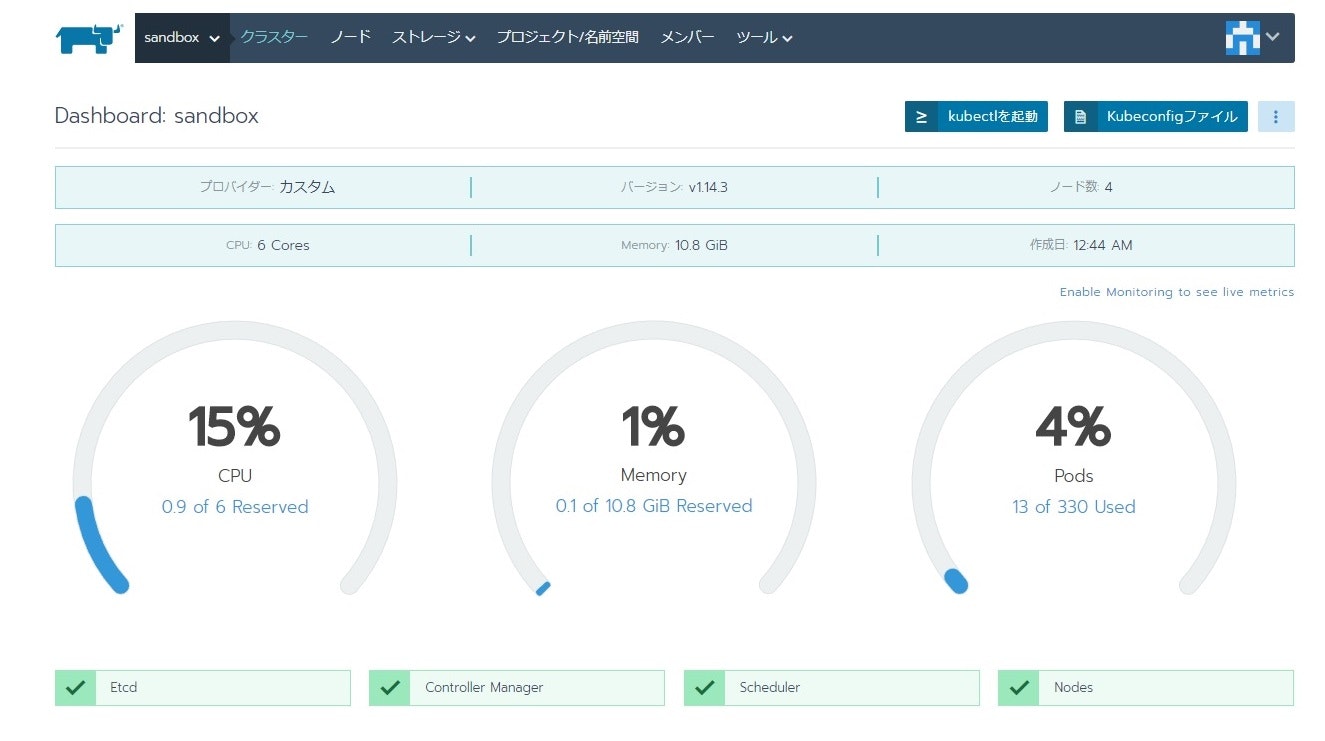
Cluster Dashboad
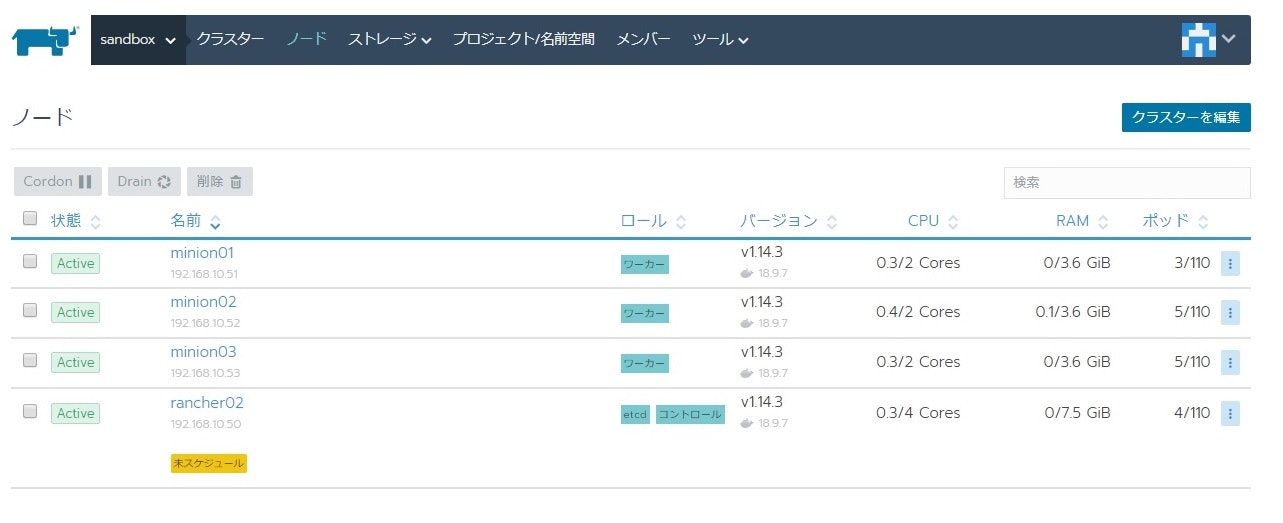
Node List
kubectl 導入
Rancher サーバに k8s のクライアント kubectl を導入します。
◆ k8s yum レポジトリ情報の追加
# cat <<EOF > /etc/yum.repos.d/kubernetes.repo
[kubernetes]
name=Kubernetes
baseurl=https://packages.cloud.google.com/yum/repos/kubernetes-el7-x86_64
enabled=1
gpgcheck=1
repo_gpgcheck=1
gpgkey=https://packages.cloud.google.com/yum/doc/yum-key.gpg https://packages.cloud.google.com/yum/doc/rpm-package-key.gpg
EOF
◆ kubectl のバージョンを確認・インストール
※ 導入した k8s に対応した kubectl を導入
# yum list kubectl --showduplicates
・・・
kubectl.x86_64 1.14.3-0 kubernetes
・・・
# yum install kubectl-1.14.3-0
◆ 接続用設定ファイルの作成
# mkdir ~/.kube
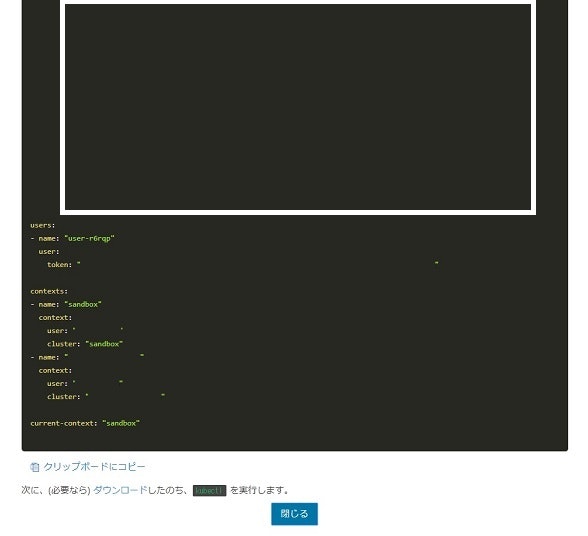
※ Cluster の Dashboard 画面から「Kubeconfigファイル」をクリック
⇒ 表示された yaml を config に入力する
# vim ~/.kube/config
◆ kubectl コマンドが実行できることを確認( namespace 取得)
# kubectl get ns
NAME STATUS AGE
cattle-system Active 1d
default Active 1d
ingress-nginx Active 1d
kube-node-lease Active 1d
kube-public Active 1d
kube-system Active 1d
◆ コマンド補完用の設定
# echo 'source <(kubectl completion bash)' >>~/.bashrc
◆ エイリアス登録(kubectl ⇒ kc)
# echo 'alias kc=kubectl' >> ~/.bashrc
# echo 'complete -F __start_kubectl kc' >> ~/.bashrc
# source ~/.bashrc
# kc get ns
【参考】kubectl Cheat Sheet
https://kubernetes.io/docs/reference/kubectl/cheatsheet/
Kubeconfig ファイル
glusterfs 導入
導入準備
まずは Namespace を作成します。
Rancher の管理画面から Default Project に移動し、「名前空間を追加」で以下の名前で「名前空間(namespace)」を作成します。
- gluseterfs
◆ 作業対象の namespace を設定
# kc config set-context sandbox --namespace glusterfs
# kc config get-contexts
CURRENT   NAME                CLUSTER             AUTHINFO     NAMESPACE
*         sandbox             sandbox             user-xxxxx   glusterfs
          sandbox-rancher02   sandbox-rancher02   user-xxxxx

◆ 読み込みモジュール追加(k8w worker で作業)
# vi /etc/sysconfig/modules/gluserfs.modules

※以下を入力
# !/bin/bash
/usr/sbin/modprobe dm_snapshot
/usr/sbin/modprobe dm_mirror
/usr/sbin/modprobe dm_thin_pool

◆ 権限変更・実行
# chmod +x /etc/sysconfig/modules/gluserfs.modules
# /etc/sysconfig/modules/gluserfs.modules

◆ git から clone
# git clone https://github.com/gluster/gluster-kubernetes.git
# cd gluster-kubernetes/deploy/

◆ heketi topology 設定ファイル作成
# cp -p topology.json{.sample,}
# vim topology.json
今回導入する際の glusterfs の設定ファイル(topology.json) です。参考までに。
{
  "clusters": [
    {
      "nodes": [
        {
          "node": {
            "hostnames": {
              "manage": [
                "minion01"
              ],
              "storage": [
                "192.168.10.51"
              ]
            },
            "zone": 1
          },
          "devices": [
            "/dev/sdb"
          ]
        },
        {
          "node": {
            "hostnames": {
              "manage": [
                "minion02"
              ],
              "storage": [
                "192.168.10.52"
              ]
            },
            "zone": 1
          },
          "devices": [
            "/dev/sdb"
          ]
        },
        {
          "node": {
            "hostnames": {
              "manage": [
                "minion03"
              ],
              "storage": [
                "192.168.10.53"
              ]
            },
            "zone": 1
          },
          "devices": [
            "/dev/sdb"
          ]
        }
      ]
    }
  ]
}
glusterfs デプロイ
k8s 上に glusterfs をデプロイします。
◆ このまま実行すると途中でエラーになるので一部変更します
# vim gk-deploy

※ kubectl のバージョンによって --show-all オプションが使えないため、
※ 以下のようにコメントアウトし、オプションを外した行を追加する(924行目あたり)
# heketi_pod=$(${CLI} get pod --no-headers --show-all --selector="heketi" | awk '{print $1}')
heketi_pod=$(${CLI} get pod --no-headers --selector="heketi" | awk '{print $1}')

◆ デプロイ
# 以下はデプロイオプション
# -g:GlusterFS のデプロイ
# -v:詳細情報出力
# --no-object:gluster-s3 のデプロイを行わない
# --templates_dir:heketi テンプレートを指定(git clone したディレクトリの中にあります)
# --namespace:namespace 指定(作成した namespace を指定)
# --admin-key:admin アカウントの鍵文字列
# --user-key:user アカウントの鍵文字列
# 最後に作成した heketi topology ファイルを指定
# -------------------------------------------------------------------#
# 以下、実行
# ./gk-deploy -gv --no-object \
--templates_dir /root/gluster-kubernetes/deploy/kube-templates \
--namespace glusterfs \
--admin-key adminkey \
--user-key userkey \
topology.json

Welcome to the deployment tool for GlusterFS on Kubernetes and OpenShift.

Before getting started, this script has some requirements of the execution
environment and of the container platform that you should verify.

The client machine that will run this script must have:
 * Administrative access to an existing Kubernetes or OpenShift cluster
 * Access to a python interpreter 'python'

Each of the nodes that will host GlusterFS must also have appropriate firewall
rules for the required GlusterFS ports:
 * 2222  - sshd (if running GlusterFS in a pod)
 * 24007 - GlusterFS Management
 * 24008 - GlusterFS RDMA
 * 49152 to 49251 - Each brick for every volume on the host requires its own
   port. For every new brick, one new port will be used starting at 49152. We
   recommend a default range of 49152-49251 on each host, though you can adjust
   this to fit your needs.

The following kernel modules must be loaded:
 * dm_snapshot
 * dm_mirror
 * dm_thin_pool

For systems with SELinux, the following settings need to be considered:
 * virt_sandbox_use_fusefs should be enabled on each node to allow writing to
   remote GlusterFS volumes

In addition, for an OpenShift deployment you must:
 * Have 'cluster_admin' role on the administrative account doing the deployment
 * Add the 'default' and 'router' Service Accounts to the 'privileged' SCC
 * Have a router deployed that is configured to allow apps to access services
   running in the cluster

Do you wish to proceed with deployment?
[Y]es, [N]o? [Default: Y]: Y ★Y を入力

・・・以下、完了後の出力・・・

heketi is now running and accessible via http://10.xx.x.x:8080 . To run
administrative commands you can install 'heketi-cli' and use it as follows:

  # heketi-cli -s http://10.xx.x.x:8080 --user admin --secret '<ADMIN_KEY>' cluster list

You can find it at https://github.com/heketi/heketi/releases . Alternatively,
use it from within the heketi pod:

  # /usr/bin/kubectl -n glusterfs exec -i heketi-549c999b6f-qw2fg -- heketi-cli -s http://localhost:8080 --user admin --secret '<ADMIN_KEY>' cluster list

For dynamic provisioning, create a StorageClass similar to this:

---
apiVersion: storage.k8s.io/v1beta1
kind: StorageClass
metadata:
  name: glusterfs-storage
provisioner: kubernetes.io/glusterfs
parameters:
  resturl: "http://10.xx.x.x:8080"
  restuser: "user"
  restuserkey: "userkey"


Deployment complete!
pv / pvc 作成
最後に pv / pvc を作成します。
◆ StorageClass 作成のため、heketi Service を確認
# kc get svc
NAME                       TYPE        CLUSTER-IP      EXTERNAL-IP   PORT(S)    AGE
heketi                     ClusterIP   10.xx.xx.xx     <none>        8080/TCP   4m19s
heketi-storage-endpoints   ClusterIP   10.yy.yy.yy     <none>        1/TCP      5m6s

◆ StorageClass 作成用 yaml ファイル作成
※ resturl に上記で確認した heketi の CLUSTER-IP を指定
※ restuser に admin、restuserkey に glusterfs をデプロイした時に指定した admin の鍵文字列を指定
※ user アカウントの情報を指定しても pv/pvc が作成できませんでした

# cat sc.yml
apiVersion: storage.k8s.io/v1beta1
kind: StorageClass
metadata:
  name: glusterfs-storage
provisioner: kubernetes.io/glusterfs
parameters:
  resturl: "http://10.xx.xx.xx:8080"
  restuser: "admin"
  restuserkey: "adminkey"

◆ StorageClass デプロイ
# kc apply -f sc.yaml
storageclass.storage.k8s.io/glusterfs-storage created

# kc get sc
NAME                PROVISIONER               AGE
glusterfs-storage   kubernetes.io/glusterfs   3s

◆ pvc yaml 作成
# cat pvc.yml
kind: PersistentVolumeClaim
apiVersion: v1
metadata:
  name: pvc-test
spec:
  storageClassName: glusterfs-storage
  accessModes:
    - ReadWriteOnce
  resources:
    requests:
      storage: 1Gi

◆ pvc デプロイ
# kc create -f pvc.yml
persistentvolumeclaim/pvc-test created

# kc get pvc
NAME       STATUS   VOLUME                                     CAPACITY   ACCESS MODES   STORAGECLASS        AGE
pvc-test   Bound    pvc-8adc25f2-b7a6-11e9-a84f-080027be31a7   1Gi        RWO            glusterfs-storage   27s
おしまい
今回は glusterfs を k8s 上に構築しました。
本家の手順で躓いた個所は補足しているため、ある程度は導入しやすいかと思います。
※git 上のソースが日々変更されているようで、推敲中にも手順を手直ししています・・・
heketi/glusterfs 単体についてはトラブルシューティングも検索可能なので、躓いた際には検索してみましょう。
glusterfs は複数 worker からアクセスする際の pv/pvc や動的にプロビジョニングする際には有用かと思います。
是非、pv/pvc のバックエンドとしてご利用ください!