はじめに
過去の投稿を参考にSQL Serverの準備をして下さい。
環境
OS:Windows 10 Pro 64bit
DB:SQL Server 2019(Cent OS 8 on Hyper-V)
node.js:v12.16.1
npm:v6.13.4
Express:v4.16.1
Editor:Visual Studio Code
Expressフレームワークの雛形作成
express --view=ejs
npm install
詳しい事はこちらを参考にして下さい。
SQL Serverへの接続ドライバ(tedious)インストール
npm install tedious --save
D:\Node\ExpressTest01>npm install tedious --save
npm WARN deprecated request@2.88.2: request has been deprecated, see https://github.com/request/request/issues/3142
+ tedious@8.0.1
added 79 packages from 184 contributors and audited 263 packages in 16.976s
found 0 vulnerabilities
WARNと表示されますが、無視して大丈夫です。
今回はv8.0.1がインストールされました。
jsファイル作成
routesフォルダにsqlSample.jsを作成します。
sqlSample.js
var express = require('express');
var router = express.Router();

// Connectionを定義する
var Connection = require('tedious').Connection;

// SQLServerの接続定義を記載する。
var config = {
    server: 'xxx.xxx.xxx.xxx',    // IPアドレスかサーバー名を指定する。
    authentication: {
        type: 'default',
        options: {
            userName: 'xxx',      // 接続ユーザー名を指定する。
            password: 'xxx'       // 接続ユーザーのパスワードを指定する。
        }
    },
    options: {
        encrypt: true,
        database: 'Training01'    // データベース名を指定する。
    }
};

/* GET users listing. */
router.get('/', function (req, res, next) {
    var connection = new Connection(config);
    var content = []; // DBからselectした結果を格納する変数

    // DB接続した際のイベントハンドラ
    connection.on('connect', function (err) {
        if (err) {
            // ERROR - SQL Serer connect error.
            console.log('SQL Serer connect error.(' + err + ')');
            // 終了
            process.exit();
        }
        console.log("connected");
        executeStatement();
    });

    // DB接続を終了した際のイベントハンドラ
    // DB接続を切断した後に画面を描写する
    connection.on('end', function () {
        console.log("disconnected");
        res.render('sqlSample', { title: '製品一覧', content: content });
    });

    var Request = require('tedious').Request;

    // SQLを発行する関数
    function executeStatement() {
        // 発行するSQLを記載する
        request = new Request("SELECT * FROM ProductsMaster with (NOLOCK)", function (err) {
            if (err) {
                console.log(err);
            }
        });

        var result = {}; // SQLの結果を行ごとにオブジェクトに格納する。
        // SQLの行ごとに実行するイベントハンドラ
        request.on('row', function (columns) {
            columns.forEach(function (column) {
                if (column.value === null) {
                    console.log('NULL');
                } else {
                    result[column.metadata.colName] = column.value;
                }
            });
            content.push(result);
            result = {};
        });

        // SQLのリクエスト完了時のイベントハンドラ。
        // コネクションをクローズしないとDBにいらないプロセスが残るので、コネクションをクローズする。
        request.on('requestCompleted', function () {
            console.log('requestCompleted');
            connection.close();
        });

        // DBへSQLを発行する。
        connection.execSql(request);
    }
});

module.exports = router;
ejsファイル作成
viewsフォルダにsqlSample.ejsを作成します。
sqlSample.ejs
<!DOCTYPE html>
<html lang="ja">
    <head>
        <meta http-equiv="content-type" content="text/html; charset=UTF-8">
        <title><%= title %></title>
        <link rel='stylesheet' href='/stylesheets/style.css' />
    </head>
    <body>
        <h1><%= title %></h1>
        <div role="main">
            <table>
                <tr>
                    <th>製品コード</th>
                    <th>製品名</th>
                    <th>単価</th>
                </tr>
                <% content.forEach(function (value, key) { %>
                    <tr>
                        <td><%= value.ProductsCode %></td>
                        <td><%= value.ProductsName %></td>
                        <td><%= value.UnitPrice %></td>
                    </tr>
                <% }); %>
            </table>
        </div>
    </body>
 </html>
app.jsの修正
ルート直下にあるapp.jsに次の2行を追加します。
var sqlSample= require('./routes/sqlSample');
app.use('/sqlSample', sqlSample);
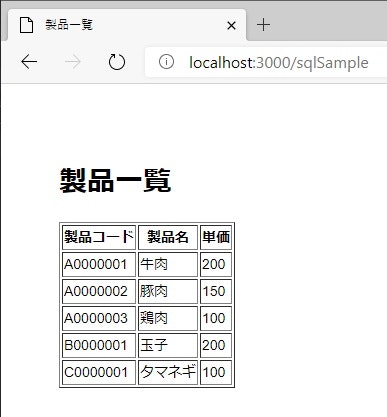
動作確認
コマンドプロンプトで次のコマンドを実行します。
npm start
ブラウザで「http://localhost:3000/sqlSample」にアクセスします。
次のキャプチャが表示されればOKです。
参考/出展
手順 3:Node.js を使用した SQL への接続を概念実証する
https://docs.microsoft.com/ja-jp/sql/connect/node-js/step-3-proof-of-concept-connecting-to-sql-using-node-js?view=sql-server-ver15
Node.jsでSQLServer2017に接続してSELECT結果を画面に表示するサンプル
http://hiyo-ac.hatenablog.com/entry/2018/01/28/141831