この記事はMarkLogic Advent Calendar 2017の3日目です。
はじめに
昨日はMarkLogic9をインストールしてDBの構築まで行いました。
MarkLogicはスキーマレスなのでDDLによるデータ定義が不要です。DBを構築した直後から、XMLやJSONデータをどんどん処理出来るようになります。
しかしアプリケーション側からDBにアクセスするには、アクセス方法に応じた設定が必要になります。
例えばREST-APIを使用する場合は、MarkLogicが搭載するHTTPサーバを設定する必要があります。
今回はNode.jsからREST-APIでMarkLogicに接続する環境を構築し、簡単なアプリケーションを作成してみます。
なお、MarkLogicのNode.jsアプリケーション開発に関する公式ドキュメントはこちらをご覧下さい。
環境
以下の環境を使用します。
| 環境 | バージョン |
|---|---|
| CentOS7 | 7.4.1708 |
| Node.js | v8.9.1 |
| npm | 5.5.1 |
| MarkLogic9 | 9.0-3 |
| MarkLogic Node.js Client API | 2.0.3 |
CentOS7にNode.jsをインストールする
まずはNode.jsとnpmをインストールします。
# curl -sL https://rpm.nodesource.com/setup_8.x | bash -
# yum install gcc gcc-c++ nodejs
MarkLogicのHTTPサーバを構築する
Node.jsアプリケーションからMarkLogicのDBにアクセスするにはREST-APIを使用することになります。
MarkLogicのREST-APIを使うためには、MarkLogicが搭載するHTTPサーバを構築し、使用するDBに紐付ける必要があります。
ここではMarkLogicのHTTPサーバの構築とREST-APIの設定を行います。設定はWebブラウザでアクセスする管理画面上で行います。
MarkLogicの管理画面でHTTPサーバを構築する
WebブラウザでMarkLogicの管理画面(当該サーバの8001番ポート)にアクセスし、ログインします。
ログイン後、画面左ペインの「Configure」-「Groups」-「Default」-「App Servers」をクリックし、右ペインの「Create HTTP」タブをクリックします。この画面でHTTPサーバの設定を行います。
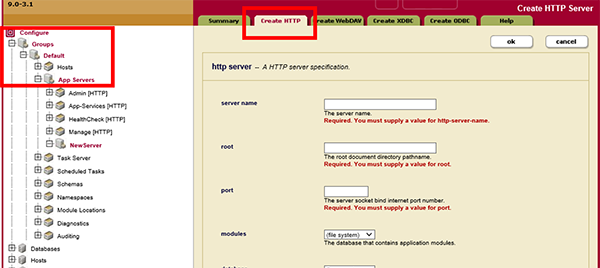
今回は以下の設定としました。以下の項目以外は初期値です。
入力が終わったら、「ok」ボタンを押下します。
| 項目名 | 設定値 |
|---|---|
| server name | IoTDatabase-HTTP-8100 |
| root | /(スラッシュ) |
| port | 8100 |
| database | IoTDatabase |
| url rewriter | /MarkLogic/rest-api/8000-rewriter.xml |
| rewrite resolves globally | true |
これでMarkLogicのHTTPサーバが用意出来ました。
このHTTPサーバは「port」に入力した8100番ポートでアクセスします。
接続するDBは「database」で選択したものになります。今回は昨日作成した「IoTDatabase」に接続します。
MarkLogic Node.js Client APIのインストール
次に、Node.jsアプリケーションからMarkLogicに接続する際に使用するクライアントAPIをインストールします。
$ npm install --save marklogic
早速、Hello, World
以上で準備が整いました。疎通確認も兼ねて、簡単なJSONドキュメントをMarkLogicに登録するNode.jsアプリケーションを作成してみます。
接続情報の作成
まず、MarkLogicへの接続情報の定義ファイルを作成します。
MarkLogicの接続情報として、Node.jsアプリケーションで本ファイルをロードします。
module.exports = {
  connInfo: {
    host: 'localhost',
    port: 8100,
    user: 'user',
    password: 'password'
  }
};
hostはMarkLogicサーバのホスト名・IPアドレスを入力します。
portは接続するMarkLogicのHTTPサーバのポート番号を入力します。今回は上記で作成したIoTDatabase用のHTTPサーバになります。
MarkLogicにアクセスするNode.jsアプリケーションの作成
簡単なJSONドキュメントを登録し、それを読み込むアプリケーションを作ってみます。
const async = require('async');
const marklogic = require('marklogic');
const my = require('./my-connection.js');
const db = marklogic.createDatabaseClient(my.connInfo);

// 登録するJSONドキュメント
let document = [
  { uri:'/helloworld_node.json',
    content: {
      message: 'Hello, World!'
    }
  }
];

// JSONドキュメントの書き込みと読み込み
(async function() {
  try{
    let resultUri = await writeDocument(document);
    console.log('----');
    console.log('Inserted to the following URI: ' + resultUri);

    console.log('----');
    console.log('Read the document.');
    readDocument(resultUri);
  } catch( error ){
    console.log(error);
  }
})();

// JSONドキュンメントの登録と結果確認
function writeDocument(documents) {
  return new Promise((resolve, reject) => {
    db.documents.write(documents).result(
      function(response) {
        response.documents.forEach( function(document) {
          resolve(document.uri);
        });
      },
      function(error) {
        let errorMsg = JSON.stringify(error, null, 2);
        reject(errorMsg);
      });
  });
}

// JSONドキュンメントの読み込み
function readDocument(documentUri){
  db.documents.read(documentUri).result(
    function(documents) {
      documents.forEach(function(document) {
        console.log(JSON.stringify(document));
      });
    }, function(error) {
      console.log(JSON.stringify(error, null, 2));
    }
  );
}
Node.jsで実行します。
$ node helloworld.js

----
Inserted to the following URI: /helloworld_node.json
----
Read the document.
{"content":{"message":"Hello, World!"},"uri":"/helloworld_node.json","category":["content"],"format":"json","contentType":"application/json"}
以上で、JSONドキュメントの登録と読み込みが成功しました。
おしまい
以上、Node.jsアプリケーションからMarkLogicを利用する方法を執筆しました。
今回は登録と参照のみを実装してみましたが、もちろん検索や更新、削除もJavascriptで行えます。
今回の登録処理を少し加工すれば、Webスクレイピングにも応用できます。
スキーマの異なる様々なオープンデータをスクレイピングしてMarkLogicに登録することで、異なる種類のデータを連係したアプリケーションも簡易に開発できます。
昨日のMarkLogicインストールからここまで、慣れれば30分もあればできてしまいます。
商用DBでありながら、これだけ簡易にスピーディーに開発できる点がMarkLogicの魅力の1つです。
次回予告
Raspberry Pi3のセンサー情報をMarkLogicに取り込むべく、MQTTを導入してみようと思います。