はじめに
本記事は
AnsibleでNW機器のタグVLANインターフェイスをNetboxに自動登録する①
の続きの記事になります。
デモの実行準備① ttpテンプレートの作成
vsrx01のコンフィグをパースするためのテンプレート定義を作成します。
inventoryのhostsファイルと同じディレクトリに作成します。
<group name="interfaces">
{{ interface  }} {
    flexible-vlan-tagging;
    <group name="vlanifs*">
    unit {{ unit }} {
        vlan-id {{ vlanid }};
        family inet {
            address {{ address }}/{{ subnetmask }};
        }
    }
    </group>
}
</group>
パースロジックの解説
- <group name="interfaces">のブロックにて、各インターフェイスの情報を配列で格納します。
"interfaces": [
    {"interface": "xe-0/0/0", ,,,},
    {"interface": "xe-0/0/1", ,,,},
    {"interface": "xe-0/0/2", ,,,},
    ,,,
]
- <group name="vlanifs*">のブロックにて、各インターフェイス配下のVLANインターフェイスの情報を配列で格納します。
"vlanifs": [
    {
        "address": "192.168.0.1",
        "subnetmask": "24",
        "unit": "1000",
        "vlanid": "1000"
    },
    {
        "address": "192.168.1.1",
        "subnetmask": "24",
        "unit": "1001",
        "vlanid": "1001"
    },
    ,,,
]
※注意
<group name="vlanifs*">ではvlanifsのあとに*をつけないと、
vlanインターフェイスが一つしかなかったときにvlanifs配下が配列化されません。
データ構造が崩れることになるので、必ず複数登場する情報セット以外は*をつけるのを忘れないでください。
- 一つだけだと配列化されない例)
"vlanifs": {
    "address": "192.168.0.1",
    "subnetmask": "24",
    "unit": "1000",
    "vlanid": "1000"
}
デモの実行準備② demo02.yamlの作成
実際にvsrx01へコンフィグ取得処理を行い、NetBoxへVLANインターフェイスを登録も行うPlaybookのdemo02.yamlを作成します。
inventoryのhostsファイルと同じディレクトリに作成します。
※長いPlaybookとなっているので、分割してPlaybookの内容を解説します。
hosts定義部分の説明
netbox.netbox.nb_lookupとadd_hostを使うことでNetBox上のvsrx01のNW機器情報をインベントリーとして登録します。
---
- name: add host
  hosts:
    - localhost
  gather_facts: False
  vars:
    netbox_url: http://test.com
    netbox_token: test
  tasks:
    - name: add host values
      add_host:
        name: "{{ item.value.display_name }}"
        ansible_host: "{{ item.value.primary_ip.address | ipaddr('address') }}"
        ansible_network_os: "{{ item.value.local_context_data.ansible_network_os }}"
        ansible_user: "{{ item.value.local_context_data.ansible_user }}"
        ansible_password: "{{ item.value.local_context_data.ansible_password }}"
      loop: "{{ query('netbox.netbox.nb_lookup','devices', api_endpoint=netbox_url, token=netbox_token) }}"
NW機器への処理の説明
-
vsrx01のコンフィグを取得して、ttpでパースする処理を行います。
前処理のadd_hostにてNetboxに登録されている機器情報を取得できているので、
varsのtargetにて対象のNW機器名を指定することで対象機器のみへ処理を制限します。
Playbook実行時にextra-varsでtargetに対象機器名を指定することで、対象機器を変えることもできます。 -
cli_parseでコンフィグ参照コマンドを実行して、template_pathには先程作成したttpのファイル名を指定します。
これによってコマンド実行結果をttpでパースした情報を取得することができます。 -
後続処理にパースした結果を引き継ぎたいので、set_factsにてnw_params変数に実行結果を格納します。
(階層が深くならないように代入時に調整します。)
- name: show config interface
  hosts: "{{ target }}"
  gather_facts: false
  connection: ansible.netcommon.network_cli
  vars:
    target: vsrx01
  tasks:
    - ansible.utils.cli_parse:
        command: show config interface
        parser:
          name: ansible.utils.ttp
          template_path: "./junos_trunk_interface.ttp"
      register: result

    - set_fact:
        nw_param: "{{ result['parsed'][0][0]['interfaces'] }}"
vsrx01のコンフィグをansible.utils.cli_parseの処理でパースすると以下の実行結果になります。
{
    "parsed": [
        [
            {
                "interfaces": [
                    {
                        "interface": "ge-0/0/0",
                        "vlanifs": [
                            {
                                "address": "172.16.0.101",
                                "subnetmask": "24",
                                "unit": "0"
                            }
                        ]
                    },
                    {
                        "interface": "ge-0/0/1",
                        "vlanifs": [
                            {
                                "address": "172.20.0.1",
                                "subnetmask": "24",
                                "unit": "1000",
                                "vlanid": "1000"
                            },
                            {
                                "address": "172.20.1.1",
                                "subnetmask": "24",
                                "unit": "1001",
                                "vlanid": "1001"
                            }
                        ]
                    },
                    {
                        "interface": "ge-0/0/2",
                        "vlanifs": [
                            {
                                "address": "172.21.0.1",
                                "subnetmask": "24",
                                "unit": "2000",
                                "vlanid": "2000"
                            }
                        ]
                    }
                ]
            }
        ]
    ]
}
NetBoxへのVLANインターフェイス登録処理の説明①
- ttpでパースした各IF情報の中にはVlanインターフェイスが含まれないge-0/0/0も含まれてしまうため、set_factでvlanidが含まれないインターフェイスを除外します。
- 各IFのvlanifs配下に複数のVlanインターフェイスがあるので、その数分NetBoxのVlanを登録する処理を行います。
interfaces内のサブ要素のvlanifs内をループする処理を行いたいので、with_subelementsを使います。Vlan名を指定する必要があるので「"Vlan" + VLANID」としています。
- hosts: localhost
  gather_facts: false
  connection: local
  vars:
    target: vsrx01
  collections:
    - netbox.netbox
  vars:
    ansible_python_interpreter: /usr/bin/python3
    netbox_url: http://test.com
    netbox_token: test

  tasks:
    - set_fact:
        nw_param: "{{ nw_param|default([]) + [ item ] }}"
      loop: "{{ hostvars[ target ].nw_param }}"
      when: "{{ item['vlanifs'] | selectattr('vlanid', 'defined') }}"

    - netbox_vlan:
        netbox_url: "{{ netbox_url }}"
        netbox_token: "{{ netbox_token }}"
        data:
          name: "vlan{{ item.1['vlanid'] }}"
          vid: "{{ item.1['vlanid'] }}"
        state: present
      with_subelements:
        - "{{ nw_param }}"
        - vlanifs
NetBoxへのVLANインターフェイス登録処理の説明②
- ①Vlanインターフェイスが紐づく物理インターフェイスを作成します。
tagged_vlansの定義には、先の手順で作成したVlanの名前を以下のフォーマットで指定する必要が有ります。
そのため、jinja2形式でjson_queryを使って各物理インターフェイスに紐づくVlanインターフェイス分をループする処理を力技で作って、物理インターフェイスとVlanインターフェイスの紐づけを行っています。
tagged_vlans:
  - "name": "Vlan名"
  - "name": "Vlan名"
  ...
- ②各VlanインターフェイスのIPアドレスを設定します。通常のNetBoxの使い方では各VlanインターフェイスごとのIPアドレスの情報を紐付けることができないので、ここではIPアドレスのdescriptionにvlanidの情報を埋め込む対応をしました。
    - name: Create interface
      netbox_device_interface:
        netbox_url: "{{ netbox_url }}"
        netbox_token: "{{ netbox_token }}"
        data:
          device: "{{ target }}"
          name: "{{ item['interface'] }}"
          enabled: true
          type: 1000Base-t (1GE)
          mtu: 1500
          mgmt_only: false
          mode: Tagged
          tagged_vlans: |-
            [
            {%- for thing in item['vlanifs'] | json_query('[*].vlanid')  -%}
              {"name": "vlan{{ thing }}"},
            {%- endfor -%}
            ]
        state: present
      loop: "{{ nw_param }}"

    - name: Create IP address and assign device interface
      netbox_ip_address:
        netbox_url: "{{ netbox_url }}"
        netbox_token: "{{ netbox_token }}"
        data:
          status: active
          address: "{{ item.1['address'] }}/{{ item.1['subnetmask'] }}"
          description:
            vlanid: '{{ item.1["vlanid"] }}'
          assigned_object:
            name: "{{ item.0['interface'] }}"
            device: "{{ target }}"
        state: present
      with_subelements:
        - "{{ nw_param }}"
        - vlanifs
デモの実行方法
ansible-playbook -i ./hosts demo02.yaml \
	-e target=vsrx01 -e netbox_url=http://{{ NetBoxのURL }} \
	-e netbox_token={{ NetBoxのApi tokens }} \
	-e ansible_network_os=junos -e ansible_user={{ vSRXのユーザ名 }} \
	-e ansible_password={{ vSRXのログインパスワード }} -v
NetBox画面
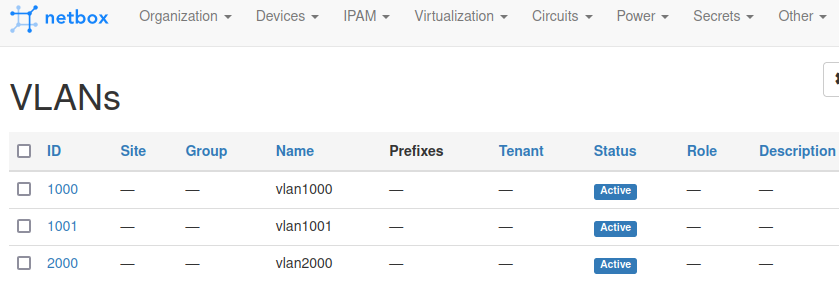
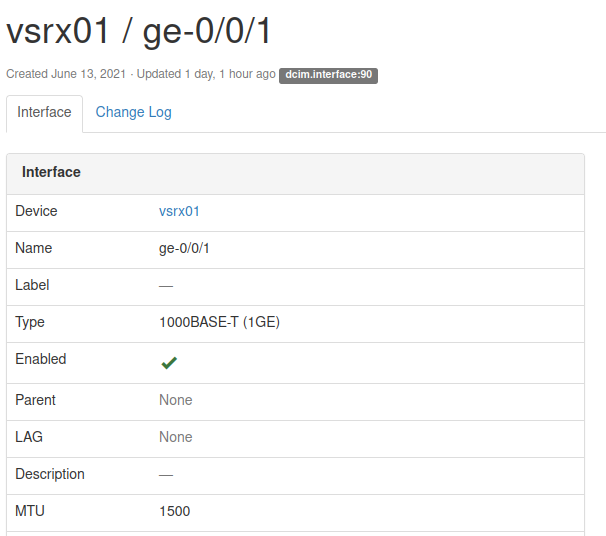
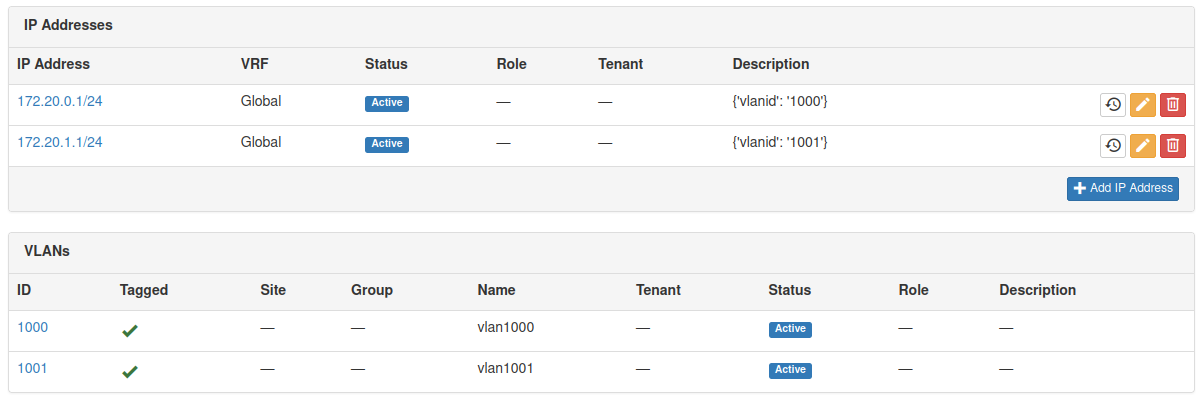
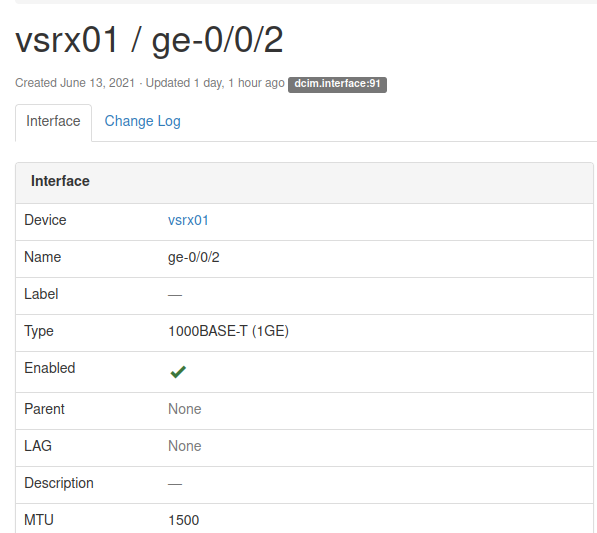
demo02.yaml実行結果のNetBoxの画面スクリーンショットになります。
VLAN ID一覧
 ※大きい画像で見たい場合はクリックして開いてください。
ge-0/0/1

 ※大きい画像で見たい場合はクリックして開いてください。
ge-0/0/2

 ※大きい画像で見たい場合はクリックして開いてください。