開発環境
サンプルアプリケーションの作成は、下記環境にSpring Tool Suite(STS)の導入が完了している事を前提とします。
| 種別 | プロダクト |
|---|---|
| JVM | Java 11 |
| OS | Windows 10 64bit |
サンプルアプリケーションの作成
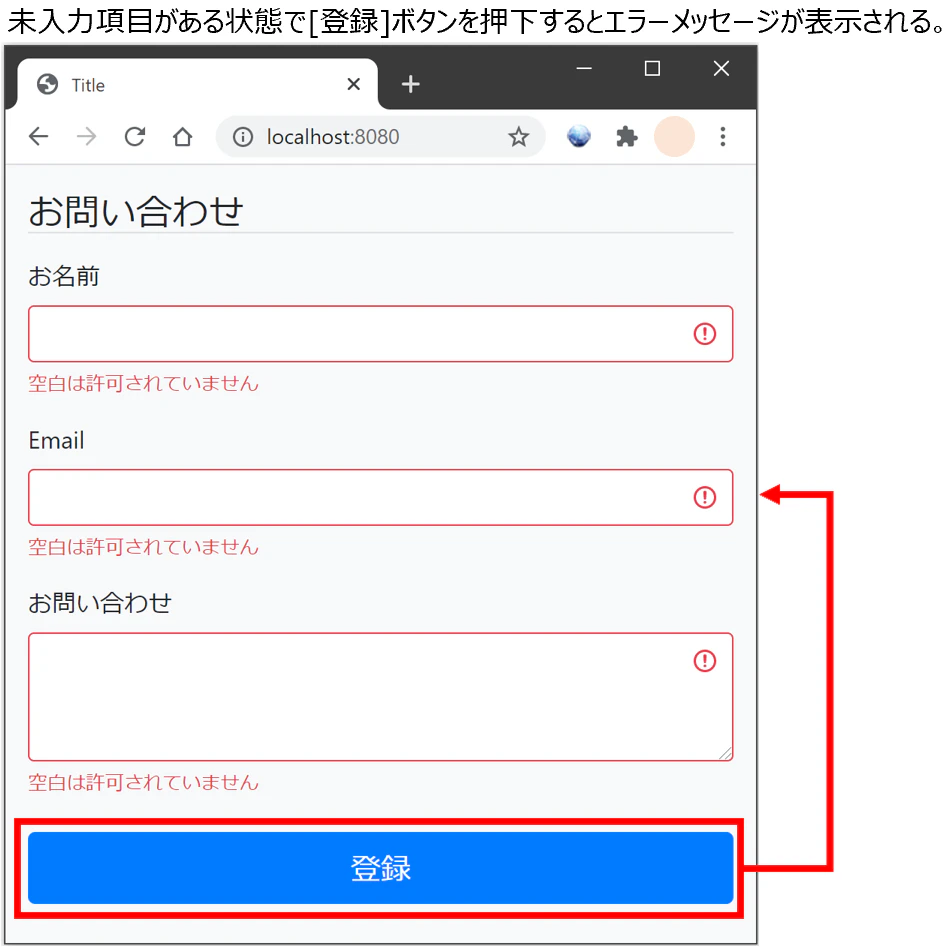
Spring Bootを利用して実際に簡単なアプリケーションを作成します。作成するのは、以下の画面のようにテキストフィールドにお名前・Email・お問い合わせを入力して[登録]ボタンを押下すると、入力した情報を表示する画面へ遷移する、お問い合わせアプリです。
各入力項目は、[登録]ボタン押下時に必須入力チェック、文字数チェック、フォーマットチェック(Email)を行うものとします。


アプリ作成完了時のフォルダ構成は下記となります。

1. 新規プロジェクト作成
Spring Tool Suite(STS)のメニューから、[ファイル] -> [新規] -> [Spring スターター・プロジェクト] を選択する。

[新規 Spring スターター・プロジェクト]ダイアログで、以下を入力して[次へ]ボタンを押下します。
- 名前:spring-mvc2
- Java バージョン:11

依存関係で以下にチェックを入れて[完了]ボタンを押下します。
▼開発ツール
・Spring Boot DevTools
・Lombok
▼I/O
・検証(Validation)
▼テンプレート・エンジン
・Thymeleaf
▼Web
・Spring Web

検証・・・入力チェック(バリデーション)を行う場合に選択します。
2. Lombokの導入設定
Springスターター・プロジェクト作成時に依存関係でLombokを指定しただけでは、作成するアプリケーション実行時にLombokが正常動作しない為、以下のとおりプロジェクトフォルダ直下の**「pom.xml」**を修正してください。
		<dependency>
			<groupId>org.projectlombok</groupId>
			<artifactId>lombok</artifactId>
			<optional>true</optional>
		</dependency>
		<dependency>
			<groupId>org.projectlombok</groupId>
			<artifactId>lombok</artifactId>
			<version>1.18.12</version>
			<scope>provided</scope>
		</dependency>
3. モデルの作成
[com.example.demo]で右クリック -> [新規] -> [クラス] を選択する。
[新規Javaクラス]ダイアログで、以下を入力して[完了]ボタンを押下します。
- パッケージ:com.example.demo.model(modelを追加)
- 名前:Inquiry
Inquiry.javaを以下のとおり編集します。
package com.example.demo.model;

import javax.validation.constraints.Email;
import javax.validation.constraints.NotBlank;
import javax.validation.constraints.Size;

import lombok.Getter;
import lombok.Setter;

@Getter
@Setter
public class Inquiry {

	// 必須入力、文字列が20文字まで。
	@NotBlank
	@Size( max = 20)
	private String name;

	// 必須入力、Email形式であること、文字列が30文字まで。
	@NotBlank
	@Email
	@Size( max = 30)
	private String email;

	// 必須入力、文字列が50文字まで。
	@NotBlank
	@Size( max = 50)
	private String inquiry;
}
@NotBlankや@Size・・・バリデーション用のアノテーションです。これらのアノテーションの付与で簡単にバリデーションが実装できます。
代表的なバリデーションを以下に記載します。
| アノテーション | 内容 | 使用例 |
|---|---|---|
| @NotBlank | 文字列が、nullか空文字、空白(半角スペース)でないかを検証します | @NotBlank String name; |
| @NotNull | nullでないかを検証します | @NotNull String id; |
| @Size | 文字列の長さが、指定の範囲内かを検証します(CollectionやMap、配列もサポートしています) | @Size(min=4, max=100) String name; |
| 文字列が、有効なメールアドレスかを検証します | @Email String email; | |
| @Range | 数値が、指定の範囲内であるかを検証します | @Range(min=1, max=120) Integer age; |
| @URL | 文字列が、有効なURLであるかを検証します | @URL String url; |
| @CreditCardNumber | 文字列が、有効なクレジットカード番号であるかを検証します | @CreditCardNumber String cardNumber; |
| @Length | 文字列の長さが、指定の範囲内かを検証します | @Length(min=4, max=100) String name; |
4. コントローラの作成
[com.example.demo]で右クリック -> [新規] -> [クラス] を選択する。
[新規Javaクラス]ダイアログで、以下を入力して[完了]ボタンを押下します。
- パッケージ:com.example.demo.controller(controllerを追加)
- 名前:HomeController
HomeController.javaを以下のとおり編集します。
package com.example.demo.controller;

import org.springframework.stereotype.Controller;
import org.springframework.validation.BindingResult;
import org.springframework.validation.annotation.Validated;
import org.springframework.web.bind.annotation.GetMapping;
import org.springframework.web.bind.annotation.ModelAttribute;
import org.springframework.web.bind.annotation.PostMapping;

import com.example.demo.model.Inquiry;

@Controller
public class HomeController {

	@GetMapping("/")
	public String index(@ModelAttribute Inquiry inquiry) {
		return "index";
	}

	@PostMapping("/")
	public String confirm(@Validated @ModelAttribute Inquiry inquiry, BindingResult result) {
		if (result.hasErrors()) {
			// エラーがある場合、index.htmlに戻る
			return "index";
		}
		return "confirm";
	}
}
@Validated・・・入力値のチェックを行います。チェックの結果は、BindingResultに入るので、result.hasErrors()でエラーがあるか確認出来ます。
5. Bootstrapの追加
Bootstrapは、CSSやJavaScriptから構成されるフレームワークです。きれいな画面が作れることや、PCやスマートフォンなどに自動対応する画面が作れることから、人気のフレームワークとなっています。 Bootstrapを使えるようにする方法は、いくつかあります。ここでは、WebJarsで管理してみたいと思います。
WebJars・・・jQueryやBootstrapなどの依存関係を、Mavenなどのビルドツールで、管理できるようにするライブラリです。
プロジェクト直下にあるpom.xmlを開き、以下のように設定を追加します。
    <!-- dependenciesタグ内に、以下の2つを追加します -->
    <dependency>
        <groupId>org.webjars</groupId>
        <artifactId>bootstrap</artifactId>
        <version>4.5.0</version>
    </dependency>
    <dependency>
        <groupId>org.webjars</groupId>
        <artifactId>webjars-locator</artifactId>
        <version>0.40</version>
    </dependency>
 bootstrap・・・Bootstrapは、依存ライブラリにjQueryとPopper.jsがあります。WebJarsでは、これらの依存ライブラリも取得してくれます。上記の1つ目に追加したdependencyのようにBootstrapを追加するだけで、jQueryとPopper.jsが使えるようになります。
 webjars-locator・・・webjars-locatorは、Webjarsのパスを自動検出するライブラリです。これを追加すると、バージョンを自動解決できます。
6. Thymeleafテンプレートの作成
お問い合わせ入力画面のThymeleafテンプレートを作成します。
[templates]で右クリック -> [新規] -> [その他] を選択する。

[新規]ダイアログで、[Web] -> [HTMLファイル] を選択して[次へ]ボタンを押下します。
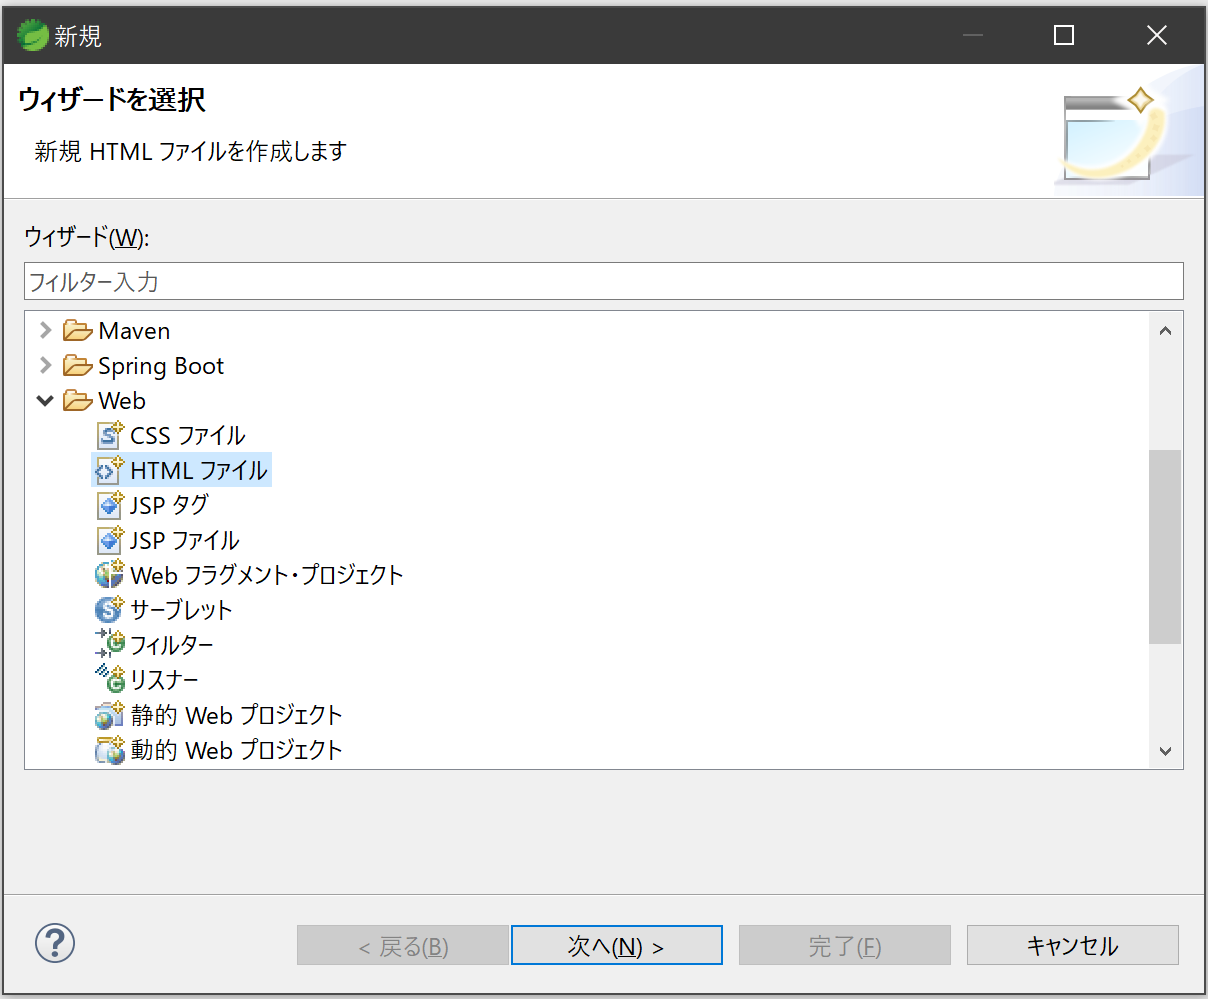
[新規 HTML ファイル]ダイアログで、以下を入力して[完了]ボタンを押下します。
- ファイル名:index.html
index.htmlを以下のとおり編集します。
<!DOCTYPE html>
<html>
<head>
  <meta charset="UTF-8">
  <meta name="viewport" content="width=device-width, initial-scale=1">
  <link rel="stylesheet" th:href="@{/webjars/bootstrap/css/bootstrap.min.css}">
<title>Title</title>
</head>
<body class="bg-light">
  <div class="container">
    <div class="row justify-content-md-center">
      <div class="col-md-8">
        <h4 class="border-bottom my-3" th:text="#{inquiry}"></h4>
        <form th:action="@{/}" th:object="${inquiry}" method="post" novalidate>
          <div class="form-group">
            <label for="name" th:text="#{name}"></label>
            <input type="text" class="form-control" th:errorclass="is-invalid" th:field="*{name}">
            <div class="invalid-feedback" th:errors="*{name}"></div >
          </div>

          <div class="form-group">
            <label for="email" th:text="#{email}"></label>
            <input type="email" class="form-control" th:errorclass="is-invalid" th:field="*{email}">
            <div class="invalid-feedback" th:errors="*{email}"></div>
          </div >

          <div class="form-group">
            <label for="inquiry" th:text="#{inquiry}"></label>
            <textarea class="form-control" rows="3" th:errorclass="is-invalid" th:field="*{inquiry}"></textarea>
            <div class="invalid-feedback" th:errors="*{inquiry}"></div>
          </div>

          <button class="btn btn-primary btn-lg btn-block my-4" type="submit" th:text="#{register}"></button>
        </form>
      </div>
    </div>
  </div>
  <script th:src="@{/webjars/jquery/jquery.min.js}"></script>
  <script th:src ="@{/webjars/popper.js/umd/popper.min.js}"></script>
  <script th:src="@{/webjars/bootstrap/js/bootstrap.min.js}"></script >
</body>
</html>
確認画面のThymeleafテンプレートを作成します。
[templates]で右クリック -> [新規] -> [その他] を選択する。
[新規]ダイアログで、[Web] -> [HTMLファイル] を選択して[次へ]ボタンを押下します。
[新規 HTML ファイル]ダイアログで、以下を入力して[完了]ボタンを押下します。
- ファイル名:confirm.html
confirm.htmlを以下のとおり編集します。
<!DOCTYPE html>
<html xmlns:th="http://www.thymeleaf.org">
<head>
  <meta charset="UTF-8">
  <meta name="viewport" content="width=device-width, initial-scale=1">
  <link rel="stylesheet" th:href="@{/webjars/bootstrap/css/bootstrap.min.css}">
<title>Title</title>
</head>
<body class="bg-light">
  <div class="container">
    <div class="row justify-content-md-center">
      <div class="col-md-8">
        <h4 class="border-bottom my-3" th:text="#{inquiry}"></h4>

        <p class="text-danger" th:text="#{confirmationMessage}"></p>

        <div th:object="${inquiry}">
          <div class="form-group">
            <label for="password" th:text="#{name}"></label>
            <input type="text" class="form-control" th:field="*{name}" disabled>
          </div>

          <div class="form-group">
            <label for="email" th:text="#{email}"></label>
            <input type="email" class="form-control" th:field="*{email}" disabled>
          </div>

          <div class="form-group">
            <label for="inquiry" th:text="#{inquiry}"></label>
            <textarea class="form-control" rows="3" th:field="*{inquiry}" disabled></textarea>
          </div>
        </div>
      </div>
    </div>
  </div>
  <script th:src="@{/webjars/jquery/jquery.min.js}"></script>
  <script th:src="@{/webjars/popper.js/umd/popper.min.js}"></script>
  <script th:src="@{/webjars/bootstrap/js/bootstrap.min.js}"></script>
</body>
</html>
7. メッセージの国際化対応
Spring Bootでは、国際化対応として「messages_ja.properties」が標準で読み込めます。これを作成します。
[resources]で右クリック -> [新規] -> [ファイル] を選択する。

[新規ファイルの作成]ダイアログで、以下をして[完了]ボタンを押下します。
- ファイル名:messages_ja.properties

templatesフォルダに下記ファイルを同様に作成し、以下のファイル構成にします。
- ファイル名:messages.properties

messages_ja.propertiesに日本語のメッセージを書く前に、文字のエンコードを設定します。
[messages_ja.properties]で右クリック -> [プロパティ] を選択する。

テキスト・ファイル・エンコードで、[その他]をクリック -> [UTF-8] を選択して、[適用して閉じる]を押下する。
※エンコード競合のメッセージが表示されたら、そのまま[はい]を押下する。

messages_ja.propertiesを以下のとおり編集します。
inquiry = お問い合わせ
name = お名前
email = Email
register = 登録
confirmationMessage = 以下の内容で登録が完了しました
messages.propertiesを以下のとおり編集します。
inquiry = Inquiry
name = Name
email = Email
register = Register
confirmationMessage = Registration has been completed with the following
application.propertiesを以下のとおり編集します。
spring.messages.fallback-to-system-locale=false
spring.messages.fallback-to-system-locale・・・対応言語が見つからない場合に、システムの言語を返すか設定します。デフォルトはtrueです。
8. Spring Bootアプリケーションの起動
[SpringMvc2Application]で右クリック -> [実行] -> [Spring Boot アプリケーション] を選択する。
コンソールで起動を確認したら、ブラウザで http://localhost:8080/ にアクセスします。
参考書籍
「Spring Boot 2.3 入門: 基礎から実演まで」(電子書籍) 原田 けいと/竹田 甘地/Robert Segawa著