Spring Securityについて
Spring Security とは、強力なアクセス制御フレームワークです。これは、Springベースのアプリケーションを保護するのに役立ちます。
Spring Security の特徴として、カスタム要件に合わせて、簡単に拡張できるという点があります。例えば、認証方式を変更したり、特定パスをアクセス制御したり簡単にできます。
セキュリティ機能として、標準のログイン画面も用意されています。ここでは標準のログイン画面を確認します。
開発環境
サンプルアプリケーションの作成は、下記環境にSpring Tool Suite(STS)の導入が完了している事を前提とします。
| 種別 | プロダクト |
|---|---|
| JVM | Java 11 |
| OS | Windows 10 64bit |
サンプルアプリケーションの作成
1. 新規プロジェクト作成
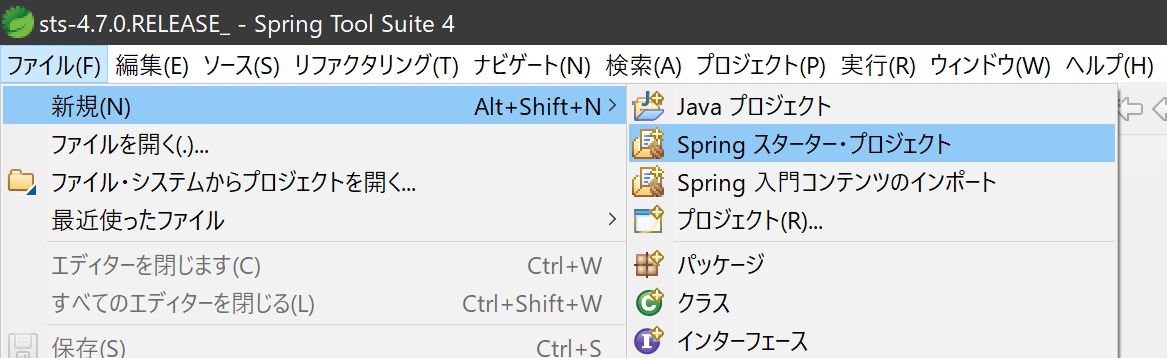
Spring Tool Suite(STS)のメニューから、[ファイル] -> [新規] -> [Spring スターター・プロジェクト] を選択する。
[新規 Spring スターター・プロジェクト]ダイアログで、以下を入力して[次へ]ボタンを押下します。
- 名前:spring-security1
- Java バージョン:11
依存関係で以下にチェックを入れて[完了]ボタンを押下します。
▼開発ツール
・Spring Boot DevTools
・Lombok
▼セキュリティ
・Spring Security
▼テンプレート・エンジン
・Thymeleaf
▼Web
・Spring Web
2. セキュリティの作成
[com.example.demo]で右クリック -> [新規] -> [クラス] を選択する。
[新規Javaクラス]ダイアログで、以下を入力して[完了]ボタンを押下します。
- パッケージ:com.example.demo.config(configを追加)
- 名前:SecurityConfig
SecurityConfig.javaを以下のとおり編集します。
package com.example.demo.config;

import org.springframework.context.annotation.Bean;
import org.springframework.context.annotation.Configuration;
import org.springframework.security.config.annotation.authentication.builders.AuthenticationManagerBuilder;
import org.springframework.security.config.annotation.web.builders.HttpSecurity;
import org.springframework.security.config.annotation.web.configuration.EnableWebSecurity;
import org.springframework.security.config.annotation.web.configuration.WebSecurityConfigurerAdapter;
import org.springframework.security.crypto.bcrypt.BCryptPasswordEncoder;

@Configuration
@EnableWebSecurity
public class SecurityConfig extends WebSecurityConfigurerAdapter {

    @Bean
    public BCryptPasswordEncoder passwordEncoder() {
        // パスワードの暗号化用に、bcrypt(ビー・クリプト)を使用します
        return new BCryptPasswordEncoder();
    }

    @Override
    protected void configure(HttpSecurity http) throws Exception {
        http
            // 認証リクエストの設定
            .authorizeRequests()
                // 認証の必要があるように設定
                .anyRequest().authenticated()
                .and()
            // フォームベース認証の設定
            .formLogin();
    }

    @Override
    protected void configure(AuthenticationManagerBuilder auth) throws Exception {
        auth
            // メモリ内認証を設定
            .inMemoryAuthentication()
            // "user"を追加
            .withUser("user")
            // "password"をBCryptで暗号化
            .password(passwordEncoder().encode("password"))
             // 権限(ロール)を設定
            .authorities("ROLE_USER");
    }
}
セキュリティを設定する場合、WebSecurityConfigurerAdapter を継承してクラスを作成します。クラスには、@Configuration と @EnableWebSecurityアノテーションを付けます。
@EnableWebSecurity・・・Spring Securityの機能を有効にします。
セキュリティの設定は、configure(http)とconfigure(auth)メソッドに記載します。これらの違いは、configure(http)がhttpリクエストの設定で、configure(auth)がユーザの設定です。
3. コントローラの作成
[com.example.demo]で右クリック -> [新規] -> [クラス] を選択する。
[新規Javaクラス]ダイアログで、以下を入力して[完了]ボタンを押下します。
- パッケージ:com.example.demo.controller(controllerを追加)
- 名前:SecurityController
SecurityController.javaを以下のとおり編集します。
package com.example.demo.controller;

import org.springframework.stereotype.Controller;
import org.springframework.web.bind.annotation.GetMapping;

@Controller
public class SecurityController {

    @GetMapping("/")
    public String success() {
        return "success";
    }
}
4. Thymeleafテンプレートの作成
[templates]で右クリック -> [新規] -> [その他] を選択する。
[新規]ダイアログで、[Web] -> [HTMLファイル] を選択して[次へ]ボタンを押下します。
[新規 HTML ファイル]ダイアログで、以下を入力して[完了]ボタンを押下します。
- ファイル名:success.html
list.htmlを以下のとおり編集します。
<!DOCTYPE html>
<html xmlns:th="www.thymeleaf.org">
<head>
  <meta charset="UTF-8">
  <title>Title</title>
</head>
<body>
  <h2>ログイン成功</h2>
  <a th:href="@{/logout}">ログアウトの確認メッセージへ</a><br>
  <br>

  <form th:action="@{/logout}" method="post">
    <button>ログアウトする</button>
  </form>
</body>
</html>
[SpringSecurity1Application]で右クリック -> [実行] -> [Spring Boot アプリケーション] を選択する。
コンソールで起動を確認したら、ブラウザで http://localhost:8080/ にアクセスします。
表示された画面で、ユーザ名「user」とパスワード「password」を入力するとログインできます。
参考書籍
「Spring Boot 2.3 入門: 基礎から実演まで」(電子書籍) 原田 けいと/竹田 甘地/Robert Segawa著