Goal
- Push remote notification
- Show badge Unread notification
Development environment
We wil continue with the source code Github and development environment from previous article at link.
Note: if you haven't read previous article then please read it first.
Let's make
How to push notification ?
A push notification is a message the pops up on a mobile device. This message look like SMS text message and mobile alerts, but they only reach users who have installed your app. Each mobile platform has support for push notification, IOS, Android all have their own services. Through these services, App publishers can send notification the their users at any time.
Currently, there are many third-party services that enable push notification to both iOS and Android platforms such as:
In this article, I will instruct you to use the FCM service.
Flow control of FCM
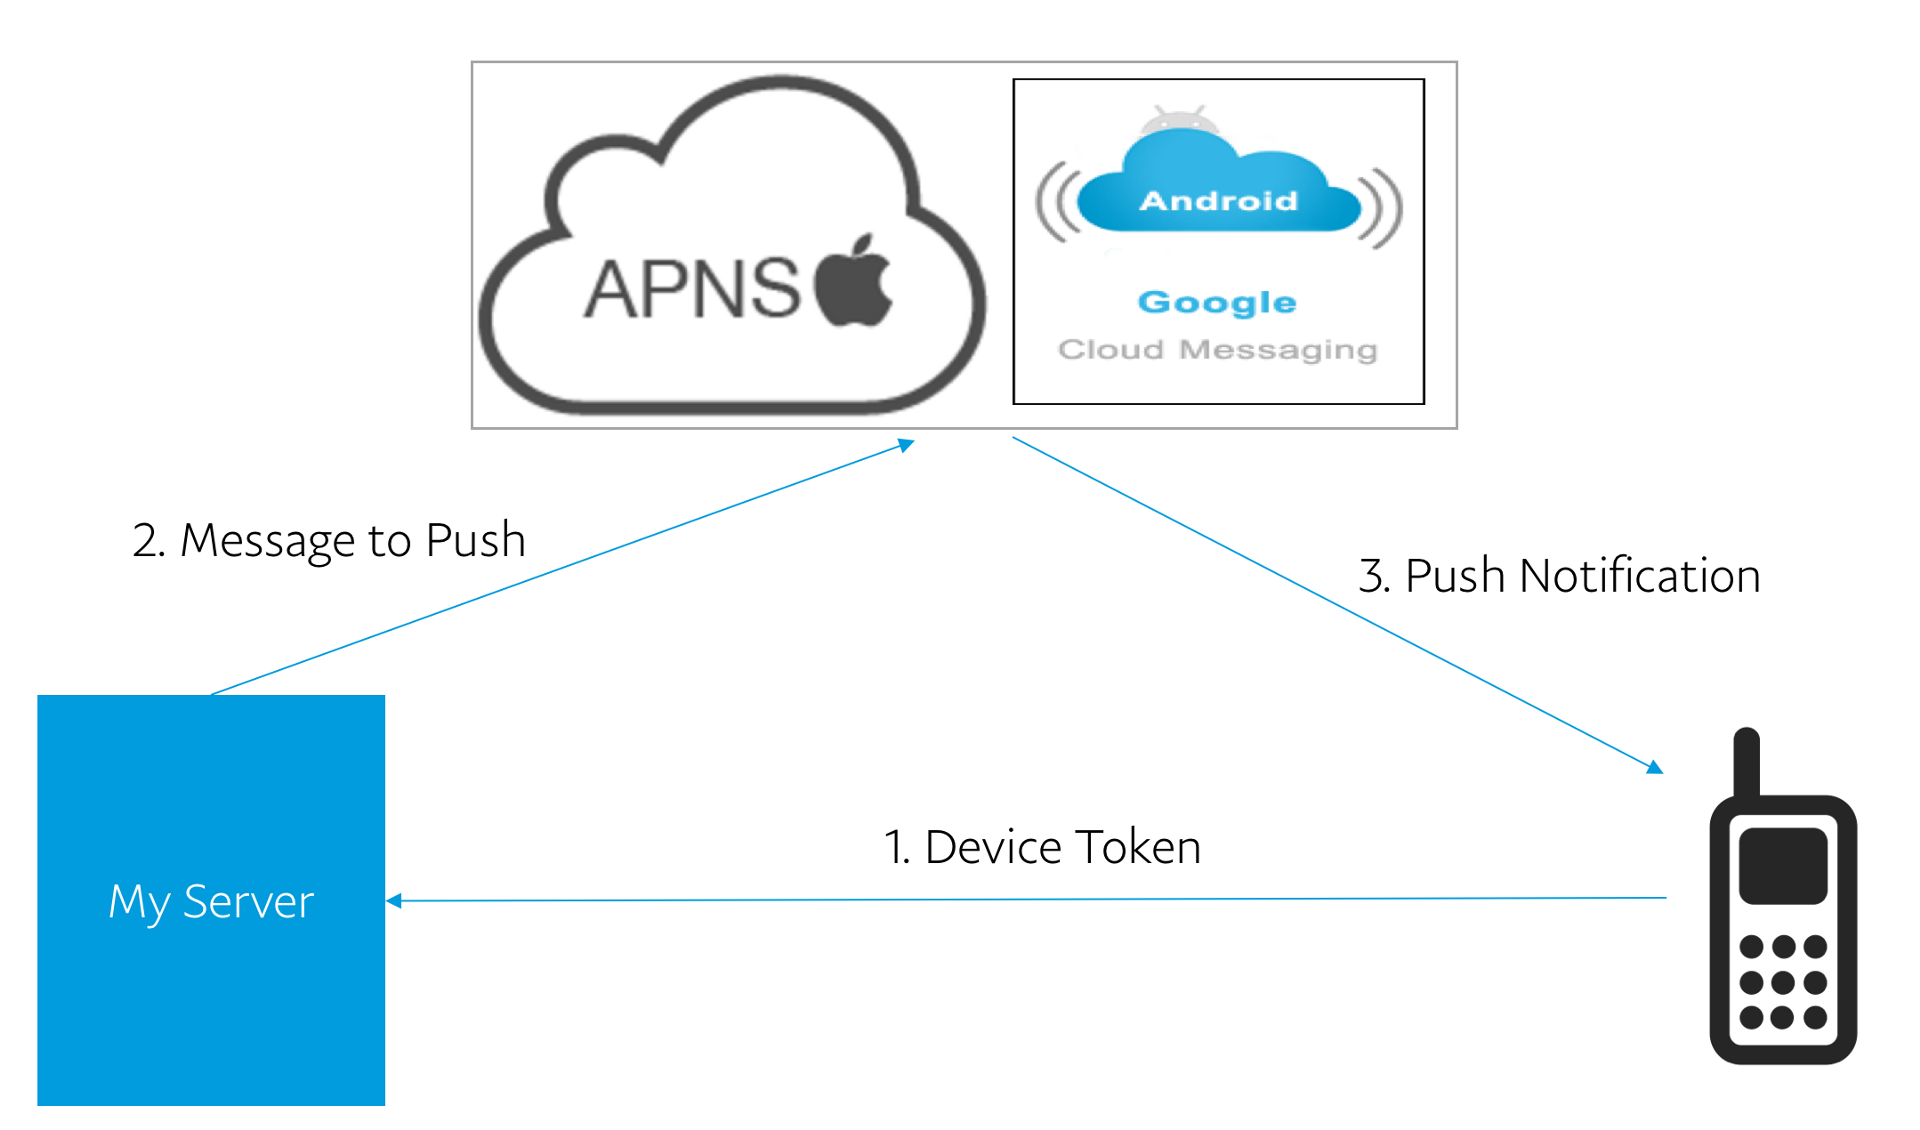
- First, the client sends the token device to the server.
- Second, the server send notification to FCM service via the API with data includes message and device token of client.
- Third, FCM service push notification to client, and client show notification on screen.
Register account FCM and add new project.
If you have a google account, you can register account FCM easily in firebase console
Then, you must to add new project for your app.
Open your project and select Project settings. In tag General, you download file google-services.json file and place it in android/app directory.
Note: you can read guide at here
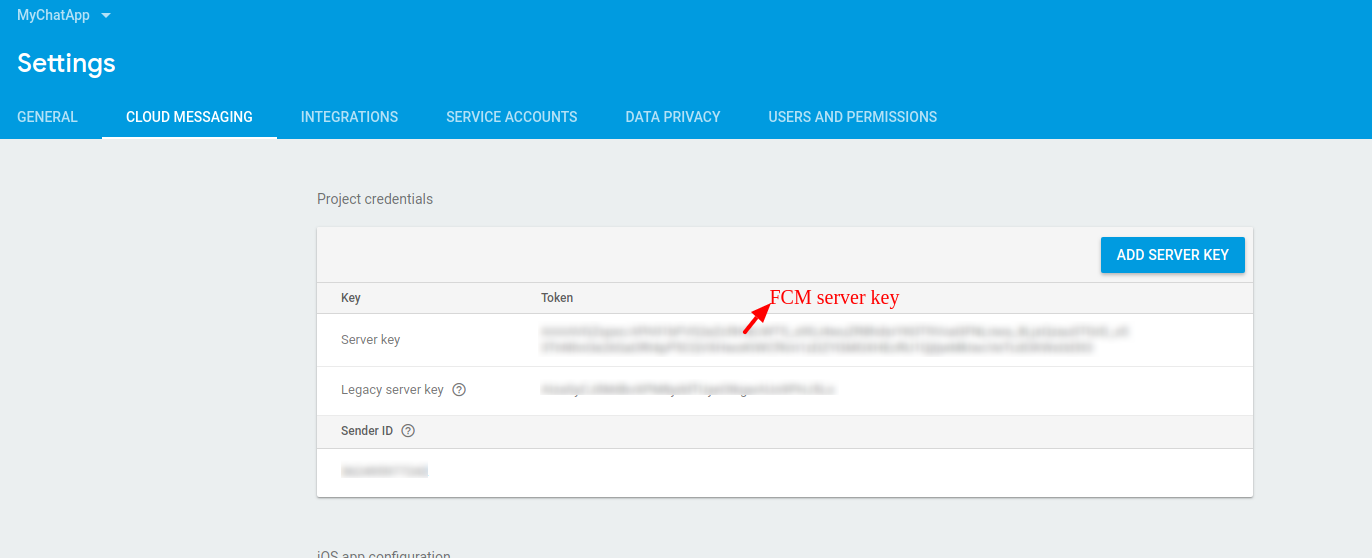
Next, you need find FCM server key API for backend server. It is in the cloud message tab.
Install package
In this article, I use 2 package for client react native and server rails
- Install react-native-fcm
npm install react-native-fcm --save
### in your Gemfile just include it: gem 'fcm'
bundle install
Implement Push remote notification
Android Configuration
You can reference here.
Implement client side
In Flow control of FCM, we can see that, client side has 2 function:
- send device token for server side
- listen event FCM push notification
Both of these tasks, react-native-fcm can support us with function
FCM.getFCMToken() and FCM.on(FCMEvent.Notification, async (notif) => {})
Create services folder and write code for FCM:
import { Platform } from 'react-native';
import FCM, { FCMEvent } from "react-native-fcm";

export function saveTokenDevice() {
  FCM.requestPermissions({ badge: true, sound: true, alert: true });

  FCM.getFCMToken().then(token => {
    storage.save({
      key: 'device',
      data: {
        type: Platform.OS,
        token: token
      }
    });
  });
};

function showLocalNotification(title, body) {
  FCM.presentLocalNotification({
    id: 0,
    icon: "ic_launcher", // as FCM payload, you can relace this with custom icon you put in mipmap
    title: title,
    body: body, // as FCM payload (required)
    priority: "high",
    ongoing: false,
    wake_screen: true,
    show_in_foreground: true // notification when app is in foreground (local & remote)
  });
};

export function registerAppListener() {
  FCM.on(FCMEvent.Notification, async (notif) => {
    showLocalNotification(notif.title, notif.body);
  });
};
import * as Fcm from './Fcm';

export {
  Fcm
};
...
import { Fcm } from "./services";

...
Fcm.saveTokenDevice();
...
After save token device into storage when run app, I will send token device to backend server when client login.
...
export default class Login extends Component {
  constructor(props) {
    super(props);
    this.state = {
      id: '',
      password: '',
      isLogin: false,
      device: {},
    };
  }

  componentWillMount() {
    storage.load({
      key: 'device'
    }).then(ret => {
      this.setState({device: ret});
    })
  }

  authLogin() {
    axios.post(`http://ip_server:3001/auth/sign_in`, {
      email: this.state.id,
      password: this.state.password,
      device_type: this.state.device.type,
      device_token: this.state.device.token
      })
      .then(res => {
        this.setState({isLogin: true});
        this.sysnStorage(res);
        this.redirect_to_chat();
      })
      .catch(err => {
        alert(err);
      });
  }
  ...
}
...
Implement server side
To receive the token from the client, we will need the customer sign in
Create a Device model
rails g model device device_type device_token user:reference
rails db:migrate
Rails.application.routes.draw do
  mount_devise_token_auth_for 'User', at: 'auth', controllers: {
    sessions: 'devise_token_auth_extend/customer_sessions'
  }
  ...
module DeviseTokenAuthExtend
  class CustomerSessionsController < DeviseTokenAuth::SessionsController
    def create
      # Check
      field = (resource_params.keys.map(&:to_sym) & resource_class.authentication_keys).first

      @resource = nil
      if field
        q_value = get_case_insensitive_field_from_resource_params(field)

        @resource = find_resource(field, q_value)
      end

      if @resource && valid_params?(field, q_value) && (!@resource.respond_to?(:active_for_authentication?) || @resource.active_for_authentication?)
        valid_password = @resource.valid_password?(resource_params[:password])
        if (@resource.respond_to?(:valid_for_authentication?) && !@resource.valid_for_authentication? { valid_password }) || !valid_password
         return render_create_error_bad_credentials
        end
        @client_id, @token = @resource.create_token
        @resource.save

        sign_in(:user, @resource, store: false, bypass: false)

        save_device

        yield @resource if block_given?

        render_create_success
      elsif @resource && !(!@resource.respond_to?(:active_for_authentication?) || @resource.active_for_authentication?)
        if @resource.respond_to?(:locked_at) && @resource.locked_at
          render_create_error_account_locked
        else
          render_create_error_not_confirmed
        end
      else
        render_create_error_bad_credentials
      end
    end

    private
    def save_device
      device = @resource.devices.find_or_initialize_by device_type: params[:device_type]
      device.update_attributes device_token: params[:device_token]
    end
  end
end
class ChatChannel < ApplicationCable::Channel
  ...
  def create messages
    messages["content"].each do |message|
      user_id = message["user"]["_id"]
      ChatMessage.create content: message["text"], user_id: user_id
      push_notification message["text"], Device.where.not(user_id: user_id).pluck(:device_token)
    end
  end

  private
  def push_notification message, device_tokens
    fcm = FCM.new ENV["fcm_server_key"], timeout: 3

    registration_ids = device_tokens # an array of one or more client registration tokens
    options = {
      data: {
        title: "You have a new message",
        body: message
      },
      collapse_key: "updated_score"
    }
    fcm.send registration_ids, options
  end
end
Note: ENV["fcm_server_key"] is taken from FCM server key on top.
Implement Show badge Unread notification
With react-native-fcm, we can implement function easily, only need use FCM.setBadgeNumber(number)
...

export function registerAppListener() {
  FCM.on(FCMEvent.Notification, async (notif) => {
    FCM.getBadgeNumber().then(number => {
      showLocalNotification(notif.title, notif.body);
      FCM.setBadgeNumber(number + 1);
    });
  });
};
Note:
- To display the badge, you must install on the real machine, because the emulator does not support badge.
- In this article, I test on Xiaomi Redmi (Android 6) and Sony Xperia (Android 7), some other machine can not display because config permissions of that machine, you can search google how to config for different machine.
Final
This article is my basic research on React Native based on some article references on the internet. Application Chat may not complete, and has some errors. But I will continue implement Application Chat.
You can follow up on my source github