目的
UbuntuでPostgresqlサーバーをインストールし、任意のユーザにてアクセス可能とするまでの手順を記述します。
環境
| 項目 | 内容 |
|---|---|
| ホストOS | Windows11pro |
| VM | VMware workstation 16 Player |
| ゲストOS | Ubuntu22.04 |
| postgresql | ver14 |
1. 必要なaptパッケージのインストール
sudo apt update
sudo apt dist-upgrade -y
sudo apt autoremove -y
sudo apt install curl finger net-tools postgresql postgresql-client vim
便利なツール
curl -fsS https://www.pgadmin.org/static/packages_pgadmin_org.pub | sudo gpg --dearmor -o /usr/share/keyrings/packages-pgadmin-org.gpg
sudo sh -c 'echo "deb [signed-by=/usr/share/keyrings/packages-pgadmin-org.gpg] https://ftp.postgresql.org/pub/pgadmin/pgadmin4/apt/$(lsb_release -cs) pgadmin4 main" > /etc/apt/sources.list.d/pgadmin4.list && apt update'
sudo apt install pgadmin4-desktop
2. OSユーザーの登録
OSのユーザーとpostgresqlでのユーザーがあり、混乱の原因となります。
PostgreSQLをインストールすると、OS上にpostgresというユーザーが自動的に作成されます。
finger postgres
Login: postgres       			Name: PostgreSQL administrator
Directory: /var/lib/postgresql      	Shell: /bin/bash
Never logged in.
No mail.
No Plan.
このOSユーザーにパスワードの設定が必要です。
任意のパスワードを設定します。
passwd postgres
新しい パスワード:
新しい パスワードを再入力してください:
passwd: パスワードは正しく更新されました
3.DBユーザーの登録
OSユーザーでPostgreSQLにログインします。
root@pc_name# su - postgres
postgres@pc_name$ psql
Password for user postgres:
psql (14.11 (Ubuntu 14.11-0ubuntu0.22.04.1))
Type "help" for help.

postgres=#
DBユーザーpostgresがデフォルトで作成されているので、このユーザーにパスワードを設定します。
postgres=# ALTER USER postgres with encrypted password '任意のパスワード';
ALTER ROLE
4.peer接続の解除
PostgreSQLはデフォルトでは、peer接続の設定になっています。
OSユーザーとDBユーザーが同じ場合、パスワード認証が省略される設定ですが、コマンドライン以外からのアクセスでは拒否されてしまいます。
以下のファイルを編集します。
vim /etc/postgresql/14/main/pg_hba.conf

...
# Database administrative login by Unix domain socket
local   all             postgres                                md5
...
# IPv4 local connections:
host    all             all             127.0.0.1/32            md5
...
5.PostgreSQL再起動
設定を反映させるためにサービスを再起動します。
root# /etc/init.d/postgresql restart
Restarting postgresql (via systemctl): postgresql.service.
6.アクセスの確認
OSのrootユーザーとしてDBユーザーpostgresでのアクセスを確認します。
root@pc_name# psql -U postgres
Password for user postgres: DBユーザーのパスワード
psql (14.11 (Ubuntu 14.11-0ubuntu0.22.04.1))
Type "help" for help.

postgres=#select * from pg_user;
 usename  | usesysid | usecreatedb | usesuper | userepl | usebypassrls |  passwd  | valuntil | useconfig
----------+----------+-------------+----------+---------+--------------+----------+----------+-----------
 postgres |       10 | t           | t        | t       | t            | ******** |          |
(1 row)
7.pgAdmin4でのアクセス
pgAdminをインストールした場合、GUIで確認ができます。

Object ExplorerでSeversを右クリックし、[Register]-[Server...]を選択します。

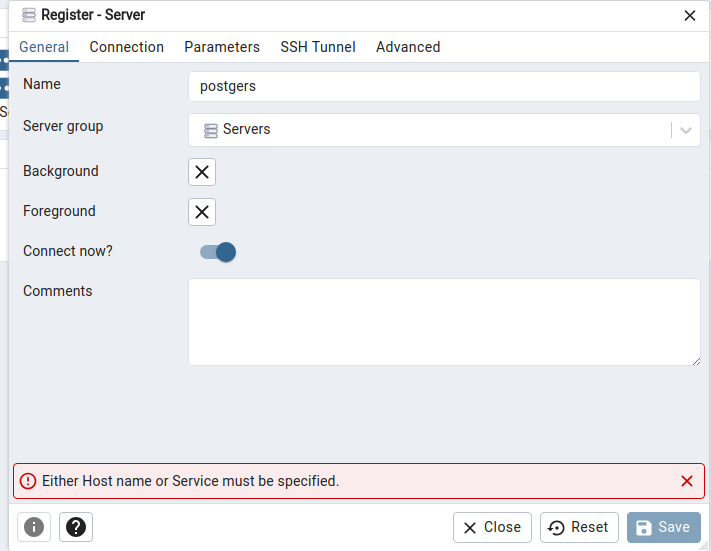
Register-Serverダイアログ
Generalタブで、Nameに識別しやすい名前を入力します。

Connectionタブで、以下の項目を入力
Saveを押して成功すると、以下の画面のように情報が見えるようになります。

Tableなどを作成した場合、ツリー上のSchemas以下に表示され、この中からTablesに作成したTableが表示されるようになります。右クリックメニュー[View/Edit Data]-[All Rows]を選ぶと、テーブル内のデータが表示されるようになります。

