今回学ぶこと
・画面遷移の実装方法
目指す成果物
このようにボタンをタップしたら,別のActivityに画面遷移する実装をしてみたいと思います.
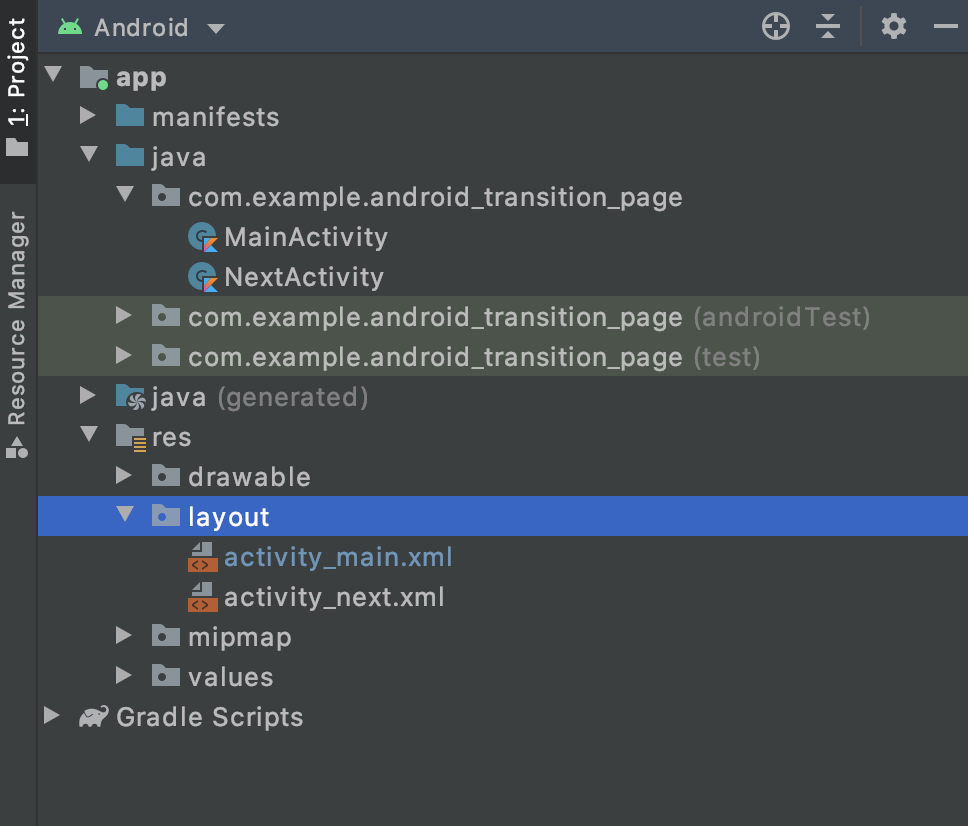
ディレクトリ構成
ポイントは「MainActivity.kt」のようなActivityを2つ作ることと、レイアウトXMLファイルを2つ作ることです.
ステップ
実装方法は2パターンあります
ポイントは画面遷移での必須の,「Intent」クラスと「startActivity」メソッドの使い方が方法①と②で異なります
1. 方法① 基本的な実装
MainActivity.kt
package com.example.android_transition_page

import android.content.Intent
import androidx.appcompat.app.AppCompatActivity
import android.os.Bundle
import kotlinx.android.synthetic.main.activity_main.*

class MainActivity : AppCompatActivity() {
    override fun onCreate(savedInstanceState: Bundle?) {
        super.onCreate(savedInstanceState)
        setContentView(R.layout.activity_main)

        //ここが方法②と異なります
        button_next_activity.setOnClickListener {
            val intent = Intent(this, NextActivity::class.java)
            startActivity(intent)
        }
    }
}
NextActivity.kt
package com.example.android_transition_page

import androidx.appcompat.app.AppCompatActivity
import android.os.Bundle

class NextActivity : AppCompatActivity() {
    override fun onCreate(savedInstanceState: Bundle?) {
        super.onCreate(savedInstanceState)
        setContentView(R.layout.activity_next)
    }
}
activity_main.xml
<?xml version="1.0" encoding="utf-8"?>
<LinearLayout xmlns:android="http://schemas.android.com/apk/res/android"
    xmlns:tools="http://schemas.android.com/tools"
    android:layout_width="match_parent"
    android:layout_height="match_parent"
    android:gravity="center"
    android:orientation="vertical"
    tools:context=".MainActivity">

    <TextView
        android:layout_width="wrap_content"
        android:layout_height="wrap_content"
        android:text="MainActivity" />

    <Button
        android:id="@+id/button_next_activity"
        android:layout_width="wrap_content"
        android:layout_height="wrap_content"
        android:text="Move to Next Activity" />

</LinearLayout>
activity_next.xml
<?xml version="1.0" encoding="utf-8"?>
<LinearLayout xmlns:android="http://schemas.android.com/apk/res/android"
    xmlns:app="http://schemas.android.com/apk/res-auto"
    xmlns:tools="http://schemas.android.com/tools"
    android:layout_width="match_parent"
    android:layout_height="match_parent"
    android:gravity="center"
    tools:context=".NextActivity">

    <TextView
        android:layout_width="wrap_content"
        android:layout_height="wrap_content"
        app:layout_constraintBottom_toBottomOf="parent"
        app:layout_constraintLeft_toLeftOf="parent"
        app:layout_constraintRight_toRightOf="parent"
        app:layout_constraintTop_toTopOf="parent"
        android:text="NextActivity"/>

</LinearLayout>
2. 方法② コード量を減らして省略した実装
MainActivity.kt
package com.example.android_transition_page

import android.content.Intent
import androidx.appcompat.app.AppCompatActivity
import android.os.Bundle
import kotlinx.android.synthetic.main.activity_main.*

class MainActivity : AppCompatActivity() {
    override fun onCreate(savedInstanceState: Bundle?) {
        super.onCreate(savedInstanceState)
        setContentView(R.layout.activity_main)

     //ここが方法①と異なります
        button_next_activity.setOnClickListener {
            startActivity(Intent(this, NextActivity::class.java))
        }
    }
}
NextActivity.kt
package com.example.android_transition_page

import androidx.appcompat.app.AppCompatActivity
import android.os.Bundle

class NextActivity : AppCompatActivity() {
    override fun onCreate(savedInstanceState: Bundle?) {
        super.onCreate(savedInstanceState)
        setContentView(R.layout.activity_next)
    }
}
activity_main.xml
<?xml version="1.0" encoding="utf-8"?>
<LinearLayout xmlns:android="http://schemas.android.com/apk/res/android"
    xmlns:tools="http://schemas.android.com/tools"
    android:layout_width="match_parent"
    android:layout_height="match_parent"
    android:gravity="center"
    android:orientation="vertical"
    tools:context=".MainActivity">

    <TextView
        android:layout_width="wrap_content"
        android:layout_height="wrap_content"
        android:text="MainActivity" />

    <Button
        android:id="@+id/button_next_activity"
        android:layout_width="wrap_content"
        android:layout_height="wrap_content"
        android:text="Move to Next Activity" />

</LinearLayout>
activity_next.xml
<?xml version="1.0" encoding="utf-8"?>
<LinearLayout xmlns:android="http://schemas.android.com/apk/res/android"
    xmlns:app="http://schemas.android.com/apk/res-auto"
    xmlns:tools="http://schemas.android.com/tools"
    android:layout_width="match_parent"
    android:layout_height="match_parent"
    android:gravity="center"
    tools:context=".NextActivity">

    <TextView
        android:layout_width="wrap_content"
        android:layout_height="wrap_content"
        app:layout_constraintBottom_toBottomOf="parent"
        app:layout_constraintLeft_toLeftOf="parent"
        app:layout_constraintRight_toRightOf="parent"
        app:layout_constraintTop_toTopOf="parent"
        android:text="NextActivity"/>

</LinearLayout>
まとめ
・画面遷移には「Intent」というクラスを使う
ソースコード
Github:
https://github.com/syuheifujita/android_transition_page
言葉の定義
おわりに:他にもっとわかりやすい方法あれば教えてください
画面遷移の実装方法をまとめてみました.
もしかすると,情報が古かったり間違っていたり,他にもっとわかりやすい方法があるのかもしれません.
皆さんの中で上手に実装方法をまとめているかたがいればぜひ教えてください!
Twitterやコメントなどでお待ちしています.質問でもお気軽に!