2019年にGoogleから,Web上でAndroidを学べるコースが提供されました.(Android Kotlin Fundamentals Course)
この記事では,そのコースを実際にやってみてアウトプットしてみるといった内容です.
何かツッコミなどあれば編集リクエストかコメントかTwitterでいただければ修正いたします ![]()
今回学ぶこと
・LinearLayoutを使ってビューを整理する方法
・ViewGroupの使い方
目指す成果物
今回は,AboutMeというアプリを作ってみます.
このアプリは,自分に関することを紹介したり友人,家族向けにカスタマイズしたりできます.

またこのアプリはこのような要素で構成されています.
・名前
・Doneボタン
・スターの画像
・スクロール可能なテキスト
実際のAndroidアプリでは,画像やテキストを表示し,クリックイベントの形式でユーザーからの入力を受け入れる組み合わせで構成されています.
ステップ
1. 「Hello World」という文字列が表示されるアプリを作ります
パラメータをこのように設定して.
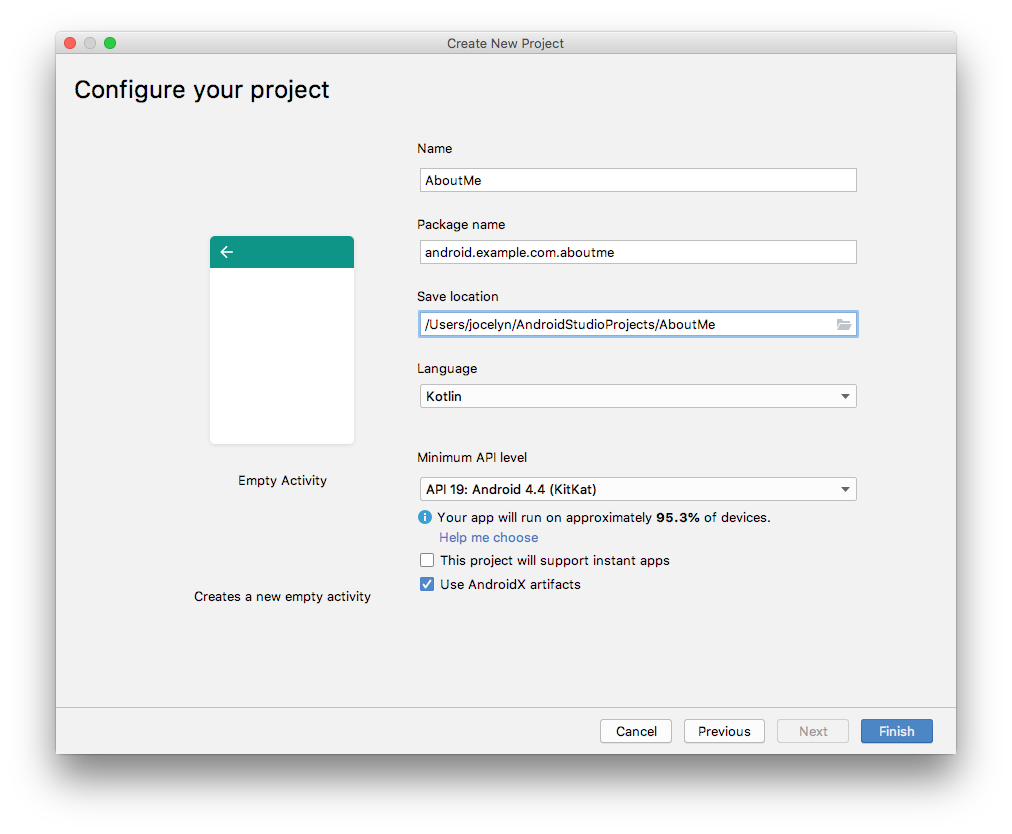
アプリを実行します.

デフォルトだとViewGroupはConstraintLayoutで,その中にTextViewが配置されています.
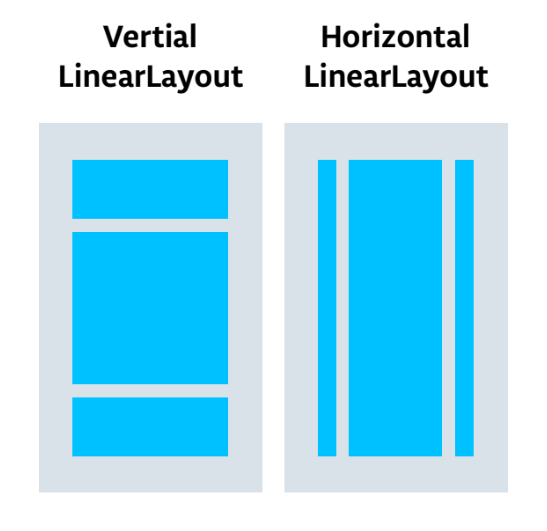
2. ルートレイアウトを変更して,LinearLayoutを使う
ここではルートのViewGroupをLinearLayoutに変更します.
そしてUI要素を垂直に配置します.
このようにLinearLayoutは,Vertial(垂直)かHorizonal(水平)に配置されます.
LinearLayoutを使うために,ルートレイアウトを変更していきます.
まず,app>res>layoutから,activity_main.xmlファイルを開きます.
次に[Text]タブの,ルートのViewGroupをContraintLayoutをLinearLayoutに変更します.
<androidx.constraintlayout.widget.ConstraintLayout xmlns:android="http://schemas.android.com/apk/res/android"
   xmlns:app="http://schemas.android.com/apk/res-auto"
   xmlns:tools="http://schemas.android.com/tools"
   android:layout_width="match_parent"
   android:layout_height="match_parent"
   tools:context=".MainActivity">

   <TextView
       android:layout_width="wrap_content"
       android:layout_height="wrap_content"
       android:text="Hello World!"
       app:layout_constraintBottom_toBottomOf="parent"
       app:layout_constraintLeft_toLeftOf="parent"
       app:layout_constraintRight_toRightOf="parent"
       app:layout_constraintTop_toTopOf="parent" />

</androidx.constraintlayout.widget.ConstraintLayout>
<LinearLayout
       xmlns:android="http://schemas.android.com/apk/res/android"
       xmlns:tools="http://schemas.android.com/tools"
       xmlns:app="http://schemas.android.com/apk/res-auto"
       android:layout_width="match_parent"
       android:layout_height="match_parent"
       android:orientation="vertical"
       tools:context=".MainActivity”>

    <TextView
           android:layout_width="wrap_content"
           android:layout_height="wrap_content"
           android:text="Hello World!"
           app:layout_constraintBottom_toBottomOf="parent"
           app:layout_constraintLeft_toLeftOf="parent"
           app:layout_constraintRight_toRightOf="parent"
           app:layout_constraintTop_toTopOf="parent" />

</LinearLayout>
orientation要素を設定するとUI要素の配置を垂直や水平に変更できます.
今回の場合は,android:orientation=“vertical"なのでUI要素は垂直に配置します.
3. TextViewを修正する
まずTextViewの要素をこのように修正しましょう.
ID name_text
text 自分の名前を設定します.(テキストはstring.xmlファイルで定義します)
textSize 20sp
textColor @android:color/black
layout_gravity center
<TextView
    android:layout_width="wrap_content"
    android:layout_height="wrap_content"
    android:id="@+id/name_text"
    android:text="@string/name"
    android:textSize="20sp"
    android:textColor="@android:color/black"
    android:layout_gravity="center"/>
次に,MainActivity.ktを開き,onCreate関数にあるこのようなコードを探します.
setContentView(R.layout.activity_main)
setContentView()はレイアウトファイルをActivityに接続するための関数です.
・R.というのが,アプリないのリソース(レイアウトファイル,画像)を参照するためのもの
・layout.activity_mainはリソースがレイアウトであることを表しています.
アプリを実行すると,TextViewがこのように表示されます.

4. TextViewのスタイルの設定
ここでは,margin,paddingやフォントと呼ばれるスタイルというものの設定をしていきます.

paddingは,ビューの境界内のスペースのことで,ビューのサイズにはpaddingも含まれます.
一般的に使用されるpadding要素はこのようなものがあります.
android:padding ビューの4つの端すべてにパディングを指定します。
android:paddingTop 上端のパディングを指定します。
android:paddingBottom 下端のパディングを指定します。
android:paddingStart ビューの「Start」のパディングを指定します。
android:paddingEnd ビューの「End」のパディングを指定します。
android:paddingLeft 左端のパディングを指定します。
android:paddingRight 右端のパディングを指定します。
またmarginは,ビューの境界の外側に追加されるスペースのことです.
一般的に使用されるmargin要素はこのようなものがあります.
android:layout_margin ビューの4つの側面すべてにマージンを指定します。
android:layout_marginBottom このビューの下側の外側のスペースを指定します。
android:layout_marginStart このビューの「Start」の外側のスペースを指定します。
android:layout_marginEnd このビューの端側のスペースを指定します。
android:layout_marginLeft このビューの左側のスペースを指定します。
android:layout_marginRight このビューの右側のスペースを指定します。
※APIレベル17(android4.2)以上をターゲットにしている場合:
・「Left」,「Right」の代わりに「Start」,「End」を使用します.
・それより前のバージョンで動かしたい場合は,android:paddingLeftとandroid:paddingStartの両方を指定します.
まず,paddingを追加していきます.
上端にスペースを入れるにはこのようにします.
<TextView
    android:layout_width="wrap_content"
    android:layout_height="wrap_content"
    android:id="@+id/name_text"
    android:text="@string/name"
    android:textSize="20sp"
    android:textColor="@android:color/black"
    android:layout_gravity="center"
    android:paddingTop="8sp" />
次に,marginを追加していきます.
<TextView
    android:layout_width="wrap_content"
    android:layout_height="wrap_content"
    android:id="@+id/name_text"
    android:text="@string/name"
    android:textSize="20sp"
    android:textColor="@android:color/black"
    android:layout_gravity=“center"
    android:paddingTop="8sp"
    android:layout_marginTop=“16dp” />
次に,フォントを変更していきます.
フォントを変更するにはfontFamily属性を使います.
<TextView
    android:layout_width="wrap_content"
    android:layout_height="wrap_content"
    android:id="@+id/name_text"
    android:text="@string/name"
    android:textSize="20sp"
    android:textColor="@android:color/black"
    android:layout_gravity="center"
    android:layout_marginTop="16dp"
    android:fontFamily="sans-serif"/>
次に,スタイルを抽出をしていきます.
スタイルはビューのデザインと形式を指定する属性のコレクションのことでした.
(スタイルは,fontColor,fontSize,backgroundColor,padding,marginなどの属性のことです)
これらのをまとめて抽出して,スタイルを再利用できるようにします.それがスタイルの抽出です.
・Component TreeでTextViewをクリックし,[Refactor]>[Extract Style]を選択します.
・[Extract Android Style]ダイアログで,Style nameにNameStyleと入力しOKをクリックします.
スタイルはリソースでもあるため,res/values/フォルダー内の,styles.xmlに保存されています.
<resources>

    <!-- Base application theme. -->
    <style name="AppTheme" parent="Theme.AppCompat.Light.DarkActionBar">
        <!-- Customize your theme here. -->
        <item name="colorPrimary">@color/colorPrimary</item>
        <item name="colorPrimaryDark">@color/colorPrimaryDark</item>
        <item name="colorAccent">@color/colorAccent</item>
    </style>

    <style name="NAmeStyle">
        <item name="android:layout_width">wrap_content</item>
        <item name="android:layout_height">wrap_content</item>
        <item name="android:textSize">20sp</item>
        <item name="android:textColor">@android:color/black</item>
        <item name="android:layout_gravity">center</item>
        <item name="android:layout_marginTop">16dp</item>
        <item name="android:fontFamily">sans-serif</item>
    </style>

</resources>
[Text]タブを開いて,style="@style/NameStyle”属性が追加されていることを確認してください.

5. ImageViewを追加する
ここでは画像を表示する,ビューを追加していきます.
TextViewの下にImageViewを配置します.
<ImageView
    android:id="@+id/star_image"
    android:layout_width="wrap_content"
    android:layout_height="wrap_content"
    app:srcCompat="@android:drawable/btn_star_big_on"
    android:layout_gravity="center"/>
6. ScrollViewを追加します
ScrollViewは,その中に配置されたテキストをスクロールできるようにするViewGroupのです.
通常は,子として一つのViewGroupやビューを含むことができます.

今回はこのように,TextViewをScrollViewの中に配置させてみます.

コードはこちらになります.
<ScrollView
    android:id="@+id/bio_scroll"
    android:layout_width="match_parent"
    android:layout_height="wrap_content">

    <TextView
        android:id="@+id/bio_text"
        android:layout_width="match_parent"
        android:layout_height="match_parent"/>
</ScrollView>
次に,ScrollView内の要素のTextViewのtextリソースを追加します.
string.xmlを開き,テキストを入力してください.
ここではサンプルを入力します.
<string name="bio">Hi, my name is Aleks.
\n\nI love fish.
\n\nThe kind that is alive and swims around in an aquarium or river, or a lake, and definitely the ocean.
\nFun fact is that I have several aquariums and also a river.
\n\nI like eating fish, too. Raw fish. Grilled fish. Smoked fish. Poached fish - not so much.
\nAnd sometimes I even go fishing.
\nAnd even less sometimes, I actually catch something.
\n\nOnce, when I was camping in Canada, and very hungry, I even caught a large salmon with my hands.
\n\nI\'ll be happy to teach you how to make your own aquarium.
\nYou should ask someone else about fishing, though.\n\n</string>
※注意:
・\nで改行
・アポストロフィを使うには,\でエスケープする必要があります
・太文字のテキストを使いたい場合は,…
・斜体のテキストを使いたい場合は,…
また行の間隔を指定するには,このようにandroid:lineSpacingMultiplier属性を使います.

これですべてのステップは終了です.
アプリを実行してみましょう.

まとめ
・LinearLayoutとScrollViewはViewGroup
・LinearLayoutは,子ビューを水平や垂直に配置できる
・ScrollViewの子ビューとして含めるのは一つだけなので,複数のビューを含みたいときはScrollViewの中にさらにViewGroupを作ることで実装できる
・スタイルは,ビューのデザインを指定する属性のコレクション(fontColor,fontSize,backgroundcolor,padding,margin)
・アプリのデザインを統一するには,スタイルを再利用する
宿題
・ScrollView内で,TextViewの上にImageViewを配置してください
Hint: ScrollView内に含めることができる子ビューは一つのみです.うまくViewGroupを使って実装しましょう.
クイズ
1問目
ViewGroupは次のうちどれですか?
▢ EditText
▢ LinearLayout
▢ TextView
▢ Button
2問目
次のリストされたビュー階層のうち、無効なものはどれですか?
▢LinearLayout> TextView、TextView、ImageView
▢ ScrollView> LinearLayout> TextView、Button、Button、ScrollView>TextView
▢ TextView> TextView、ImageView、ScrollView
3問目
スタイルは,styles.xmlで定義されたリソースです。スタイルを使用して、色、フォント、テキストサイズ、およびビューの他の多くの特性を定義できます。正しいか間違っているか?
▢true
▢false
4問目
ScrollViewは、任意の数のビューまたはビューグループを子として含むことができるビューグループです。正しいか間違っているか?
▢true
▢false
5問目
画像を表示するために使用できる,UI要素はどれですか?
▢ TextView
▢ ImageView
▢ Button
▢ ScrollView
参考資料
ソースコード
Github:
https://github.com/syuheifujita/android-codeLab-fundamental-2-1
言葉の定義
・LinearLayout(リニアレイアウト)
ViewGroupの一つで,これを使うと簡単にUI要素を垂直や水平に並べて配置できる.
・ViewGroup
ビューを一つにまとめることのできるもので,LinearLayout,ConstrainLayout,ScrollViewがある.
CodeLabs by Google
https://codelabs.developers.google.com/android-kotlin-fundamentals/