(1)React Native(Expo)で3D表示
普段はソーシャルワーカーとして障がいをお持ちの方の支援をしています。ReactやReact Nativeでアプリ作成を楽しんでおり、最近は3D表示に関心がありThree.jsなどを使っています。前回は3D表示で簡単な一人称視点のコードを紹介しました。さすがにタップ連打で移動は大変なので、これも簡単なバーチャルスティックを追加してみようと思います 。
(2)今回は三人称視点で3D空間を動いてみる
今回は三人称視点で動いてみようと思います。前回は一人称だったのでカメラの位置座標を動かしていましたが、今回はバーチャルスティックで入力された数値分オブジェクトも一緒に動かしてみます。
参考にしたサイト Three.js公式 Expo公式 GLView
(3)使った技術
・react-native
・expo 42.0.1
・expo-gl 10.4.2
・expo-three 6.0.1
・gsap 3.6.0
・three 0.134.0
(4)コード
まずは読み込み
```ts //App.js import React from "react"; import { View } from "react-native"; import { GLView } from "expo-gl"; import { Renderer } from "expo-three"; import { TweenMax } from "gsap"; import { PointLight, GridHelper, Mesh, PerspectiveCamera, Scene, BoxGeometry, MeshLambertMaterial, } from "three"; import Positon from "./Position"; // バーチャルスティック可能な限りコメントしました
```ts
//App.js
export default function App() {
const [cameras, setCameras] = useState(null); // cameraを読めるよう変数にします
const [cubes, setCubes] = useState(null); // cubeを読めるよう変数にします
// TweenMax.to(何が, 何秒で, { z軸に distance 分移動 })
//オブジェクトとカメラを同時に動かすことで三人称視点にする
const move = (distance) => {
TweenMax.to(cubes.position, 0.1, {
z: cubes.position.z + distance.y,
x: cubes.position.x + distance.x,
});
TweenMax.to(cameras.position, 0.1, {
z: cameras.position.z + distance.y,
x: cameras.position.x + distance.x,
});
};
return (
<>
<View style={{ flex: 1 }}>
<GLView
style={{ flex: 1 }}
onContextCreate={async (gl) => {
// 3D空間の準備
const { drawingBufferWidth: width, drawingBufferHeight: height } =
gl;
const renderer = new Renderer({ gl }); // レンダラーの準備
renderer.setSize(width, height); // 3D空間の幅と高さ
renderer.setClearColor("white"); // 3D空間の配色
const scene = new Scene(); // これが3D空間
scene.add(new GridHelper(100, 100)); //グリッドを表示
// 配置するオブジェクト
const geometry = new BoxGeometry(2, 2, 2); // 四角い物体
const material = new MeshLambertMaterial({ color: "blue" }); // 物体に光を反射させ色や影を表現する
cube = new Mesh(geometry, material); // geometryとmaterialでオブジェクト完成
cube.position.set(0, 1, 0); // 配置される座標 (x,y,z)
scene.add(cube); // 3D空間に追加
setCubes(cube); // 変数cubesにセットします
// 3D空間の光!
const pointLight = new PointLight(0xffffff, 2, 1000, 1); //一点からあらゆる方向への光源(色, 光の強さ, 距離, 光の減衰率)
pointLight.position.set(0, 200, 200); //配置される座標 (x,y,z)
scene.add(pointLight); //3D空間に追加
// カメラが映し出す設定(視野角, アスペクト比, near, far)
const camera = new PerspectiveCamera(45, width / height, 1, 1000);
setCameras(camera); // 変数camerasにセットします
// カメラの初期座標
let cameraInitialPositionX = 0;
let cameraInitialPositionY = 2;
let cameraInitialPositionZ = 7;
// カメラの座標
camera.position.set(
cameraInitialPositionX,
cameraInitialPositionY,
cameraInitialPositionZ
);
const render = () => {
cube.rotation.x += 0.01; // 繰り返しオブジェクトを回転させる
cube.rotation.y += 0.01;
requestAnimationFrame(render); // アニメーション
renderer.render(scene, camera); // レンダリング
gl.endFrameEXP(); // 現在のフレームを表示する準備ができていることをコンテキストに通知するpresent (Expo公式)
};
render();
}}
/>
</View>
<View style={{ flexDirection: "row", alignSelf: "center" }}>
// Position.jsから取得したx座標 y座標を除算して 関数moveに渡す
<Positon
onMove={(data) => {
move({ x: (data.x - 60) / 1000, y: (data.y - 60) / 1000 });
}}
/>
</View>
</>
);
}
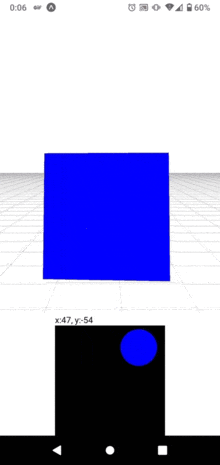
App.jsに渡すx座標、y座標をバーチャルスティックを使って取得する
// Position.js
import React, { useState } from "react";
import { View, Text } from "react-native";

export default function Position(props) {
  const { onMove } = props; // App.jsに渡します

  const largeRadius = 90; // 外側の四角の一片の半分
  const smallRadius = largeRadius / 3; // 中の円の半径

  const [x, setX] = useState(largeRadius - smallRadius); // 四角の一片の半分 - 小さい円の半径の差 x
  const [y, setY] = useState(largeRadius - smallRadius); // 四角の一片の半分 - 小さい円の半径の差 y

  const handleTouchMove = (e) => {
    const touchX = e.nativeEvent.locationX; // 画面をタッチしたときのx座標
    const touchY = e.nativeEvent.locationY; // 画面をタッチしたときのy座標
    // 小さい円の半径を差し引く
    let coordinates = {
      x: touchX - smallRadius,
      y: touchY - smallRadius,
    };
    // 外側の四角の範囲内の数値だけを取得したいので
    setX(Math.min(120, Math.max(0, coordinates.x))); // Math関数でxの範囲を設定 0 < x < 120
    setY(Math.min(120, Math.max(0, coordinates.y))); // Math関数でyの範囲を設定 0 < y < 120
    onMove({ x: x, y: y });
 };
  // 指を外した時に実行される関数 x座標、y座標をリセットし小さい円が真ん中に戻る
  const handleTouchEnd = () => {
    setX(largeRadius - smallRadius);
    setY(largeRadius - smallRadius);
  };

  return (
    <>
      <View>
        <Text>
          x:{Math.trunc(x - 60)}, y:{Math.trunc(y - 60)} // Math.truncで少数以下をまるめる
        </Text>
        <View
          onTouchMove={handleTouchMove} // タッチして指を動かした時
          onTouchEnd={handleTouchEnd} // 指を画面から外した時
          style={{
            width: 2 * largeRadius,
            height: 2 * largeRadius,
            backgroundColor: "black",
          }}
        >
          <View
            pointerEvents="none"
            style={{
              height: 2 * smallRadius, // 直径
              width: 2 * smallRadius,
              borderRadius: smallRadius, // まーるい円にする
              backgroundColor: "blue",
              position: "absolute",
              transform: [{ translateX: x }, { translateY: y }], // 小さい円の座標
            }}
          />
        </View>
      </View>
    </>
  );
}
(5)終わりに
Advent Calendarがあるとモチベーションが上がりますね!バーチャルスティックでできることが見つかるといいな。React NativeでのVRMモデル読み込みが実現できず、Reactよりもできることが限られてしまい残念です。いろいろなオブジェクトが表示できると広がりそう![]()