本記事について
UdemyでDjangoについて学習した結果のアウトプットページです。
前の記事の続きになります。
今回は、Djangoの機能の1つであるrenderを使ってみようと思います。
urls.py
ulrs.pyは前回と同じです。
from django.urls import path
from . import views

app_name = 'myapp'

urlpatterns = [
    path('', views.index, name='index'),
]
views.py
views.pyを以下のように変更します。
from django.shortcuts import render

def index(request):
    context = {
        'names':['鈴木','佐藤','高橋'],
        'message':'こんにちは。',
    }
    return render(request, 'myapp/index.html', context)
まずfrom django.shortcuts import renderでrenderをインポートします。
つづいて、def indexを編集します。
def indexに、contextというdictionaryを追記します。
contextには、namesとmessageというKeyがあります。
namesには複数の値を登録しておきましょう。
最後にreturn render(request, 'myapp/index.html', context)でmyapp/index.htmlにcontextを渡します。
これで、myapp/index.htmlでcontextのKeyと値が利用できるようになります。
テンプレートファイルの置き場所の設定
Djangoでは、テンプレートファイルの置き場所が決められています。
この辺がDjangoを学び始めだとかなり混乱するのですが、
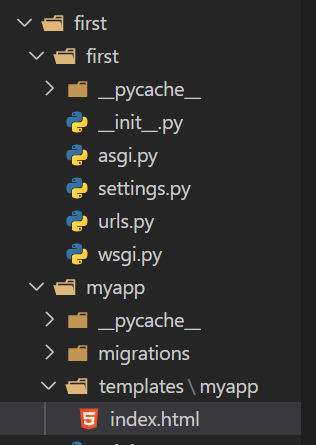
結論から言いますと、myapp/index.htmlは以下の場所になります。
first\myapp\templates\myapp\index.html

具体的に手順を追って説明します。
1.first\myappの下に、templatesというフォルダを作成します。
2.さらにその下にアプリ名と同じフォルダ(今回はmyapp)を作成します。
3.そのmyappフォルダにindex.htmlを作成します。
4.urls.pyでmyapp/index.htmlにアクセスがあると、このindex.htmlファイルにアクセスされます。
5.↓のようなルールで保存されると覚えると良いかもしれません。
<プロジェクト名>/<アプリ名>/templates/<アプリ名>
index.html
index.htmlには以下のように記述します。
<p>{{ names.0 }}さん。{{ message }}</p>
<p>{{ names.1 }}さん。{{ message }}</p>
<p>{{ names.2 }}さん。{{ message }}</p>

<hr>

{% for name in names %}
    <p>{{ name }}さん。{{ message }}</p>
{% endfor %}
DjangoのHTMLファイルに書く記述はPythonと似ているようで微妙に記法が異なります。
変数は{{ }}で囲い、forなどのプログラム命令は{% %}で囲みます。
また、HTML内にはインデントという概念が無いため、forやifの終わりに{% endfor %}などで明示的と表現してあげる必要があります。
Pythonに慣れていると、かなり面倒に感じますが、慣れるしかありません。
最初の3行から解説します。
contextのnamesには、3つの値が登録されていました。
names.0とは、namesの1番目の値を引っ張ってくるという意味になります。
names.1は、namesの2番目の値です。
messageは1つしか値が無いので、添字は不要です。
続いて、最後の3行について説明します。
{% for name in names %}でnamesから1つずつ値を取り出します。
この辺はPythonと表記が同じなので分かりやすいですね。
最後は{% endfor %}で閉じるのを忘れずに。
動作確認
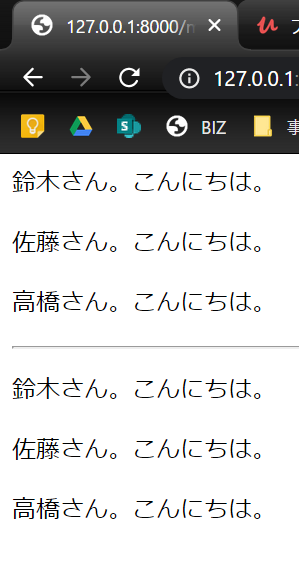
開発用サーバーを、py manage.py runserverで起動して、index.htmlにアクセスしてみましょう。以下のように表示されていれば問題ありません。
上の3行が添字での値表示で、下3行がfor分による値表示になります。
次回の記事
