はじめに
オンプレ Kubernetes に、Service の type: Loadbalancer を可能にするため、
ベアメタル環境で Loadbalancer が構築可能な MetalLB を導入したのでその内容を記載する
また、MetalLB は BGP でプールIP を広報できるため、BGP が利用できコスパが高い EdgerouterX を外部ルータとして利用したのでそちらの内容も合わせて記載する
MetalLB とは
- ベアメタル環境向け Loadbalancer 実装
- Loadbalancer で付与する IP をクラスタ外部に広報する方法として、2つのモードがある
- Layer2 mode (ARP/NDP)
- ノード接続セグメントと同じセグメントにプールIPを作成して ARP(IPv4)/NDP(IPv6) で広報する
- BGP mode
- BGP で外部ルータとピアリングをし Loadbalancer で使用するプール IP を広報する
- Layer2 mode (ARP/NDP)
- 現在はベータ版 [成熟度]
今回利用 Version: v0.8.3 (2020.03.01 時点で最新)
EdgeRouter X (ER-X) とは
Vyatta ベースの OS で動く Router
Amazon で ¥9,999 (2020.03.01時点) でとてもコスパがいい
- Vyatta からフォークされ開発されている EdgeOS で動作 (Vyatta, VyOS と似た操作・設定)
- WebUI 有り。ある程度なら Web で操作・設定が可能
- Routing Protocol は様々なプロトコルに対応
- Static Routes
- OSPF/OSPFv3
- RIP/RIPng
- BGP (with IPv6 Support)
- IGMP Proxy
- Security 機能として ACL/Zone Base Firewall および NAT 機能
- その他にも色々機能あり[データシート]
- 最大消費電力 5W
- ベンダー: Ubiquiti Networks
実機写真

OS Version は後述するが、2020.03.01 時点で最新の v2.0.8 に Upgrade している
Kubernetes クラスタ環境
kubespray で構築した Kubernetes クラスタ。(intel nuc + ESXi + CentOS7 + kubespray)
Version : v1.16.3
詳細構成は下記記事の環境。
https://qiita.com/suzuyui/items/e7531fe5e1e84c061b23
ノードのIPは 192.168.129.0/24 のうち、192.168.129.25-28,35-38 を使用している。
構成図
今回の、 Metallb リソースや Network 構成を整理把握するため、概要を下記に記載する。
(左側のオレンジ・紫付近を Netowrk , 右側の K8s cluster 内が Kubernetes リソースをメインに記載)

- Kubernetes リソース (青色箇所)
- Controler は Deployment で通常 1 Pod 構築される
- Speaker は DaemonSet で tolerations も設定され、Master/Worker 全ノードに構築される
- Controler / Speaker は SA を持ち rules が適応されている
- Speaker は PodSecurityPolicy が適応される
- BGP 構成 (オレンジ・紫箇所)
- EdgeRouterX と MetalLB 間は eBGP で接続 (iBGP でも可)
- MutiPaths 設定で接続し ECMP でのルーティングを実施する
- config詳細は後述する
- 今回は、EdgeRouterX 側を AS:65001, MetalLB 側を AS:65002, LoadBalancer へのIPプールアドレスは 192.168.131.0/24 とした
また、DaemonSet は下記の記載がある。
-
hostnetwork: true- Pod はノードのネットワークに属することができる。これは PodSecurityPolicy で許可されている。
概要図の設定は下記に分かれる。(赤色で設定範囲を囲っている)
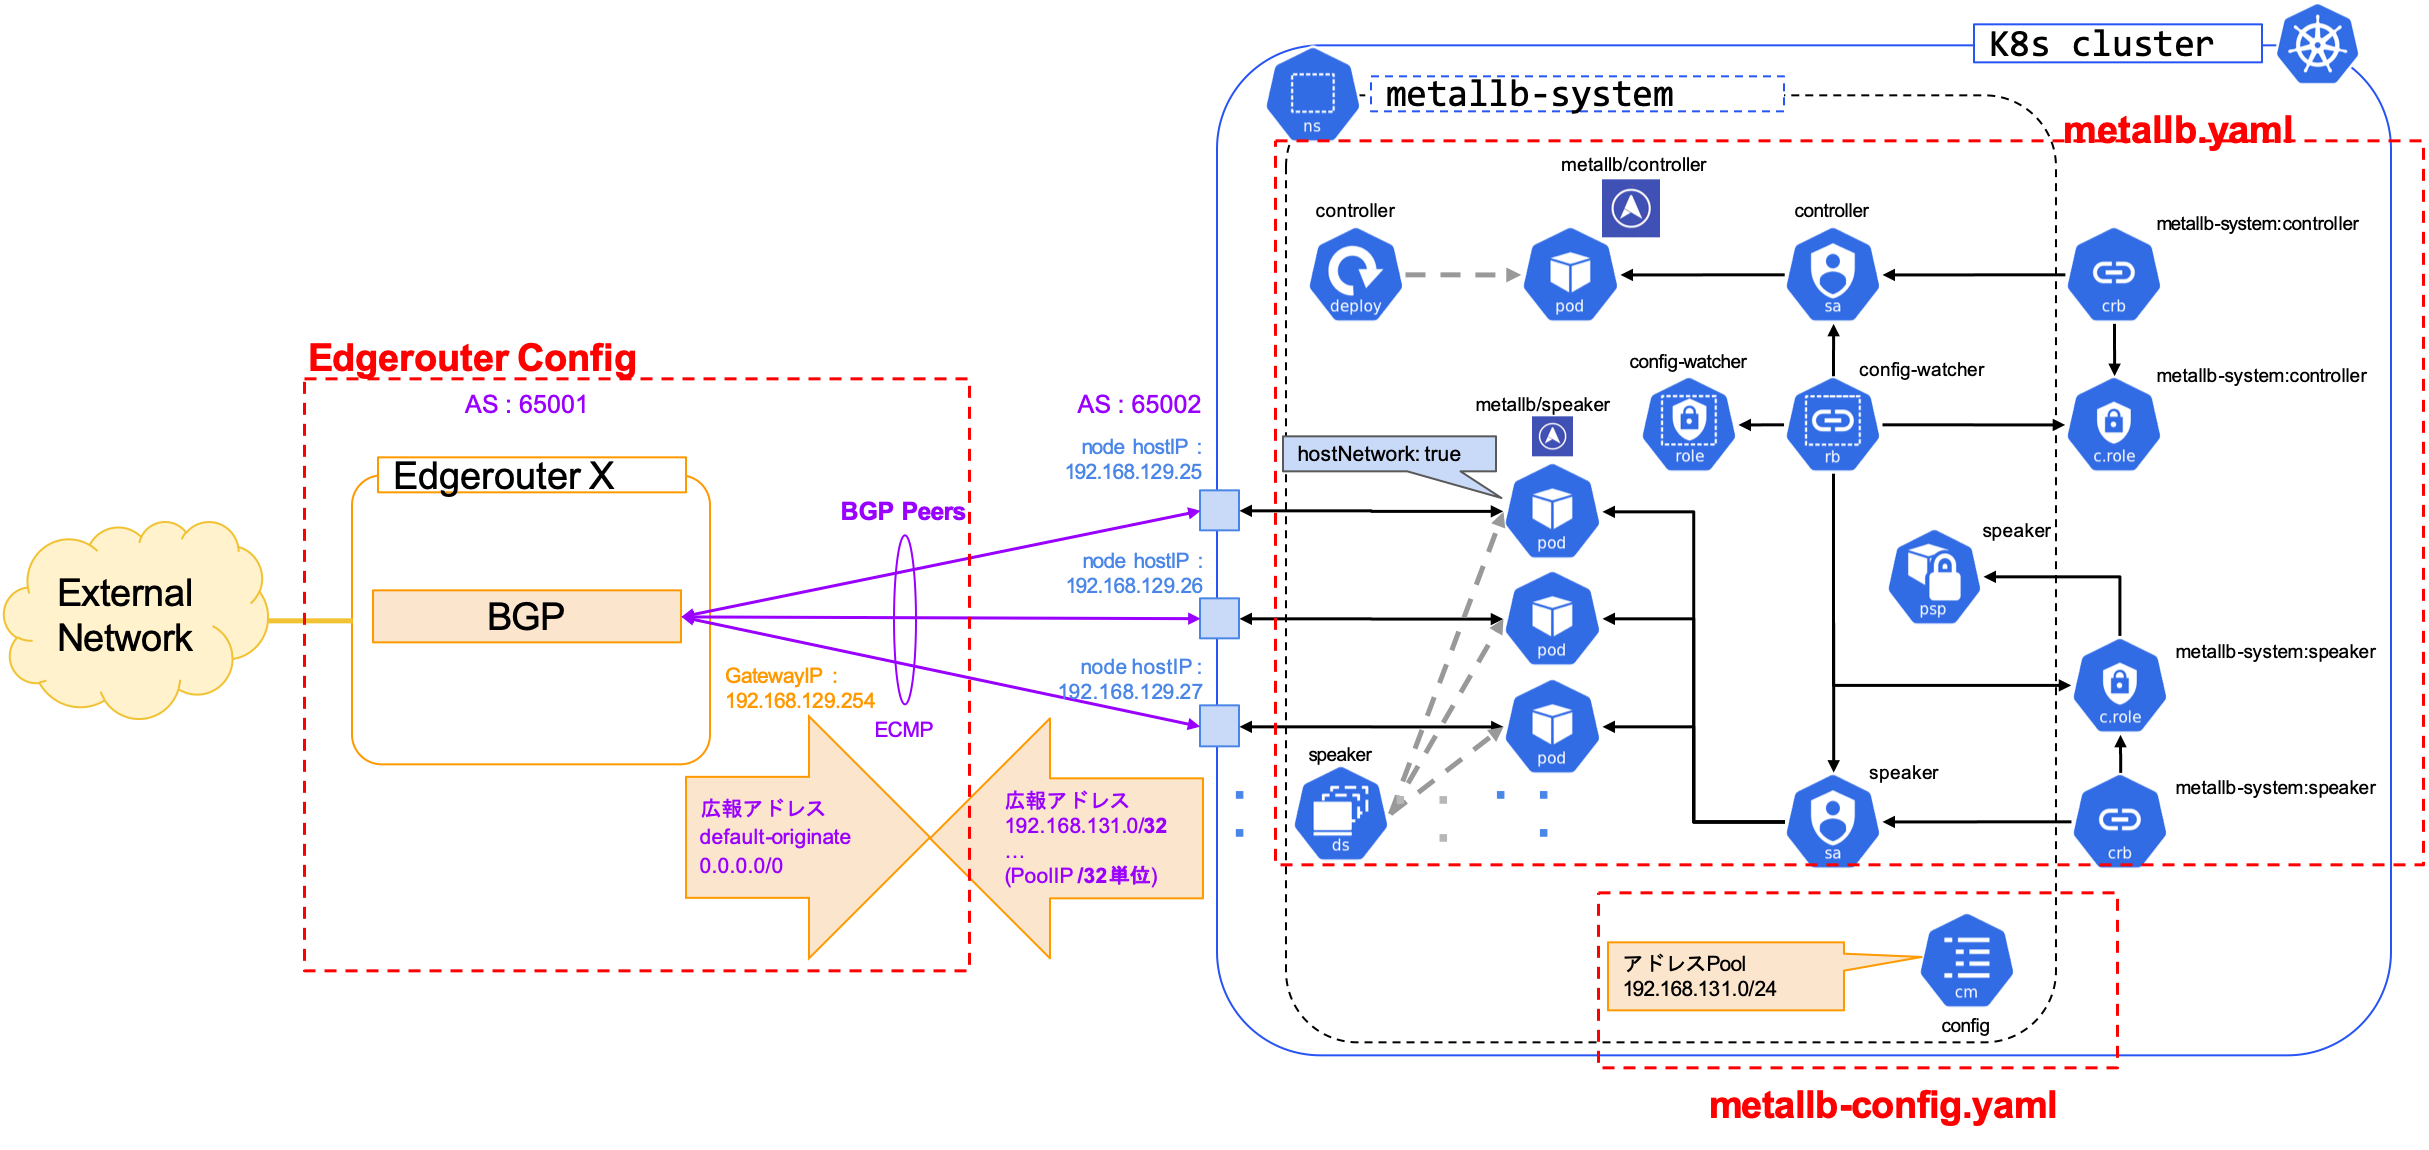
上記図の設定 3 つは下記
- Edgerouter Config : Edgerouter で設定する Config範囲 (BGP 設定を抜粋して Edgerouter X 設定の際に記載する)
- metallb.yaml: metallb 導入時に使用するyaml
- metallb-config.yaml: metallb の設定をするユーザ側で設定する config
実行手順
下記の順番で導入し確認を実施する。
- MetalLB インストール
- MetalLB Configuration
- Edgerouter X OS Upgrade
- Edgerouter X Configuration
- Loadbalancer 利用テストアプリでの動作確認
参考:
https://metallb.universe.tf/
https://github.com/metallb/metallb
コマンドは 2020.03.01 時点の記載となる。
1. MetalLB インストール
MetalLB を公式サイトの manifest : metallb.yaml をダウンロードして apply して導入する。
$ curl -OL  https://raw.githubusercontent.com/google/metallb/v0.8.3/manifests/metallb.yaml
$ kubectl apply -f metallb.yaml
namespace/metallb-system created
podsecuritypolicy.policy/speaker created
serviceaccount/controller created
serviceaccount/speaker created
clusterrole.rbac.authorization.k8s.io/metallb-system:controller created
clusterrole.rbac.authorization.k8s.io/metallb-system:speaker created
role.rbac.authorization.k8s.io/config-watcher created
clusterrolebinding.rbac.authorization.k8s.io/metallb-system:controller created
clusterrolebinding.rbac.authorization.k8s.io/metallb-system:speaker created
rolebinding.rbac.authorization.k8s.io/config-watcher created
daemonset.apps/speaker created
deployment.apps/controller created
適応すると、controller が 1 Pod と、各ノードに speaker Pod が構築される
$ kubectl get po -n metallb-system -o wide
NAME                          READY   STATUS    RESTARTS   AGE     IP               NODE            NOMINATED NODE   READINESS GATES
controller-65895b47d4-5tpkx   1/1     Running   0          6h39m   10.233.92.184    k8sworker02     <none>           <none>
speaker-4db6t                 1/1     Running   0          6h39m   192.168.129.26   k8smaster03     <none>           <none>
speaker-ftz2p                 1/1     Running   0          6h39m   192.168.129.38   k8scalicorr02   <none>           <none>
speaker-kntts                 1/1     Running   0          6h39m   192.168.129.25   k8smaster01     <none>           <none>
speaker-pgnll                 1/1     Running   0          6h39m   192.168.129.28   k8scalicorr01   <none>           <none>
speaker-rjc4n                 1/1     Running   0          6h39m   192.168.129.27   k8sworker01     <none>           <none>
speaker-tzhmv                 1/1     Running   0          6h39m   192.168.129.37   k8sworker03     <none>           <none>
speaker-v2xz7                 1/1     Running   0          6h39m   192.168.129.35   k8smaster02     <none>           <none>
speaker-vp7rp                 1/1     Running   0          6h39m   192.168.129.36   k8sworker02     <none>           <none>
2. MetalLB Configuration
MetalLB の設定をする ConfigMap を作成する。
今回は BGP mode で設定する。
- my-asn: k8s-cluster 向けに
65002とした - peer-ana: EdgeRouterX 側のAS番号。今回はeBGPのため別のAS
65001とした - peer-address: EdgeRouterX 側のアドレス
- protocol:
bgpとする - addresses: loadbalancer で実際に付与するアドレスプールアドレス
apiVersion: v1
kind: ConfigMap
metadata:
  namespace: metallb-system
  name: config
data:
  config: |
    peers:
    - my-asn: 65002
      peer-asn: 65001
      peer-address: 192.168.129.254
    address-pools:
    - name: my-ip-space
      protocol: bgp
      addresses:
      - 192.168.131.0/24
上記を apply する
$ kubectl apply -f metallb-config.yaml
configmap/config created
3. Edgerouter X OS Upgrade
EdgerouterXのOS Upgrade を実施する。
EdgeOS が v1.10 以降であれば実施不要。
Upgrade 理由
Edgerouter では Version により BGP ECMP 構成でメモリリークがあるらしく、
コミュニティではv1.10以降は大丈夫との報告があるので、念のため最新版にバージョンアップグレードを実施する。
参考コミュニティ情報
上記抜粋
eBGP multipath memory leak / EdgeRouter Pro v1.9.7+hotfix.1
Since updating to 1.10, I have not encountered the memory leak problem.
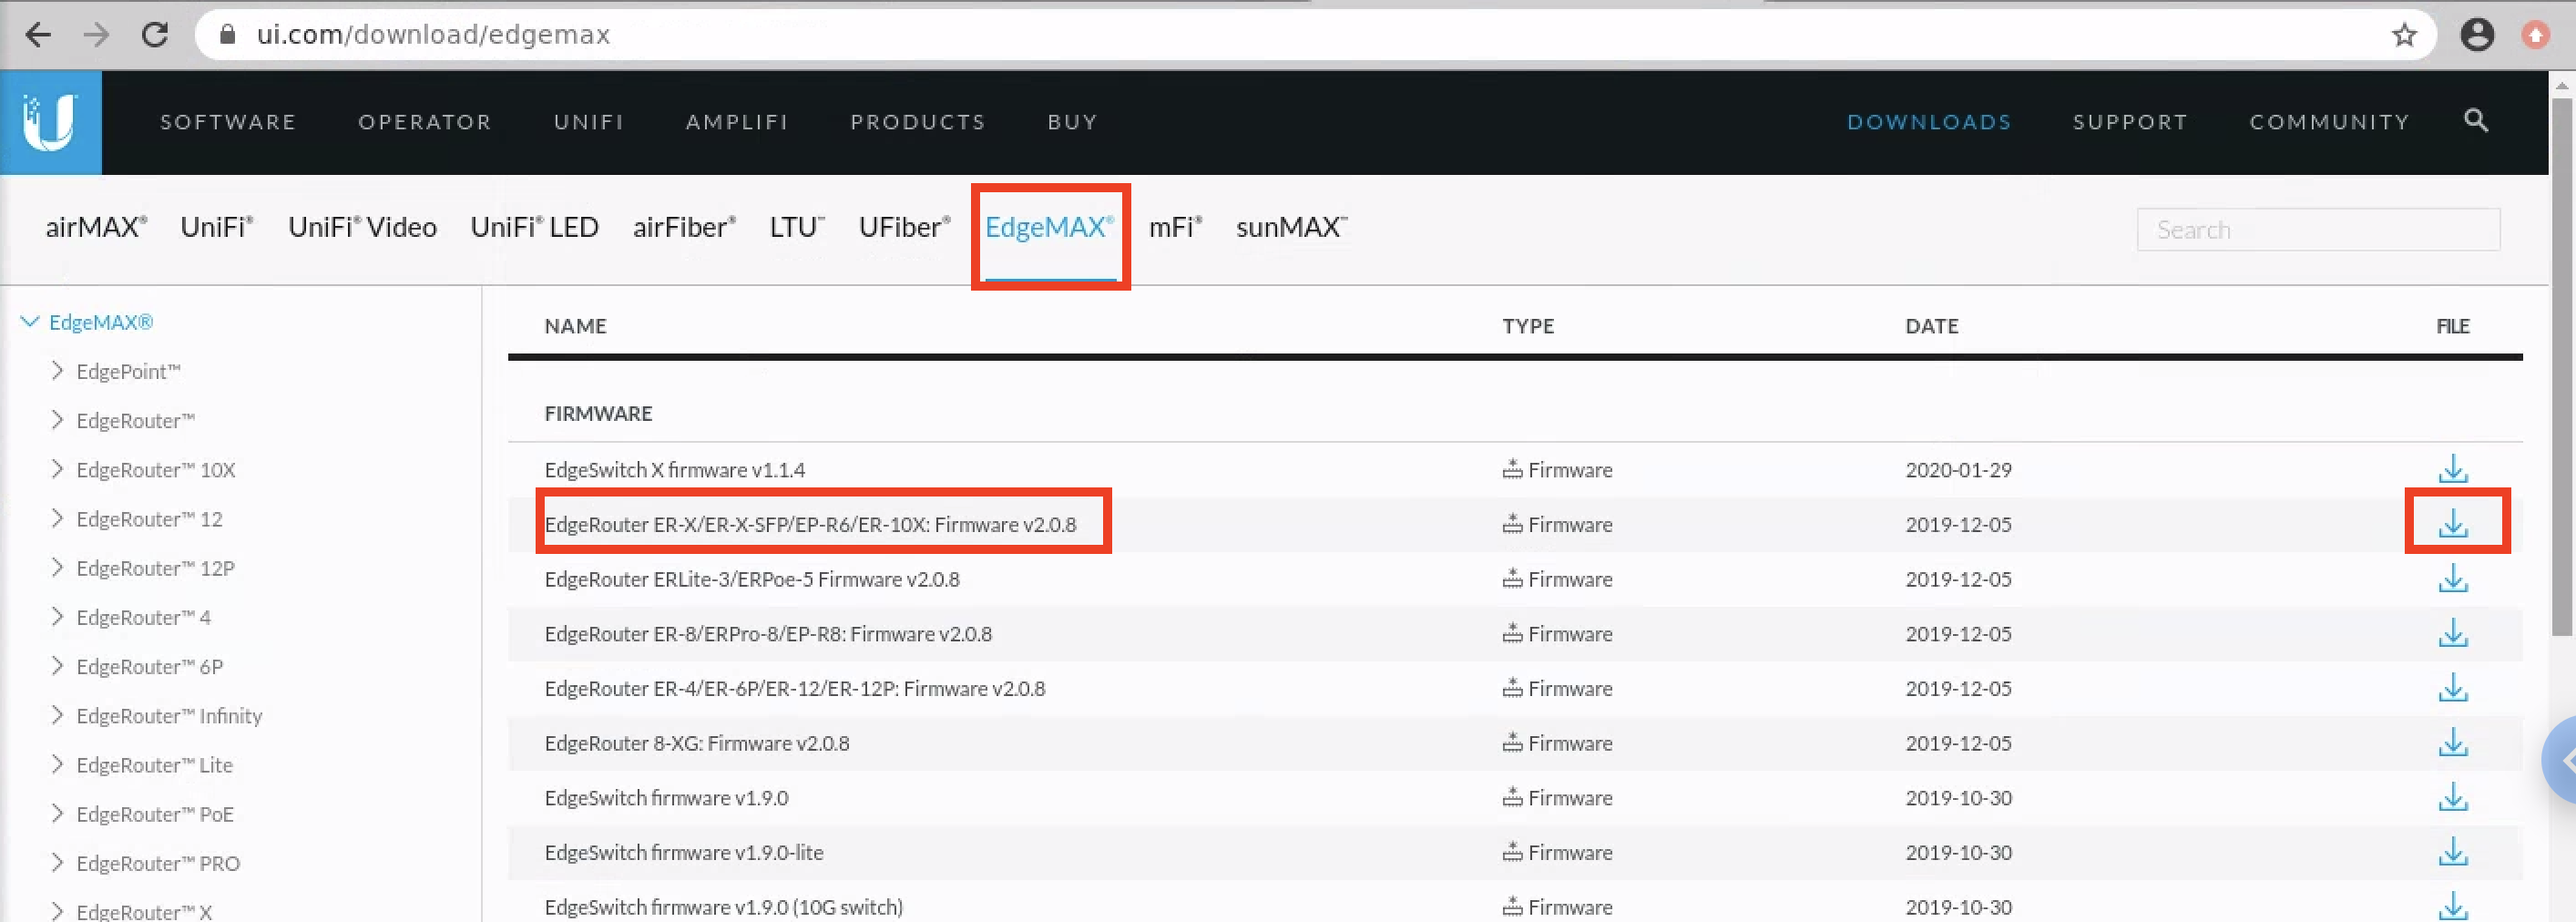
OS Download
OSは下記でダウンロード可能。ER-Xと記載のあるものをダウンロードする。
OS Upgrade
WebUI でログインして、Systemタブを開き「Upgrade System Image」でダウンロードした OS を Upload する。
Upload が終わると、Upgrade を続けるかなど聞かれるのでビューに従い進める。(rebootすることになる)

Upgradeが終わるとログインし直しとなり、左上の ver 表記が変わる。
Upgrade前

Upgrade後

(2020.03.01 時点で最新の v2.0.8 に Upgrade が完了している)
4. Edgerouter X Configuration
EdgeRouterX へ今回のための BGP の設定を追加します。
- maximum-paths ebgp: 最大のパス数を 32 にする (これはノード数以上であれば良い)
- peer-group: k8scluster01 として BGP ネイバーをグルーピングする
- default-originate: デフォルトルートを広報する
- remote-as: k8s側のAS番号
- neighbor: k8sノードのIP分設定する (下記では 8IP)
set protocols bgp 65001 maximum-paths ebgp 32
set protocols bgp 65001 neighbor 192.168.129.25 peer-group k8scluster01
set protocols bgp 65001 neighbor 192.168.129.26 peer-group k8scluster01
set protocols bgp 65001 neighbor 192.168.129.27 peer-group k8scluster01
set protocols bgp 65001 neighbor 192.168.129.28 peer-group k8scluster01
set protocols bgp 65001 neighbor 192.168.129.35 peer-group k8scluster01
set protocols bgp 65001 neighbor 192.168.129.36 peer-group k8scluster01
set protocols bgp 65001 neighbor 192.168.129.37 peer-group k8scluster01
set protocols bgp 65001 neighbor 192.168.129.38 peer-group k8scluster01
set protocols bgp 65001 parameters router-id 192.168.129.254
set protocols bgp 65001 peer-group k8scluster01 default-originate
set protocols bgp 65001 peer-group k8scluster01 remote-as 65002
適応
$ configure
# [edit]
# 上記のコマンドを投入
[edit]
# commit
[edit]
# save
Saving configuration to '/config/config.boot'...
Done
[edit]
# exit
exit
$
BGP ネイバー確認
$ show ip bgp summary
BGP router identifier 192.168.129.254, local AS number 65001
BGP table version is 12
2 BGP AS-PATH entries
0 BGP community entries
32  Configured ebgp ECMP multipath: Currently set at 32
1  Configured ibgp ECMP multipath: Currently set at 1

Neighbor                 V   AS   MsgRcv    MsgSen TblVer   InQ   OutQ    Up/Down   State/PfxRcd
192.168.129.25           4 65002  415        418      12      0      0  03:12:02               2
192.168.129.26           4 65002  415        420      12      0      0  03:12:02               2
192.168.129.27           4 65002  412        418      12      0      0  03:12:02               2
192.168.129.28           4 65002  415        420      12      0      0  03:12:02               2
192.168.129.35           4 65002  412        418      12      0      0  03:12:02               2
192.168.129.36           4 65002  412        417      12      0      0  03:12:02               2
192.168.129.37           4 65002  412        418      12      0      0  03:12:02               2
192.168.129.38           4 65002  415        420      12      0      0  03:12:02               2

Total number of neighbors 8

Total number of Established sessions 8
ルーティング確認
$ show ip route
Codes: K - kernel, C - connected, S - static, R - RIP, B - BGP
       O - OSPF, IA - OSPF inter area
       N1 - OSPF NSSA external type 1, N2 - OSPF NSSA external type 2
       E1 - OSPF external type 1, E2 - OSPF external type 2
       > - selected route, * - FIB route, p - stale info

IP Route Table for VRF "default"
〜〜〜
中略
〜〜〜
B    *> 192.168.131.0/32 [20/0] via 192.168.129.38, eth4.100, 00:10:42
     *>                  [20/0] via 192.168.129.37, eth4.100, 00:10:42
     *>                  [20/0] via 192.168.129.36, eth4.100, 00:10:42
     *>                  [20/0] via 192.168.129.35, eth4.100, 00:10:42
     *>                  [20/0] via 192.168.129.28, eth4.100, 00:10:42
     *>                  [20/0] via 192.168.129.27, eth4.100, 00:10:42
     *>                  [20/0] via 192.168.129.26, eth4.100, 00:10:42
     *>                  [20/0] via 192.168.129.25, eth4.100, 00:10:42
全ての Neighbor からのルーティングがベストパス ( *> ) となっていることが確認できる。
Service(Type: Loadbalancer) へアドレスプールからアサインされた後に /32 単位で広報されるようで、
今回は LoadBalancer Service が 1 つ動いていたので 1 IP (ここでは192.168.131.0/32) が上記では広報された。
5. Loadbalancer 利用テストアプリでの動作確認
テストアプリケーションでloadbalancer service を通して外部からアクセスできるようになったことを確認する。
テストは metallb の github にあった Manifest dir 内の tutorial を元にしている。
---
apiVersion: apps/v1
kind: Deployment
metadata:
  name: nginx
spec:
  selector:
    matchLabels:
      app: nginx
  template:
    metadata:
      labels:
        app: nginx
    spec:
      containers:
      - name: nginx
        image: nginx:1
        ports:
        - name: http
          containerPort: 80

---
apiVersion: v1
kind: Service
metadata:
  name: nginx
spec:
  ports:
  - name: http
    port: 80
    protocol: TCP
    targetPort: 80
  selector:
    app: nginx
  type: LoadBalancer
上記テスト Deployment, Service を apply する
$ kubectl apply -f testlb.yaml
deployment.apps/nginx created
service/nginx created
$ kubectl get po
NAME                     READY   STATUS    RESTARTS   AGE
nginx-5f78746595-877sq   1/1     Running   0          10s
kubectl get svc で EXTERNAL-IP に IP がアサインされていることを確認する
$ kubectl get svc
NAME         TYPE           CLUSTER-IP     EXTERNAL-IP     PORT(S)        AGE
kubernetes   ClusterIP      10.233.0.1     <none>          443/TCP        77d
nginx        LoadBalancer   10.233.7.180   192.168.131.1   80:30706/TCP   14s
Edgeroute X 側で show ip route を実施し、上記 EXTERNAL-IP が追加広報されていることを確認する
$ show ip route
Codes: K - kernel, C - connected, S - static, R - RIP, B - BGP
       O - OSPF, IA - OSPF inter area
       N1 - OSPF NSSA external type 1, N2 - OSPF NSSA external type 2
       E1 - OSPF external type 1, E2 - OSPF external type 2
       > - selected route, * - FIB route, p - stale info

IP Route Table for VRF "default"
〜〜〜
中略
〜〜〜
B    *> 192.168.131.0/32 [20/0] via 192.168.129.38, eth4.100, 04:23:57
     *>                  [20/0] via 192.168.129.37, eth4.100, 04:23:57
     *>                  [20/0] via 192.168.129.36, eth4.100, 04:23:57
     *>                  [20/0] via 192.168.129.35, eth4.100, 04:23:57
     *>                  [20/0] via 192.168.129.28, eth4.100, 04:23:57
     *>                  [20/0] via 192.168.129.27, eth4.100, 04:23:57
     *>                  [20/0] via 192.168.129.26, eth4.100, 04:23:57
     *>                  [20/0] via 192.168.129.25, eth4.100, 04:23:57
B    *> 192.168.131.1/32 [20/0] via 192.168.129.38, eth4.100, 00:01:30
     *>                  [20/0] via 192.168.129.37, eth4.100, 00:01:30
     *>                  [20/0] via 192.168.129.36, eth4.100, 00:01:30
     *>                  [20/0] via 192.168.129.35, eth4.100, 00:01:30
     *>                  [20/0] via 192.168.129.28, eth4.100, 00:01:30
     *>                  [20/0] via 192.168.129.27, eth4.100, 00:01:30
     *>                  [20/0] via 192.168.129.26, eth4.100, 00:01:30
     *>                  [20/0] via 192.168.129.25, eth4.100, 00:01:30
外部からブラウザで EXTERNAL-IP にアサインされた IP へアクセスできることを確認する
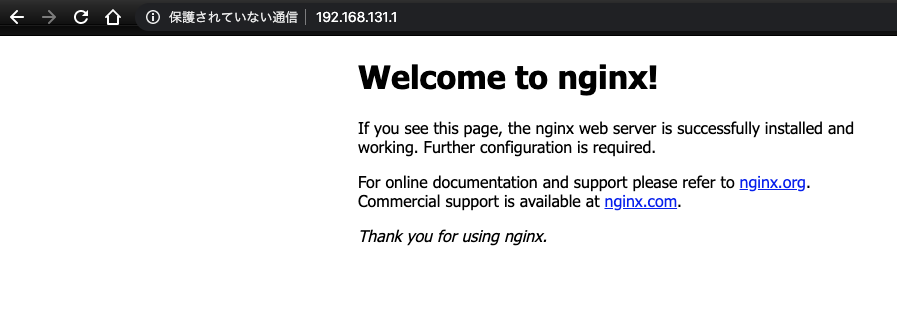
以上、外部から直接アクセスできる IP まで作成完了することを確認できた。
その他. Kubespray
kubespray でも MetalLB がサポートされている模様。(本構成は kubespray で構築した環境で実施したが、下記では実施してない)
また、L2mode を使用する場合は、kube_proxy_strict_arpで デフォルト false から true に変更する必要がありそう。
# configure arp_ignore and arp_announce to avoid answering ARP queries from kube-ipvs0 interface
# must be set to true for MetalLB to work
# kube_proxy_strict_arp: false
kube_proxy_strict_arp: true
追記(2020.03.20). IPアドレス共有 allow-shared-ip
現在 (2020.03.20 時点)、Kubernetes は Loadbalancer にて複数のプロトコル (TCP/UDP) を同じ IP で使用することを許可されてない
(TCP/UDP 両方指定の type: Loadbalancer を作成すると cannot create an external load balancer with mix protocols とエラーが出る)
Metallb では、allow-shared-ip を使用することで、複数の Loadbalancer Service に同じ IP を指定することが可能になる。
指定方法は、Service (type: Loadbalancer) に、metadata として下記のように metallb.universe.tf/allow-shared-ip 追記する。
※下記例の share-service-name は共通にする名前(変数)。同じ annotation の Service が同じ IP が振られる(振れる)
metadata:
  annotations:
    metallb.universe.tf/allow-shared-ip: "share-service-name"
allow-shared-ip を使用することで type: LoadBalancer を、
TCP/UDP を同じ IP で Service 提供できたり、
違う Deployment (違う selector での 別Service) のアプリケーションを同じ IP でポートで分けて提供できたりする。
Metallb 公式: https://metallb.universe.tf/usage/#ip-address-sharing
おわりに
オンプレ環境でも Service type: Loadbalancer が作成できるようになった。
外部への IP (EXTERNAL-IP) も確保できるようになったので、今後のサービスはこれで作成していく予定。