Pulumi は Infrastructure as Code を実現するためのツールです。Microsoft Azure、GCP、AWS などのクラウドサービスに対して、TypeScript や Python で書いたコードでクラウドリソースをデプロイできます。
たとえば下記のようなコードで AWS VPC を構築できます。
const vpc = new aws.ec2.Vpc("my-vpc", {
  cidrBlock: "10.0.0.0/16",
  tags: { Name: "my-vpc" }
});
環境
- Windows 10 Pro 1809
- Windows Subsystem for Linux (Bash on windows) Ubuntu 16.04.4 LTS
Pulumiを使ってみる
Download and Install - Pulumi に書いてあるとおりでインストールできます。今回は WSL で実行するので Linux 版を使います。
$ curl -fsSL https://get.pulumi.com | sh
プロジェクトをセットアップします。
今回は aws-typescript を使います。
$ pulumi login --local
$ pulumi new aws-typescript --dir my-project-name
$ cd my-project-name
構築する構成
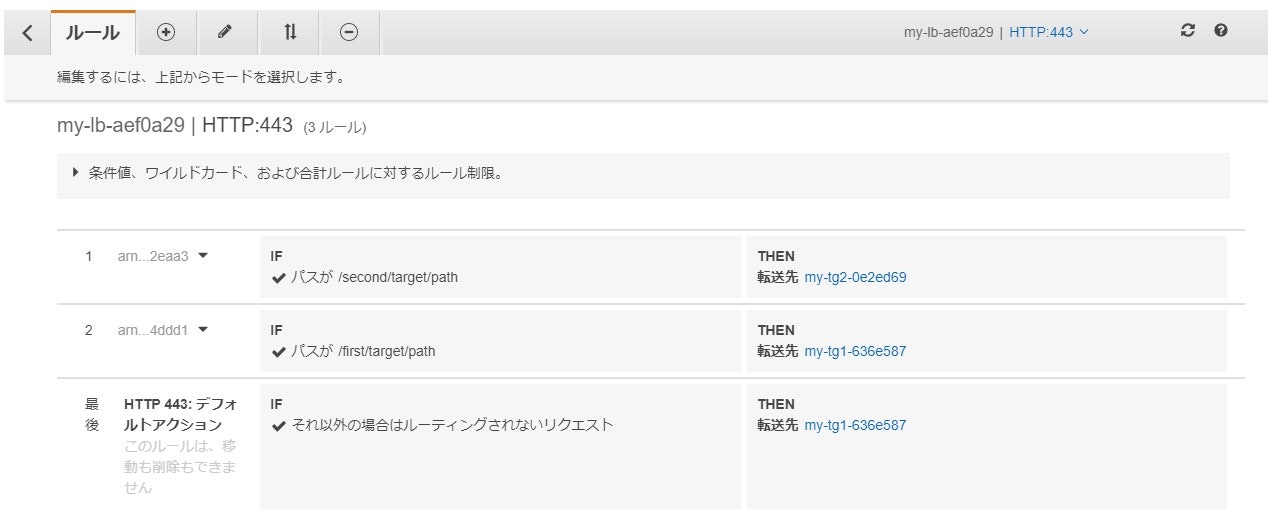
AWS Application Load Balancer (ALB) を構築します。
その中で /first/target/path というパスでアクセスされた場合と、/second/target/path というパスの時とで、転送するターゲットグループを切り替えます。
実際に作るものは下記です。
- VPC
- インターネットゲートウェイ
- サブネット2つ
- アプリケーションロードバランサー
- ターゲットグループ2つ
- リスナー
- リスナールール2つ
実際のプログラム
import * as aws from "@pulumi/aws";

// ネットワークの作成
const vpc = new aws.ec2.Vpc("my-vpc", {
  cidrBlock: "10.0.0.0/16",
  tags: { Name: "my-vpc" }
});

const igw = new aws.ec2.InternetGateway("my-igw", {
  vpcId: vpc.id,
  tags: { Name: "my-igw" }
}, vpc);

const generateSubnet = (name: string, cidr: string, vpc: aws.ec2.Vpc) => {
  return new aws.ec2.Subnet(name, {
    cidrBlock: cidr,
    vpcId: vpc.id
  });
};

const subnet1 = generateSubnet("my-subnet1", "10.0.1.0/24", vpc);
const subnet2 = generateSubnet("my-subnet2", "10.0.2.0/24", vpc);

// ロードバランサーの作成
const alb = new aws.applicationloadbalancing.LoadBalancer("my-lb", {
  subnets: [subnet1.id, subnet2.id],
});

const tgParams: aws.applicationloadbalancing.TargetGroupArgs = {
  port: 80,
  protocol: "HTTP",
  vpcId: vpc.id
};

const tg1 = new aws.applicationloadbalancing.TargetGroup("my-tg1", tgParams);
const tg2 = new aws.applicationloadbalancing.TargetGroup("my-tg2", tgParams);

// リスナールールの作成
const listener = new aws.elasticloadbalancingv2.Listener("my-listener", {
    defaultActions: [{
      targetGroupArn: tg1.arn,
      type: "forward",
    }],
    loadBalancerArn: alb.arn,
    port: 443
});

const generateListenerRule = (
  name: string,
  path: string,
  tg: aws.applicationloadbalancing.TargetGroup,
  listener: aws.applicationloadbalancing.Listener
) => {
  return new aws.elasticloadbalancingv2.ListenerRule(name, {
    actions: [{
      targetGroupArn: tg.arn,
      type: "forward"
    }],
    conditions: [{
      field: "path-pattern",
      values: path,
    }],
    listenerArn: listener.arn,
  });
};

const listenerRule1 = generateListenerRule("my-listener1", "/first/target/path", tg1, listener);
const listenerRule2 = generateListenerRule("my-listener2", "/second/target/path", tg2, listener);

// Export
export const ALB_ID = alb.id;
デプロイ
preview コマンドで、実際に適用される内容を確認することができます。
$ pulumi preview
up コマンドでデプロイします。 --yes を外すと確認の入力待受が発生します。
$ pulumi up --yes
片付け
下記コマンドで、AWS 上のリソースと Pulumi の stack を削除できます。
$ pulumi destroy
$ pulumi stack rm
なお私の場合インターネットゲートウェイと VPC の削除が上手く行かなかったため、手動で行う必要がありました。
まとめ
クラウドサービスの構成をプログラムで書けると、似たような構成を構築するときに関数化したり、下記のようなサービス同士の依存関係を変数と引数とで表現できる利点があります。
const alb = new aws.applicationloadbalancing.LoadBalancer("my-lb", {
  subnets: [subnet1.id, subnet2.id],
});
Pulumi が流行ってレシピやノウハウが出揃ってくると、使いやすくなってくるのではないかと思いました。
Tips
CLI が強制終了してしまった
CLI を途中で止めるなどして処理を中断した場合、以降下記のようなエラーが発生します。
These resources are in an unknown state because the Pulumi CLI was interrupted while
waiting for changes to these resources to complete. You should confirm whether or not the
operations listed completed successfully by checking the state of the appropriate provider.
For example, if you are using AWS, you can confirm using the AWS Console.

Once you have confirmed the status of the interrupted operations, you can repair your stack
using 'pulumi stack export' to export your stack to a file. For each operation that succeeded,
remove that operation from the "pending_operations" section of the file. Once this is complete,
use 'pulumi stack import' to import the repaired stack.
stack の状態をエクスポートして適切に編集してあげる必要があります。エクスポートされた内容の詳細については不詳なため、編集するためのコマンドのみ示します。
$ pulumi stack export --file exported.json
$ code exported.json # 適当に編集
$ pulumi stack import --file exported.json