はじめに
[2021/4/20 更新] 以前書いたものよりいい感じに書けたものがこちらです。
このリポジトリは、Kerasによる学習とMlflow RegistoryとFastAPIを組み合わせたものになっています。
普段Flaskをよく使いますが、「FastAPIはいいぞ!」と知人に進められたので簡単な画像認識APIを作って見ようと思いました。
しかし、あまりFastAPIとMLの日本語記事を見かけなかったので、メモ代わりに本記事を作成することにしました!
本記事では、開発環境を整えた後、APIサーバとフロントエンドの簡単な説明を記載しております。
今回使用したコードはすべてGithubに公開しています。
(以下実装のフォルダ構成などはGithubを前提に記載しています。サンプルモデルのダウンロードについてもREADME.mdに記載しています。)
FastAPIとは?
FlaskのようなPythonのフレームワークの1つです。
かんたんな概要と使い方のまとめは、以下の記事を参照していただけると良いと思います。(本記事でも大変お世話になりました、ありがとうございます!!)
もっと詳しく知りたい方は、FastAPIの公式チュートリアルが充実しておりオススメです!
画像認識について
今回は時間がなかったため、tensorflow.kerasのモデルを使って構築します!
具体的には、imagenetで学習されたResNet50をそのまま利用し、入力画像を1000クラスのどれに属するかを推論することとします。
(本当に使いたかったモデルは、只今絶賛学習中で間に合わなかった...)
https://www.tensorflow.org/versions/r1.15/api_docs/python/tf/keras?hl=ja
開発環境
Mac OS X Mojave
Python3.7.1(Anaconda)
環境構築
必要なPythonライブラリをインストールします。
$pip install tensorflow==1.15
$pip install fastapi
$pip install uvicorn
以下のような条件があることから、それに必要なライブラリもインストールします。
- index.htmlをRenderする
- 画像ファイルをアップロードする
- 画像を読み込み、リサイズする
$pip install Jinja
$pip install aiofiles
$pip install python-multipart
$pip install opencv-python
APIサーバ
APIサーバの実装は以下のようになりました。
# -*- coding: utf-8 -*-
import io
from typing import List

import cv2
import numpy as np
import tensorflow as tf
from tensorflow.keras.applications.resnet50 import decode_predictions
from fastapi import FastAPI, Request, File, UploadFile
from fastapi.staticfiles import StaticFiles
from fastapi.templating import Jinja2Templates

# 画像認識モデルの用意
global model, graph
graph = tf.get_default_graph()
model = tf.keras.models.load_model("./static/model/resnet_imagenet.h5")

# FastAPIの用意
app = FastAPI()

# static/js/post.jsをindex.htmlから呼び出すために必要
app.mount("/static", StaticFiles(directory="static"), name="static")

# templates配下に格納したindex.htmlをrenderするために必要
templates = Jinja2Templates(directory="templates")


def read_image(bin_data, size=(224, 224)):
    """画像を読み込む

    Arguments:
        bin_data {bytes} -- 画像のバイナリデータ

    Keyword Arguments:
        size {tuple} -- リサイズしたい画像サイズ (default: {(224, 224)})

    Returns:
        numpy.array -- 画像
    """
    file_bytes = np.asarray(bytearray(bin_data.read()), dtype=np.uint8)
    img = cv2.imdecode(file_bytes, cv2.IMREAD_COLOR)
    img = cv2.cvtColor(img, cv2.COLOR_BGR2RGB)
    img = cv2.resize(img, size)
    return img


@app.post("/api/image_recognition")
async def image_recognition(files: List[UploadFile] = File(...)):
    """画像認識API

    Keyword Arguments:
        files {List[UploadFile]} -- アップロードされたファイル情報 (default: {File(...)})

    Returns:
        dict -- 推論結果
    """
    bin_data = io.BytesIO(files[0].file.read())
    img = read_image(bin_data)
    with graph.as_default():
        pred = model.predict(np.expand_dims(img, axis=0))
        result_label = decode_predictions(pred, top=1)[0][0][1]
        return {"response": result_label}


@app.get("/")
async def index(request: Request):
    return templates.TemplateResponse("index.html", {"request": request})
フロントからデータを受け取る
@app.post("/api/image_recognition")
async def image_recognition(files: List[UploadFile] = File(...)):
    """画像認識API

    Keyword Arguments:
        files {List[UploadFile]} -- アップロードされたファイル情報 (default: {File(...)})

    Returns:
        dict -- 推論結果
    """
    bin_data = io.BytesIO(files[0].file.read())
    img = read_image(bin_data)
    with graph.as_default():
        pred = model.predict(np.expand_dims(img, axis=0))
        result_label = decode_predictions(pred, top=1)[0][0][1]
        return {"response": result_label}
今回は、FastAPIのUploadFileを使用してPOSTされる画像を取得しております。
bin_data = io.BytesIO(files[0].file.read())
ファイルは一つしかPOSTされないのでfiles[0]としており、フロント側からBASE64形式で渡されるのでAPI側でBytes配列に変換しました。
データを画像に変換する
def read_image(bin_data, size=(224, 224)):
    """画像を読み込む

    Arguments:
        bin_data {bytes} -- 画像のバイナリデータ

    Keyword Arguments:
        size {tuple} -- リサイズしたい画像サイズ (default: {(224, 224)})

    Returns:
        numpy.array -- 画像
    """
    file_bytes = np.asarray(bytearray(bin_data.read()), dtype=np.uint8)
    img = cv2.imdecode(file_bytes, cv2.IMREAD_COLOR)
    img = cv2.cvtColor(img, cv2.COLOR_BGR2RGB)
    img = cv2.resize(img, size)
    return img
opencvの力を借りて、Byte配列からuint8の画像に変換します。
このとき、opencvのデフォルトフォーマットがBGRなため、RGBに変換してリサイズしました。
推論する
global model, graph
graph = tf.get_default_graph()
model = tf.keras.models.load_model("./static/model/resnet_imagenet.h5")

...

with graph.as_default():
        pred = model.predict(np.expand_dims(img, axis=0))
        result_label = decode_predictions(pred, top=1)[0][0][1]
事前にresnet_imagenet.h5を作成しておき、それをファイル上部で読み込んでいます。
推論処理自体は、with graph.as_default() でグローバルで設定したTensorFlowのグラフにこのスレッドでのコンテキストを固定して、predict関数で推論しています。
今回はtf.kerasのResNet50を使っていることから、predictの結果をラベルに変換するdecode_predictionsを使って推論結果を取得しています。
他のモデルや自作モデルも、プロジェクトディレクトリのどこかに.h5ファイルを保存しておき、それをload_modelすることで、この実装のように使うことができるかと思います。
フロント実装
こちらを参考にさせていただきました。(ありがとうございます!)
<html>
<head>
    <meta http-qeuiv="Content-Type" content="text/html; charset=utf-8">
    <title>Fastapi 画像認識テスト</title>
    <script src="//code.jquery.com/jquery-2.2.3.min.js"></script>
    <script src="/static/js/post.js"></script>
</head>

<body>

<!-- ファイル選択ボタン -->
<div style="width: 500px">
  <form enctype="multipart/form-data" method="post">
    <input type="file" name="userfile" accept="image/*">
  </form>
</div>

<!-- 画像表示領域 -->
<canvas id="canvas" width="0" height="0"></canvas>

<!-- アップロード開始ボタン -->
<button class="btn btn-primary" id="post">投稿</button>
<br>
<h2 id="result"></h2>
</body>
</html>
// 画像をリサイズして、HTMLで表示する
$(function () {
  var file = null;
  var blob = null;
  const RESIZED_WIDTH = 300;
  const RESIZED_HEIGHT = 300;

  $("input[type=file]").change(function () {
    file = $(this).prop("files")[0];

    // ファイルチェック
    if (file.type != "image/jpeg" && file.type != "image/png") {
      file = null;
      blob = null;
      return;
    }

    var result = document.getElementById("result");
    result.innerHTML = "";

    // 画像をリサイズする
    var image = new Image();
    var reader = new FileReader();
    reader.onload = function (e) {
      image.onload = function () {
        var width, height;

        // 縦or横の長い方に合わせてリサイズする
        if (image.width > image.height) {
          var ratio = image.height / image.width;
          width = RESIZED_WIDTH;
          height = RESIZED_WIDTH * ratio;
        } else {
          var ratio = image.width / image.height;
          width = RESIZED_HEIGHT * ratio;
          height = RESIZED_HEIGHT;
        }

        var canvas = $("#canvas").attr("width", width).attr("height", height);
        var ctx = canvas[0].getContext("2d");
        ctx.clearRect(0, 0, width, height);
        ctx.drawImage(
          image,
          0,
          0,
          image.width,
          image.height,
          0,
          0,
          width,
          height
        );

        // canvasからbase64画像データを取得し、POST用のBlobを作成する
        var base64 = canvas.get(0).toDataURL("image/jpeg");
        var barr, bin, i, len;
        bin = atob(base64.split("base64,")[1]);
        len = bin.length;
        barr = new Uint8Array(len);
        i = 0;
        while (i < len) {
          barr[i] = bin.charCodeAt(i);
          i++;
        }
        blob = new Blob([barr], { type: "image/jpeg" });
        console.log(blob);
      };
      image.src = e.target.result;
    };
    reader.readAsDataURL(file);
  });

  // アップロード開始ボタンがクリックされたら
  $("#post").click(function () {
    if (!file || !blob) {
      return;
    }

    var name,
      fd = new FormData();
    fd.append("files", blob);

    // API宛にPOSTする
    $.ajax({
      url: "/api/image_recognition",
      type: "POST",
      dataType: "json",
      data: fd,
      processData: false,
      contentType: false,
    })
      .done(function (data, textStatus, jqXHR) {
          // 通信が成功した場合、結果を出力する
        var response = JSON.stringify(data);
        var response = JSON.parse(response);
        console.log(response);
        var result = document.getElementById("result");
        result.innerHTML = "この画像...「" + response["response"] + "」やんけ";
      })
      .fail(function (jqXHR, textStatus, errorThrown) {
          // 通信が失敗した場合、エラーメッセージを出力する
        var result = document.getElementById("result");
        result.innerHTML = "サーバーとの通信が失敗した...";
      });
  });
});
ajaxを使って画像認識APIへPOSTを行い、結果を表示しています。
動作確認
結果こんな感じに動くようになりました!
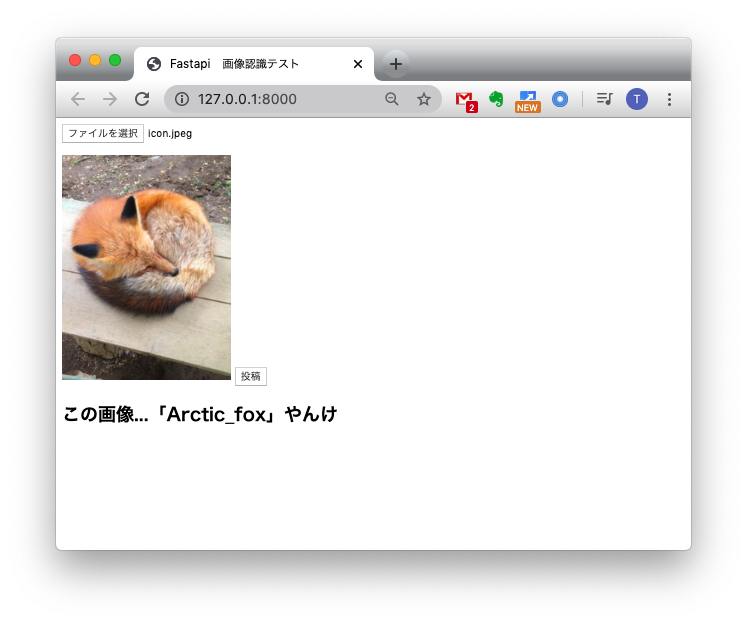
(フロントをもうちょっとオサレにしたかったのですが...)
おわりに
FastAPIのお勉強に画像認識APIを作ってみました。
今回作った実装がベストプラクティスではないと思いますが、動くものをつくることができてよかったかと思います。
今後どのフレームワークを使って仕事をするかわかりませんが、FastAPIは割と使いやすくてFlaskから乗り換えようかなぁと思いました。
最後となりますが、参考にさせていただいた皆様に感謝いたします!