はじめに
勉強ついでに適当に作ってみたモデルをTouchDesigner内で動かしてみたくなったのでやってみました。
実際やってみたらこんな感じ!(この記事で使ったモデルとは違うけれど、だいたいこんな感じです)
サンプルのリポジトリはこちら!
ちなみに、今回はWindows前提で記事を書いていますがMacでも動作可能です!
TouchDesignerのPythonについて
TouchDesignerでは、拡張機能としてPythonを使用することができます(私の環境だと内部でPython3.7.2が動作するようです)。
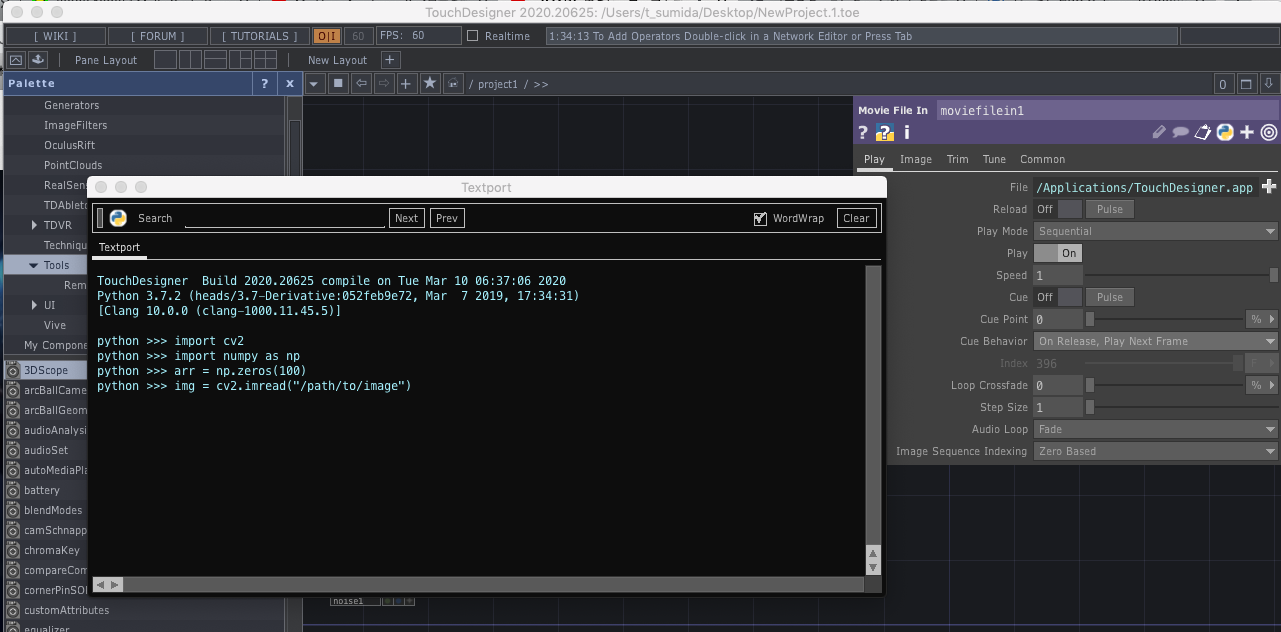
Dialogs > Textport and DATs からPythonのインタプリタを使うことができます。
プリインストールとして、標準ライブラリとOpenCV、numpyなんかが使えます。
今回はこれに加えて機械学習でよく使われるライブラリを使って、TouchDesginer内でObjectDetectionさせたいと思います。
どうやるかというと、Edit > Preferenceの「Add External Python to Search Path」に外部ライブラリへのパスを指定してTouchDesignerで使えるようにします。
ObjectDetectionについて
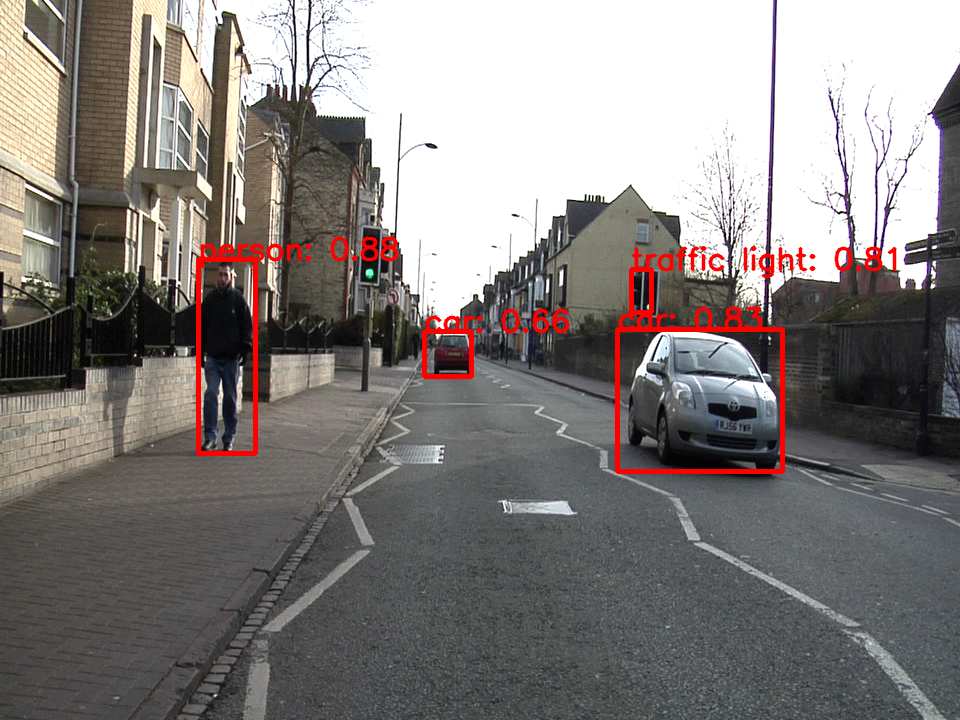
ObjectDetectionの詳しい説明は省きますが、下の画像みたいな人やモノなどのオブジェクトを検出(四角で囲んで、これが何かを示す)する感じです。
今回はできるだけ処理の軽いアルゴリズムを採用してなんとかFPSを稼ごうという魂胆のもと、モバイル端末でも動いてくれるMobileNetv2-SSDを使ってみます!
Pythonで機械学習(主にDNN)を扱うライブラリ(フレームワーク)としては、
なんかが存在します。
私が普段扱うのはTensorflow/Kerasですが(たまにPytorchも使う)、今回はONNXを使います。(正確にはONNXRuntimeという推論環境を使います)
理由は、なぜか私の環境だとTouchDesigner内のPythonからTensorflowやPytorchを使うとエラーメッセージも吐かずにTouchDesignerが落ちてしまうからです。
そんなことがあった後でダメ元でONNX試したら動いてくれたのでこれを使います!(MXNetはわからない...)
肝心のモデルは、Tensorflowで作ったモデルをONNX形式に書き出したものを用意しました。(リポジトリ内に含めています)
作業環境
- Windows10 home
- Anaconda
- TouchDesigner 64-Bit Build 2020.20625
1. 環境構築
作業環境が揃ったら、さっそくONNXをインストールしてみます!
1-1. Anacondaで仮想環境を作る
$conda create -n touchdesigner python=3.7.2
1-2. 仮想環境内にONNXをインストールする
$conda activate touchdesigner
$pip install onnxruntime==1.1.0
1-3. TouchDesignerに仮想環境のパスを通す
Edit > Preferences をクリックし環境設定を開きます。
以下の画像のように「Add External Python to Search Path」にチェックを入れ、「Python 64-bit Module Path」にAnacondaの仮想環境へのパスを通します。
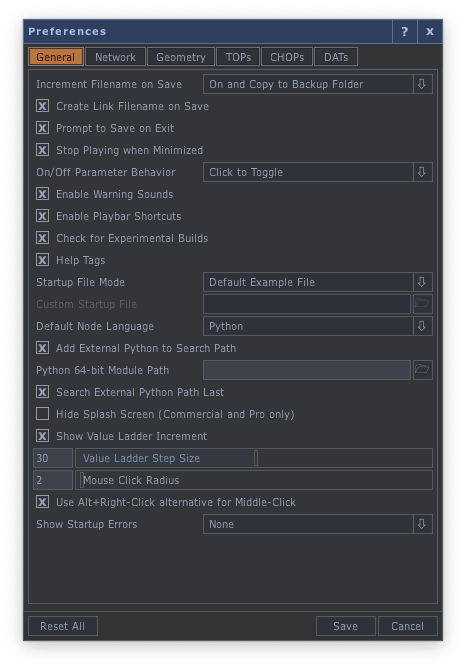
私の環境だと以下のようなパスを通すことになります。
C:/Users/T-Sumida/Anaconda3/envs/touchdesigner/Lib/site-packages
これを参考にしてパスを通してみてください!
2. ONNXの準備
それではONNXがTouchDesiger上で動作することを確認します!
Dialogs > Textport and DATs からPythonのインタプリタを起動し、そこに以下のコードを貼り付けて実行してみてください。
※モデルへのパスと、試したい画像のパスは適宜適切に設定してください。
import cv2
import numpy as np
import onnxruntime

# cocoデータセットのクラス番号:クラス名
coco_classes = {
    1: 'person',
    2: 'bicycle',
    3: 'car',
    4: 'motorcycle',
    5: 'airplane',
    6: 'bus',
    7: 'train',
    8: 'truck',
    9: 'boat',
    10: 'traffic light',
    11: 'fire hydrant',
    12: 'stop sign',
    13: 'parking meter',
    14: 'bench',
    15: 'bird',
    16: 'cat',
    17: 'dog',
    18: 'horse',
    19: 'sheep',
    20: 'cow',
    21: 'elephant',
    22: 'bear',
    23: 'zebra',
    24: 'giraffe',
    25: 'backpack',
    26: 'umbrella',
    27: 'handbag',
    28: 'tie',
    29: 'suitcase',
    30: 'frisbee',
    31: 'skis',
    32: 'snowboard',
    33: 'sports ball',
    34: 'kite',
    35: 'baseball bat',
    36: 'baseball glove',
    37: 'skateboard',
    38: 'surfboard',
    39: 'tennis racket',
    40: 'bottle',
    41:'wine glass',
    42: 'cup',
    43: 'fork',
    44: 'knife',
    45: 'spoon',
    46: 'bowl',
    47: 'banana',
    48: 'apple',
    49: 'sandwich',
    50: 'orange',
    51: 'broccoli',
    52: 'carrot',
    53: 'hot dog',
    54: 'pizza',
    55: 'donut',
    56: 'cake',
    57: 'chair',
    58: 'couch',
    59: 'potted plant',
    60: 'bed',
    61: 'dining table',
    62: 'toilet',
    63: 'tv',
    64: 'laptop',
    65: 'mouse',
    66: 'remote',
    67: 'keyboard',
    68: 'cell phone',
    69: 'microwave',
    70: 'oven',
    71: 'toaster',
    72: 'sink',
    73: 'refrigerator',
    74: 'book',
    75: 'clock',
    76: 'vase',
    77: 'scissors',
    78: 'teddy bear',
    79: 'hair drier',
    80: 'toothbrush'
}

# モデルを読み込む
session = onnxruntime.InferenceSession("ONNXモデルへのパスを指定")

# 画像を読み込む
img = cv2.imread("試したい画像のパスを指定")

# OpenCVは画像データをBGRで読み込むので、BGRに変換する
img = cv2.cvtColor(img, cv2.COLOR_BGR2RGB)

width, height = img.shape[0], img.shape[1]

img_data = np.expand_dims(img, axis=0)

# モデルの推論の準備
input_name = session.get_inputs()[0].name   # 'image'
output_name_boxes = session.get_outputs()[0].name     # 'boxes'
output_name_classes = session.get_outputs()[1].name   # 'classes'
output_name_scores = session.get_outputs()[2].name    # 'scores'
output_name_num = session.get_outputs()[3].name       # 'number of detections'

# 推論
outputs_index = session.run(
    [output_name_num, output_name_boxes, output_name_scores, output_name_classes],
    {input_name: img_data}
)

# 結果を受け取る
output_num = outputs_index[0] # 検出した物体数
output_boxes = outputs_index[1] # 検出した物体の場所を示すボックス
output_scores = outputs_index[2] # 検出した物体の予測確率
output_classes = outputs_index[3] # 検出した物体のクラス番号

# 予測確率の閾値
threshold = 0.6

# 推論結果を画像に変換
img = cv2.cvtColor(img, cv2.COLOR_RGB2BGR)
for detection in range(0, int(output_num[0])):
    if output_scores[0][detection] > threshold:
        classes = output_classes[0][detection]
        boxes = output_boxes[0][detection]
        scores = output_scores[0][detection]
        top = boxes[0] * width
        left = boxes[1] * height
        bottom = boxes[2] * width
        right = boxes[3] * height

        top = max(0, top)
        left = max(0, left)
        bottom = min(width, bottom)
        right = min(height, right)
        img = cv2.rectangle(img, (int(left), int(top)), (int(right), int(bottom)), (0,0,255), 3)
        img = cv2.putText(
        	img, "{}: {:.2f}".format(coco_classes[classes], scores),
        	(int(left), int(top)),
        	cv2.FONT_HERSHEY_SIMPLEX, 1, (0, 0, 255), 2, cv2.LINE_AA
        )

cv2.imshow('img', img)
k = cv2.waitKey(0)
実行すると以下のような画像が描画されるかと思います。
これが問題なく動けば一旦は大丈夫です!
3. TouchDesignerでPythonを書く
続いてTouchDesigerのパッチで動くようにしていきます。
こちらの記事を参考にさせて頂き(ありがとうございます!)、カメラ画像からの入力に対してObjectDetectionさせようと思います。
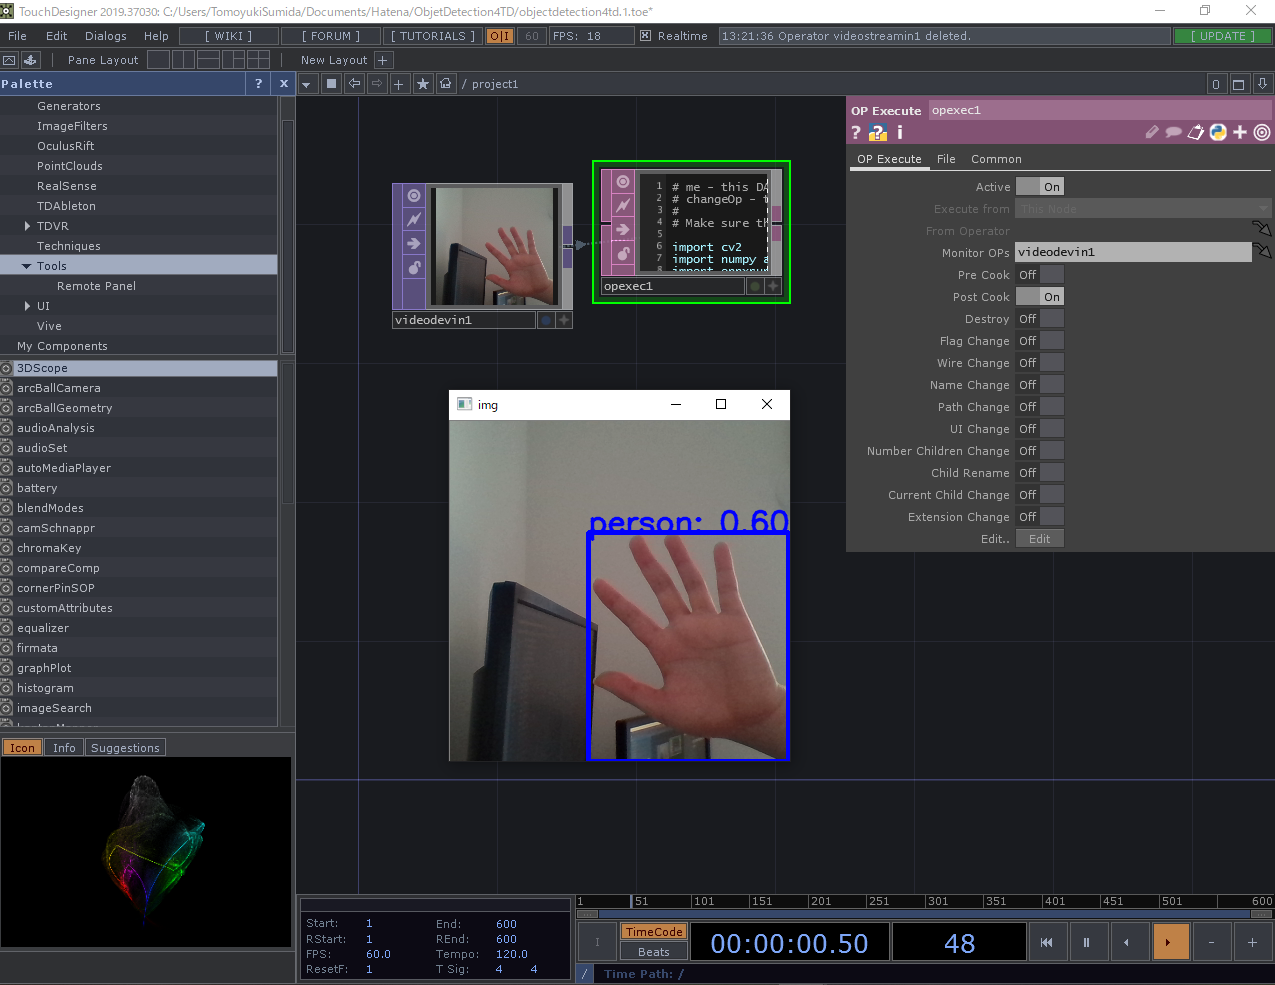
プロジェクト自体は非常にシンプルなもので、「Video Device In」からの入力を「OP Execute」で受け取りOpencvの機能で描画するようなモノにしました。
「OP Execute」の中身は以下のようにしました。
# me - this DAT.
# changeOp - the operator that has changed
#
# Make sure the corresponding toggle is enabled in the OP Execute DAT.

import cv2
import numpy as np
import onnxruntime

# 上のテストと一緒なので省略します(使うときは上からコピーして使ってください)
coco_classes = {
    1: 'person',
    2: 'bicycle',
    ...
}

session = onnxruntime.InferenceSession("C:/Users/TomoyukiSumida/Documents/Hatena/ObjetDetection4TD/ssdlite_mobilenetv2.onnx")

def onPreCook(changeOp):
	return

def onPostCook(changeOp):
	# 画像の読み込み
	frame = changeOp.numpyArray(delayed=True)
	arr = frame[:, :, 0:3]
	arr = arr * 255
	arr = arr.astype(np.uint8)
	arr = np.flipud(arr)
	width, height = arr.shape[0:2]
	image_data = np.expand_dims(arr, axis=0)

	# モデルの推論の準備
	input_name = session.get_inputs()[0].name   # 'image'
	output_name_boxes = session.get_outputs()[0].name     # 'boxes'
	output_name_classes = session.get_outputs()[1].name   # 'classes'
	output_name_scores = session.get_outputs()[2].name    # 'scores'
	output_name_num = session.get_outputs()[3].name       # 'number of detections'

	# 推論
	outputs_index = session.run([output_name_num, output_name_boxes,
                                output_name_scores, output_name_classes],
                                {input_name: image_data})

	# 結果を受け取る
	output_num = outputs_index[0] # 検出した物体数
	output_boxes = outputs_index[1] # 検出した物体の場所を示すボックス
	output_scores = outputs_index[2] # 検出した物体の予測確率
	output_classes = outputs_index[3] # 検出した物体のクラス番号

	# 予測確率の閾値
	threshold = 0.6

	# 推論結果を画像に変換
	for detection in range(0, int(output_num[0])):
		if output_scores[0][detection] > threshold:
			classes = output_classes[0][detection]
			boxes = output_boxes[0][detection]
			scores = output_scores[0][detection]
			top = boxes[0] * width
			left = boxes[1] * height
			bottom = boxes[2] * width
			right = boxes[3] * height

			top = max(0, top)
			left = max(0, left)
			bottom = min(width, bottom)
			right = min(height, right)
			arr = cv2.rectangle(arr, (int(left), int(top)), (int(right), int(bottom)), (0,0,255), 3)
			arr = cv2.putText(
				arr, "{}: {:.2f}".format(coco_classes[classes], scores),
				(int(left), int(top)),
				cv2.FONT_HERSHEY_SIMPLEX, 1, (0, 0, 255), 2, cv2.LINE_AA)
	arr = cv2.cvtColor(arr, cv2.COLOR_RGB2BGR)
	cv2.imshow('img', arr)
	return

def onDestroy():
	return

def onFlagChange(changeOp, flag):
	return

def onWireChange(changeOp):
	return

def onNameChange(changeOp):
	return

def onPathChange(changeOp):
	return

def onUIChange(changeOp):
	return

def onNumChildrenChange(changeOp):
	return

def onChildRename(changeOp):
	return

def onCurrentChildChange(changeOp):
	return

def onExtensionChange(changeOp, extension):
	return
これが書けたら、「OP Execute」のMonitor OPsに「Video Device In」を指定し、Post CookをONにしてください。
動いた!
おわりに
今回はTouchDesigner内でONNXを使ってObjectDetectionを動かしてみました。何故かTensorflowが動かなくて困りましたが、なんとか動くものができてよかったです。
ただ、TouchDesigner内でObjectDetection(ひいては機械学習)を動かすことには以下のようなデメリットがあります。
TouchDesignerがシングルスレッドのため、プロジェクト全体のFPSが制限される
- 私が確認した中だと、ONNXに変換されたモデルしか使えない(他のよいアルゴリズムが使えない場合がある)
なので、「TouchDesignerの後ろでPythonプロセスを起動しそこからOSCで情報を送る」などのほうが良さげではあります(今後TouchDesignerでマルチスレッドが使えるようになれば有用性はあるかもしれません)。
ONNXのモデルについても今回は私の自作モデルで試しましたが、onnx/modelからモデルファイルをダウンロードして使っても大丈夫です。(私もそこからmask-rcnnをダウンロードして動くことを確認しました)
また、GPUを使っての高速な推論も可能です。(今回のモデルはCPUでも高速に動くものを使いました)
$pip install onnxruntime==1.1.0
これの代わりに
$pip install onnxruntime-gpu==1.1.0
これをインストールしてやればGPU上で推論が行われるようになります。色々試してみても面白いのでしょうか!
表現側は難して手を出せていないですが、今後はその辺りも触れればいいなぁと思います!