フルコードはgithubにあります。
週末レイトレーシングのここをやります。
リファクタリング
下記の部分が冗長ではないかとコメントをもらう。
確かにhoge.x()などせずにhoge.xで構造体の中身にアクセスできる。
impl Vec3 {
    pub fn x(&self) -> f64 {
        self.x
    }
}
Rayモジュールにも同様の問題がある。
74de2cdとc776e2aで修正した。
PI, INFINITY, clampについては、f64のものをそのまま使えばよいとこれもコメントをもらった。f6adf8eで修正。
f64の定数について
PIとINFINITYの扱いに差があって気持ち悪い。ドキュメントによると、どちらも定数だけど、数学的な定数はf64::constsの下にいくと。なんでやねん。
ちなみにRubyでは数学関数はモジュールとして独立している。これなら分かる。
Gemini.mdとMakefile
今更ながら、Gemini.mdとMakefileを書く。Makefileを書く理由はcargoコマンドを覚えられないから。
# Project Overview

このプロジェクトは、レイトレーシングの基礎をRustプログラミングを通じて理解するためのものです。
下記のチュートリアルを通して学んでいます。

https://raytracing.github.io/books/RayTracingInOneWeekend.html
https://raytracing.github.io/books/RayTracingTheNextWeek.html
https://raytracing.github.io/books/RayTracingTheRestOfYourLife.html

チュートリアルはC++で書かれていますが、本プロジェクトはRustで記述します

# Tech Stack

- **Languages:** Rust
- **Libraries:** 基礎を学ぶのが目的なので、ライブラリは極力使いません

# Key Commands
- Running the app: `make`
- Building: `cargo check check`
- Running tests: `make test`
all::
	cargo run > output.ppm
	magick convert output.ppm output.png
	open -W output.ppm

test::
	cargo check
	cargo fmt
	cargo test

lint::
	cargo clippy
マテリアルを表すモジュール
チュートリアルに戻る。表面の色と質感を扱うマテリアルモジュールの作成。
use crate::hittable::HitRecord;
use crate::ray::Ray;
use crate::vec3::Color;

pub trait Material {
    fn scatter(
        &self,
        r_in: &Ray,
        rec: &HitRecord,
        attenuation: &mut Color,
        scattered: &mut Ray,
    ) -> bool;
}
HitRecord構造体側を拡張して、Materialのスマートポインタを作る。
pub struct HitRecord {
    pub p: Point3,
    pub normal: Vec3,
    pub t: f64,
    pub mat_ptr: Arc<dyn Material>,
    pub front_face: bool,
}
Material側でもHitRecordを参照しているので、循環参照の形になるが、片側がスマートポインタなのでメモリリークは発生しないという理解でいいのかしら。まあ、今のコードだとそもそもメモリを解放するタイミングがないんだけど。
ランバート反射の抽象化
main.rsにあったランバート反射の計算をMaterialモジュールに移動する。
impl Material for Lambertian {
    fn scatter(
        &self,
        _r_in: &Ray,
        rec: &HitRecord,
        attenuation: &mut Color,
        scattered: &mut Ray,
    ) -> bool {
        let scatter_direction = rec.normal + Vec3::random_unit_vector();
        *scattered = Ray::new(rec.p, scatter_direction);
        *attenuation = self.albedo;
        true
    }
}
以上を踏まえてmain.rsを書き直す(関係ない部分は省略しています)。
fn ray_color(r: &Ray, world: &dyn Hittable, depth: u32) -> Color {
if depth <= 0 {
return Color::new(0.0, 0.0, 0.0);
}
if let Some(rec) = world.hit(r, 0.001, f64::INFINITY) {
let mut scattered = Ray::new(Point3::new(0.0, 0.0, 0.0), Vec3::new(0.0, 0.0, 0.0));
let mut attenuation = Color::new(0.0, 0.0, 0.0);
if rec
.mat_ptr
.scatter(r, &rec, &mut attenuation, &mut scattered)
{
return attenuation * ray_color(&scattered, world, depth - 1);
}
return Color::new(0.0, 0.0, 0.0);
} else {
let unit_direction = r.direction.unit_vector();
let t = 0.5 * (unit_direction.y + 1.0);
(1.0 - t) * Color::new(1.0, 1.0, 1.0) + t * Color::new(0.5, 0.7, 1.0)
}
}
fn main() {
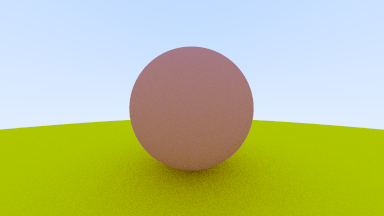
let material_ground = Arc::new(Lambertian::new(Color::new(0.8, 0.8, 0.0)));
let material_center = Arc::new(Lambertian::new(Color::new(0.7, 0.3, 0.3)));
let mut world = HittableList::new();
world.add(Arc::new(Sphere::new(
Point3::new(0.0, -100.5, -1.0),
100.0,
material_ground,
)));
world.add(Arc::new(Sphere::new(
Point3::new(0.0, 0.0, -1.0),
0.5,
material_center,
)));
}
Lamberian構造体は反射率(albedo)をフィールドに持つ。
pub struct Lambertian {
    pub albedo: Color,
}

impl Lambertian {
    pub fn new(albedo: Color) -> Self {
        Self { albedo }
    }
}
albedoはColor構造体を使っているので、RGBごとに減衰率を指定している。これまではどの色でも50%減衰固定。
main.rsのray_color()を修正して、albedoを使う。
-        return 0.5 * ray_color(&Ray::new(rec.p, target - rec.p), world, depth - 1);
+        return attenuation * ray_color(&scattered, world, depth - 1);
これで、物体に任意の色をつけることができるようになった。
チュートリアルではいきなり金属球も描画しているが、ここでは分けて進めた。
金属マテリアルはその7でやる。続く。