フルコードはgithubにあります。
週末レイトレーシングのここをやります。
ランダムな vec3 を計算するユーティリティ関数
Vec3モジュールに下記を追加。
pub fn random() -> Self {
    Self {
        x: random_double(),
        y: random_double(),
        z: random_double(),
    }
}

pub fn random_range(min: f64, max: f64) -> Self {
    Self {
        x: random_double_range(min, max),
        y: random_double_range(min, max),
        z: random_double_range(min, max),
    }
}

pub fn random_in_unit_sphere() -> Vec3 {
	loop {
	    let p = Vec3::random_range(-1.0, 1.0);
	    if p.length_squared() >= 1.0 {
		continue;
    }
    return p;
}
メモ
その4の共有モジュールで見逃していたが、C++では引数が異なる同名の関数を使っていたが、Rustになったタイミングで異なる関数名になっていた。C++のようなことはできないらしい。理屈でいえば、コンパイル時にどちらを使うか判断できるので、静的型付けでもやれそうな気はする。
Gemini CLIは下記を言ってるが、複雑になりそうなので、宿題とする
ユーザーがリネームを望まない場合は、Option型で引数をラップし、Vec3::random(r
ange: Option)のように単一の関数で引数の有無を判定する手法も考えられます。
random_in_unit_sphere() は立方体で乱数を出して、球の内面になるまで無限ループという雑なコード。成功確率は48%らしい。乱数性を維持しつつ、一発で決められるアルゴリズムはないものかとChatGPTに相談したら、球の内側であることが保証される極座標を乱数で出してから、xyzの座標に変換する方法を教えてくれた。radiusは半径で、オリジナルの関数は一辺が2.0の立方体なので、1.0にハードコードすればいいはず。
fn random_point_in_sphere(radius: f64) -> (f64, f64, f64) {
    let mut rng = rand::thread_rng();

    let u: f64 = rng.gen();
    let v: f64 = rng.gen();
    let w: f64 = rng.gen();

    let theta = 2.0 * PI * u;
    let phi = (1.0 - 2.0 * v).acos();
    let r = radius * w.cbrt(); // ← 重要(立方根)

    let x = r * phi.sin() * theta.cos();
    let y = r * phi.sin() * theta.sin();
    let z = r * phi.cos();

    (x, y, z)
}
後で差し替えてみる。一旦、保留。
拡散マテリアル
ray_color()関数を下記に修正。
fn ray_color(r: &Ray, world: &dyn Hittable) -> Color {
    if let Some(rec) = world.hit(r, 0.0, INFINITY) {
	let target: Point3 = rec.p + rec.normal + Vec3::random_in_unit_sphere();
	return 0.5 * ray_color(&Ray::new(rec.p, target - rec.p), world);
    } else {
        let unit_direction = r.direction.unit_vector();
        let t = 0.5 * (unit_direction.y + 1.0);
        (1.0 - t) * Color::new(1.0, 1.0, 1.0) + t * Color::new(0.5, 0.7, 1.0)
    }
}
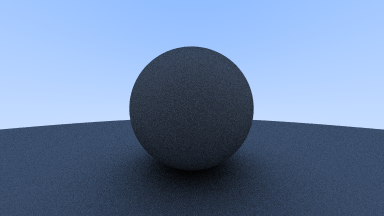
おお、レイがトレーシングされた。
メモ
- scanlineが進むとどんどん処理時間が伸びる。どのピクセルでも計算時間は同じはずなのに何故と悩んだが、今の画像の上半分は、オブジェクトが存在するピクセルが少ないので拡散マテリアルの計算が不要になるためだ。試しに下から上へレンダリングするようにコードを変更したら、前半に時間を要するようになった。
子レイの数を制限する
ray_color()関数の再帰呼び出しを最大50回に制限。ちゃんと測ってないけど、そこまで感覚的に早くなったようには思えない。再帰やめてループにしたら早くなるかしらね。これも宿題。
@@ -7,10 +7,14 @@ use myraytracing::vec3::{Color, Point3, Vec3};
 use std::sync::Arc;
 use std::io::Write;

-fn ray_color(r: &Ray, world: &dyn Hittable) -> Color {
+fn ray_color(r: &Ray, world: &dyn Hittable, depth: u32) -> Color {
+    if depth <= 0 {
+       return Color::new(0.0, 0.0, 0.0);
+    }
+
     if let Some(rec) = world.hit(r, 0.0, INFINITY) {
        let target: Point3 = rec.p + rec.normal + Vec3::random_in_unit_sphere();
-       return 0.5 * ray_color(&Ray::new(rec.p, target - rec.p), world);
+       return 0.5 * ray_color(&Ray::new(rec.p, target - rec.p), world, depth - 1);
     } else {
         let unit_direction = r.direction.unit_vector();
         let t = 0.5 * (unit_direction.y + 1.0);
@@ -39,6 +43,7 @@ fn main() {
     const IMAGE_HEIGHT: i32 = (IMAGE_WIDTH as f64 / ASPECT_RATIO) as i32;

     let samples_per_pixel: u32 = 100;
+    let max_depth: u32 = 50;

     let mut world = HittableList::new();
     world.add(Arc::new(Sphere::new(Point3::new(0.0, 0.0, -1.0), 0.5)));
@@ -63,7 +68,7 @@ fn main() {
                let v: f64 = (j as f64 + random_double()) / (IMAGE_HEIGHT - 1) as f64;

                let r = cam.get_ray(u, v);
-               pixel_color += ray_color(&r, &world);
+               pixel_color += ray_color(&r, &world, max_depth);
            }
             write_color(pixel_color, samples_per_pixel);
         }
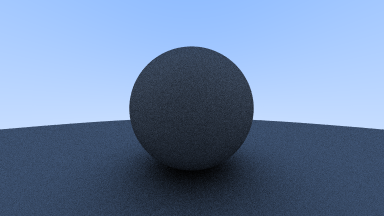
画像的にはあまり変わらない。つまり、有限回数で終了しても画像品質に影響はないということか。
ガンマ補正
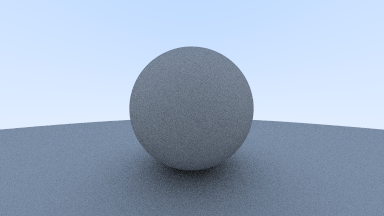
ガンマ補正をして、物体が黒くなりすぎる問題を修正。
@@ -23,11 +23,15 @@ fn ray_color(r: &Ray, world: &dyn Hittable, depth: u32) -> Color {
 }

 fn write_color(pixel_color: Color, samples_per_pixel: u32) {
-    // Write the translated [0,255] value of each color component.
-    let scale: f64 = 1.0 / samples_per_pixel as f64;
-    let r: f64 = pixel_color.x * scale;
-    let g: f64 = pixel_color.y * scale;
-    let b: f64 = pixel_color.z * scale;
+    let r = pixel_color.x;
+    let g = pixel_color.y;
+    let b = pixel_color.z;
+
+    // Divide the color by the number of samples and gamma-correct for gamma=2.0.
+    let scale = 1.0 / samples_per_pixel as f64;
+    let r = (scale * r).sqrt();
+    let g = (scale * g).sqrt();
+    let b = (scale * b).sqrt();

     println!(
         "{} {} {}",
キタっ! 深夜二時のテンション爆上がり

シャドウアクネを消す
@@ -12,7 +12,7 @@ fn ray_color(r: &Ray, world: &dyn Hittable, depth: u32) -> Color {
 	return Color::new(0.0, 0.0, 0.0);
     }

-    if let Some(rec) = world.hit(r, 0.0, INFINITY) {
+    if let Some(rec) = world.hit(r, 0.001, INFINITY) {
 	let target: Point3 = rec.p + rec.normal + Vec3::random_in_unit_sphere();
 	return 0.5 * ray_color(&Ray::new(rec.p, target - rec.p), world, depth - 1);
     } else {
ちょっと綺麗になったのか? まあ浮動小数点の誤差を吸収しないといけないことは理解した。
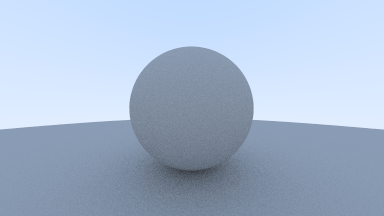
完全なランバード反射
ランバード反射の関数を別に作成
pub fn random_unit_vector() -> Vec3 {
    let a = random_double_range(0.0, 2.0 * PI);
    let z = random_double_range(-1.0, 1.0);
    let r = (1.0 - z * z).sqrt();

    Self {
        x: r * a.cos(),
        y: r * a.sin(),
        z: z,
    }
}
拡散の関数を差し替える。
@@ -13,7 +13,7 @@ fn ray_color(r: &Ray, world: &dyn Hittable, depth: u32) -> Color {
     }

     if let Some(rec) = world.hit(r, 0.001, INFINITY) {
-       let target: Point3 = rec.p + rec.normal + Vec3::random_in_unit_sphere();
+       let target: Point3 = rec.p + rec.normal + Vec3::random_unit_vector();
        return 0.5 * ray_color(&Ray::new(rec.p, target - rec.p), world, depth - 1);
     } else {
         let unit_direction = r.direction.unit_vector();
全体的に薄くなった。
この後、初期に使われていた別アルゴリズムが説明されているが、試すほどでもないのでスキップ。
球を増やしてみる
     let max_depth: u32 = 50;

     let mut world = HittableList::new();
-    world.add(Arc::new(Sphere::new(Point3::new(0.0, 0.0, -1.0), 0.5)));
+    world.add(Arc::new(Sphere::new(Point3::new(-0.3, 0.0, -0.6), 0.2)));
+    world.add(Arc::new(Sphere::new(Point3::new(0.0, 0.0, -1.4), 0.5)));
     world.add(Arc::new(Sphere::new(
         Point3::new(0.0, -100.5, -1.0),
         100.0,
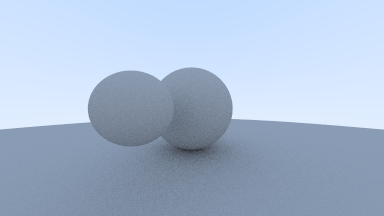
球の色を変えてみようと思ったが、次の章でやってた。その6に続く。