今回作るもの
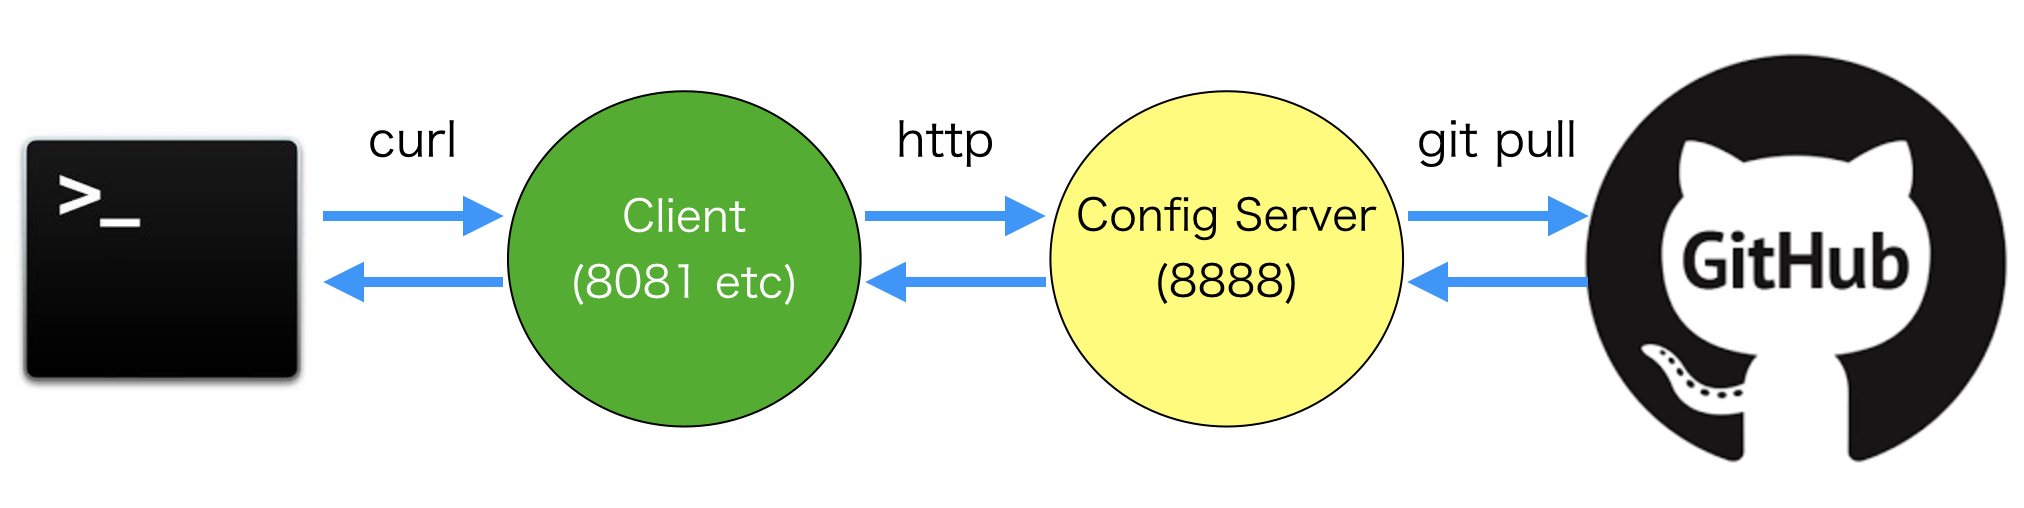
curlとClient間、ClientとConfig Server間は、BASIC認証をかけています。本来はたぶんOAuth 2.0の方がいいんでしょうけど、それはまた別に機会に。
サンプルコードはGitHubにアップしてあります。
環境
- JDK 8
- Spring Boot 2.0.0.RELEASE
- Spring Cloud Finchley.M8
執筆時点では、Spring Cloud Finchleyはまだ正式リリース版が出ていません。今後、仕様が変わる可能性もあるので、注意してください。
Config Server自体については、槙さんのブログを参照してください。ただし、正式リリース前の記事なので、いくつか現在と違う点もあるので注意してください。
Configリポジトリの作成
リポジトリとしては、GitやSVNが使えます。今回はGitHubを使います。
URLはコチラ -> https://github.com/MasatoshiTada/app-config
フォークして使ってください!
application.properties
全アプリケーション・全プロファイルで利用される設定です。
message=Hello application!
common=common
application-xxx.properties
全アプリケーションで利用されますが、特定のプロファイルでのみ利用される設定です("xxx"にはプロファイル名が入ります)。
message=Hello application-dev!
common=common-dev
message=Hello application-qa!
common=common-qa
client.properties
名前が「client」であるアプリケーションでのみ、全プロファイルで利用される設定です。
message=Hello client!
server.port=8081
# 設定のリフレッシュで使用する/refreshエンドポイントを有効化する
management.endpoints.web.exposure.include=refresh
# Spring Securityのログレベルをtraceにして、内部の実行の様子を見やすくする
logging.level.org.springframework.security=trace
3行目の
management.endpoints.web.exposure.include=refreshは、Spring Boot 2.0からの新しい設定です。Spring Boot 2.0では、この設定に記述されたエンドポイントのみ有効化されます(カンマ区切りで複数指定可)。
client-xxx.properties
名前が「client」であるアプリケーションでのみ、特定のプロファイルでのみ利用される設定です("xxx"にはプロファイル名が入ります)。
message=Hello client-dev!
server.port=8082
message=Hello client-qa!
server.port=8083
foo.properties
名前が「foo」であるアプリケーションでのみ、全プロファイルで利用される設定です。
message=Hello foo!
server.port=9001
foo-xxx.properties
名前が「foo」であるアプリケーションでのみ、特定のプロファイルでのみ利用される設定です("xxx"にはプロファイル名が入ります)。
message=Hello foo-dev!
server.port=9002
message=Hello foo-qa!
server.port=9003
設定の優先順位
別のファイルに同じ名前の設定値があった場合、下記の順で優先されます(上のものほど優先されます)。
- アプリケーション名-プロファイル名.properties
- アプリケーション名.properties
- application-プロファイル名.properties
- application.properties
Config Serverを作る
(1) Spring Initializrで雛形を作りましょう。「Group」「Artifact」を適当に決め、「Dependencies」で「Config Server」「Security」を追加します。

(2) main()メソッドがあるクラスに@EnableConfigServerを付加します。
@SpringBootApplication
@EnableConfigServer // コレを付ける
public class ConfigServerApplication {

    public static void main(String[] args) {
        SpringApplication.run(ConfigServerApplication.class, args);
    }
}
(3) Spring Security用のJava Configクラスを作ります。任意のユーザー名・パスワードでユーザーを1つ作り、BASIC認証を有効化します。
@Configuration
public class SecurityConfig extends WebSecurityConfigurerAdapter {

    @Override
    protected void configure(AuthenticationManagerBuilder auth) throws Exception {
        // "client"というユーザーを作成する
        // 本番環境ではNoOpPasswordEncoderを使わず、代わりにBCryptPasswordEncoderを使ってください
        auth.inMemoryAuthentication()
                .passwordEncoder(NoOpPasswordEncoder.getInstance())
                .withUser("client").password("password").roles("CLIENT");
    }

    @Override
    protected void configure(HttpSecurity http) throws Exception {
        // BASIC認証を有効化して、全URLを認証済みでないとアクセスできないようにする
        http.httpBasic();
        http.authorizeRequests()
                .anyRequest().authenticated();
    }
}
コメントにも書いてありますが、NoOpPasswordEncoderはパスワードをまったくエンコードしないため、本番では使わないでください(既にSpring Security 5では非推奨になっています)。今回はあくまで学習用として使っています。
(4) application.propertiesに設定を記述します。
# GitリポジトリのURL
spring.cloud.config.server.git.uri=https://github.com/MasatoshiTada/app-config.git

# このConfig Serverのポート番号
server.port=8888
クライアントを作る
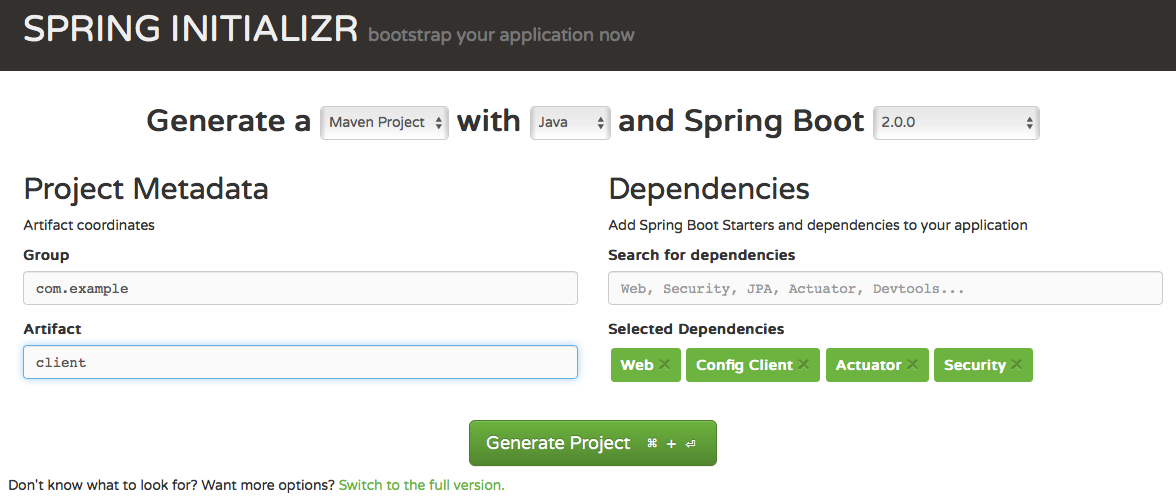
(1) Spring Initializrで雛形を作りましょう。「Group」「Artifact」を適当に決め、「Dependencies」で「Web」「Config Client」「Actuator」「Security」を追加します。
(2) Spring Security用のJava Configクラスを作ります。任意のユーザー名・パスワードでユーザーを2つ作ります(ロールも分けて、任意のロール名を付けてください)。
@Configuration
public class SecurityConfig extends WebSecurityConfigurerAdapter {

    @Override
    protected void configure(AuthenticationManagerBuilder auth) throws Exception {
        // "ACTUATOR"と"USER"という2つのロールのユーザーを作る
        // 本番ではNoOpPasswordEncoderは使わないで!
        auth.inMemoryAuthentication()
                .passwordEncoder(NoOpPasswordEncoder.getInstance())
                .withUser("actuator").password("password").roles("ACTUATOR").and()
                .withUser("user").password("password").roles("USER");
    }

    @Override
    protected void configure(HttpSecurity http) throws Exception {
        // BASIC認証の有効化
        http.httpBasic();
        // ActuatorエンドポイントはACTUATORロールのみアクセス可能、
        // その他はログイン済みであればどのロールでもアクセス可能
        http.authorizeRequests()
                .requestMatchers(EndpointRequest.toAnyEndpoint()).hasRole("ACTUATOR")
                .anyRequest().authenticated();

        // 本番ではCSRFは無効化しないで!
        http.csrf().disable();
    }
}
今回はサンプルが複雑になりすぎるのを避けるために、CSRFを無効化しています。本番環境では無効化せず、curlでのアクセスの前に何らかの手段でトークンを取得するなどしてください。
(3) bootstrap.propertiesに設定を記述します。
# このクライアントのアプリケーション名
spring.application.name=client

# Config ServerのURL
spring.cloud.config.uri=http://localhost:8888/

# Config Serverにアクセスする際のユーザー名・パスワード
# (Config ServerのJava Configで作成したもの)
spring.cloud.config.username=client
spring.cloud.config.password=password
bootstrap.propertiesは、起動時の設定を記述するもので、Spring Cloud環境でのみ使われます。
(4) Config Serverから取得した値を返す、適当なコントローラーを作ります。クラスには@RefreshScopeを付加します。
@RefreshScope  // "POST /actuator/refresh"されると、このクラスのインスタンスが破棄される
@RestController
@RequestMapping("/hello")
public class HelloController {

    private final String message;
    private final String common;

    // Config Serverから取得した値をコンストラクタで取得
    public HelloController(@Value("${message}") String message, @Value("${common}") String common) {
        this.message = message;
        this.common = common;
    }

    @GetMapping
    public Map<String, String> hello() {
        HashMap<String, String> map = new HashMap<>();
        map.put("message", message);
        map.put("common", common);
        return map;
    }
}
Config Server起動と、curlでの設定取得
(1) Config Serverのみ起動します。
(2) /application/defaultにアクセスすると、application.propertiesの値が取得できます。
$ curl -X GET -u client:password http://localhost:8888/application/default | jq
{
  "name": "application",
  "profiles": [
    "default"
  ],
  "label": null,
  "version": "e87b3c3ff0239394963e3bddf0a2982db5064339",
  "state": null,
  "propertySources": [
    {
      "name": "https://github.com/MasatoshiTada/app-config.git/application.properties",
      "source": {
        "message": "Hello application!",
        "common": "common"
      }
    }
  ]
}
(2) /application/devにアクセスすると、application.propertiesとapplication-dev.propertiesの値が取得できます。
$ curl -X GET -u client:password http://localhost:8888/application/dev | jq
{
  "name": "application",
  "profiles": [
    "dev"
  ],
  "label": null,
  "version": "e87b3c3ff0239394963e3bddf0a2982db5064339",
  "state": null,
  "propertySources": [
    {
      "name": "https://github.com/MasatoshiTada/app-config.git/application-dev.properties",
      "source": {
        "message": "Hello application-dev!",
        "common": "common-dev"
      }
    },
    {
      "name": "https://github.com/MasatoshiTada/app-config.git/application.properties",
      "source": {
        "message": "Hello application!",
        "common": "common"
      }
    }
  ]
}
記載しませんが、
/application/qaにアクセスすると、application.propertiesとapplication-qa.propertiesの値が取得できます。
(3) /client/defaultにアクセスすると、application.propertiesとclient.propertiesの値が取得できます。
$ curl -X GET -u client:password http://localhost:8888/client/default | jq
{
  "name": "client",
  "profiles": [
    "default"
  ],
  "label": null,
  "version": "e87b3c3ff0239394963e3bddf0a2982db5064339",
  "state": null,
  "propertySources": [
    {
      "name": "https://github.com/MasatoshiTada/app-config.git/client.properties",
      "source": {
        "message": "Hello client!",
        "server.port": "8081",
        "management.endpoints.web.exposure.include": "refresh",
        "logging.level.org.springframework.security": "trace"
      }
    },
    {
      "name": "https://github.com/MasatoshiTada/app-config.git/application.properties",
      "source": {
        "message": "Hello application!",
        "common": "common"
      }
    }
  ]
}
記載しませんが、
/foo/defaultにアクセスすると、application.propertiesとfoo.propertiesの値が取得できます。
(4) /client/devにアクセスすると、application.properties・application-dev.properties・client.properties・client-dev.propertiesの値が取得できます。
$ curl -X GET -u client:password http://localhost:8888/client/dev | jq
{
  "name": "client",
  "profiles": [
    "dev"
  ],
  "label": null,
  "version": "e87b3c3ff0239394963e3bddf0a2982db5064339",
  "state": null,
  "propertySources": [
    {
      "name": "https://github.com/MasatoshiTada/app-config.git/client-dev.properties",
      "source": {
        "message": "Hello client-dev!",
        "server.port": "8082"
      }
    },
    {
      "name": "https://github.com/MasatoshiTada/app-config.git/application-dev.properties",
      "source": {
        "message": "Hello application-dev!",
        "common": "common-dev"
      }
    },
    {
      "name": "https://github.com/MasatoshiTada/app-config.git/client.properties",
      "source": {
        "message": "Hello client!",
        "server.port": "8081",
        "management.endpoints.web.exposure.include": "refresh",
        "logging.level.org.springframework.security": "trace"
      }
    },
    {
      "name": "https://github.com/MasatoshiTada/app-config.git/application.properties",
      "source": {
        "message": "Hello application!",
        "common": "common"
      }
    }
  ]
}
記載しませんが、
/client/qaにアクセスすると、application.properties・application-qa.properties・client.properties・client-qa.propertiesの値が取得できます。/foo/devにアクセスすると、application.properties・application-dev.properties・foo.properties・foo-dev.propertiesの値が取得できます。/foo/qaにアクセスすると、application.properties・application-qa.properties・foo.properties・foo-qa.propertiesの値が取得できます。
上記の確認が終わっても、Config Serverは起動したままにしておいてください。
クライアントからの値の取得
(1) 何のプロファイルも指定しないで、クライアントを起動してください。
(2) クライアントは起動時に、spring.application.nameで指定したアプリケーション名・実行中のプロファイル名をもとに、前章で試したURLでConfig Serverにアクセスします(今回だと/client/default)。また、このアクセスの時にBASIC認証を使っています(ユーザー名client、パスワードpassword)。
(3) curlでlocalhost:8081/helloにアクセスしましょう。
$ curl -X GET -u user:password http://localhost:8081/hello | jq
{
  "common": "common",
  "message": "Hello client!"
}
"common"はapplication.propertiesの値です。"message"はapplication.propertiesにも定義されていますが、優先順位のルールからclient.propertiesの値が使われています。
起動しているポート番号8081も、client.propertiesの値ですね。
(4) クライアントをいったん停止し、devプロファイルで再起動します。プロファイルは「--」を付けたコマンドライン引数で指定しています(他にも、環境変数やJVMシステムプロパティなどで指定可能です)
client $ mvn clean package
client $ java -jar target/client-0.0.1-SNAPSHOT.jar --spring.profiles.active=dev
client $ curl -X GET -u user:password http://localhost:8082/hello | jq
{
  "common": "common-dev",
  "message": "Hello client-dev!"
}
"common"はapplication-dev.propertiesの値です。"message"はclient-dev.propertiesの値です。
起動しているポート番号8082も、client-dev.propertiesの値ですね。
実行中に値を変更する
(1) いま実行中のクライアントは停止し、プロファイル指定なしでもう一度起動してください。
(2) curlで/helloエンドポイントにアクセスします。messageの値は「Hello client!」です。
$ curl -X GET -u user:password http://localhost:8081/hello | jq
{
  "common": "common",
  "message": "Hello client!"
}
(3) GitHub上で、client.propertiesのmessageの値を書き換えてください。
message=Hello client!!!!!!!!!!!!!!!!!!!!!!!!!
(4) もう一度、curlで/helloエンドポイントにアクセスします。messageの値は「Hello client!」のままで変わっていません。まだ、GitHubで変更した値をクライアント側に反映していないためです。
$ curl -X GET -u user:password http://localhost:8081/hello | jq
{
  "common": "common",
  "message": "Hello client!"
}
(5) curlで/actuator/refreshにアクセスします。すると、クライアントがConfig Serverにアクセスし、Config ServerがGitHubから値を取得してクライアントに渡します。
$ curl -X POST -u actuator:password http://localhost:8081/actuator/refresh | jq
[
  "config.client.version",
  "message"
]
-uで指定しているユーザー名がactuatorであることに注意してください。これは、クライアントのJava Configで作成したユーザーで、/actuator/**にアクセスする権限を持つACTUATORロールのユーザーです。
(6) リフレッシュされた際に、@RefreshScopeが付加されたBean(今回はHelloController)のインスタンスが破棄されます。インスタンスの再作成は、リフレッシュ後にそのBeanが初めて必要になった際(今回だとcurlで/helloにアクセスした際)に行われ、その際に変更後の新しい設定値が使われます。
$ curl -X GET -u user:password http://localhost:8081/hello | jq
{
  "common": "common",
  "message": "Hello client!!!!!!!!!!!!!!!!!!!!!!!!!"
}