こんな状態の人向け
あ~、Linuxで作った認識のライブラリをWindowsでも実行できるように環境作りてぇな~
Visual studioのGUIうっとおしいから、CmakeとMsbuildでやってみるかぁ~
なんだこれ、、、どうすればばいいんだよ。ぐぐっても情報あんまりひっかかんねーぞ。。

ゴール
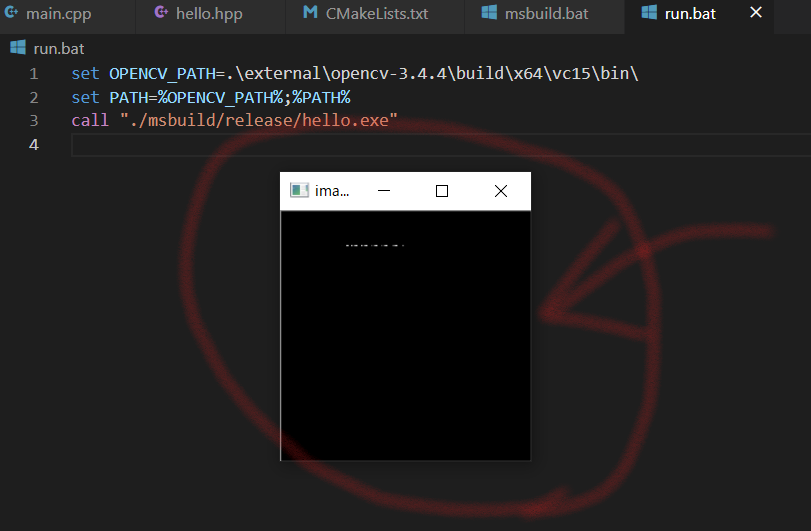
opencvでwindowが表示されるコードを、msbuildとcmakeで構築します。
こんなのを表示されたらOK。ついでに、コマンドラインにはHello!って文字も表示されます。

手順概要
- ツールをインストール(msbuild cmake)
- サンプルコード、cmakeを書く
- ビルド、実行用のbatファイルを書く
- 実行する
1. ツールをインストール(msbuild cmake)
超分かり易いインストール方法を書いてる人のモノを参考にしましょう!
msbuild等 : https://qiita.com/piacerex/items/4d6d234dc0fb66bbb592
cmake : https://qiita.com/East_san/items/aff4f7907aedabe6da47
2. サンプルコード、cmakeを書く
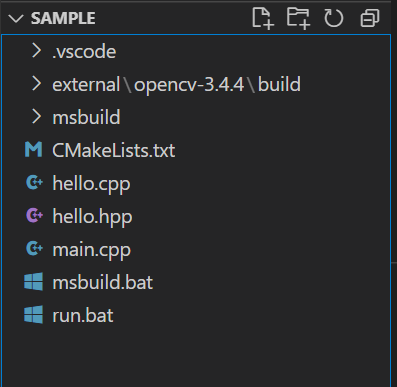
dir構成はこんな感じ。
opencvを使うのでここから好きなバージョンをダウンロードして、適当に突っ込みましょう。(僕の場合はexternal/opencv-3.4.4以下に配置)
https://opencv.org/releases/

# include <stdio.h>
# include "hello.hpp"
# include <opencv2/opencv.hpp>

int main()
{
	cv::Mat image(cv::Size(200, 200), CV_8UC1);

	hello();
	cv::imshow("images", image);

	cv::waitKey(0);
	return 1;
}
# include <iostream>
# include "hello.hpp"

void hello() {
    std::cout << "Hello!" << std::endl;
}
# ifndef HELLO_H
# define HELLO_H

void hello();

# endif
Cmakeその他のことはここを見ましょう。
https://qiita.com/janus_wel/items/a673793d448c72cbc95e
message()を使うとログを出すことができるので、
バグった場合は利用しましょう。
cmake_minimum_required(VERSION 2.8)

# PROGNAME変数にhelloをセット
set(PROGNAME hello)

include_directories(./external/opencv-3.4.4/build/include/)

link_directories(./external/opencv-3.4.4/build/x64/vc15/lib/)

add_executable(${PROGNAME} main.cpp hello.cpp)

message("[INFO] debug log -----------")
message("${PROGNAME}")

# 3rd libの管理をする変数を作成して、追加
set(list_lib_3rd)
list(APPEND list_lib_3rd
../external/opencv-3.4.4/build/x64/vc15/lib/opencv_world344
)

# 最後にリンク
target_link_libraries(${PROGNAME}
                    ${list_lib_3rd}
                    )
3. ビルド、実行用のbatファイルを書く
x64&Releaseとしてビルドするので、cmakeの引数に追記するのを忘れずに。
cmakeやmsbuild.exeのpathは各自調べておきましょう。
mkdir msbuild
cd msbuild

REM x64 Relasseはここで指定っぽい。
call "C:\Program Files\CMake\bin\cmake.exe" ../ ^
     -DCMAKE_GENERATOR_PLATFORM=x64 -DCMAKE_BUILD_TYPE=Release

REM ここで、Relesaeの指定も必要っぽい。
call "C:\Program Files (x86)\Microsoft Visual Studio\2017\Community\MSBuild\15.0\Bin\MSBuild.exe" ^
                                                            "hello.vcxproj" /p:Configuration=Release
実行時にDLLのパスが通ってないとエラーになるので、指定しておきましょう。
set OPENCV_PATH=.\external\opencv-3.4.4\build\x64\vc15\bin\
set PATH=%OPENCV_PATH%;%PATH%
call "./msbuild/release/hello.exe"
4.実行する
- msbuild.batをダブルクリック
- run.batをダブルクリック
おわり
こんな環境を構築するのにも、丸1日かかっちまったぜ・・・
会社の人には言えない言えない。(・x・)
あと、日本語のコメントはエラーの発生源だからマジで注意。
参考になりそうな情報はここら辺が参考になりそう。
- cmakeビルドオプション関係
https://www.wagavulin.jp/entry/2011/11/27/222650 - make -> cmakeに書き換える
https://www.hiroom2.com/2016/09/07/makefile%E3%82%92cmakelists-txt%E3%81%AB%E7%BD%AE%E3%81%8D%E6%8F%9B%E3%81%88%E3%82%8B/ - 共有ライブラリの作成関係
https://mijinc0.github.io/blog/post/20190530_cpp_library/
https://theolizer.com/cpp-school3/cpp-school3-8/
https://www.qoosky.io/techs/814fda555d