はじめに
Oracle Cloud には、バージョンアップやチューニング、障害時の回復などの自動化を備えた DBaaS が存在しています。今回は、Autonomous Transaction Processingを使用して、Golang から接続する方法を確認します。
前提作業
oci cliの導入
oci cli と jq コマンドを使用可能なこと。次のQiita記事で導入した手順を書いています
https://qiita.com/sugimount/items/63a8cfe1163030ae8804
Autonomous Transaction Processing を作成
oci cliを使用して、Autonomous Transaction Processing のインスタンスを作成します。
oci db autonomous-database create --db-name tutorial1 --cpu-core-count 1 --data-storage-size-in-tbs 1 --admin-password nsfan824u789Fjfoijoj3098j --display-name tutorial-atp1 --license-model LICENSE_INCLUDED
Instance(Ubuntu18.04) を作成して、SQL *Plus から接続する
OCI上でUbuntu18.04 を新規作成し、Oracleが提供しているcliツールの[SQL *Plus] から Autonomous Transaction Processing へアクセスします。
Instanceの作成
まずは、Instanceを作成するために、仮想ネットワーク関連の OCID を変数に格納します
set vcn_ocid (oci network vcn list | jq -r '.data | map(select(.["display-name"] == "TutorialVCN"))[].id')
set subnet1_ocid (oci network subnet list --vcn-id $vcn_ocid | jq -r '.data | map(select(.["display-name"] == "tutorial_subnet1"))[].id')
Ubuntu 18.04のImageの OCID を変数に格納します
oci compute image list --sort-by TIMECREATED --sort-order DESC | jq -r '.data | map(select( .["operating-system"] == "Canonical Ubuntu" and .["operating-system-version"] == "18.04"))'
set ubuntu1804_ocid (echo ocid1.image.oc1.iad.aaaaaaaahh6wjs5qp2sieliieujdnih7eyxt32ets3nuiifzjjfkqnbelcra)
Instanceを作成します
oci compute instance launch \
--availability-domain AJtg:US-ASHBURN-AD-1 \
--fault-domain FAULT-DOMAIN-1 \
--shape VM.Standard2.1 \
--display-name ins_ubuntu_1 \
--hostname-label ins-ubuntu-1 \
--image-id $ubuntu1804_ocid \
--subnet-id $subnet1_ocid \
--assign-public-ip true \
--private-ip 172.16.1.2 \
--ssh-authorized-keys-file ~/.ssh/id_rsa.pub
前提パッケージの導入
作成したインスタンスにSSHでアクセスし、以下の作業を行います。
必要なパッケージを導入します。
sudo apt install gcc unzip libaio1 pkg-config -y
gcc の version を確認
> gcc --version                                                                                                                       21sgcc (Ubuntu 7.3.0-27ubuntu1~18.04) 7.3.0
Copyright (C) 2017 Free Software Foundation, Inc.
This is free software; see the source for copying conditions.  There is NO
warranty; not even for MERCHANTABILITY or FITNESS FOR A PARTICULAR PURPOSE.
Instant Client (18.3) の導入
Instant Client とは、Oracle Database に接続するために使用するライブラリ・ツール・ヘッダファイルを再パッケージ化したものです。PythonやPHP、NodeJS、Go などの言語から Oracle Database にアクセスするために必要なライブラリです。
下のURLにアクセスします。
https://www.oracle.com/database/technologies/instant-client/downloads.html
導入したいマシンに応じて必要なバージョンを選択します。Ubuntu18.04 の場合は、「Instant Client for Linux x86-64」を選択します。
http://download.oracle.com/otn/linux/instantclient/183000/instantclient-basic-linux.x64-18.3.0.0.0dbru.zip
以下の3種類のファイルをダウンロードします
- instantclient-basic-linux.x64-18.3.0.0.0dbru.zip
- instantclient-sqlplus-linux.x64-18.3.0.0.0dbru.zip
- instantclient-sdk-linux.x64-18.3.0.0.0dbru.zip
Ubuntu18.04にダウンロードしてきたファイルを格納します
scp instantclient-basic-linux.x64-18.3.0.0.0dbru.zip ubuntu@132.145.175.40:/home/ubuntu
scp instantclient-sqlplus-linux.x64-18.3.0.0.0dbru.zip ubuntu@132.145.175.40:/home/ubuntu
scp instantclient-sdk-linux.x64-18.3.0.0.0dbru.zip ubuntu@132.145.175.40:/home/ubuntu
/opt/oracle に格納します
sudo mkdir /opt/oracle
cd /opt/oracle
mv /home/ubuntu/instantclient-basic-linux.x64-18.3.0.0.0dbru.zip /opt/oracle
mv /home/ubuntu/instantclient-sqlplus-linux.x64-18.3.0.0.0dbru.zip /opt/oracle
mv /home/ubuntu/instantclient-sdk-linux.x64-18.3.0.0.0dbru.zip /opt/oracle
zipを解凍します。/opt/oracle/instantclient_18_3 ディレクトリに3個のzipファイルが解凍されます。
cd /opt/oracle
unzip instantclient-basic-linux.x64-18.3.0.0.0dbru.zip
unzip instantclient-sqlplus-linux.x64-18.3.0.0.0dbru.zip
unzip instantclient-sdk-linux.x64-18.3.0.0.0dbru.zip
runtime のリンクパスを構成します
sudo sh -c "echo /opt/oracle/instantclient_18_3 > /etc/ld.so.conf.d/oracle-instantclient.conf"
sudo ldconfig
sqlplus のバイナリファイルにpathを通します
export PATH=/opt/oracle/instantclient_18_3:$PATH
root ユーザの .bashrc に設定します
echo 'export PATH=/opt/oracle/instantclient_18_3:$PATH' >> /root/.bashrc
個人的に使用するubuntu ユーザ(fish)にもpathの設定をします
echo 'set PATH /opt/oracle/instantclient_18_3 $PATH' >> ~/.config/fish/config.fish
Wallet をダウンロードして格納
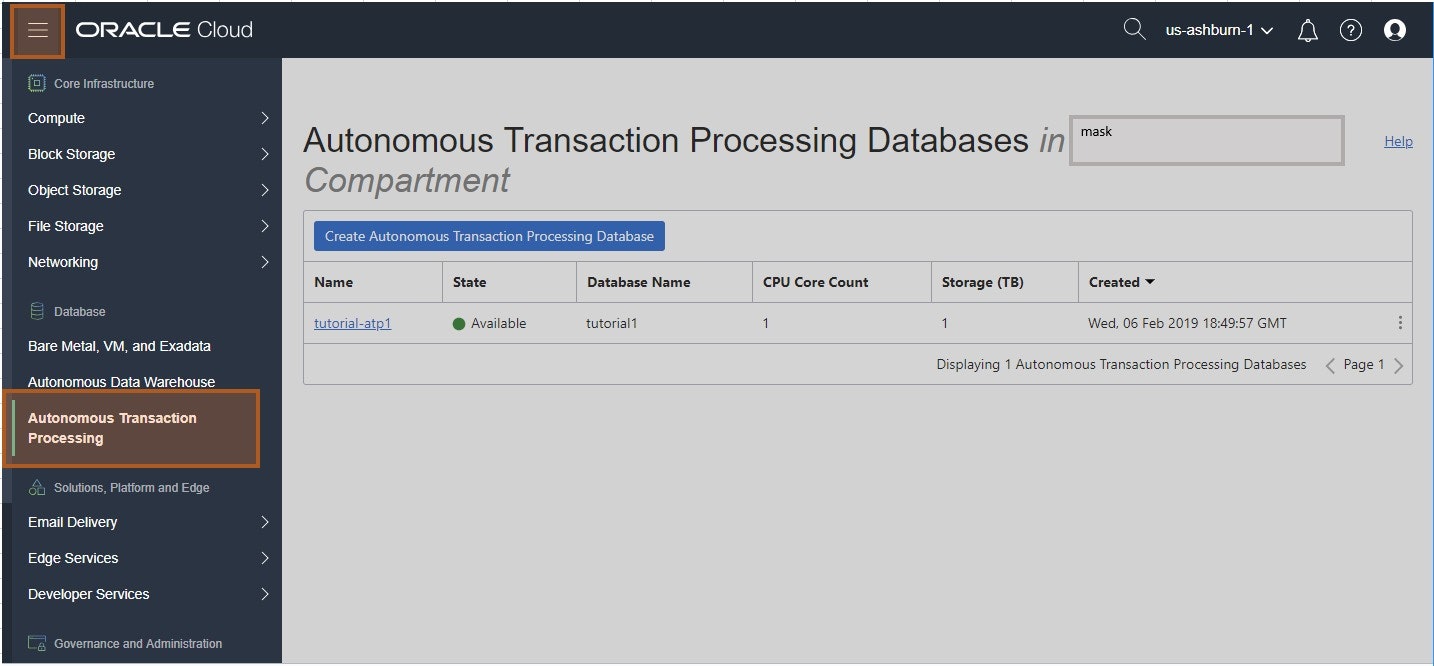
Autonomous Transaction Processingを外部のプログラムから接続するには、Wallet というクレデンシャルファイル(zipファイル)をダウンロードする必要があります。OCIのサービスコンソールから、作成したAutonomous Transaction Processingのページへ遷移します。

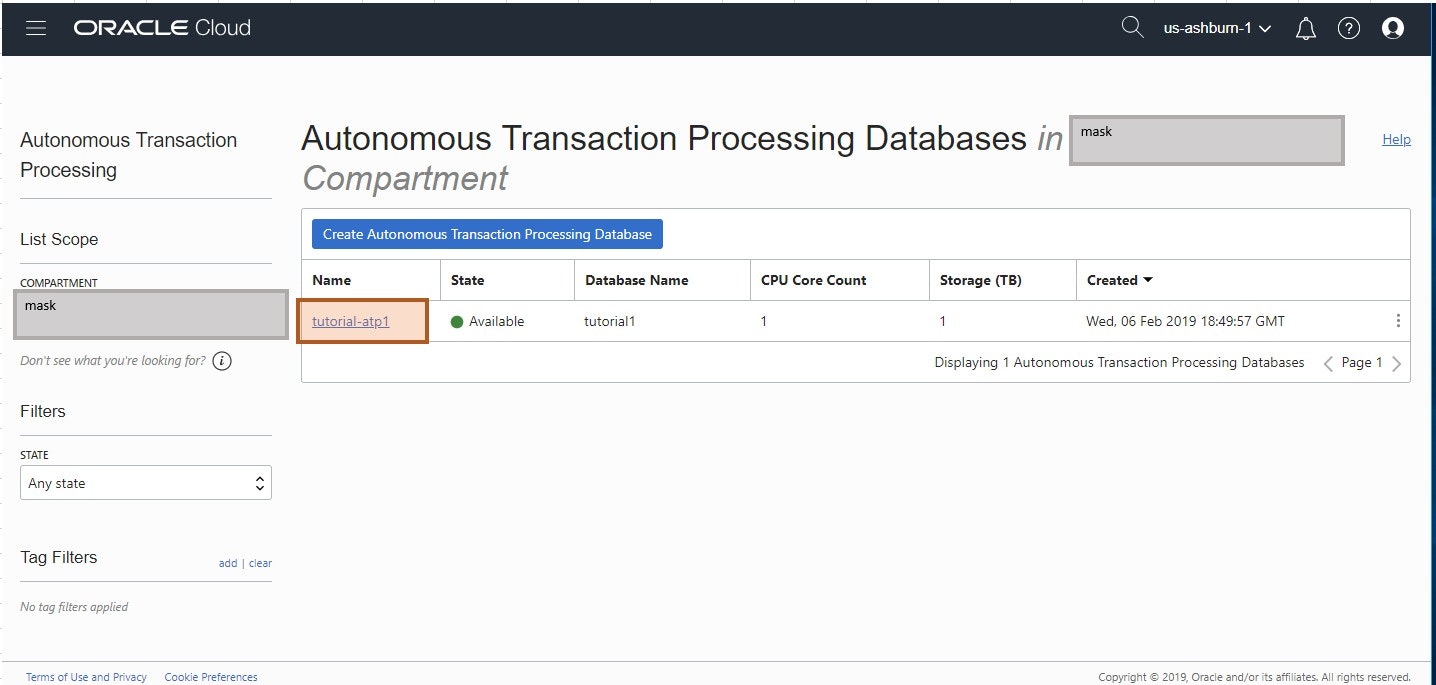
その後、作成したATPを選択します。
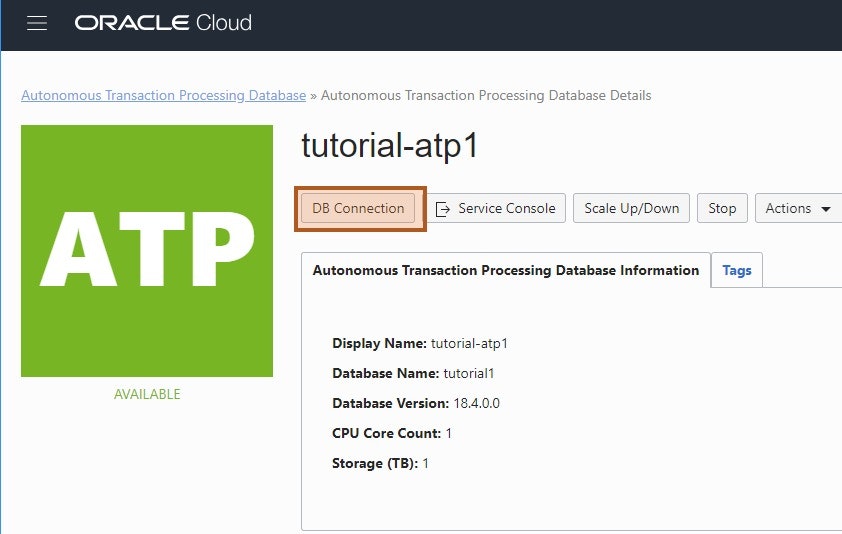
詳細画面で、[DB Connection]を選択します。
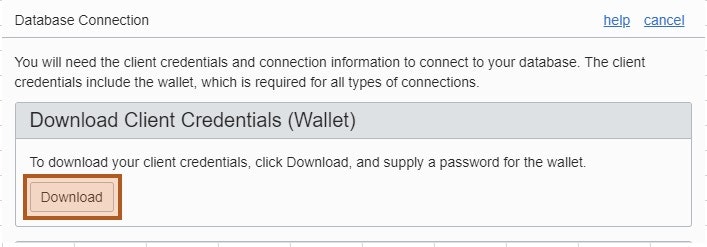
Download を押して、Wallet(zipファイル) をダウンロードします。パスワードが求められるので、ATPを作成した時に指定した admin-password を入力します。
ダウンロードしてきたWalletをscpしてATPに接続したいインスタンスに格納します
scp Wallet_tutorial1.zip ubuntu@132.145.175.40:/home/ubuntu
zipで導入した instant client の以下のディレクトリに Wallet ファイルを格納します
mv /home/ubuntu/Wallet_tutorial1.zip /opt/oracle/instantclient_18_3/network/admin
cd /opt/oracle/instantclient_18_3/network/admin
unzip Wallet_tutorial1.zip
下記のディレクトリ構成になっていればOKです
root@ins-ubuntu-1:~# ls -la /opt/oracle/instantclient_18_3/network/admin/
total 68
drwxr-xr-x 2 root   root    4096 Feb  6 19:42 .
drwxr-xr-x 3 root   root    4096 Jun 28  2018 ..
-rw-r--r-- 1 root   root     502 Jun 28  2018 README
-rwxr-xr-x 1 ubuntu ubuntu 19791 Feb  6 19:19 Wallet_tutorial1.zip
-rw-r--r-- 1 root   root    6661 Feb  6 19:09 cwallet.sso
-rw-r--r-- 1 root   root    6616 Feb  6 19:09 ewallet.p12
-rw-r--r-- 1 root   root    3240 Feb  6 19:09 keystore.jks
-rw-r--r-- 1 root   root      87 Feb  6 19:09 ojdbc.properties
-rw-r--r-- 1 root   root     114 Feb  6 19:09 sqlnet.ora
-rw-r--r-- 1 root   root    1741 Feb  6 19:09 tnsnames.ora
-rw-r--r-- 1 root   root    3336 Feb  6 19:09 truststore.jks
SQL *Plus から接続テスト
adminユーザと、ATPを作成した時に指定したパスワード、TNSNAMEを指定することでログインが出来ます。TNSNAMEは、Autonomous Transaction Processingのサービスコンソール上でも確認できますし、ダウンロードしてきたWalletのファイルにも記載がされています。
sqlplus admin/nsfan824u789Fjfoijoj3098j@tutorial1_low
なお、TNSNAMEは5種類生成されています。以下の特徴があり、適切に選択します。
-
(name)_tpurgent : タイムクリティカルなトランザクション処理操作用に用意されている、最も処理を優先するTNS。このTSNは並列処理をサポートします。
-
(name)_tp : トランザクション処理用の一般的なTNS。このTSNは並列処理されません。
-
(name)_high : レポートおよびバッチ操作の用途で使用する、優先順位の高いTSN。すべての操作は並行して実行され、キューイングして処理されます。
-
(name)_medium : レポートおよびバッチ操作の用途で使用する、優先度中のTSN。すべての操作は並行して実行され、キューイングして処理されます。
-
(name)_low : レポートおよびバッチ操作の用途で使用する、最も優先度の低いTSN。並列処理されません。
SQL *Plus 実行例
# sqlplus admin/nsfan824u789Fjfoijoj3098j@tutorial1_low

SQL*Plus: Release 18.0.0.0.0 - Production on Wed Feb 6 19:46:21 2019
Version 18.3.0.0.0

Copyright (c) 1982, 2018, Oracle.  All rights reserved.

Last Successful login time: Wed Feb 06 2019 19:45:40 +00:00

Connected to:
Oracle Database 18c Enterprise Edition Release 18.0.0.0.0 - Production
Version 18.4.0.0.0

SQL>
バージョンなど確認
SQL> select * from global_name;

GLOBAL_NAME
--------------------------------------------------------------------------------
L2GTCWAXYFKYO55_TUTORIAL1

SQL>
SQL> SELECT * FROM PRODUCT_COMPONENT_VERSION;

PRODUCT
--------------------------------------------------------------------------------
VERSION
--------------------------------------------------------------------------------
VERSION_FULL
--------------------------------------------------------------------------------
STATUS
--------------------------------------------------------------------------------
Oracle Database 18c Enterprise Edition
18.0.0.0.0
18.4.0.0.0
Production


SQL>
動作確認用のデータを作成
Table作成
CREATE TABLE emp
  (
    empno VARCHAR2(10) NOT NULL,
    empname VARCHAR2(50),
    gender_f NUMBER(1,0)
  );
テストデータを挿入
INSERT INTO emp (
  empno,
  empname,
  gender_f
)
VALUES (
  '0000000001',
  'sugimount',
  1
);

INSERT INTO emp (
  empno,
  empname,
  gender_f
)
VALUES (
  '0000000002',
  'helloworld',
  0
);

INSERT INTO emp (
  empno,
  empname,
  gender_f
)
VALUES (
  '0000000003',
  'hellooracle',
  0
);

INSERT INTO emp (
  empno,
  empname,
  gender_f
)
VALUES (
  '0000000004',
  'hellowug',
  1
);
データの確認
SQL> select * from emp;

EMPNO      EMPNAME                                              GENDER_F
---------- -------------------------------------------------- ----------
0000000001 sugimount                                                   1
0000000002 helloworld                                                  0
0000000003 hellooracle                                                 0
Golang から ATPに接続
make を install
sudo apt install make -y
GolangをInstall (fish)
Golangのバイナリをダウンロードして、環境変数を設定
mkdir $HOME/go
wget -qO- "https://dl.google.com/go/go1.11.5.linux-amd64.tar.gz" | tar -zx --strip-components=1 -C $HOME/go
mkdir $HOME/go-third-party
export -x GOPATH=$HOME/go-third-party
export PATH=$PATH:$HOME/go/bin
export PATH=$PATH:$GOPATH/bin
fishの環境変数を設定 (bashを使用する場合は、適宜書き換えてください)
echo 'set -x GOPATH $HOME/go-third-party' >> ~/.config/fish/config.fish
echo 'set PATH $HOME/go/bin $PATH' >> ~/.config/fish/config.fish
echo 'set PATH $GOPATH/bin $PATH' >> ~/.config/fish/config.fish
dep の install
golang でのパッケージマネージャ的なdepをinstallします
go get -u github.com/golang/dep/cmd/dep
テスト実行用のコードをgitからclone
GitHubに動作確認したコードを載せています。これをcloneして動作確認をします。
https://github.com/Sugi275/go-oracledb-test/blob/master/src/go-oracledb-test.go
mkdir ~/go-third-party/src/github.com/Sugi275/
cd ~/go-third-party/src/github.com/Sugi275/
git clone https://github.com/Sugi275/go-oracledb-test.git
なお、以下の関数で接続先の userid と password, tnsname を指定しているので、環境に合わせて修正してください
func getDSN() string {
    return "admin/nsfan824u789Fjfoijoj3098j@tutorial1_low" // user/name@host:port/sid
}
go-oci8をinstall
oci8.pc ファイルを作成
mattnさんが作成されている、go-oci8ライブラリを使用するための準備を行います
pkgconfig用のファイルをroot権限で作成
vim /usr/lib/pkgconfig/oci8.pc
prefix=/opt/oracle/instantclient_18_3
libdir=${prefix}
includedir=${prefix}/sdk/include/

Name: oci8
Description: Oracle Instant Client
Version: 18.3
Libs: -L${libdir} -lclntsh
Cflags: -I${includedir}
環境変数 PKG_CONFIG_PATH の設定
echo 'set -x PKG_CONFIG_PATH /usr/lib/pkgconfig/' >> ~/.config/fish/config.fish
go-oci8をinstall
go get github.com/mattn/go-oci8
動作確認
以下のように実行すると、ATPに挿入したデータを取得し、正常にprintが出来ました。(すばらしー!)
これで、GolangとATP間と接続を確認することが出来ました
> cd /home/ubuntu/go-third-party/src/github.com/Sugi275/go-oracledb-test
> go run src/go-oracledb-test.go
empno:0000000004 empname:hellowug, gender:1
empno:0000000001 empname:sugimount, gender:1
empno:0000000002 empname:helloworld, gender:0
empno:0000000003 empname:hellooracle, gender:0
参考URL
go-oci8
https://github.com/mattn/go-oci8
各言語からATPへの接続方法
https://docs.oracle.com/en/cloud/paas/atp-cloud/atpug/connecting-nodejs.html#GUID-AB1E323A-65B9-47C4-840B-EC3453F3AD53
GoからOracleDB
https://blogs.oracle.com/developers/how-to-connect-a-go-program-to-oracle-database-using-goracle
https://qiita.com/kpppn/items/a65b855b6e758ed90796
Instant Client 導入手順
https://www.oracle.com/technetwork/topics/linuxx86-64soft-092277.html#ic_x64_inst
dockerからgo→oracle db
https://github.com/wendyeq/go-oracle-docker


