Raspberry Pi 3b+とSensorTagを接続 ①Raspberry Pi初期設定の続き。
はじめに
SensorTagへの接続方法
- SensorTagへの接続にはBLE(Bluetooth Low Energy)を使用する。
- SensorTagにはデフォルトでBLEのファームウェアが入っているのでそのまま使用可能。
- Raspberry Pi OSにも同じく標準でBLEスタックのbluezが入っているので標準的なツールも使える。
BlueZについて
BlueZはLinuxプラットフォームで稼働するオープンソースのBluetoothプロトコルスタック。
通常のBluetooth(Bluetooth Basic)、BLE(Bluetooth Low Energy)両方に対応。
参考:https://re-engines.com/2021/09/21/bluez/
主要コマンドは下記。
| Utility | Function |
|---|---|
| hciconfig | ネットワークの ifconfig や iwconfig に近く、Bluetooth アダプタの起動や停止、動作設定などを行う。 |
| hcitool | 様々な機能があるがよく使うのはデバイスを検索する inq と scan で、WiFi で言うところの iwlist 。 |
| gatttool | コマンドラインベースのGATTクライアント |
GATTについて
BLEでセントラル機器(Rapasberry Pi)とペリフェラル機器(SensorTag)が通信する際にGATT(Generic ATTribute)通信を行う。
GATT は Bluetooth LE における標準的なデータフォーマットで、SNMPにおけるMIBのようなもの。
解説はこのあたりの記事がわかりやすかった。
https://www.musen-connect.co.jp/blog/course/trial-production/ble-beginner-2/
https://www.mikan-tech.net/entry/ble-gatt-study
gatttoolでSensorTagに接続
下記のページをなぞってgatttoolでSensorTagに接続、情報を取得する。
https://www.mikan-tech.net/entry/raspi-sensortag-gatttool
事前作業
(1) BlueZパッケージの確認
sensortag@raspi3bp-01:~ $ dpkg -l | cat | grep blue
ii bluetooth              5.50-1.2~deb10u1+rpt1 all   Bluetooth support (metapackage)
ii bluez                  5.50-1.2~deb10u1+rpt1 armhf Bluetooth tools and daemons
ii bluez-firmware         1.2-4+rpt2            all   Firmware for Bluetooth devices
ii libbluetooth-dev:armhf 5.50-1.2~deb10u1+rpt1 armhf Development files for using the BlueZ Linux Bluetooth library
ii libbluetooth3:armhf    5.50-1.2~deb10u1+rpt1 armhf Library to use the BlueZ Linux Bluetooth stack
ii node-bluebird          3.5.1+dfsg2-2         all   Fully featured Promises/A+ implementation for Node.js
ii pi-bluetooth           0.1.12                all   Raspberry Pi 3 bluetooth
(2) Raspberry PiのBluetooth起動確認
hciconfigを実行するとUPの項目がRUNNINGになっているのが確認できる
$ hciconfig
hci0:	Type: Primary  Bus: UART
	BD Address: B8:27:EB:40:37:18  ACL MTU: 1021:8  SCO MTU: 64:1
	UP RUNNING
	RX bytes:778 acl:0 sco:0 events:48 errors:0
	TX bytes:1775 acl:0 sco:0 commands:48 errors:0
(3) SensorTagの電源ON
SensorTagの横の電源ボタンを押して電源を入れる。起動後2分間はアドバタイズが行われる。
SensorTagに接続
(1) BLEデバイスをスキャン
CC2650が出てくるはずなのでMACアドレスをメモ。
もたもたしているとSensorTagがスリープになってしまったりするのでその時は本体の電源ボタンを押してアクティブにしてあげる。
$ sudo hcitool lescan
[sudo] password for sensortag:
LE Scan ...
6A:XX:XX:XX:XX:XX (unknown)
6F:XX:XX:XX:XX:XX (unknown)
54:6C:XX:XX:XX:XX (unknown)
54:6C:XX:XX:XX:XX CC2650 SensorTag
(2) gatttool -I -b MACアドレスコマンドでメモしたMACアドレスを指定してSensorTagに接続
(3) connectコマンドで接続を確立。
(4) characteristicsでSensorTagが持つCharacteristicsの一覧を取得
sensortag@raspi3bp-01:~ $ gatttool -I -b 54:6C:XX:XX:XX:XX
[54:6C:XX:XX:XX:XX][LE]> connect
Attempting to connect to 54:6C:XX:XX:XX:XX
Connection successful
[54:6C:XX:XX:XX:XX][LE]> characteristics
handle: 0x0002, char properties: 0x02, char value handle: 0x0003, uuid: 00002a00-0000-1000-8000-00805f9b34fb
handle: 0x0004, char properties: 0x02, char value handle: 0x0005, uuid: 00002a01-0000-1000-8000-00805f9b34fb
handle: 0x0006, char properties: 0x02, char value handle: 0x0007, uuid: 00002a04-0000-1000-8000-00805f9b34fb
handle: 0x000a, char properties: 0x02, char value handle: 0x000b, uuid: 00002a23-0000-1000-8000-00805f9b34fb
handle: 0x000c, char properties: 0x02, char value handle: 0x000d, uuid: 00002a24-0000-1000-8000-00805f9b34fb
handle: 0x000e, char properties: 0x02, char value handle: 0x000f, uuid: 00002a25-0000-1000-8000-00805f9b34fb
handle: 0x0010, char properties: 0x02, char value handle: 0x0011, uuid: 00002a26-0000-1000-8000-00805f9b34fb
handle: 0x0012, char properties: 0x02, char value handle: 0x0013, uuid: 00002a27-0000-1000-8000-00805f9b34fb
handle: 0x0014, char properties: 0x02, char value handle: 0x0015, uuid: 00002a28-0000-1000-8000-00805f9b34fb
handle: 0x0016, char properties: 0x02, char value handle: 0x0017, uuid: 00002a29-0000-1000-8000-00805f9b34fb
handle: 0x0018, char properties: 0x02, char value handle: 0x0019, uuid: 00002a2a-0000-1000-8000-00805f9b34fb
handle: 0x001a, char properties: 0x02, char value handle: 0x001b, uuid: 00002a50-0000-1000-8000-00805f9b34fb
handle: 0x001d, char properties: 0x12, char value handle: 0x001e, uuid: 00002a19-0000-1000-8000-00805f9b34fb
handle: 0x0023, char properties: 0x12, char value handle: 0x0024, uuid: f000aa01-0451-4000-b000-000000000000
handle: 0x0026, char properties: 0x0a, char value handle: 0x0027, uuid: f000aa02-0451-4000-b000-000000000000
handle: 0x0028, char properties: 0x0a, char value handle: 0x0029, uuid: f000aa03-0451-4000-b000-000000000000
handle: 0x002b, char properties: 0x12, char value handle: 0x002c, uuid: f000aa21-0451-4000-b000-000000000000
handle: 0x002e, char properties: 0x0a, char value handle: 0x002f, uuid: f000aa22-0451-4000-b000-000000000000
handle: 0x0030, char properties: 0x0a, char value handle: 0x0031, uuid: f000aa23-0451-4000-b000-000000000000
handle: 0x0033, char properties: 0x12, char value handle: 0x0034, uuid: f000aa41-0451-4000-b000-000000000000
handle: 0x0036, char properties: 0x0a, char value handle: 0x0037, uuid: f000aa42-0451-4000-b000-000000000000
handle: 0x0038, char properties: 0x0a, char value handle: 0x0039, uuid: f000aa44-0451-4000-b000-000000000000
handle: 0x003b, char properties: 0x12, char value handle: 0x003c, uuid: f000aa81-0451-4000-b000-000000000000
handle: 0x003e, char properties: 0x0a, char value handle: 0x003f, uuid: f000aa82-0451-4000-b000-000000000000
handle: 0x0040, char properties: 0x0a, char value handle: 0x0041, uuid: f000aa83-0451-4000-b000-000000000000
handle: 0x0043, char properties: 0x12, char value handle: 0x0044, uuid: f000aa71-0451-4000-b000-000000000000
handle: 0x0046, char properties: 0x0a, char value handle: 0x0047, uuid: f000aa72-0451-4000-b000-000000000000
handle: 0x0048, char properties: 0x0a, char value handle: 0x0049, uuid: f000aa73-0451-4000-b000-000000000000
handle: 0x004b, char properties: 0x10, char value handle: 0x004c, uuid: 0000ffe1-0000-1000-8000-00805f9b34fb
handle: 0x0050, char properties: 0x0a, char value handle: 0x0051, uuid: f000aa65-0451-4000-b000-000000000000
handle: 0x0052, char properties: 0x0a, char value handle: 0x0053, uuid: f000aa66-0451-4000-b000-000000000000
handle: 0x0055, char properties: 0x0a, char value handle: 0x0056, uuid: f000ac01-0451-4000-b000-000000000000
handle: 0x0057, char properties: 0x0a, char value handle: 0x0058, uuid: f000ac02-0451-4000-b000-000000000000
handle: 0x0059, char properties: 0x0a, char value handle: 0x005a, uuid: f000ac03-0451-4000-b000-000000000000
handle: 0x005c, char properties: 0x12, char value handle: 0x005d, uuid: f000ccc1-0451-4000-b000-000000000000
handle: 0x005f, char properties: 0x08, char value handle: 0x0060, uuid: f000ccc2-0451-4000-b000-000000000000
handle: 0x0061, char properties: 0x08, char value handle: 0x0062, uuid: f000ccc3-0451-4000-b000-000000000000
handle: 0x0064, char properties: 0x1c, char value handle: 0x0065, uuid: f000ffc1-0451-4000-b000-000000000000
handle: 0x0068, char properties: 0x1c, char value handle: 0x0069, uuid: f000ffc2-0451-4000-b000-000000000000
handle: 0x006c, char properties: 0x0c, char value handle: 0x006d, uuid: f000ffc3-0451-4000-b000-000000000000
handle: 0x006f, char properties: 0x12, char value handle: 0x0070, uuid: f000ffc4-0451-4000-b000-000000000000
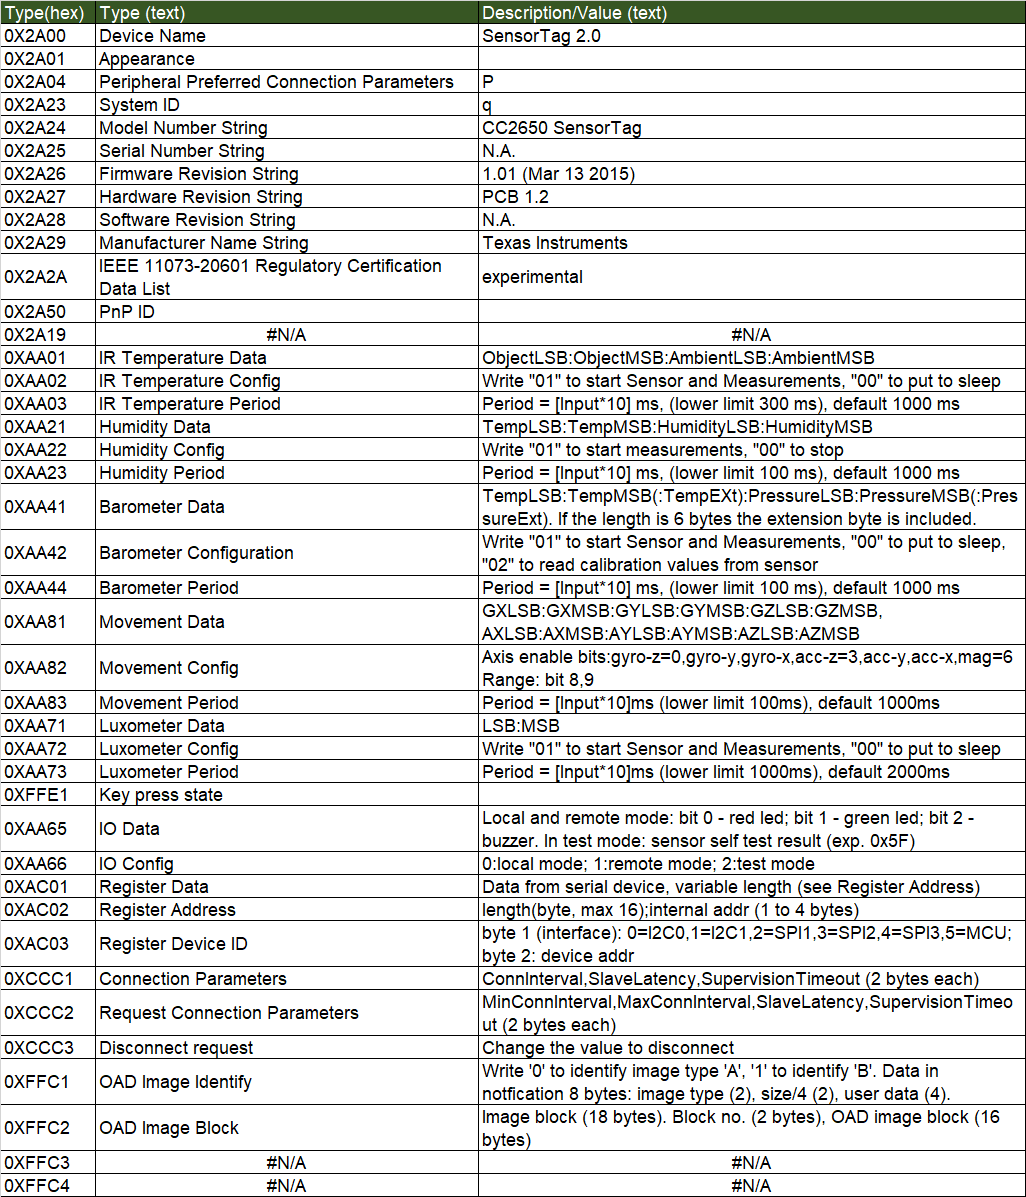
UUIDを理解する
参考ページではWikiを見て対応を参照していたが2022年現在Wikiは存在しない様子。
代わりにこのページを発見。
https://e2e.ti.com/cfs-file/__key/communityserver-discussions-components-files/538/attr_5F00_cc2650-sensortag.html
ページ上部に「TI Base UUID: F000XXXX-0451-4000-B000-000000000000」とあり、XXXXの部分にType(hex)に記載されている4桁の16進数が入る模様。
一部、リストにはあってCharacteristicsコマンド実行結果にはないもの、その逆もあるがとりあえず実行結果にあるものであれば情報を取れるはず。
実行結果と突合したらこのような結果になった。
値を取得
0xAA21(Humidity Data)に温度、湿度の情報が入っているようなので取得してみたが値がすべて0で返ってきた。
[54:6C:XX:XX:XX:XX][LE]> char-read-uuid F000AA21-0451-4000-B000-000000000000
handle: 0x002c   value: 00 00 00 00
データ取得を有効化
もはや情報が残っていないので参考ページをなぞるしかない。
0xAA22(Humidity Config)でデータ取得を有効化。
まずはchar-read-uuidを実行してhandleを確認、その値を引数にしてchar-write-reqから値を更新。
[54:6C:XX:XX:XX:XX][LE]> char-read-uuid F000AA22-0451-4000-B000-000000000000
handle: 0x002f   value: 00
[54:6C:XX:XX:XX:XX][LE]> char-write-req 002f 01
Characteristic value was written successfully
[54:6C:XX:XX:XX:XX][LE]> char-read-uuid F000AA22-0451-4000-B000-000000000000
handle: 0x002f   value: 01
再度値を取得
今度は値が返ってきた。
[54:6C:XX:XX:XX:XX][LE]> char-read-uuid F000AA21-0451-4000-B000-000000000000
handle: 0x002c   value: f4 6a 14 c1
換算
温度(Temp)が0x6af4、湿度(Hum)が0xc114。
1つめと2つめ、3つめと4つめの値をそれぞれひっくり返すのを忘れるととんでもない値になる。
Excelを使って下記の数式で換算。
- 温度(Temp)
=HEX2DEC("6af4")/ 65536*165 - 40 - 湿度(Hum)
=HEX2DEC("c114")/ 65536*100
結果、温度(Temp)が約28.9、湿度(Hum)が約75.4となった。真夏なので妥当な気がする。
データ取得を無効に戻す
有効化と逆の手順でセンサーのデータ取得を無効に戻しておく
[54:6C:XX:XX:XX:XX][LE]> char-read-uuid F000AA22-0451-4000-B000-000000000000
handle: 0x002f   value: 01
[54:6C:XX:XX:XX:XX][LE]> char-write-req 002f 00
Characteristic value was written successfully
[54:6C:XX:XX:XX:XX][LE]> char-read-uuid F000AA22-0451-4000-B000-000000000000
handle: 0x002f   value: 00
終了
exitでgattoolを終了