1. はじめに
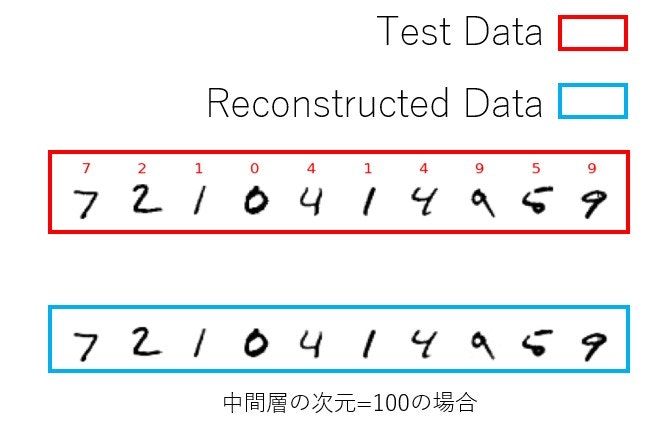
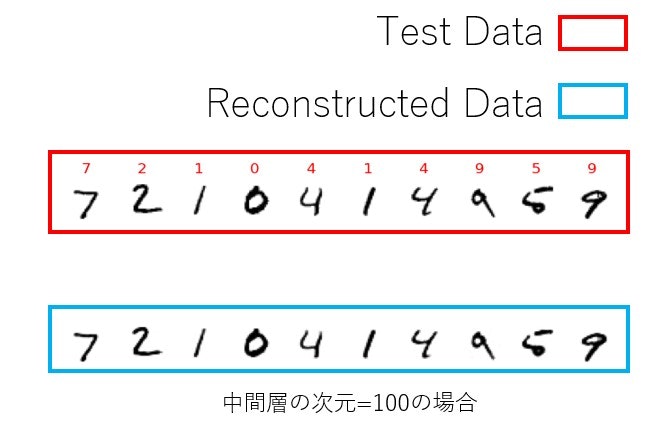
オートエンコーダ(Auto Encoder)をさわる機会があったので、MNISTを再構成できるかテストしてみました。以下のようにテストデータの再構成しました。

目次
1.はじめに
2.オートエンコーダとは
3.実行環境
4.実装コード説明
5.結果
6.オートエンコーダのコード全文
7.参考文献
2. オートエンコーダとは
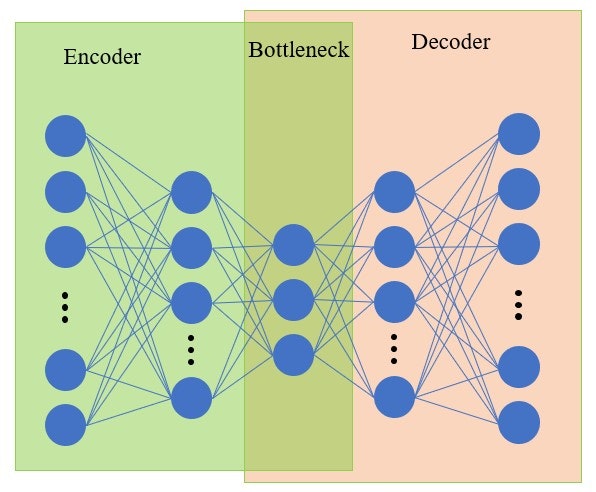
半教師あり学習とよばれており、エンコーダとデコーダのアーキテクチャをもちます。エンコーダは入力を隠れベクトルに変換し、デコーダは隠れベクトルを入力と同様のデータに変換します。すなわち、学習データの入力と出力を同様の学習機構となっています。実際には特徴量抽出や次元圧縮が目的なので、エンコーダの出力値を応用して使用することが多いです。この隠れベクトルを分類、新たな学習データとして用いたりなどですかね。
アーキテクチャは以下のようなフィードフォワードニューラルネットワークです。

3. 実行環境
pythonのパッケージ管理ツールであるAnacondaを使って仮想環境を構築し実行しました。
順番に以下のコマンドを実行しました。
conda create -n 'env' python=3.9
conda install tensorflow
conda install -c conda-forge matplotlib
conda install -c anaconda scikit-learn
4. 実装コード説明
クラスとして実装するので、イニシャライザ部分、学習部分、main部分に分けて説明します。importするライブラリやフレームワークは6.オートエンコーダのコード全文に記述してあります。
イニシャライザ
今回のオートエンコーダは中間層を一つにしました。中間層の活性化関数はReLU、出力層は回帰なのでsigmoid関数にしています。メンバ変数のencoderとdecoderはオートエンコーダを学習させた後に、作成します。実際にオートエンコーダは次元を圧縮することが主な目的なので、このメンバ変数(encoder, decoder)を作成しています。
    def __init__(self, input_size, hf_size, epoch):
        self.epoch = epoch
        self.hf_size = hf_size
        # Auto Encoder
        self.model = models.Sequential()
        self.model.add(Dense(self.hf_size, activation='relu', input_shape=(input_size,)))
        self.model.add(Dense(input_size, activation='sigmoid'))
        self.model.summary()
        self.histories = []
        self.encoder = None
        self.decoder = None
学習
最適化アルゴリズムはAdamで、損失関数はbinary_crossentropyを使用しています。ここで、注目すべきはmodels.Sequential()のfitメソッドです。第一引数、第二引数がトレーニングデータの入力と出力に対応しているのですが、どちらもトレーニングデータの入力を与えています。
トレーニングの終了後は入力層から中間層の重みをエンコーダとして保存し、中間層から出力層の重みをデコーダとして保存しています。
 def train(self, train_data, test_data, lossf='binary_crossentropy'):

        self.model.compile(optimizer='adam',
                     loss=lossf,
                     metrics=['accuracy', lossf])
        self.histories = self.model.fit(train_data, train_data,
                  epochs=self.epoch,
                  batch_size=32,
                  shuffle=True,
                  validation_data=(test_data, test_data)
                  )

        print(self.histories)

        ## エンコーダーの作成
        learned_encoder = models.clone_model(self.model)
        learned_encoder.pop()
        learned_encoder.layers[0].set_weights(self.model.layers[0].get_weights())
        self.encoder = learned_encoder

        ## デコーダーの保存
        learned_decoder = models.Sequential()
        learned_decoder.add(Dense(train_data.shape[1], activation='sigmoid', input_shape=(self.hf_size,)))
        learned_decoder.layers[0].set_weights(self.model.layers[1].get_weights())
        self.decoder = learned_decoder
main
さて、作成したオートエンコーダをMNISTを使って再構成できるかテストします。まず、ネットワークのパラメータは中間層の次元数が100、学習回数が10としています。
MNISTを一次元に変換し、正規化するなどの前処理を行います。その後、学習させ、エンコーダとデコーダをgetメソッドで取り出します。(コード上にgetメソッドは実装していません。)その後、テストデータの10個を取り出し、再構成できるか確認します。
from AE import AE
from tensorflow.keras.datasets import mnist
from tensorflow.keras.models import load_model
from sklearn.model_selection import train_test_split
from matplotlib import pyplot as plt
from matplotlib import cm
import numpy as np

# MNIST データセットを読み込む
(x_train, y_train), (x_test, y_test) = mnist.load_data()
image_height, image_width = 28, 28

# 平滑化
x_train = x_train.reshape(x_train.shape[0], image_height * image_width)
x_test = x_test.reshape(x_test.shape[0], image_height * image_width)

 # 正規化
x_train = x_train.astype('float32')
x_test = x_test.astype('float32')
x_train = (x_train - x_train.min()) / (x_train.max() - x_train.min())
x_test = (x_test - x_test.min()) / (x_test.max() - x_test.min())

x_train = x_train[0:10000,:]
y_train = y_train[0:10000]

first_h = 100
epoch = 10

print("学習##########################################################")
ae = AE(image_height*image_width, first_h, epoch)
ae.train(x_train, x_test, 'binary_crossentropy')

# データの復元
encoder = ae.get_encoder()
decoder = ae.get_decoder()


print("テスト############################################################")
# テストデータからランダムに 10 点を選び出す
p = np.arange(10)
x_test_sampled = x_test[p]
x_train_sampled = x_train[p]

##トレインデータとテストデータの描写
x_test_sampled_pred = x_test_sampled
x_test_sampled_pred = encoder.predict(x_test_sampled_pred, verbose=0)
x_test_sampled_pred = decoder.predict(x_test_sampled_pred, verbose=0)

# 処理結果を可視化する
fig, axes = plt.subplots(2, 10)

for i, label in enumerate(y_test[p]):
    test_img = x_test_sampled[i].reshape(image_height, image_width)
    axes[0][i].imshow(test_img, cmap=cm.gray_r)
    axes[0][i].axis('off')
    axes[0][i].set_title(label, color='red')
    axes[0][i].set_ylabel('test_data', color='red')
    # AutoEncoder で復元した画像を下段に表示する
    test_pred_img = x_test_sampled_pred[i].reshape(image_height, image_width)
    axes[1][i].imshow(test_pred_img, cmap=cm.gray_r)
    axes[1][i].axis('off')
    axes[1][i].set_ylabel('decoded_test_data', color='red')

plt.tight_layout()
plt.show()
5. 結果
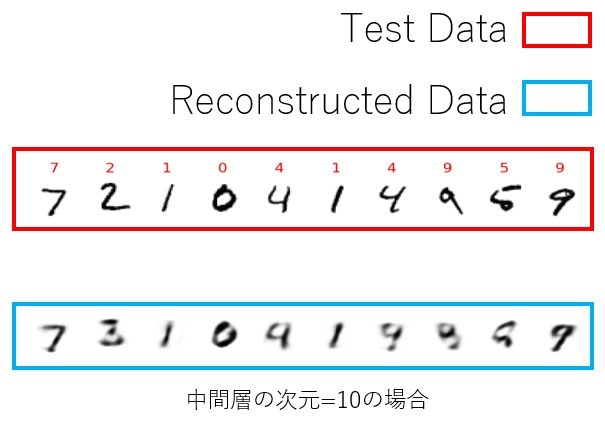
最初に示した通りになりますが、中間層の次元を10とした時の結果も載せておきます。中間層の次元が10の場合はぼやけてしまっていますが、中間層の次元が100の場合ははっきりともとの入力を再構成しているように見えます。


6. オートエンコーダのコード全文
import tensorflow as tfw
from tensorflow.keras.layers import Dense, Dropout, Activation
from tensorflow.keras.optimizers import Adam
from tensorflow.keras import models
from tensorflow.keras.layers import Input, Dense
from tensorflow.keras.models import Model
from tensorflow.keras import callbacks
from matplotlib import pyplot as plt

import numpy as np
class AE:
    def __init__(self, input_size, hf_size, epoch):

        self.epoch = epoch
        self.hf_size = hf_size
        # Auto Encoder
        self.model = models.Sequential()
        self.model.add(Dense(self.hf_size, activation='relu', input_shape=(input_size,)))
        self.model.add(Dense(input_size, activation='sigmoid'))
        self.model.summary()
        self.histories = []
        self.encoder = None
        self.decoder = None

    # 学習
    def train(self, train_data, test_data, lossf):

        self.model.compile(optimizer='adam',
                     loss=lossf,
                     metrics=['accuracy', lossf])
        self.histories = self.model.fit(train_data, train_data,
                  epochs=self.epoch,
                  batch_size=32,
                  shuffle=True,
                  validation_data=(test_data, test_data)
                  )

        print(self.histories)

        ## エンコーダーの作成
        learned_encoder = models.clone_model(self.model)
        learned_encoder.pop()
        learned_encoder.layers[0].set_weights(self.model.layers[0].get_weights())
        self.encoder = learned_encoder

        ## デコーダーの保存
        learned_decoder = models.Sequential()
        learned_decoder.add(Dense(train_data.shape[1], activation='sigmoid', input_shape=(self.hf_size,)))
        learned_decoder.layers[0].set_weights(self.model.layers[1].get_weights())
        self.decoder = learned_decoder

    def get_encoder(self):
        return self.encoder
    def get_decoder(self):
        return self.decoder