概要
「Clarity Designを使ったWebシステムを作ってみる」のフロントエンド編になります。
フロントエンド編ではClarityDesignを使ったAngularのフロントを実装していきます。
本記事の対象
- Clarity Designを使ってみたい方
- Angularで簡易的なアプリを作ってみたい方
- 本シリーズの続きを読んでくださっている方
本記事での作成物
本記事での作成物は以下gihubに上げております。
いくつか本記事上では割愛をしている部分もあるため、必要な場合はご参照ください。
フロントエンド構成
画面構成
| # | リンク | 名称 | 種別 | 概要 |
|---|---|---|---|---|
| 1 | /list | アンケート一覧 | 通常ページ | 登録されているアンケートの一覧を表示 新規アンケートの作成や編集、回答画面の遷移もここから |
| 2 | /answer/:id | アンケート回答 | 通常ページ | 選択されたアンケートの回答画面 現在の投票状況を円グラフで表示してみる |
| 3 | なし | アンケート作成 | モーダル | 新規アンケートの作成を行う |
| 4 | なし | アンケート編集 | モーダル | 登録済みのアンケートの編集を行う |
| 5 | なし | アンケート削除確認 | モーダル | アンケートの削除ボタンを押した際の確認用 |
ファイル構成
/src/app/
│  app-routing.module.ts
│  app.component.css
│  app.component.html
│  app.component.spec.ts
│  app.component.ts
│  app.module.ts
│
├─class
│      answer.ts
│      chart.ts
│      survey-item.ts
│      survey.ts
│
├─environment
│      environment.ts
│
├─service
│      answer.service.spec.ts
│      answer.service.ts
│      survey-item.service.spec.ts
│      survey-item.service.ts
│      survey.service.spec.ts
│      survey.service.ts
│
├─survey-add
│      survey-add.component.css
│      survey-add.component.html
│      survey-add.component.spec.ts
│      survey-add.component.ts
│
├─survey-answer
│      survey-answer.component.css
│      survey-answer.component.html
│      survey-answer.component.spec.ts
│      survey-answer.component.ts
│
├─survey-delete
│      survey-delete.component.css
│      survey-delete.component.html
│      survey-delete.component.spec.ts
│      survey-delete.component.ts
│
├─survey-edit
│      survey-edit.component.css
│      survey-edit.component.html
│      survey-edit.component.spec.ts
│      survey-edit.component.ts
│
└─survey-list
        survey-list.component.css
        survey-list.component.html
        survey-list.component.spec.ts
        survey-list.component.ts
各フォルダの簡易的な説明は以下となります。
| フォルダ | 説明 |
|---|---|
| class | API用のClass等を格納 |
| environment | APIのリンクを格納 |
| service | APIへの処理を実施する機能を格納 |
| survey-〇〇〇〇 | 各Angularコンポーネント |
実装
準備
各種コンポーネント等の作成
プロジェクト作成
AngularCLIでプロジェクトを作成していきます。
プロジェクト名は任意です。
ng new demo-survey
コンポーネントの作成
今回必要なコンポーネントを作成していきます。
ng generate component survey-list
ng generate component survey-add
ng generate component survey-answer
ng generate component survey-edit
ng generate component survey-delete
サービスの作成
必要なサービスを作成していきます。
ng generate service service/survey
ng generate service service/survey-item
ng generate service service/answer
ルーティングモジュールの作成
ルーティングモジュールを作成していきます。
ng generate module app-routing --flat --module=app
必要ライブラリのインストール
Clarity Designのインストール
Clarity Designのインストールを実施します。
※環境によっては「--legacy-peer-deps」のオプションが必要になります
npm install @cds/core @clr/angular @clr/ui
Clarity Designを有効化
Clarity Designを有効化するために、angular.jsonのstylesに追記をします。
"styles": [
      "node_modules/@clr/ui/clr-ui.min.css",
]
グラフライブラリのインストール
円グラフで利用するためのライブラリをインストールします。
npm install ng2-charts
npm install chart.js
コンポーネント以外の実装
moduleのインポート
必要なmoduleインポートを実施しておきます。
Clarityのアイコンは1つ1つ定義する必要があります。
それぞれの名前は以下リンクにて確認をすることができます。
https://core.clarity.design/foundation/icons/shapes/
import { NgModule } from '@angular/core';
import { BrowserModule } from '@angular/platform-browser';

import { AppComponent } from './app.component';
import { SurveyListComponent } from './survey-list/survey-list.component';
import { SurveyAddComponent } from './survey-add/survey-add.component';
import { SurveyAnswerComponent } from './survey-answer/survey-answer.component';
import { SurveyEditComponent } from './survey-edit/survey-edit.component';
import { SurveyDeleteComponent } from './survey-delete/survey-delete.component';
import { AppRoutingModule } from './app-routing.module';

import { HttpClientModule } from '@angular/common/http';
import { FormsModule } from '@angular/forms';
import { BrowserAnimationsModule } from "@angular/platform-browser/animations";
import { ClarityModule } from "@clr/angular";
import { NgChartsModule } from 'ng2-charts';
import { ClarityIcons, trashIcon, cloneIcon, noteIcon, vmBugIcon } from '@cds/core/icon';

ClarityIcons.addIcons(trashIcon);
ClarityIcons.addIcons(cloneIcon);
ClarityIcons.addIcons(noteIcon);
ClarityIcons.addIcons(vmBugIcon);

@NgModule({
  declarations: [
    AppComponent,
    SurveyListComponent,
    SurveyAddComponent,
    SurveyAnswerComponent,
    SurveyEditComponent,
    SurveyDeleteComponent
  ],
  imports: [
    BrowserModule,
    AppRoutingModule,
    HttpClientModule,
    FormsModule,
    BrowserAnimationsModule,
    ClarityModule,
    NgChartsModule
  ],
  providers: [],
  bootstrap: [AppComponent]
})
export class AppModule { }
Classファイルの作成
必要なClassファイルの作成を進めていきます。
残りのClass配下のファイルは本記事上では割愛をさせていただきますが、
github上にまとめてソースは上げておりますため、気になる方はそちらをご参照いただけますと幸いです。
export class Survey {
    id: number;
    title: string;
    question: string;
    created: string;
    updated: string;

    constructor() {
        this.id = 0;
        this.title = "";
        this.question = "";
        this.created = "";
        this.updated = "";
    }
}
ルーティングの作成
各リンクごとに呼び出すコンポーネントを定義するルーティングを作成しておきます。
import { NgModule } from '@angular/core';
import { RouterModule, Routes } from '@angular/router';

import { SurveyListComponent } from './survey-list/survey-list.component';
import { SurveyAnswerComponent } from './survey-answer/survey-answer.component';

const routes: Routes = [
  { path: '', redirectTo: '/list', pathMatch: 'full' },
  { path: 'list', component: SurveyListComponent },
  { path: 'survey/:id', component: SurveyAnswerComponent }
];

@NgModule({
  imports: [RouterModule.forRoot(routes)],
  exports: [RouterModule]
})
export class AppRoutingModule { }
environmentの作成
各種環境ごとに用意する定数を記載するenvironmentを作成しておきます。
今回はバックエンド編で作成したAPIのURLを記載します。
以下は仮でローカルホストを指定していますが、実際のデプロイ時にはデプロイ先に合わせて記載が必要です。
※こちらはgithub上には上げていない各々で作成が必要となります。
export const environment = {
    apiUrl: "http://127.0.0.1:1323/"
};
serviceの作成
各種APIへ接続を実施する処理の記載を実施します。
残りのserviceは本記事上では割愛をさせていただきますが、
github上にまとめてソースは上げておりますため、気になる方はそちらをご参照いただけますと幸いです。
import { Injectable } from '@angular/core';
import { HttpClient, HttpHeaders } from '@angular/common/http';
import { Observable, throwError } from 'rxjs';
import { catchError } from 'rxjs/operators';
import { HttpErrorResponse } from '@angular/common/http';

import { Survey } from '../class/survey';
import { environment } from '../environment/environment';

@Injectable({
  providedIn: 'root'
})

export class SurveyService {

  constructor(private http: HttpClient) { }
  private surveyApiUrl = environment.apiUrl + "surveys";

  httpOptions = {
    headers: new HttpHeaders({ 'Content-Type': 'application/json' })
  };

  getSurveys(): Observable<Survey[]> {
    return this.http.get<Survey[]>(this.surveyApiUrl).pipe(
      catchError((error: HttpErrorResponse) => {
        console.error(error);
        return throwError(error);
      })
    );
  }

  getSurveyById(surveyId: number): Observable<Survey[]> {
    const url = `${this.surveyApiUrl}/${surveyId}`;
    return this.http.get<Survey[]>(url).pipe(
      catchError((error: HttpErrorResponse) => {
        console.error(error);
        return throwError(error);
      })
    );
  }

  addSurvey(survey: Survey): Observable<Survey> {
    return this.http.post<Survey>(this.surveyApiUrl, survey, this.httpOptions).pipe(
      catchError((error: HttpErrorResponse) => {
        console.error(error);
        return throwError(error);
      })
    );
  }

  updateSurvey(survey: Survey): Observable<Survey> {
    return this.http.put<Survey>(this.surveyApiUrl, survey, this.httpOptions).pipe(
      catchError((error: HttpErrorResponse) => {
        console.error(error);
        return throwError(error);
      })
    );
  }

  deleteSurvey(id: number): Observable<{}> {
    const url = `${this.surveyApiUrl}/${id}`;
    return this.http.delete(url, this.httpOptions).pipe(
      catchError((error: HttpErrorResponse) => {
        console.error(error);
        return throwError(error);
      })
    );
  }
}
コンポーネントの実装
ここからは画面側の処理を含めたコンポーネントの実装に移ります。
ナビゲーションの作成
ナビゲーションを作成していきます。
ここはClarity Designを思いのまま使って実装しております。
https://clarity.design/documentation/navigation
なおここのHTMLは必ず呼ばれる箇所になっており、コード末尾の<router-outlet></router-outlet>にてアクセスされたリンクに応じてルーティングモジュールから必要な画面と処理が返される形になります。
<div class="main-container">
  <header class="header-6">
    <div class="branding">
      <a routerLink="/list" class="nav-link">
          <cds-icon shape="note"></cds-icon>
          <span class="title">Clarity Design</span>
      </a>
  </div>
  </header>
  <div class="content-container">
    <clr-vertical-nav [clrVerticalNavCollapsible]="true" [(clrVerticalNavCollapsed)]="collapsed">
      <a clrVerticalNavLink routerLink="/list" routerLinkActive="active">アンケート一覧</a>
      <a clrVerticalNavLink routerLinkActive="active">COMMING SOON</a>
      <div class="nav-divider"></div>
      <a clrVerticalNavLink routerLinkActive="active">COMMING SOON</a>
    </clr-vertical-nav>
    <div class="content-area">
      <router-outlet></router-outlet>
    </div>
  </div>
</div>
survey-listの実装
ここではアンケート一覧ページの実装をしていきます。
基本的にはこのページを中心としたアプリケーションになります。
またこちらもClarity Designをがっつりと使わせていただき、テーブルの作成とページネーションを実装しています。
https://clarity.design/documentation/datagrid/structure
https://clarity.design/documentation/datagrid/pagination
また、以下HTMLの一番下の書いてある<app-survey-add>等は各子コンポーネントに値を渡したりするためのものになります。
詳細はここでは記載しませんため、ぜひAngularのドキュメントを読んでみていただけたらと思います。
https://angular.jp/guide/inputs-outputs
<h2>アンケート一覧</h2>
<clr-datagrid>
    <clr-dg-column>ID</clr-dg-column>
    <clr-dg-column>タイトル</clr-dg-column>
    <clr-dg-column>質問</clr-dg-column>
    <clr-dg-column>作成日時</clr-dg-column>
    <clr-dg-column>アクション</clr-dg-column>
    <clr-dg-row *clrDgItems="let survey of surveys" [clrDgItem]="survey">
        <clr-dg-cell>{{survey.id}}</clr-dg-cell>
        <clr-dg-cell>{{survey.title}}</clr-dg-cell>
        <clr-dg-cell>{{survey.question}}</clr-dg-cell>
        <clr-dg-cell>{{survey.created | date}}</clr-dg-cell>
        <clr-dg-cell>
            <div class="btn-group btn-primary">
                <a [routerLink]="['/survey/', survey.id]" class="btn">回答</a>
                <button class="btn btn-success" (click)="onEditSurvey(survey)">編集</button>
                <button class="btn btn-danger" (click)="onDeleteSurvey(survey)">削除</button>
            </div>
        </clr-dg-cell>
    </clr-dg-row>
    <clr-dg-footer>
        <clr-dg-pagination #pagination [clrDgPageSize]=5>
            <clr-dg-page-size #clrDgPageSize [clrPageSizeOptions]="[5,10,20,50,100]">
                <label [for]="clrDgPageSize.pageSizeOptionsId">surveys per page</label>
            </clr-dg-page-size>
            {{pagination.firstItem + 1}} - {{pagination.lastItem + 1}}
            of {{pagination.totalItems}} surveys
        </clr-dg-pagination>
    </clr-dg-footer>>
</clr-datagrid>
<button class="btn" (click)="onAddSurvey()">アンケート追加</button>

<app-survey-add [addModalOpen]="addSurveyModal" (reloadSurveys)="endModal()"></app-survey-add>
<app-survey-edit [surveyItems]="selectedSurveyItems" [survey]="selectedUpdateSurvey"
    (reloadSurveys)="getSurveys()"></app-survey-edit>
<app-survey-delete [survey]="selectedDeleteSurvey"
    (reloadSurveys)="getSurveys()"></app-survey-delete>
import { Component } from '@angular/core';

import { Survey } from '../class/survey';
import { SurveyItem } from '../class/survey-item';
import { SurveyService } from '../service/survey.service';
import { SurveyItemService } from '../service/survey-item.service';


@Component({
  selector: 'app-survey-list',
  templateUrl: './survey-list.component.html',
  styleUrls: ['./survey-list.component.css']
})
export class SurveyListComponent {
  surveys: Survey[] = [];
  addSurveyModal?: Boolean;
  selectedUpdateSurvey?: Survey;
  selectedDeleteSurvey?: Survey;
  selectedSurveyItems?: SurveyItem[];

  constructor(
    private surveyService: SurveyService,
    private surveyItemService: SurveyItemService
  ) { }

  ngOnInit() {
    this.getSurveys();
  }

  getSurveys() {
    this.surveyService.getSurveys()
      .subscribe(surveys => this.surveys = surveys);
  }

  endModal() {
    this.addSurveyModal = false;
    this.getSurveys();
  }

  onAddSurvey() {
    this.addSurveyModal = true;
  }

  onEditSurvey(survey: Survey) {
    this.selectedUpdateSurvey = survey;
    this.getSurveyItemsBySurveyId(survey.id);
  }

  getSurveyItemsBySurveyId(surveyId: number) {
    this.surveyItemService.getSurveyItemsBySurveyId(surveyId)
      .subscribe(surveyItems => {
        this.selectedSurveyItems = surveyItems;
      });
  }
  onDeleteSurvey(survey: Survey) {
    this.selectedDeleteSurvey = survey;
  }
}
survey-answerの実装
ここではアンケートの回答画面の作成を実施します。
こちらももちろんClarity Designで実装していくのですが、、
非常に残念なことにClarity Designには円グラフが見当たらなかったため、
円グラフのみchart.jsを使って実装しています。
(見落としでしたら恐縮です。。)
<div *ngIf="survey;">
    <h2 style="text-align: center;">{{survey.title}}</h2>
    <h3 style="text-align: center;">{{survey.question}}</h3>
</div>

<div *ngIf="surveyItems">
    <div class="clr-row">
        <div class="clr-col-3" *ngFor="let item of surveyItems;">
            <div class="card">
                <h3 class="card-header"></h3>
                <div class="card-block">
                    <h4 class="card-title">{{item.text}}</h4>
                    <div class="card-text"></div>
                </div>
                <div class="card-footer">
                    <button class="btn btn-primary" (click)="selectAnswer(item.id)">Vote</button>
                </div>
                <br>
            </div>
        </div>
    </div>
</div>

<div *ngIf="answers" style="position:relative;width:500px;height:500px;margin:0 auto;">
    <canvas baseChart [type]="answerChart.chartType" [datasets]="answerChart.chartDatasets"
        [labels]="answerChart.chartLabels" [options]="answerChart.chartOptions"
        [legend]="answerChart.chartLegend"></canvas>
</div>
import { Component } from '@angular/core';
import { ActivatedRoute } from '@angular/router';
import { Observable } from 'rxjs';

import { Survey } from '../class/survey';
import { SurveyItem } from '../class/survey-item';
import { Answer } from '../class/answer';
import { ChartTemplate } from '../class/chart';

import { SurveyService } from '../service/survey.service';
import { SurveyItemService } from '../service/survey-item.service';
import { AnswerService } from '../service/answer.service';

import { ChartDataset } from "chart.js";

@Component({
  selector: 'app-survey-answer',
  templateUrl: './survey-answer.component.html',
  styleUrls: ['./survey-answer.component.css']
})
export class SurveyAnswerComponent {

  survey?: Survey;
  surveyItems?: SurveyItem[];
  answers?: Answer[];
  answerChart = new ChartTemplate();
  surveyId = Number(this.route.snapshot.paramMap.get('id'))

  constructor(
    private surveyService: SurveyService,
    private surveyItemService: SurveyItemService,
    private answerService: AnswerService,
    private route: ActivatedRoute
  ) { }

  ngOnInit(): void {
    this.getSurveyById(this.surveyId).subscribe(survey => { this.survey = survey });
    this.getSurveyItemsBySurveyId(this.surveyId).subscribe(surveyItems => { this.surveyItems = surveyItems });
    this.getAnswerBySurveyId(this.surveyId).subscribe(answers => {
      this.answers = answers;
      this.initChartDataset();
    });
  }

  getSurveyById(surveyId: number): Observable<any> {
    return this.surveyService.getSurveyById(surveyId)
  }

  getSurveyItemsBySurveyId(surveyId: number): Observable<any> {
    return this.surveyItemService.getSurveyItemsBySurveyId(surveyId);
  }

  getAnswerBySurveyId(surveyId: number): Observable<any> {
    return this.answerService.getAnswerBySurveyId(surveyId);
  }

  selectAnswer(surveyItemId: number) {
    const answer = new Answer;
    answer.surveyId = this.surveyId;
    answer.surveyItemId = surveyItemId;
    this.addAnswer(answer).subscribe(() => {
      this.getAnswerBySurveyId(this.surveyId).subscribe(answers => {
        this.answers = answers
        this.updateChartDataset();
      })
    });
  }

  addAnswer(answer: Answer): Observable<any> {
    return this.answerService.addAnswer(answer);
  }

  initChartDataset() {
    if (!this.surveyItems) return;
    this.answerChart.chartType = "pie";
    this.answerChart.chartOptions = { responsive: true };
    this.answerChart.chartLegend = true;
    this.surveyItems.forEach((surveyItem) => {
      this.answerChart.chartLabels.push(surveyItem.text);
    });
    this.updateChartDataset();
  }

  updateChartDataset() {
    if (!this.surveyItems) return;
    const answerCount: number[] = []
    this.surveyItems.forEach((surveyItem) => {
      if (this.answers) {
        answerCount.push(this.answers.filter(answer => answer.surveyItemId === surveyItem.id).length);
      }
    });
    const answerChartData: ChartDataset[] = [{ data: answerCount }];
    this.answerChart.chartDatasets = answerChartData;
  }
}
残りのコンポーネントに関して
ここまでで2つコンポーネントを実装しました。
残りの以下コンポーネントに関しましては、記事のボリュームが増えてしまいすぎるため、
本記事上では割愛をさせていただきますため、githubをご確認いただけますと幸いです。
(survey-editが一番実装がややこしかったです。。)
- survey-add
- survey-delete
- survey-edit
上記の残りコンポーネントまで作成が出来れば一応完成となります。
動作確認
それでは動作確認をしていこうと思います。
アプリケーションのルートディレクトリで以下コマンドを実行すると、規定のブラウザで表示がされると思います。
(-oオプションは起動時にブラウザへ遷移するものになります)
ng serve -o
トップにアクセスをするとアンケート一覧の画面が表示されました。
現在はバックエンド編でのテストの残りのアンケートが1件表示されております。
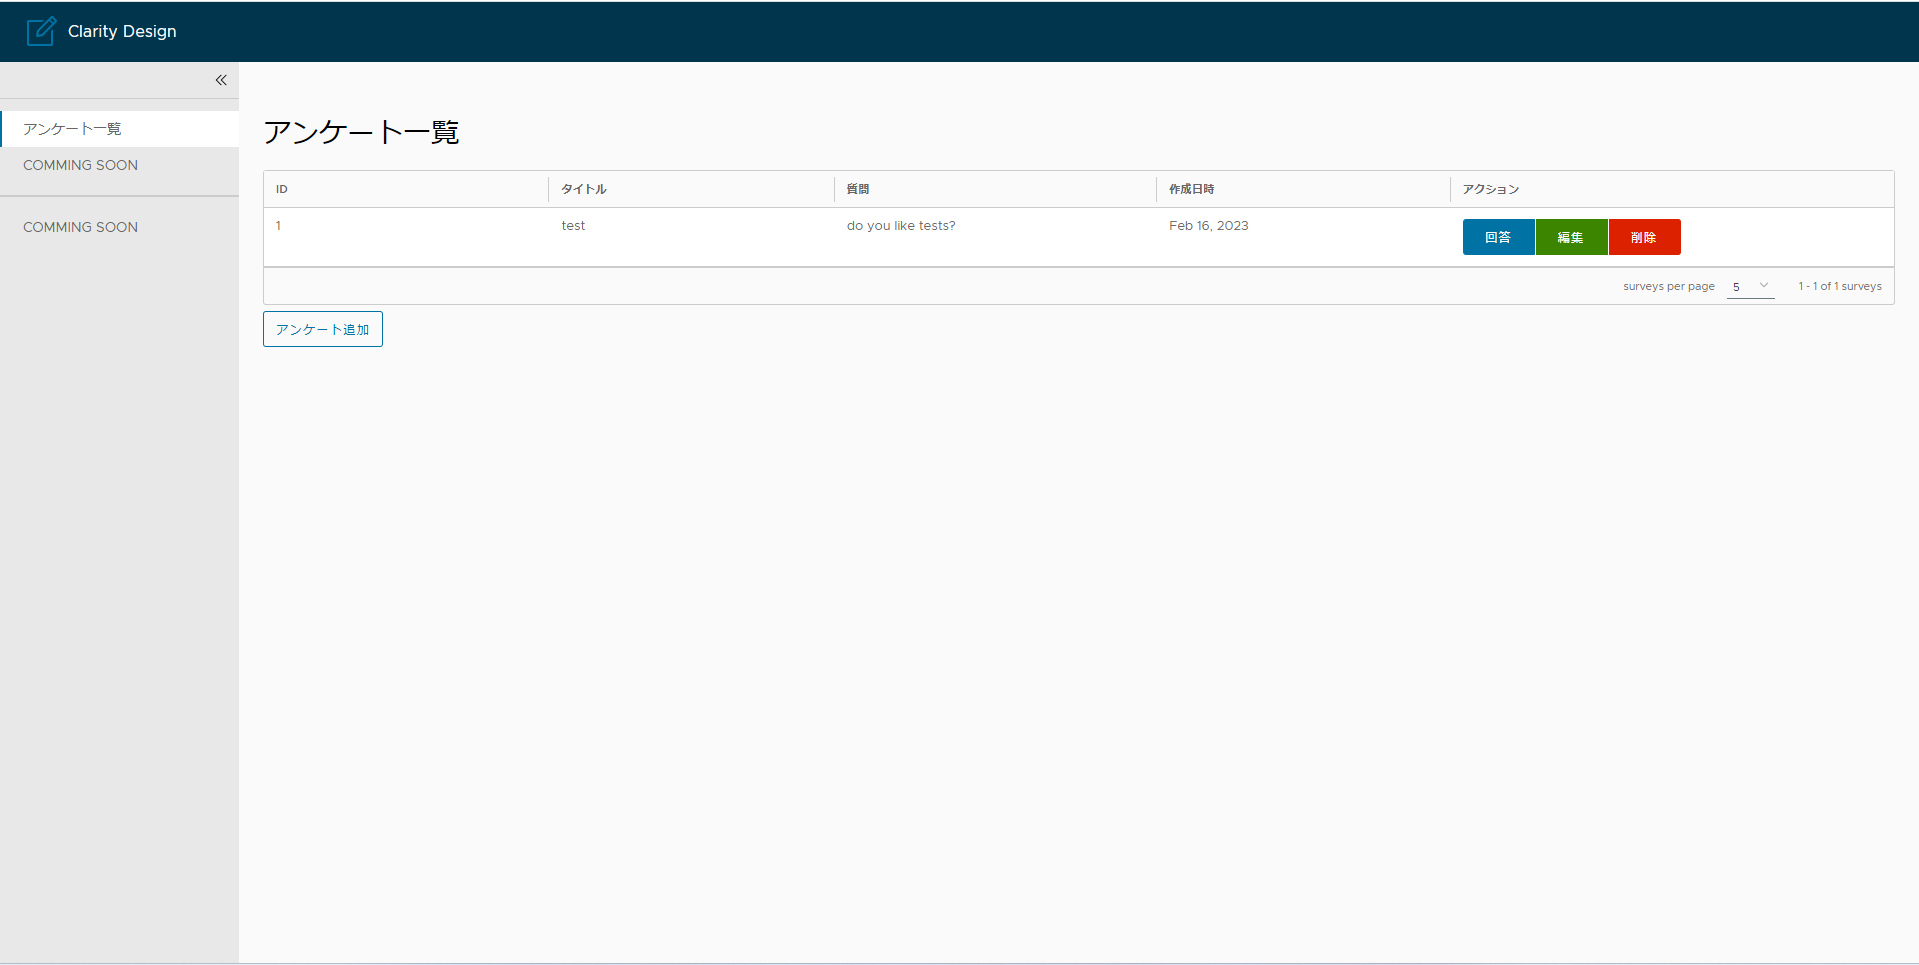
ページネーションが表示される6件までアンケート追加機能にてアンケートを追加してみます。

ページネーションも問題なく動作しました!!
(Clarity Designをそのまま貼っただけで何も考えず実装できてますね)

では一旦最後にアンケート回答まで見ていきます。
試しに1つ選択をしてみて、Voteを連打してみます。

しっかりと動的に円グラフが更新されていくのが確認できました。
(円グラフはClarity Designではないです)

まとめ
今回はフロントエンド編ということで、Clarity Designを使った実装を行ってみました。
正直Angularがかなり難しく、、敷居は高く感じました。(慣れるまで時間かかりそう。。)
また、今回は量が多かったこともあり、記事上のコードをかなり割愛しております。
そのため、動かしてみたいという方は、githubからcloneの上、environmentだけ用意いただければあとは、
npm install ng serve -oで使えると思いますのでぜひClarity Designを見てみてください。
次回はおそらく最後でデプロイ編になります。
デプロイ先はKubernetes想定です。