最近チーム開発でLINE Botを作成したのと偶然Qiitaで見かけたLINE BOTを使ってアニメ情報を教えてくれるボットを作ってみたからインスピレーションを受けたので作ることにしました。
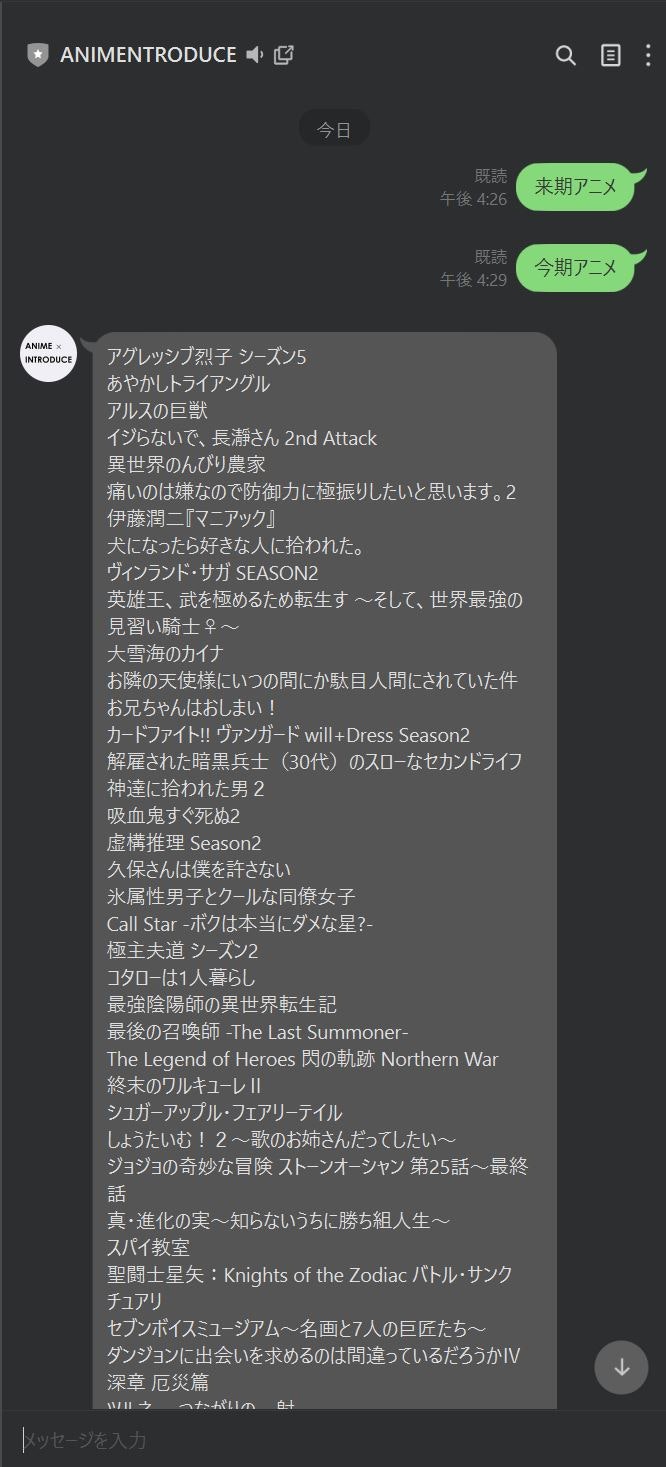
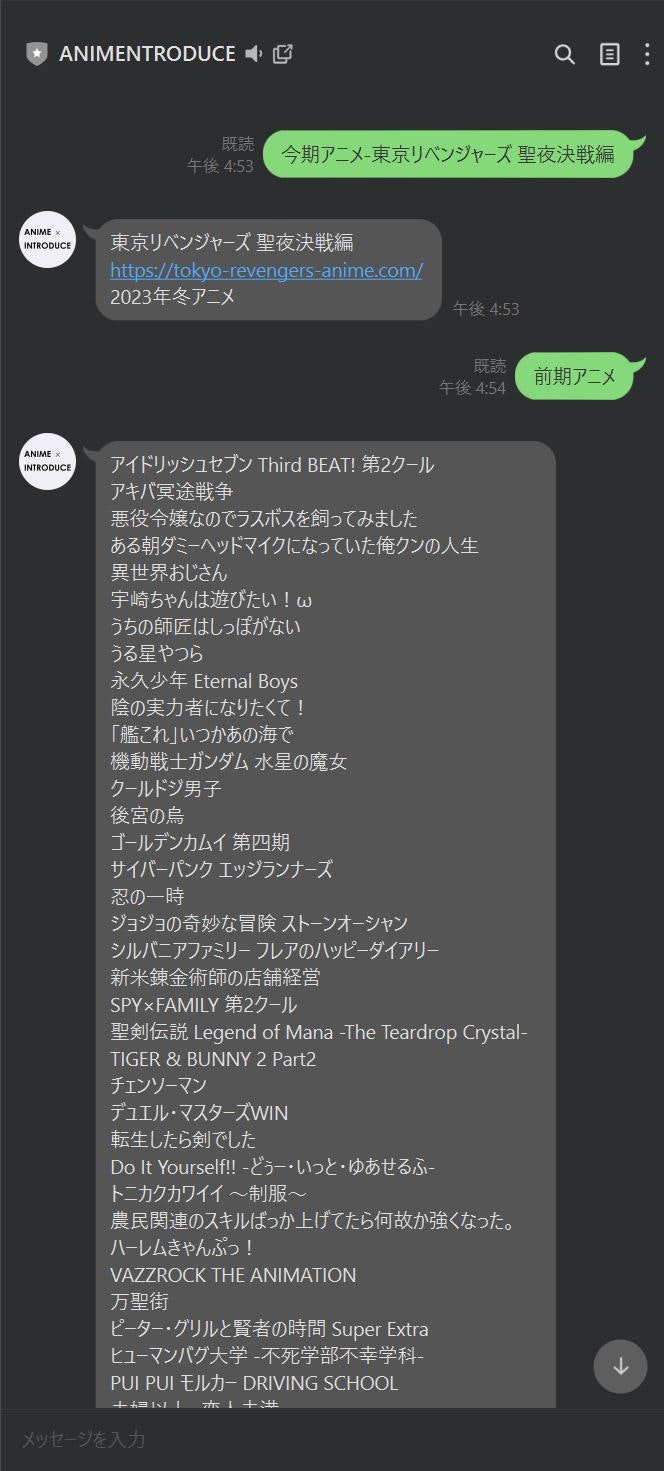
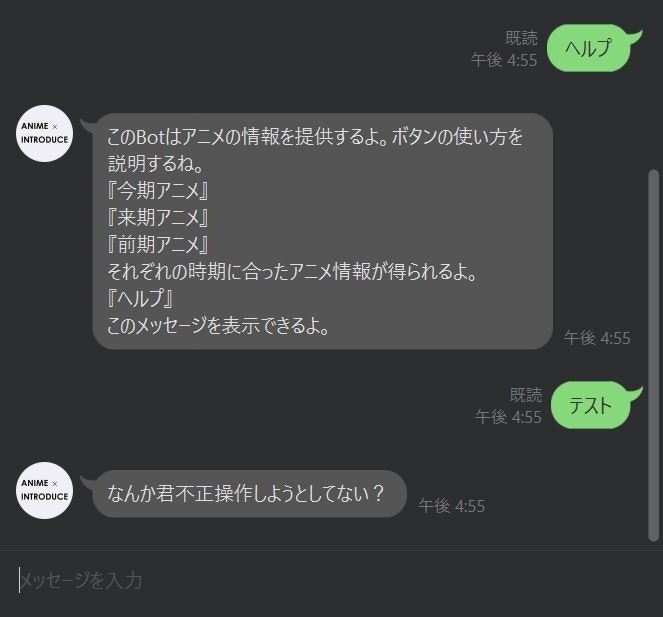
今回作るのは今期放送しているアニメ、来期放送予定アニメ、前期アニメを教えてくれるボットです。下に完成デモのスクショを貼っておきます。


一応対象読者としては、
- Djangoをある程度理解しているが作りたいものがない人
- おうむ返し以外のLINE Botを作ってみたい人
- ngrokの簡単な使い方をわかる人
を想定しています。順番としては、
- LINE Botの動作が確認しやすいオウム返しの機能の作成で肩慣らし
- APIを叩いてアニメ情報を取得・返信の機能の作成で目的のBotを作る
といった感じでチュートリアル形式で進めていこうと思います。チュートリアルで進めるにあたって
をベースにしていきますが、環境設定やフォルダ構成など微妙に違う点がありますので見落とさずに読んでいただければと思います。では早速取り掛かっていきましょう。
LINE側の設定
チャネルの作成
下記URLからLINE Developersにログインしてください。
https://developers.line.biz/ja/
プロバイダーの作成や、LINE Messageing API のチャネルを発行します。
新しくチャネルが作られたら、チャネル基本設定の「LINE Official Account Manager」というボタンを押します。すると、新しくタブが開きます。
LINE Official Account Manager の設定
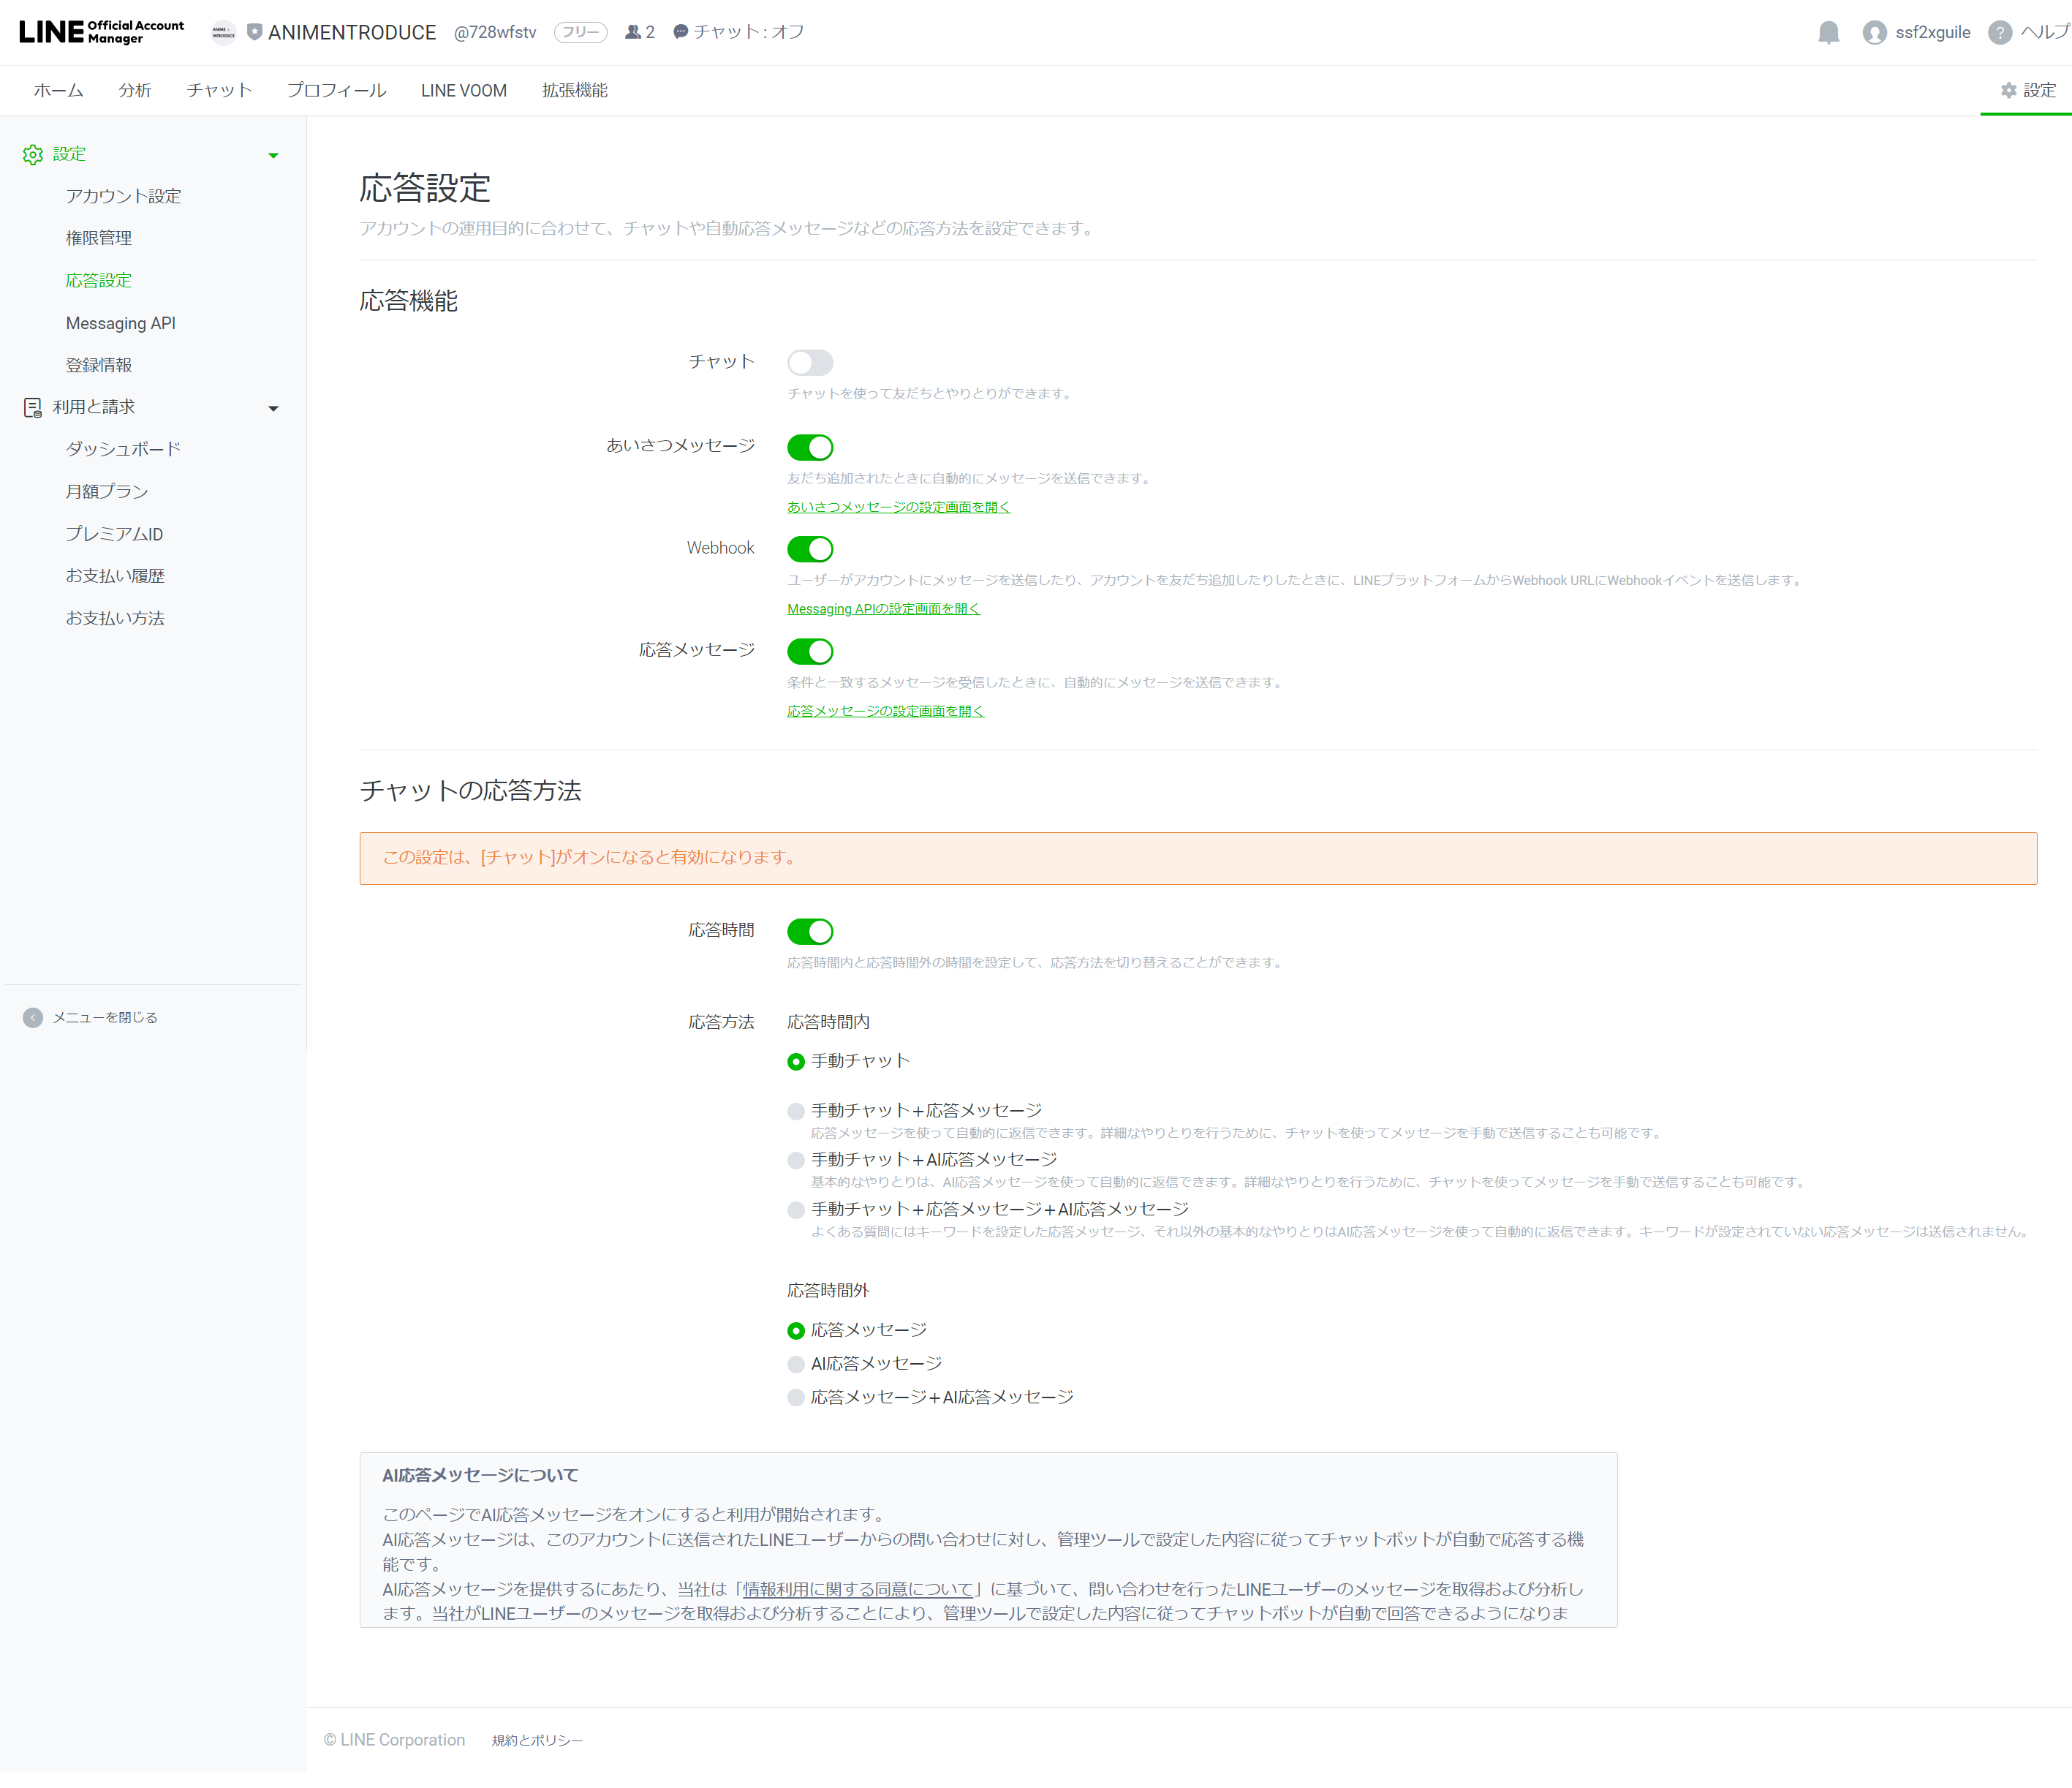
応答設定をクリックして、下記のように設定します。
アクセストークンの発行
こちらも参考記事の通りにLINE Developers のページに戻り、MessagingAPI設定の一番下の、チャネルアクセストークンから、アクセストークンを取得します。
Django側の実装
ディレクトリ作成
$ mkdir animentroduce
$ cd animentroduce
仮想環境を構築してDjangoとその他ライブラリを構築
Python3.6以上であれば、Pythonコマンドで仮想環境を作ることができます。今回はvenvという仮想環境を作ります。Djangoの3.2をインストールするのはLTSであるためです。
$ python -m venv venv
$ source venv/bin/activate
$ pip install Django==3.2
$ pip install django-environ
$ pip install requests
※Windowsの方はsource venv/bin/activateではなく、source venv/Scripts/activateで実行してみてください。
プロジェクト作成
今回こちらのようなフォルダ構成にしていきたいと思います。
animentroduce
│  .env
│  .gitignore
│  db.sqlite3
│  manage.py
│  README.md
│  requirements.txt
│
├─config
│  │  asgi.py
│  │  settings.py
│  │  urls.py
│  │  wsgi.py
│  │  __init__.py
│  │
│  └─__pycache__
│          (略)
│
└─linebot
    │  admin.py
    │  apps.py
    │  line_message.py
    │  message_create.py
    │  models.py
    │  tests.py
    │  urls.py
    │  views.py
    │  __init__.py
    │
    ├─migrations
    │  │  __init__.py
    │  │
    │  └─__pycache__
    │          __init__.cpython-37.pyc
    │
    └─__pycache__
            (略)
ディレクトリとdjangoプロジェクトを作成していきます。
$ cd animentroduce
$ django-admin startproject config .
$ python manage.py startapp linebot
$ python manage.py migrate
次に.envファイルを作成し、先ほど発行したアクセストークンを記述します。
ACCESSTOKEN='発行したアクセストークン'
ついでにsettings.pyも追加・変更を加えます。差分だけ示しておきます。
import os, environ #追加

env = environ.Env() # 追加
env.read_env(os.path.join(BASE_DIR, '.env')) # 追加

ACCESSTOKEN = env('ACCESSTOKEN') #追加

ALLOWED_HOSTS = ["127.0.0.1", ".ngrok.io"] # 変更

INSTALLED_APPS = [
    'django.contrib.admin',
    'django.contrib.auth',
    'django.contrib.contenttypes',
    'django.contrib.sessions',
    'django.contrib.messages',
    'django.contrib.staticfiles',
    'linebot', #追加
]

LANGUAGE_CODE = 'ja' #変更

TIME_ZONE = 'Asia/Tokyo' #変更
アプリ側のurls.pyを作成
続いてアプリ側にurls.pyを作成していきます。
from django.urls import path
from . import views

urlpatterns = [
    path('', views.index, name='callback'),
]
プロジェクト側のurls.pyを作成
続いてアプリ側にurls.pyを作成していきます。
from django.contrib import admin
from django.urls import include, path # 追加部分

urlpatterns = [
    path('linebot/', include('linebot.urls')), # 追加部分
    path('admin/', admin.site.urls),
]
アプリ側にLineMessageクラスの作成
views.pyを編集する前に、新しくLineMessageクラスを作成し、LINE Messaging APIにHTTPリクエストを送りまるための、replyメソッドを作成します。
参考サイトとは微妙に違うのでご注意を。
from django.http import HttpResponse
from django.views.decorators.csrf import csrf_exempt
from django.conf import settings
import urllib.request
import json

REPLY_ENDPOINT_URL = "https://api.line.me/v2/bot/message/reply"
HEADER = {
    'Content-Type': 'application/json',
    'Authorization': 'Bearer ' + settings.ACCESSTOKEN
}

class LineMessage():
    def __init__(self, messages):
        self.messages = messages

    def reply(self, reply_token):
        body = {
            'replyToken': reply_token,
            'messages': self.messages
        }
        print(body)
        req = urllib.request.Request(REPLY_ENDPOINT_URL, json.dumps(body).encode(), HEADER)
        try:
            with urllib.request.urlopen(req) as res:
                body = res.read()
        except urllib.error.HTTPError as err:
            print(err)
        except urllib.error.URLError as err:
            print(err.reason)
また、ここでメソッドreplyに渡されているmessageは以下のような形式を想定しています。
{
  type: "text",
  text: "hogehoge"
}
今回はtextタイプのメッセージしか送受信しない想定なので細かいことは割愛します。
メッセージ作成用のmessage_create.pyを作成
LINEにメッセージを送るためのメッセージ作成用のpythonファイルを作成します。
def create_single_text_message(message):
    if message == 'ありがとう':
        message = 'どういたしまして!'
    test_message = [
                {
                    'type': 'text',
                    'text': message
                }
            ]
    return test_message
参考サイトでは「ありがとう」という文字が来たときにだけ「どういたしまして!」と返す仕様にしていますが、今はおうむ返しのLINE Botが動くように作るので細かいことは言いません。今回作るアニメ紹介Botは主にこのファイルをいじるのですが後でしっかり説明するので心配しないでください。
アプリ側のviews.pyを編集
from django.shortcuts import render
from django.http import HttpResponse
import json
from django.views.decorators.csrf import csrf_exempt

from .message_create import create_single_text_message
from .line_message import LineMessage

@csrf_exempt
def index(request):
    if request.method == 'GET':
        return HttpResponse("今期のアニメ一覧紹介Botだよ。")
    if request.method == 'POST':
        request = json.loads(request.body.decode('utf-8'))
        data = request['events'][0]
        message = data['message']
        reply_token = data['replyToken']
        line_message = LineMessage(create_single_text_message(message['text']))
        line_message.reply(reply_token)
        return HttpResponse("ok")
ひとまずオウム返しする機能は作成できました。
ngrokでLINEと連携
ngrokの設定
参考サイト通りに設定します。
Webhook URLの設定
参考サイト通りに設定します。※設定するURLはhttps://*********.ngrok.io/linebot/です。*はngrokで生成されたサブドメインになります。
ALLOWED_HOSTの編集
参考サイトではこのタイミングで編集していますが私の記事では最初にsettings.pyの設定の時に編集しているので特にやることなし。
ひとまず完成
これで準備は整いました。サーバーを起動して、参考サイトのように返信されればひとまず完成です。
python manage.py runserver
アニメ紹介機能の作成
やりたいこととロジック
アニメ紹介Botでは、『今期アニメ』と入力すると今期アニメの一覧が返ってきたり、『今期アニメ-アニメ名』と入力するとアニメの詳細情報が返ってきたりするような機能を作っていきたいと思います。そこで対応するコマンドを以下のように定めます。
今期アニメ
今期アニメ-アニメ名
来期アニメ
来期アニメ-アニメ名
前期アニメ
前期アニメ-アニメ名
ヘルプ
それ以外の入力は弾くようにします。次にロジックを解説します。
- 入力された文字を-(ハイフン)で分割する。要素数が1または2の配列ができると仮定する。ここでは第一引数、第二引数と呼ぶことにする。
- 第一引数が『今期アニメ』である場合
1.第二引数が空でない場合
APIリクエストを送り、返ってきたjsonデータから第二引数と同じ名前のアニメの情報を返す。
2.第二引数が空である場合
APIリクエストを送り、返ってきたjsonデータを変換しタイトルの一覧で返す。 - 第一引数が『来期アニメ』である場合
1.第二引数が空でない場合
APIリクエストを送り、返ってきたjsonデータから第二引数と同じ名前のアニメの情報を返す。
2.第二引数が空である場合
APIリクエストを送り、返ってきたjsonデータを変換しタイトルの一覧で返す。 - 第一引数が『前期アニメ』である場合
1.第二引数が空でない場合
APIリクエストを送り、返ってきたjsonデータから第二引数と同じ名前のアニメの情報を返す。
2.第二引数が空である場合
APIリクエストを送り、返ってきたjsonデータを変換しタイトルの一覧で返す。 - 第一引数が『ヘルプ』である場合
このBotの使い方を説明する文章を返す。 - 第一引数がいずれの単語にも該当しない場合
エラーメッセージを返す。
このロジックを実装していきます。
メッセージ作成用のmessage_create.pyを編集
from datetime import datetime
from math import ceil
import requests
import json
import pprint

def create_single_text_message(message):
    cool = {1: '冬アニメ', 2: '春アニメ', 3: '夏アニメ', 4: '秋アニメ'}
    msg_array = message.split('-')  # メッセージを分割 例:今期アニメ または 今期アニメ-アニメ名
    first_argument = msg_array[0]  # 今期アニメ 、来期アニメ 、前期アニメ 、ヘルプ
    try:
        second_argument = msg_array[1]  # アニメ名
    except IndexError:
        second_argument = None

    if (first_argument == '今期アニメ'):
        year = datetime.now().year  # 今年の年を取得
        course = ceil(datetime.now().month / 3) # 今クールの値を取得 例:1~3月なら1、4~6月なら2、7~9月なら3、10~12月なら4
        data = callapi(year, course)
        if (second_argument != None):
            for i in range(len(data)):
                if(data[i]['title'] == second_argument):
                    message = data[i]['title'] + '\n' + data[i]['public_url'] + '\n' + str(year) + "年" +cool[course]
        else:
            message = ''
            for i in range(len(data)):
                message += data[i]['title'] + '\n'
    elif (first_argument == '来期アニメ'):
        year, course = checkcourse(datetime.now().year, ceil(datetime.now().month / 3)+1)
        data = callapi(year, course)
        if (second_argument != None):
            for i in range(len(data)):
                if(data[i]['title'] == second_argument):
                    message = data[i]['title'] + '\n' + data[i]['public_url'] + '\n' + str(year) + "年" +cool[course]
        else:
            message = ''
            for i in range(len(data)):
                message += data[i]['title'] + '\n'
    elif (first_argument == '前期アニメ'):
        year, course = checkcourse(datetime.now().year, ceil(datetime.now().month / 3)-1)
        data = callapi(year, course)
        if (second_argument != None):
            for i in range(len(data)):
                if(data[i]['title'] == second_argument):
                    message = data[i]['title'] + '\n' + data[i]['public_url'] + '\n' + str(year) + "年" +cool[course]
        else:
            message = ''
            for i in range(len(data)):
                message += data[i]['title'] + '\n'
    elif (first_argument == 'ヘルプ'):
        message = 'このBotはアニメの情報を提供するよ。ボタンの使い方を説明するね。\n' + '『今期アニメ』\n『来期アニメ』\n『前期アニメ』\nそれぞれの時期に合ったアニメ情報が得られるよ。\n' + '『ヘルプ』\nこのメッセージを表示できるよ。'
    else:
        message = 'なんか君不正操作しようとしてない?'

    test_message = [
                {
                    'type': 'text',
                    'text': message
                }
            ]
    return test_message
いきなり長いコードを見せられて「何これ?」と思うかもしれませんが一つ一つ解説していきます。まずこちらを見ていきます。
    cool = {1: '冬アニメ', 2: '春アニメ', 3: '夏アニメ', 4: '秋アニメ'}
    msg_array = message.split('-')  # メッセージを分割 例:今期アニメ または 今期アニメ-アニメ名
    first_argument = msg_array[0]  # 今期アニメ 、来期アニメ 、前期アニメ 、ヘルプ
    try:
        second_argument = msg_array[1]  # アニメ名
    except IndexError:
        second_argument = None
最初に辞書配列でクールを設定しておきます。またsplitメソッドで入力されてきたmessageを分割し、作成された配列を変数msg_arrayに代入します。第一引数や第二引数はfirst_argument、second_argumentとします。ここでtry~except構文を使用しているのは第二引数がなかったときIndexErrorが起こってしまうので、なかったときにはNoneを代入して空扱いにするからです。次に『今期アニメ』のロジック部分を見ていきます。
    if (first_argument == '今期アニメ'):
        year = datetime.now().year  # 今年の年を取得
        course = ceil(datetime.now().month / 3) # 今クールの値を取得 例:1~3月なら1、4~6月なら2、7~9月なら3、10~12月なら4
        data = callapi(year, course)
        if (second_argument != None):
            for i in range(len(data)):
                if(data[i]['title'] == second_argument):
                    message = data[i]['title'] + '\n' + data[i]['public_url'] + '\n' + str(year) + "年" +cool[course]
        else:
            message = ''
            for i in range(len(data)):
                message += data[i]['title'] + '\n'
まずAPIリクエストを送るために何年のどのクールなのかを設定する必要があります。年はdatetimeライブラリのdatetimeメソッドで取得し、クールはmathライブラリのceilメソッドを使って現在の月から算出します。これらの変数を新しく定義するcallapi関数に代入します。第二引数のロジックは上で解説するので読めばわかると思います。肝心のcallapi関数についてみていきたいと思います。
def callapi(year, course):
    # 取得先のURLに年とクールを指定して、APIを呼び出す
    API_URL = f'https://api.moemoe.tokyo/anime/v1/master/{year}/{course}'
    res = requests.get(API_URL)
    data = json.loads(res.text)
    # pprint.pprint(data) # デバッグ用
    return data
この関数は年とクールを引数にとって、アニメ情報を格納した辞書配列を返す関数です。
先ほど設定したyearとcourseをURLに埋め込みます。requestsライブラリのgetメソッドで得られたjson形式のデータをdataという変数に渡します。コメントアウトしているのですがpprintメソッドを使うとこのような感じでjson形式のデータが返ってくることが確認できます。
[{'city_code': 0,
  'city_name': '',
  'cours_id': 0,
  'created_at': '2022-12-31T21:36:21Z',
  'id': 1663,
  'product_companies': 'ファンワークス',
  'public_url': 'https://www.sanrio.co.jp/characters/retsuko/',
  'sequel': 5,
  'sex': 0,
  'title': 'アグレッシブ烈子 シーズン5',
  'title_en': '',
  'title_short1': 'アグレッシブ烈子',
  'title_short2': '',
  'title_short3': '',
  'twitter_account': 'retsuko_sanrio',
  'twitter_hash_tag': 'アグレッシブ烈子',
  'updated_at': '2022-12-31T21:36:21Z'},
 {'city_code': 0,
  'city_name': '',
  'cours_id': 0,
  'created_at': '2022-12-31T21:36:21Z',
  'id': 1664,
  'product_companies': 'CONNECT',
  'public_url': 'https://ayakashitriangle-anime.com/',
  'sequel': 0,
  'sex': 0,
  'title': 'あやかしトライアングル',
  'title_en': '',
  'title_short1': 'あやかしトライアングル',
  'title_short2': '',
  'title_short3': '',
  'twitter_account': 'ayakashi_anime',
  'twitter_hash_tag': 'あやトラ',
  'updated_at': '2022-12-31T21:36:21Z'}]
次に『来期アニメ』のロジック部分を見ていきます。基本的には『今期アニメ』のロジックと変わりません。違うのは年とクールの部分だけです。来期アニメは次のクールになるので値としては1増えます。この時1~4の範囲を超えてはいけないので5になってしまっては困りますそこでcheckcourseという関数を新しく定義します。
    elif (first_argument == '来期アニメ'):
        year, course = checkcourse(datetime.now().year, ceil(datetime.now().month / 3)+1)
        data = callapi(year, course)
        if (second_argument != None):
            for i in range(len(data)):
                if(data[i]['title'] == second_argument):
                    message = data[i]['title'] + '\n' + data[i]['public_url'] + '\n' + str(year) + "年" +cool[course]
        else:
            message = ''
            for i in range(len(data)):
                message += data[i]['title'] + '\n'
def checkcourse(year, course):
    # courseの値が5になったら、次の年の1期になるので、年を1増やす。一方で、courseの値が0になったら、前の年の4期になるので、年を1減らす。
    if (course == 5):
        year += 1
        course = 1
    elif (course == 0):
        year -= 1
        course = 4
    return year, course
コードのコメントに書いてある通りです。
完成
これでアニメ情報を教えてくれるBotの作成は完了です。最後にmessage_create.pyの全体コードを貼っておきます。
from datetime import datetime
from math import ceil
import requests
import json
import pprint

def create_single_text_message(message):
    cool = {1: '冬アニメ', 2: '春アニメ', 3: '夏アニメ', 4: '秋アニメ'}
    msg_array = message.split('-')  # メッセージを分割 例:今期アニメ または 今期アニメ-アニメ名
    first_argument = msg_array[0]  # 今期アニメ 、来期アニメ 、前期アニメ 、ヘルプ
    try:
        second_argument = msg_array[1]  # アニメ名
    except IndexError:
        second_argument = None

    if (first_argument == '今期アニメ'):
        year = datetime.now().year  # 今年の年を取得
        course = ceil(datetime.now().month / 3) # 今クールの値を取得 例:1~3月なら1、4~6月なら2、7~9月なら3、10~12月なら4
        data = callapi(year, course)
        if (second_argument != None):
            for i in range(len(data)):
                if(data[i]['title'] == second_argument):
                    message = data[i]['title'] + '\n' + data[i]['public_url'] + '\n' + str(year) + "年" +cool[course]
        else:
            message = ''
            for i in range(len(data)):
                message += data[i]['title'] + '\n'
    elif (first_argument == '来期アニメ'):
        year, course = checkcourse(datetime.now().year, ceil(datetime.now().month / 3)+1)
        data = callapi(year, course)
        if (second_argument != None):
            for i in range(len(data)):
                if(data[i]['title'] == second_argument):
                    message = data[i]['title'] + '\n' + data[i]['public_url'] + '\n' + str(year) + "年" +cool[course]
        else:
            message = ''
            for i in range(len(data)):
                message += data[i]['title'] + '\n'
    elif (first_argument == '前期アニメ'):
        year, course = checkcourse(datetime.now().year, ceil(datetime.now().month / 3)-1)
        data = callapi(year, course)
        if (second_argument != None):
            for i in range(len(data)):
                if(data[i]['title'] == second_argument):
                    message = data[i]['title'] + '\n' + data[i]['public_url'] + '\n' + str(year) + "年" +cool[course]
        else:
            message = ''
            for i in range(len(data)):
                message += data[i]['title'] + '\n'
    elif (first_argument == 'ヘルプ'):
        message = 'このBotはアニメの情報を提供するよ。ボタンの使い方を説明するね。\n' + '『今期アニメ』\n『来期アニメ』\n『前期アニメ』\nそれぞれの時期に合ったアニメ情報が得られるよ。\n' + '『ヘルプ』\nこのメッセージを表示できるよ。'
    else:
        message = 'なんか君不正操作しようとしてない?'

    test_message = [
                {
                    'type': 'text',
                    'text': message
                }
            ]
    return test_message

def callapi(year, course):
    # 取得先のURLに年とクールを指定して、APIを呼び出す
    API_URL = f'https://api.moemoe.tokyo/anime/v1/master/{year}/{course}'
    res = requests.get(API_URL)
    data = json.loads(res.text)
    # pprint.pprint(data[0:2]) # デバッグ用
    return data

def checkcourse(year, course):
    # courseの値が5になったら、次の年の1期になるので、年を1増やす。一方で、courseの値が0になったら、前の年の4期になるので、年を1減らす。
    if (course == 5):
        year += 1
        course = 1
    elif (course == 0):
        year -= 1
        course = 4
    return year, course
いかがでしたか。ロジックの実装の部分は馬鹿の一つ覚えみたいにif文でネストしていってしまったので読みづらくなってしまったと思うのですが、もしもっと効率の良い書き方があればこの記事をパクって新しく書いていただけると嬉しいです。
この次はLINEのリッチメニュー機能を使ってユーザーから見ていい感じに仕上げていきます。
