環境
この記事は以下の環境で動いています。
| 項目 | 値 |
|---|---|
| CPU | Core i5-8250U |
| Ubuntu | 20.04 |
| ROS | Noetic |
インストールについてはROS講座02 インストールを参照してください。
またこの記事のプログラムはgithubにアップロードされています。ROS講座11 gitリポジトリを参照してください。
概要
rosbridgeはROSの通信とwebsocketを相互変換するROSパッケージです。ブラウザはjavascriptでwebsocketの通信を扱えるので、これによってwebページ経由でROSと通信できます。
今回はTalkerとListenerのサンプルを解説します。
インストール
rosbridgeのインストールは以下のコマンドで行えます。
sudo apt install ros-noetic-rosbridge-suite
ソースコード
launch
前回使ったroswwwに加えて、rosbridgeのlaunchを起動させるだけです。
<launch>
  <include file="$(find roswww)/launch/roswww.launch" />
  <include file="$(find rosbridge_server)/launch/rosbridge_websocket.launch" />
</launch>
talker(html)
publishを行うwebページ(javascript)の例です。
<!DOCTYPE HTML PUBLIC "-//W3C//DTD HTML 4.01//EN" "http://www.w3.org/TR/html4/strict.dtd">
<html xmlns="http://www.w3.org/1999/xhtml" xml:lang="en" lang="en">
  <head>
    <meta http-equiv="content-type" content="text/html;charset=utf-8"/>
    <style type="text/css">
    <!--
      *{ padding:0px; margin:0px;}
    -->
    </style>
    <title>ROS WEB Publisher</title>
    <script src="https://static.robotwebtools.org/EventEmitter2/current/eventemitter2.min.js"></script>
    <script src="https://static.robotwebtools.org/roslibjs/current/roslib.min.js"></script>
  </head>

  <body>
    <script type="text/javascript">

        <!--
if(!Talker){
    var Talker = {
        ros : null,
        name : "",
        init : function(){
            this.ros = new ROSLIB.Ros();
            this.ros.on('error', function(error) {
                document.getElementById('state').innerHTML = "Error";
            });
            this.ros.on('connection', function(error) {
                document.getElementById('state').innerHTML = "Connect";
            });
            this.ros.on('close', function(error) {
                document.getElementById('state').innerHTML = "Close";
            });
            this.ros.connect('ws://' + location.hostname + ':9090');
        },
        send : function(){
            if(document.getElementById("comment").value.length == 0) return;
            var comment = document.getElementById("comment").value;
            var pub = new ROSLIB.Topic({
                ros : this.ros,
                name : '/chatter',
                messageType : 'std_msgs/String'
            });

            var str = new ROSLIB.Message({data : comment});
            pub.publish(str);
        }
    }
    Talker.init();

    window.onload = function(){
    };
    window.onunload = function(){
        Talker.ros.close();
    };
}
        //-->
    </script>
    <p>status: <label id="state">Disconnect</label></p>

    <form action="javascript:Talker.send();" id="ui">
      <label>Comment: </label>
      <input type="text" id="comment" size="20" />
      <input type="submit" value="send" id="btn" /><br/>
    </form>
  </body>
</html>
詳しく解説していきます。
以下のような部分でTalkerの宣言を行っています。
var Talker = {
...
}
以下の部分で初期化動作の宣言をしています。function以下の最初の行ではROSLIBを設定しています。その下の9行はrosbridgeのコネクションの状態が変わった時の処理です。下から2行目のthis.ros.connect('ws://' + location.hostname + ':9090');ではwebsocket通信を開始します。rosbridgeは標準では9090ポートで通信を行います。
init : function(){
  this.ros = new ROSLIB.Ros();
  this.ros.on('error', function(error) {
    document.getElementById('state').innerHTML = "Error";
  });
  this.ros.on('connection', function(error) {
    document.getElementById('state').innerHTML = "Connect";
  });
  this.ros.on('close', function(error) {
    document.getElementById('state').innerHTML = "Close";
  });
  this.ros.connect('ws://' + location.hostname + ':9090');
}
以下がpublisherのコードです。今回のスクリプトでは「send」ボタンを押すと毎回publisherを生成してpublishします。
1行目は送る文字列(id:commentのテキストボックスから持ってくる)が0文字なら飛ばす処理です。
4~8行目がpublisherの生成です。トピック名とメッセージTypeを記述します。
var str = new ROSLIB.Message({data : comment});でメッセージを作っています。括弧の中でフィールド名を持つ構造体として生成します。
send : function(){
  if(document.getElementById("comment").value.length == 0) return;
  var comment = document.getElementById("comment").value;
  var pub = new ROSLIB.Topic({
    ros : this.ros,
    name : '/chatter',
    messageType : 'std_msgs/String'
  });

  var str = new ROSLIB.Message({data : comment});
  pub.publish(str);
}
listener(html)
<!DOCTYPE HTML PUBLIC "-//W3C//DTD HTML 4.01//EN" "http://www.w3.org/TR/html4/strict.dtd">
<html xmlns="http://www.w3.org/1999/xhtml" xml:lang="en" lang="en">
    <head>
        <meta http-equiv="content-type" content="text/html;charset=utf-8"/>
        <style type="text/css">
        <!--
            *{ padding:0px; margin:0px;}
        -->
        </style>
        <title>ROS WEB Subscriber</title>
        <script src="https://static.robotwebtools.org/EventEmitter2/current/eventemitter2.min.js"></script>
        <script src="https://static.robotwebtools.org/roslibjs/current/roslib.min.js"></script>
      </head>
    <body>
    <script type="text/javascript">
    <!--
if(!Listener){
    var Listener = {
        ros : null,
        name : "",
        init : function(){
            this.ros = new ROSLIB.Ros();
            this.ros.on('error', function(error) {
                document.getElementById('state').innerHTML = "Error";
            });
            this.ros.on('connection', function(error) {
                document.getElementById('state').innerHTML = "Connect";
            });
            this.ros.on('close', function(error) {
                document.getElementById('state').innerHTML = "Close";
            });
            this.ros.connect('ws://' + location.hostname + ':9090');

            var sub = new ROSLIB.Topic({
                ros : this.ros,
                name : '/chatter',
                messageType : 'std_msgs/String'
            });
            sub.subscribe(function(message) {
                var res = message.data;
                var el = document.createElement("p");
                el.innerHTML = res
                document.getElementById("talk").appendChild(el);
            });
        }
    }
    Listener.init();

    window.onload = function(){
    };
    window.onunload = function(){
        Listener.ros.close();
    };
}
        //-->
    </script>
    <p>status: <label id="state">Disconnect</label></p>
    <div id="talk"><p></p></div>
  </body>
</html>
以下の部分でSubscriberを設定します。publisherと同じようにTopic名とメッセージTypeを宣言します。その下で、callback関数の設定をします。今回のスクリプトではやってきた文字列を<p>要素(id:talk)に追記していきます。
var sub = new ROSLIB.Topic({
  ros : this.ros,
  name : '/chatter',
  messageType : 'std_msgs/String'
});
sub.subscribe(function(message) {
  var res = message.data;
  var el = document.createElement("p");
  el.innerHTML = res
  document.getElementById("talk").appendChild(el);
});
実行
launchを実行します。
roslaunch web_lecture bridge.launch
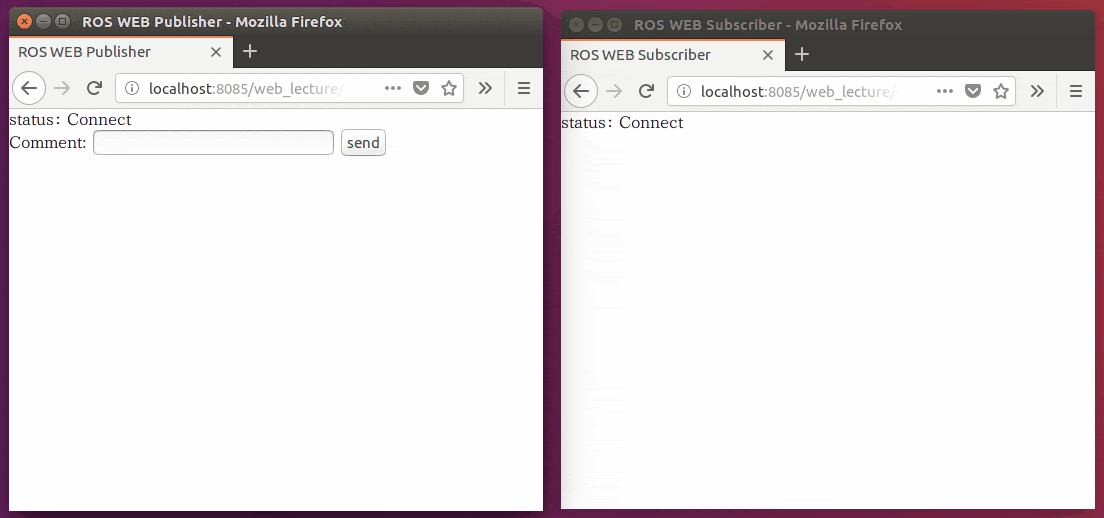
この後にブラウザを2つ開いてlocalhost:8085/web_lecture/pub.htmlとlocalhost:8085/web_lecture/sub.htmlのページにアクセスします。以下のようにpub.htmlのページでテキストボックスに文字を入れて「send」を押すと、sub.htmのページに表示されます。