環境
この記事は以下の環境で動いています。
| 項目 | 値 |
|---|---|
| CPU | Core i5-8250U |
| Ubuntu | 20.04 |
| ROS | Noetic |
| Gazebo | 11.9.0 |
インストールについてはROS講座02 インストールを参照してください。
またこの記事のプログラムはgithubにアップロードされています。ROS講座11 gitリポジトリを参照してください。
概要
ロボットの重要な入力データとして画像があります。ROSでは画像処理はOpenCVを使って行います。ROSのバージョンとOpenCVのバージョンは紐づけられていて、NoeticではOpenCV4を使います。ROSをインストールしたときにOpenCVもインストールされるので、特に追加でインストールをする必要はありません。
シミュレーション環境の用意
毎回実際のWebカメラをつないで実験するのは大変なのでシミュレーションで環境構築をします。カメラとカメラで写す対象のコーラの缶があるシミュレーション環境を用意します。
シミュレーターへの光源の追加
シミュレーターの初期設定ではワールド内がだいぶ暗く映ります。画像処理に影響が出そうなので光源を追加します。
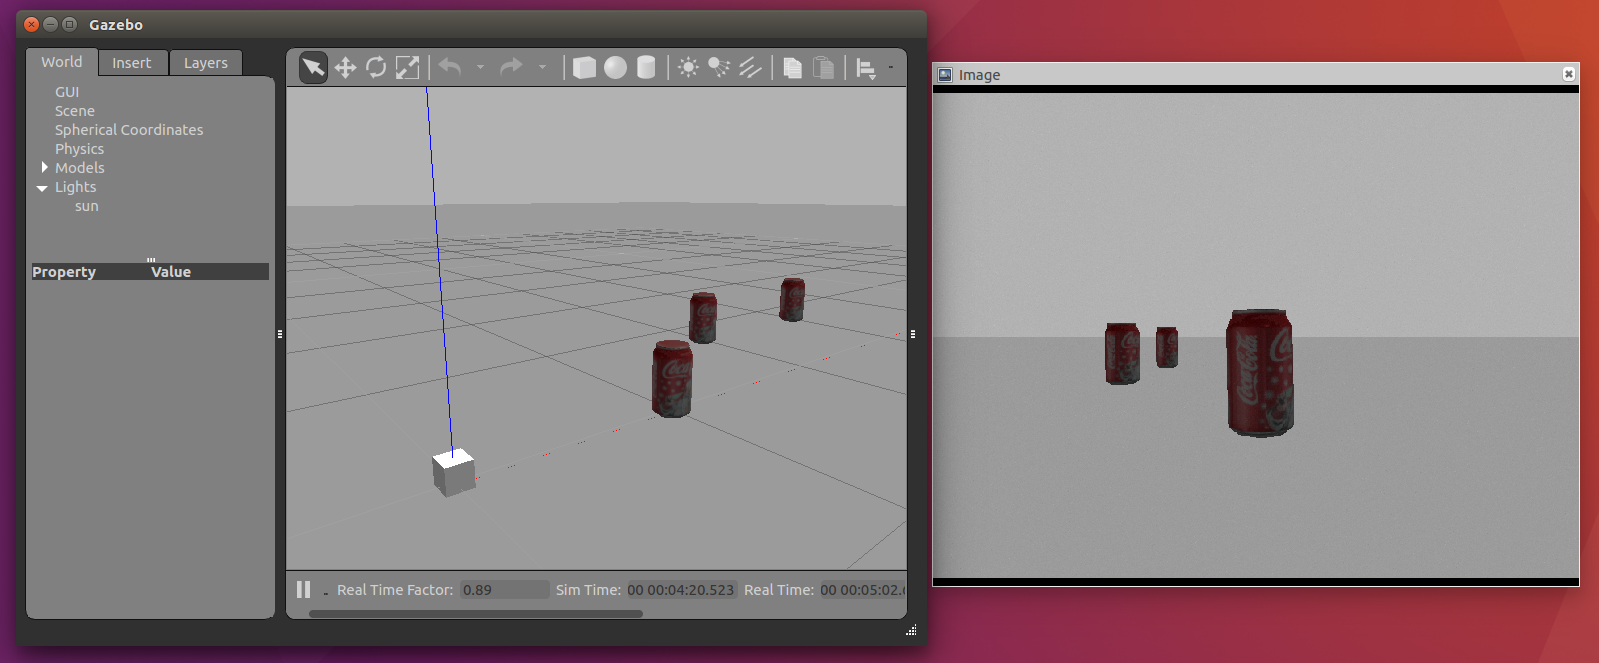
光源が無い場合
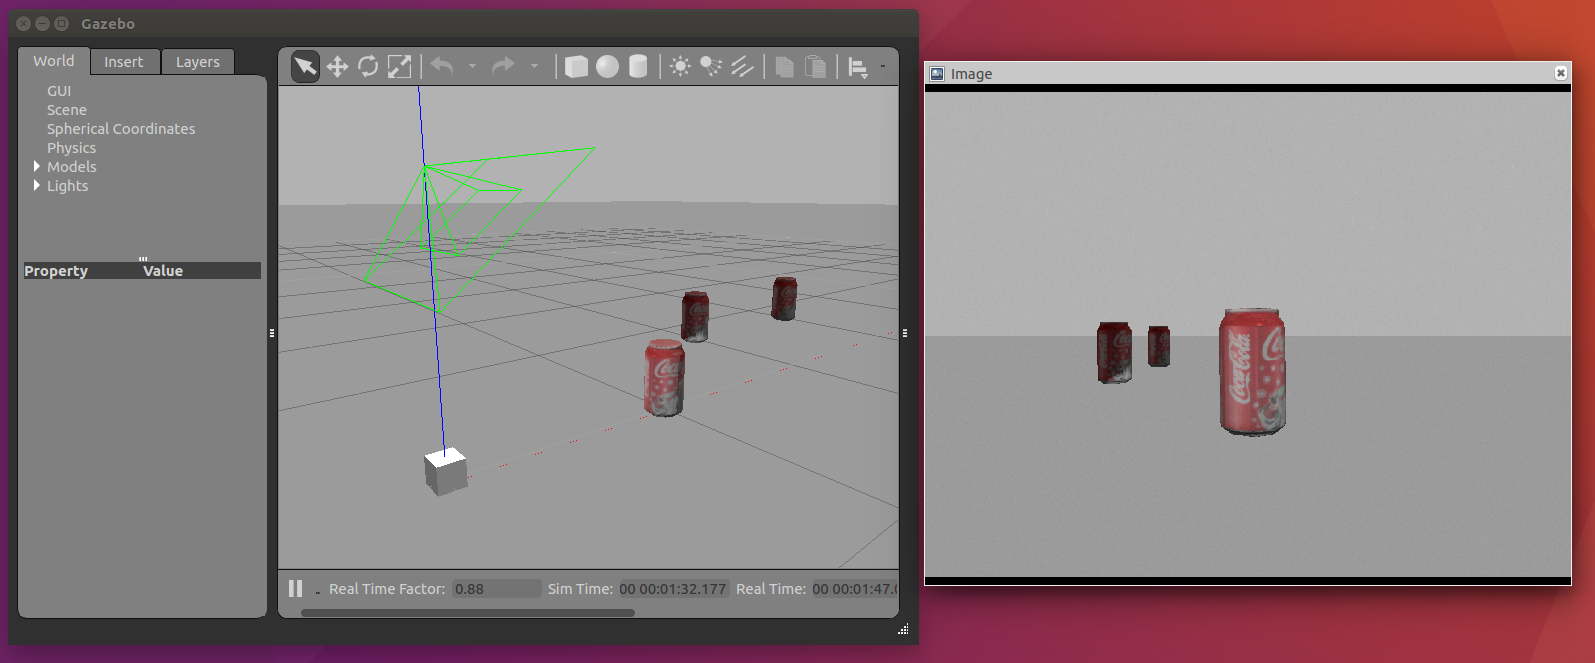
光源を追加した場合
ソースコード
sdf
カメラのついているモデルを作成します。
sim_env_lecture/models/sensor_station/model.sdf
world
カメラで写すコーラ缶と追加のライトがあるWorldです。
<?xml version="1.0" ?>
<sdf version='1.6'>
  <world name='default'>
    <include>
      <uri>model://sun</uri>
    </include>
    <include>
      <uri>model://ground_plane</uri>
    </include>

    <include>
      <name>sensor_station</name>
      <uri>model://sensor_station</uri>
      <pose>0 0 0 0 0 0</pose>
    </include>

    <include>
      <name>coke0</name>
      <uri>model://coke_can</uri>
      <pose>1 0 0 0 0 0</pose>
    </include>
    <include>
      <name>coke1</name>
      <uri>model://coke_can</uri>
      <pose>2 -0.7 0 0 0 0</pose>
    </include>
    <include>
      <name>coke2</name>
      <uri>model://coke_can</uri>
      <pose>1.5 0.7 0 0 0 0</pose>
    </include>

    <light name='user_spot_light_0' type='spot'>
      <pose frame=''>0 0 1 0 -0.9 0</pose>
      <diffuse>0.5 0.5 0.5 1</diffuse>
      <specular>0.4 0.4 0.4 1</specular>
      <direction>0 0 -1</direction>
      <attenuation>
        <range>20</range>
        <constant>0.5</constant>
        <linear>0.01</linear>
        <quadratic>0.001</quadratic>
      </attenuation>
      <cast_shadows>0</cast_shadows>
      <spot>
        <inner_angle>0.6</inner_angle>
        <outer_angle>1</outer_angle>
        <falloff>1</falloff>
      </spot>
    </light>
  </world>
</sdf>
launch
軌道を行うlaunchファイルです。
<?xml version="1.0" encoding="UTF-8"?>
<launch>
  <arg name="model" default="$(find cam_lecture)/urdf/camera_sim.urdf" />
  <arg name="rvizconfig" default="$(find cam_lecture)/rviz/camera_sim.rviz" />
  <param name="robot_description" type="str" textfile="$(arg model)"/>

  <include file="$(find gazebo_ros)/launch/empty_world.launch">
    <arg name="world_name" value="$(find cam_lecture)/world/camera_sim.world" />
    <arg name="paused" value="false"/>
    <arg name="use_sim_time" value="true"/>
    <arg name="gui" value="true"/>
    <arg name="headless" value="false"/>
    <arg name="debug" value="false"/>
  </include>

  <node name="spawn_urdf" pkg="gazebo_ros" type="spawn_model" args="-param robot_description -urdf -model camera_robot" />

  <node name="robot_state_publisher" pkg="robot_state_publisher" type="robot_state_publisher" />
  <node name="rviz" pkg="rviz" type="rviz" args="-d $(arg rvizconfig)" required="true" />
</launch>
実行
各ターミナルごとに実行前にsource ~/catkin_ws/devel/setup.bashを実行する必要があります。
roslaunch gazebo_ros empty_world.launch world_name:=sensor_station_coke.world
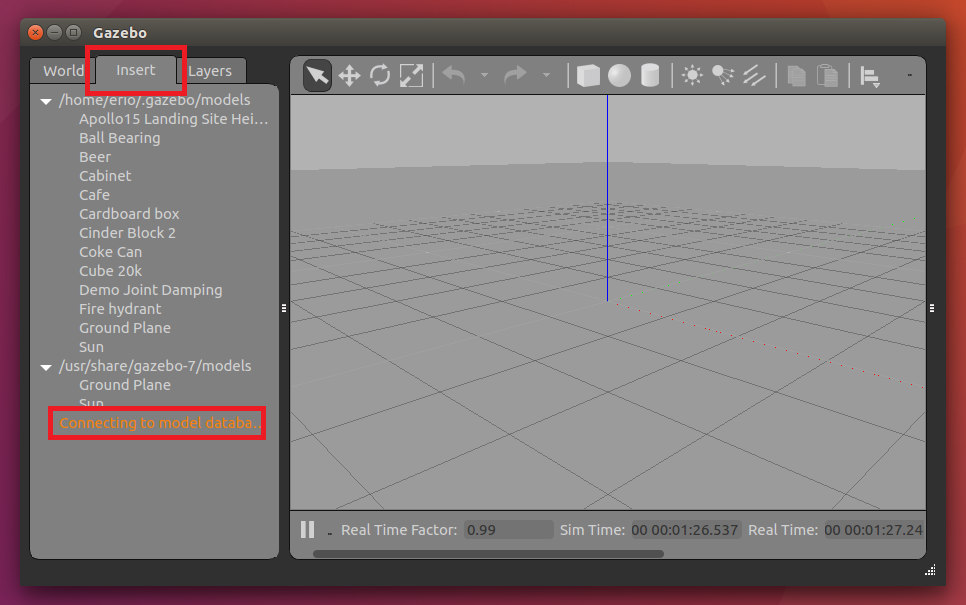
コーラ缶が出現しないときの対処法
Gazeboのバージョンによってはコーラ缶がデフォルトで入っていないことがあります。その対処法を説明します。
- まずターミナルで
gazeboを打ってgazeboを起動します。 - insetタブをクリックします。
- Connectting to model database をクリックします。
- この中でcoke_canがあるのでそれをクリックした後に3Dビュー上で適当な位置に出現させます。
- gazeboを終了します。
簡単な画像処理を行う
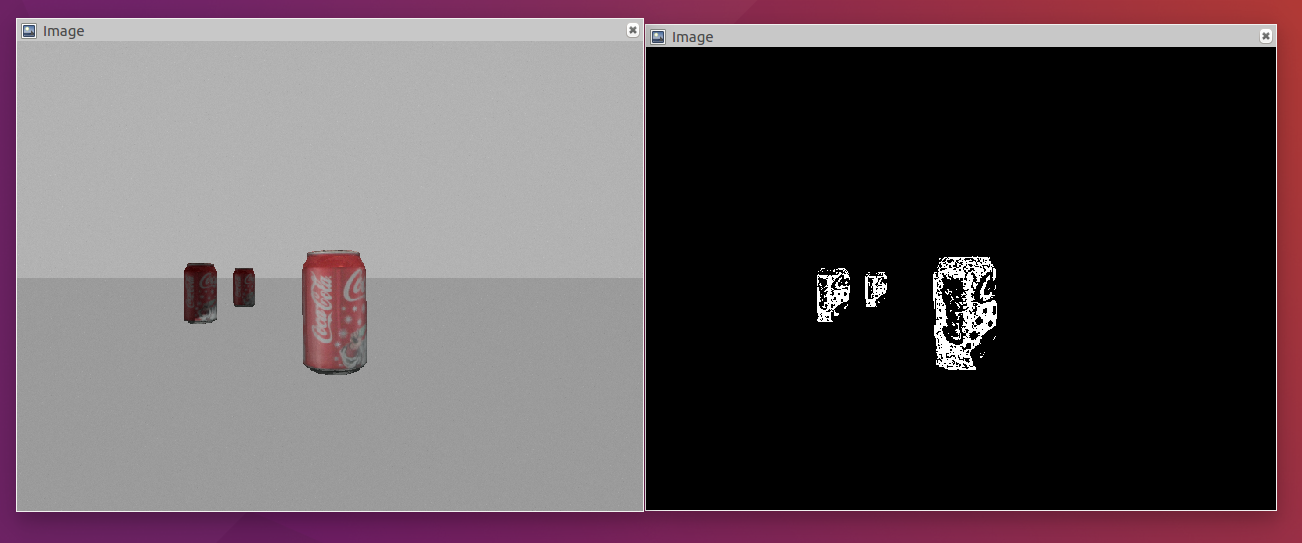
opencv-appというOpenCVの処理を行うためのROSパッケージがあります。これにはエッジ検出や顔検出などを行うノードが入っています。これを使って赤色を検出してみましょう。
インストール
sudo apt-get install -y ros-noetic-opencv-apps
ソースコード
画像をhsv表記に変換してh:330~360、s:80~200、v:0~256の間の色を検出します。
<?xml version="1.0" encoding="UTF-8"?>
<launch>
  <include file="$(find gazebo_ros)/launch/empty_world.launch">
    <arg name="world_name" value="sensor_station_coke.world" />
  </include>

  <node name="hsv_color_filter" pkg="opencv_apps" type="hsv_color_filter" >
    <remap from="/image" to="/head_camera/image_raw" />
    <remap from="~image" to="output/image_raw" />
    <param name="h_limit_max" value="360" />
    <param name="h_limit_min" value="330" />
    <param name="s_limit_max" value="200" />
    <param name="s_limit_min" value="80" />
    <param name="v_limit_max" value="256" />
    <param name="v_limit_min" value="0" />
  </node>

  <node name="original_image_view" pkg="image_view" type="image_view" >
    <remap from="image" to="/head_camera/image_raw"/>
  </node>
  <node name="filtered_image_view" pkg="image_view" type="image_view" >
    <remap from="image" to="/output/image_raw"/>
  </node>
</launch>
実行
各ターミナルごとに実行前にsource ~/catkin_ws/devel/setup.bashを実行する必要があります。
roslaunch cam_lecture opencv_app_example.launch
以下のようにコーラ缶の赤い部分のみが抽出されます。
pythonで画像処理を行う
次にOpenCVを使った画像処理を行ってみます。ROS講座では主にC++でプログラムを紹介していきますが、ここではpythonで書いてみます。
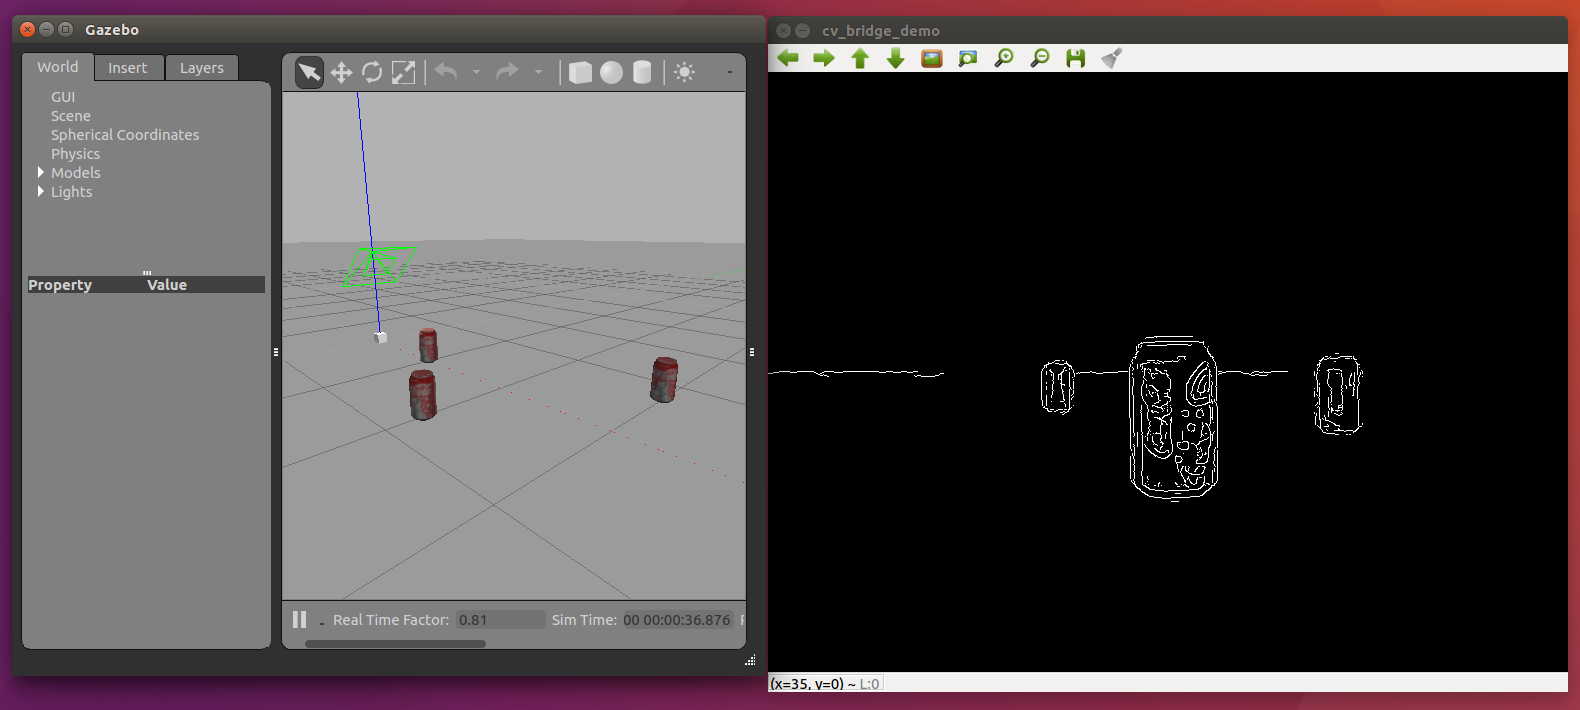
今回はImage型の画像を取得してそれをcannyフィルタをかけてImage型で出すノードを作ります。
ソースコード
以下のようなモダンな書き方をします。機能を持つクラスを作成してからそのクラスを実行します。
# !/usr/bin/env python3
import rospy
import sys
import cv2
from sensor_msgs.msg import Image, CameraInfo
from cv_bridge import CvBridge, CvBridgeError
import numpy as np

class cvBridgeDemo:
    def __init__(self):
        self.node_name = "cv_bridge_demo"
        rospy.init_node(self.node_name)
        rospy.on_shutdown(self.cleanup)
        self.bridge = CvBridge()
        self.image_sub = rospy.Subscriber("/head_camera/image_raw", Image, self.image_callback, queue_size=1)
        self.image_pub = rospy.Publisher("/output/image_raw", Image, queue_size=1)

    def image_callback(self, ros_image):
        try:
            input_image = self.bridge.imgmsg_to_cv2(ros_image, "bgr8")
        except CvBridgeError as e:
            print(e)
        output_image = self.process_image(input_image)
        self.image_pub.publish(self.bridge.cv2_to_imgmsg(output_image, "mono8"))

        cv2.imshow(self.node_name, output_image)
        cv2.waitKey(1)

    def process_image(self, frame):
        grey = cv2.cvtColor(frame, cv2.COLOR_BGR2GRAY)
        blur = cv2.blur(grey, (7, 7))
        edges = cv2.Canny(blur, 15.0, 30.0)
        return edges

    def cleanup(self):
        cv2.destroyAllWindows()

if __name__ == '__main__':
    cvBridgeDemo()
    rospy.spin()
- まずは
__init__の部分が実行されます。この中のself.image_sub = rospy.Subscriber("input_image", Image, self.image_callback, queue_size=1)とself.image_pub = rospy.Publisher("output_image", Image, queue_size=1)でpubliser、subscriberの登録をしています。 - 画像をsubすると
image_callback(self, ros_image)が実行されます。この中のinput_image = self.bridge.imgmsg_to_cv2(ros_image, "bgr8")でROSの形式からOpenCVの形式(実質はnumpy)に変換します。カラー画像なのでbgr8と指定します。 - 処理の本体は
process_image(self, frame)にいます。この中ではカラー(3ch)からグレー(1ch)に変換、ぼかし、Cannyエッジ検出の段階を踏んでエッジ検出をしています。
self.image_pub.publish(self.bridge.cv2_to_imgmsg(output_image, "mono8"))で処理した画像をpubします。グレー画像なのでmono8で変換します。 - 最後に
cv2.imshow(self.node_name, output_image)とcv2.waitKey(1)で変換後の画像を新しくウィンドウを作って表示します。cv2.waitKey(1)があることでプログラムがwaitして、その間にウィンドウが描画されます。ないとウィンドウが正しく表示されません。ちなみにcv2.waitKey(0)ではキー入力があるまで無限に待ちます。
起動用のlaunchが以下になります。
<?xml version="1.0" encoding="UTF-8"?>
<launch>
  <include file="$(find gazebo_ros)/launch/empty_world.launch">
    <arg name="world_name" value="sensor_station_coke.world" />
  </include>

  <node name="edge_filter" pkg="cam_lecture" type="edge_filter.py" />

  <node name="original_image_view" pkg="image_view" type="image_view" >
    <remap from="image" to="/head_camera/image_raw"/>
  </node>
  <node name="filtered_image_view" pkg="image_view" type="image_view" >
    <remap from="image" to="/output/image_raw"/>
  </node>
</launch>
実行
roslaunch cam_lecture sim_edge_filter.launch
参考
opencv-apps
ROSwiki cv_bridge tutorial