環境
この記事は以下の環境で動いています。
| 項目 | 値 |
|---|---|
| CPU | Core i5-8250U |
| Ubuntu | 20.04 |
| ROS | Noetic |
インストールについてはROS講座02 インストールを参照してください。
またこの記事のプログラムはgithubにアップロードされています。ROS講座11 gitリポジトリを参照してください。
概要
Rviz上で移動ロボットのシミュレーターを作ってみましょう。本当はROS上ではシミュレーションはgazeboを使うのですが、今回は簡易的にc++で運動を記述したROSノードを作り動かしてみます。
オムニホイールのロボットを今回想定します。オムニホイールはこの動画のように前後移動と旋回に加えて、左右にも移動できる不思議な機構です。
今回はROSトピックで前後方向(x軸)速度、左右方向(y軸)速度、回転(Rz軸)角速度を指定してロボットを動かします。
この時
V_x:前後方向速度(ロボット座標系)\\
V_y:左右方向速度(ロボット座標系)\\
W_z:回転角速度(ロボット座標系)\\
\Delta t:処理のタイムステップ
また、あるタイムステップiの時の位置を
x_i:x軸位置(ワールド座標系)\\
y_i:y軸位置(ワールド座標系)\\
\theta_i:回転方向位置:向いている方角(ワールド座標系)\\
とすると、移動のシミュレーションは
x_{i+1}=x_i+(V_x cos(\theta_i+W_z \Delta t/2)-V_y sin(\theta_i+W_z \Delta t/2)) \Delta t\\
y_{i+1}=y_i+(V_x sin(\theta_i+W_z \Delta t/2)+V_y cos(\theta_i+W_z \Delta t/2)) \Delta t\\
\theta_{i+1}=\theta_i+W_z \Delta t\\
となる。これをこのまま実装していく
ソースコード
移動シミュレーション
# include <ros/ros.h>
# include <geometry_msgs/Twist.h>
# include <geometry_msgs/Pose2D.h>
# include <tf/transform_broadcaster.h>

# include <string>
# include <math.h>

void robot_pose_publish(geometry_msgs::Pose2D pose)
{
  static tf::TransformBroadcaster br;
  tf::Transform transform;
  transform.setOrigin(tf::Vector3(pose.x, pose.y, 0.0));
  tf::Quaternion q;
  q.setRPY(0, 0, pose.theta);
  transform.setRotation(q);
  br.sendTransform(tf::StampedTransform(transform, ros::Time::now(), "world", "base_link"));
}

geometry_msgs::Pose2D robot_tick(geometry_msgs::Pose2D pose, geometry_msgs::Twist cmd_vel, float dt)
{
  geometry_msgs::Pose2D output;
  float tmp_rz = pose.theta + cmd_vel.angular.z * dt / 2;
  output.x = pose.x + (cos(tmp_rz) * cmd_vel.linear.x - sin(tmp_rz) * cmd_vel.linear.y) * dt;
  output.y = pose.y + (sin(tmp_rz) * cmd_vel.linear.x + cos(tmp_rz) * cmd_vel.linear.y) * dt;
  output.theta = pose.theta + cmd_vel.angular.z * dt;
  return output;
}

geometry_msgs::Twist twist_last;
void twist_callback(const geometry_msgs::Twist& twist_msg)
{
  twist_last = twist_msg;
}

float normal_rad(float value)
{
  if (value > 0)
    return fmod(value, 3.1415);
  else
    return -fmod(-value, 3.1415);
}

int main(int argc, char** argv)
{
  ros::init(argc, argv, "vis_robot_sim");
  ros::NodeHandle nh;
  ros::Subscriber twist_sub = nh.subscribe("/cmd_vel", 10, twist_callback);
  geometry_msgs::Pose2D pose;

  ros::Rate loop_rate(20);
  while (ros::ok())
  {
    pose = robot_tick(pose, twist_last, 0.05);
    robot_pose_publish(pose);
    ros::spinOnce();
    loop_rate.sleep();
  }
  return 0;
}
urdf
ただ円柱状の本体があるだけのロボットです。
<robot name="test_robot">
  <material name="red">
    <color rgba="1.0 0.0 0.0 1.0"/>
  </material>
  <material name="green">
    <color rgba="0.0 1.0 0.0 1.0"/>
  </material>

  <link name="world"/>

  <joint name="base_joint" type="floating">
    <parent link="world"/>
    <child  link="base_link"/>
  </joint>
  <link name="base_link">
    <visual>
      <origin rpy="0 0 0" xyz="0 0 0.05"/>
      <geometry>
        <cylinder radius="0.15" length="0.10" />
      </geometry>
      <material name="red"/>
    </visual>
  </link>

  <joint name="joint1" type="fixed">
    <parent link="base_link"/>
    <child  link="link1"/>
  </joint>
  <link name="link1">
    <visual>
      <origin rpy="0 0 0" xyz="0.1 0 0.12"/>
      <geometry>
        <box size="0.07 0.07 0.07" />
      </geometry>
      <material name="green"/>
    </visual>
  </link>
</robot>
launch
cmd_velをpublishするためにbasic_lectureでturtlesimを動かすために使用したノードを再利用する。
<launch>
  <arg name="model" default="$(find vis_lecture)/urdf/move_robot.urdf" />
  <arg name="rvizconfig" default="$(find vis_lecture)/rviz/move_robot.rviz" />
  <arg name="joy" default="false" />
  <param name="robot_description" command="$(find xacro)/xacro $(arg model)" />

  <group if="$(arg joy)">
    <node name="joy_node"   pkg="joy" type="joy_node" />
    <node name="basic_twist_publisher" pkg="basic_lecture" type="basic_twist_publisher"/>
  </group>
  <node name="vis_robot_sim" pkg="vis_lecture" type="vis_robot_sim"/>

  <node name="robot_state_publisher" pkg="robot_state_publisher" type="robot_state_publisher" />
  <node name="rviz" pkg="rviz" type="rviz" args="-d $(arg rvizconfig)" required="true" />
</launch>
実行
各ターミナルごとに実行前にsource ~/catkin_ws/devel/setup.bashを実行する必要があります。
roslaunch vis_lecture move_robot.launch
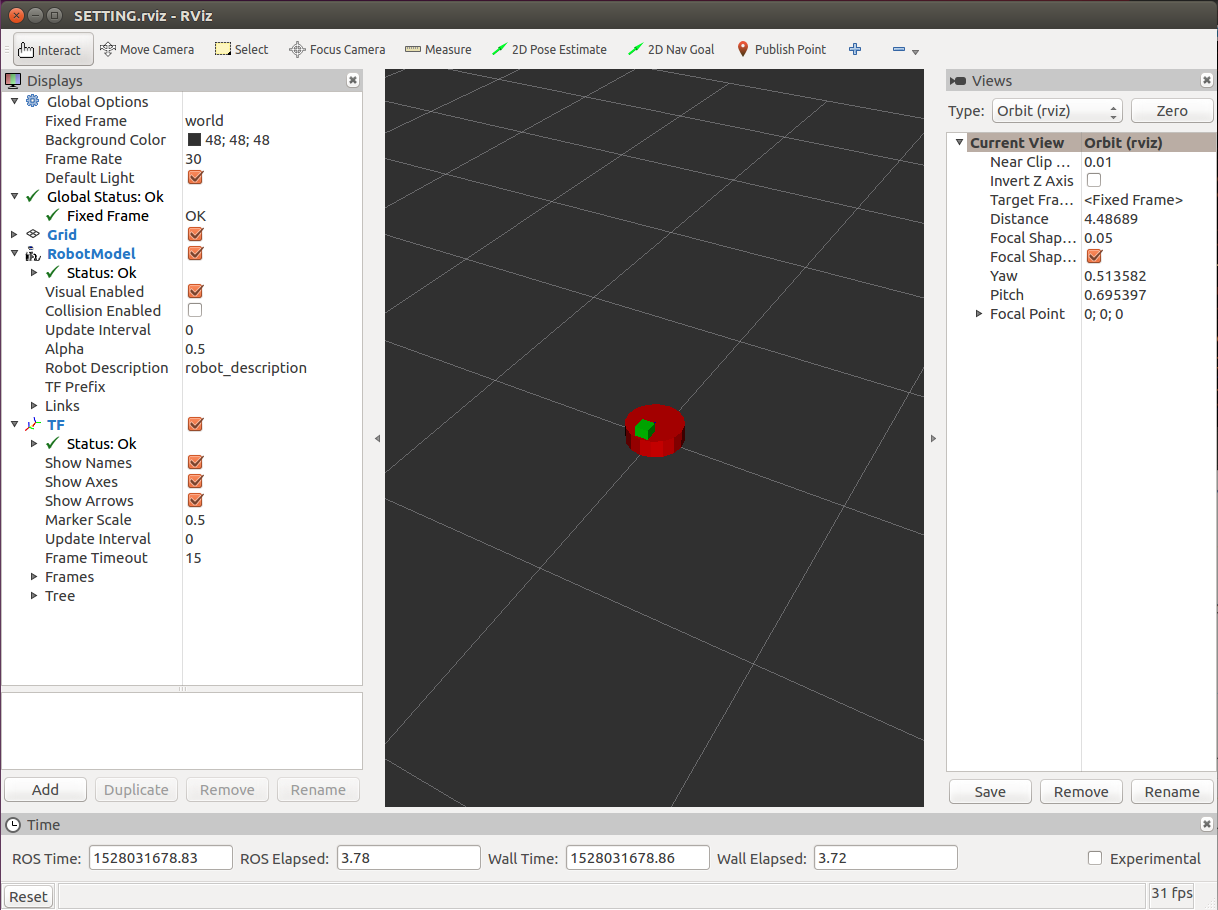
コマンドを打つと以下のようなRvizの画面が立ち上がる。
ここで別のウィンドウを開いてrostopic pubで以下のROSトピックをpublishしてみる。ロボットが動くはず。
rostopic pub -1 /cmd_vel geometry_msgs/Twist "linear:
  x: 0.5
  y: 0.0
  z: 0.0
angular:
  x: 0.0
  y: 0.0
  z: 0.0"
今度はjoyスティックを使用してみよう。PS3のコントローラーをつないで以下のコマンドを実行してみる。joy変数にtrueを入れることで追加でjoy_nodeとtwist_publisherを立ち上げる。以下の動画のようにジョイスティックで自由に動かせるはずだ。
roslaunch vis_lecture move_robot.launch joy:=true
rvizの設定
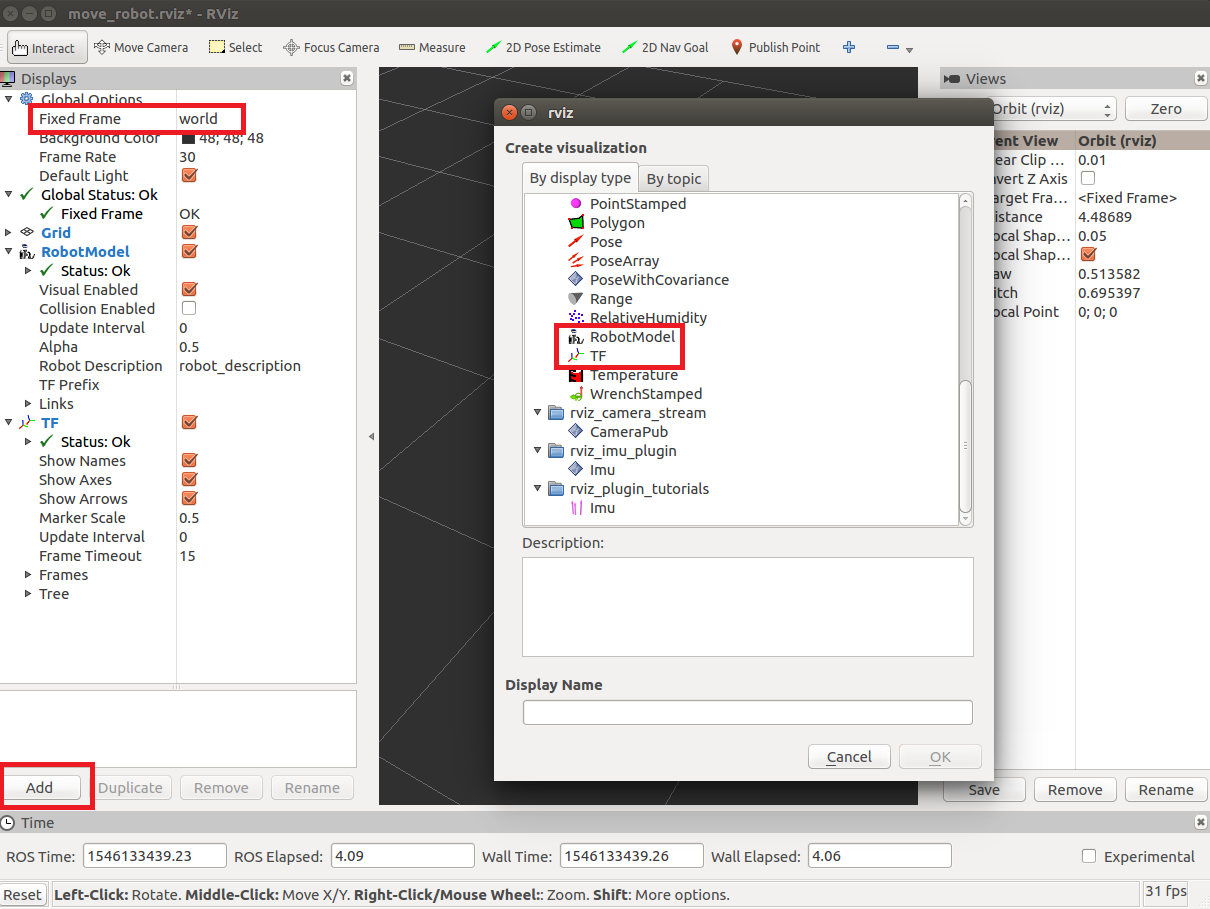
rvizがうまく表示できないときは
- FixedFrameでworldを選択する。
- 左下のaddを押してTFを選択する。
- 左下のaddを押してRobotModelを選択する。
を設定すると上記のようになります。


