こんにちは。
@sori883です。
AgentCoreやBedrockによりAWSでストリーミングを求められる機会が増えましたが、いまいち何が良いのか分からなかったので色々調べてみました。
そのまとめとAPIGatewayを推すだけの記事です。
ストリーミングでよく見るアーキテクチャ
AWSでストリーミングするアーキテクチャは様々あると思いますが、よく見るパターンは下記の4パターンかと思います。
それぞれざっくり構成図と一長一短を列挙しますが、個人的な最推しはAPIGatewayです。
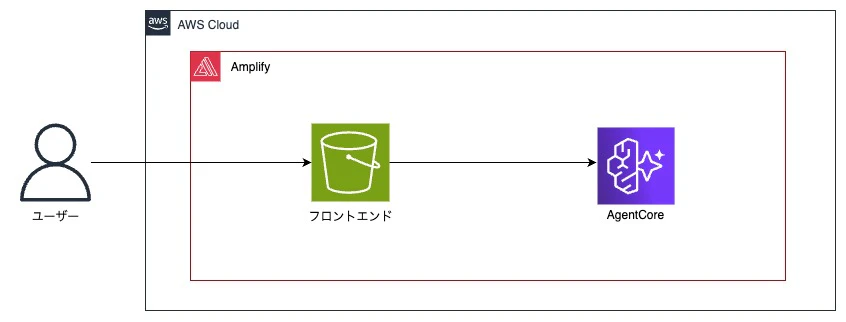
Amplify
某AWSヒーローの記事でよく見る最速簡単に作れるパターンです。
ざっくりとした特徴
- 構築速度: フロントエンド、バックエンドを早く簡単に構築可能
- コスト: 基本サーバレス実装のため利用した金額
- 拡張性: Gen2でCDKが使えるようになったが限定的
- 既存システムへの導入: どちらかと言うとPoCや管理画面向け
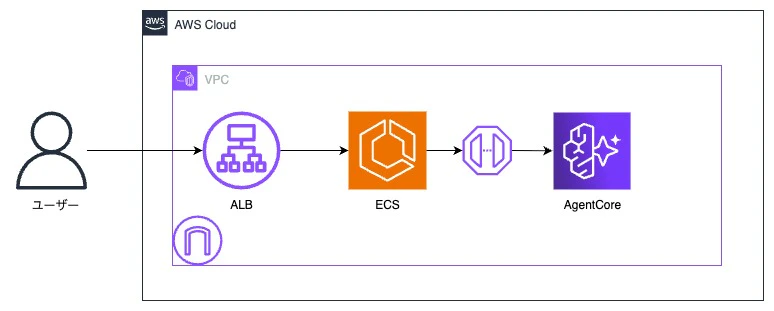
ALB&ECS、EC2
商用で使うなら実行コストと可用性の観点で選ばれがちの構成です。
ざっくりとした特徴
- 構築速度: 設定多数、考慮事項多数
- コスト: ALB、ECSの起動コストが発生するため高め
- 拡張性: WAFや認証追加、ALBの後ろ側で好き勝手できるので高い
- 既存システムへの導入: CIDRは必要だが、アプリ観点はエンドポイントを叩くだけの疎結合
CloudFront&関数URL
いかんせんLambda@Edgeが必要なため、めんどう。
過去の記事で使ってみて、利用リソース上げてます。
ざっくりとした特徴
- 構築速度: 設定多数、考慮事項多数
- コスト: 基本サーバレス実装のため利用した金額
- 拡張性: WAFや認証追加が出来る一方、VPC内部からのアクセスは難しい
- 既存システムへの導入: フロントエンドを追加する場合は検討の余地あり

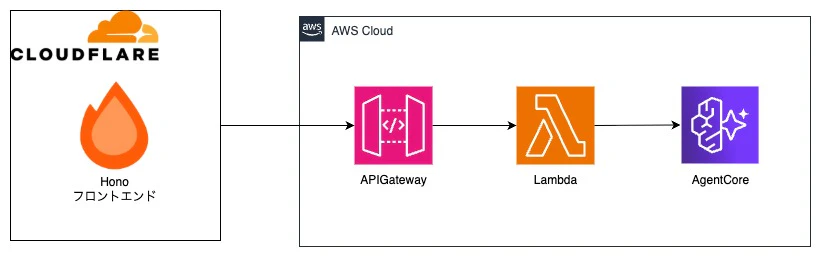
APIGatewayストリーミング
個人的な推し。
ざっくりとした特徴
- 構築速度:
- コスト: 基本サーバレス実装のため利用した金額
- 拡張性: WAFや認証追加、VPC内部外部からのアクセスが可能
- 既存システムへの導入: APIを作るだけなのでインフラアプリ影響が少ない

アーキテクチャ案の採用関連まとめ
各アーキテクチャ案の採用観点を○△でまとめると下記です。
多くの利用用途にハマって簡単に実装できるのがAPIGatewayパターンの良い部分だと思ってます。
APIGateway触ったことない人が少ないのもまた良いポイントです。
| 採用観点 | Amplify | ALB | CloudFront | APIGateway |
|---|---|---|---|---|
| 構築速度 | ◎ | △ | △ | ○ |
| コスト | ◎ | △ | ○ | ◎ |
| 拡張性 | △ | ◎ | ○ | ◎ |
| 既存システムへの導入 | △ | ◎ | ○ | ◎ |
APIGatewayストリーミングを使ってみる
実装はここが世界で一番分かりやすいです。
成果物
下記に実装を格納しています。
アーキテクチャ
今回は個人開発を想定して、CloudflareでホストしたHonoXからAPIGatewayにアクセスしてストリーミングしてみます。
AgentCoreの実装
uvを使用して最小で作成します。
# プロジェクト作成
uv init
# パッケージインストール
uv add bedrock-agentcore strands-agents
main.pyにAIエージェントを実装します。
from dotenv import load_dotenv
load_dotenv()
from bedrock_agentcore.runtime import BedrockAgentCoreApp
from strands import Agent

app = BedrockAgentCoreApp()

@app.entrypoint
async def invoke(payload):
    agent = Agent(
        model="openai.gpt-oss-120b-1:0",
        system_prompt="""
            You are a helpful assistant.
        """,
    )

    stream = agent.stream_async(payload.get("prompt"))

    async for event in stream:
        if "data" in event and isinstance(event["data"], str):
            yield event["data"]


if __name__ == "__main__":
    app.run()
また、DockerでデプロイするためDockerfileも作成しておきます。
FROM python:3.13-slim-trixie

# Install uv
COPY --from=ghcr.io/astral-sh/uv:latest /uv /uvx /bin/

# Copy application files
ADD . /app
WORKDIR /app

# Install dependencies
RUN uv sync --locked

ENV UV_CACHE_DIR=/tmp/uv-cache
ENV PORT=8080

CMD ["uv", "run", "main.py"]
AgentCoreストリーミングLambdaの実装
ストリーミングを中継するLambdaを実装します。
実装はhttps://dev.classmethod.jp/articles/amazon-bedrock-agentcore-runtime-api-gateway-lambda-streaming-responseを完全に真似しています。
import { promisify } from "util";
import { pipeline as streamPipeline, Readable, Writable } from "stream";
import { randomUUID } from "crypto";
import type { APIGatewayProxyEvent, Context } from "aws-lambda";
import {
  BedrockAgentCoreClient,
  InvokeAgentRuntimeCommand,
} from "@aws-sdk/client-bedrock-agentcore";

// 環境変数からAgentCoreのARNを取得
const agentCoreArn = process.env.AGENT_RUNTIME_ARN;
if (!agentCoreArn) {
  throw new Error("AGENT_ARN must be set in environment variables");
}

// ストリームパイプライン処理をPromise化
const asyncPipeline = promisify(streamPipeline);

// BedrockAgentCoreクライアントの初期化
const agentCoreClient = new BedrockAgentCoreClient({
  region: process.env.AWS_REGION || "us-west-2",
});

// クライアントリクエストの構造定義
interface ClientRequest {
  sessionId?: string;
  prompt: string;
}

// Lambda Response Streaming用の型定義
type StreamHandler = (
  event: APIGatewayProxyEvent,
  responseStream: NodeJS.WritableStream,
  context: Context,
) => Promise<void>;

// awslambdaグローバルオブジェクトの型定義
declare const awslambda: {
  streamifyResponse: (handler: StreamHandler) => StreamHandler;
  HttpResponseStream: {
    from: (
      stream: NodeJS.WritableStream,
      metadata: {
        statusCode: number;
        headers: Record<string, string>;
      },
    ) => NodeJS.WritableStream;
  };
};

export const handler = awslambda.streamifyResponse(
  async (
    event: APIGatewayProxyEvent,
    responseStream: NodeJS.WritableStream,
    context: Context,
  ) => {
    console.log("Incoming request:", JSON.stringify(event, null, 2));

    try {
      // リクエストボディからパラメータを解析
      const requestParams = parseClientRequest(event);
      console.log("Parsed request parameters:", requestParams);

      // Server-Sent Events形式でレスポンスを返す設定
      const responseMetadata = {
        statusCode: 200,
        headers: {
          "Content-Type": "text/event-stream",
          "Cache-Control": "no-cache",
          "X-Accel-Buffering": "no",
        },
      };

      const httpStream = awslambda.HttpResponseStream.from(
        responseStream as Writable,
        responseMetadata,
      );

      // AgentCore Runtimeへのリクエストを構築
      const invokeCommand = new InvokeAgentRuntimeCommand({
        agentRuntimeArn: agentCoreArn,
        runtimeSessionId: requestParams.sessionId,
        payload: new TextEncoder().encode(
          JSON.stringify({
            prompt: requestParams.prompt,
          }),
        ),
        qualifier: "DEFAULT",
      });

      console.log("Calling AgentCore Runtime...");

      // AgentCoreを実行してレスポンスを取得
      const runtimeResponse = await agentCoreClient.send(invokeCommand);

      console.log("Received response, initiating stream transfer...");

      // レスポンスストリームをクライアントへパイプライン接続
      await asyncPipeline(runtimeResponse.response as Readable, httpStream);

      console.log("Stream transfer completed");
    } catch (error) {
      console.error("Request processing failed:", error);

      // エラー情報をストリームに書き込み
      try {
        responseStream.write('data: {"error": "Internal server error"}\n\n');
        if (error instanceof Error) {
          responseStream.write(`data: {"error": "${error.message}"}\n\n`);
        }
      } catch (streamError) {
        console.error("Error stream write failed:", streamError);
      } finally {
        responseStream.end();
      }
    }
  },
);

/**
 * リクエストイベントからクライアントパラメータを抽出
 */
const parseClientRequest = (event: APIGatewayProxyEvent): ClientRequest => {
  let params: ClientRequest;

  // POSTリクエストでBase64エンコードされている場合
  if (event.isBase64Encoded && event.body) {
    const decodedBody = Buffer.from(event.body, "base64").toString("utf-8");
    params = JSON.parse(decodedBody);
  }
  // POSTリクエストで通常のJSON
  else if (event.body) {
    params = JSON.parse(event.body);
  }
  // GETリクエストのクエリパラメータ
  else if (event.queryStringParameters?.prompt) {
    params = {
      prompt: event.queryStringParameters.prompt,
      sessionId: event.queryStringParameters.sessionId,
    };
  }
  // デフォルトのプロンプト
  else {
    params = { prompt: "こんにちは、元気ですか?" };
  }

  // セッションIDが未指定の場合は新規生成
  params.sessionId = params.sessionId || randomUUID();

  return params;
};
CDKの実装
まず、AgentCoreを作成します。
モデルへのアクセス権限は忘れずに付与しておきます。
export class AgentCore extends Construct {
  public readonly agentCoreRuntime: agentcore.IBedrockAgentRuntime;

  constructor(scope: Construct, id: string) {
    super(scope, id);

    // AgentCore Runtime Artifact
    const artifact = agentcore.AgentRuntimeArtifact.fromAsset(
      path.join(__dirname, '../../../agentcore')
    );

    // AgentCore Runtimeを定義
    this.agentCoreRuntime = new agentcore.Runtime(this, 'agent', {
      runtimeName: 'sample_agent',
      agentRuntimeArtifact: artifact,
      description: 'Sample agent',
    });

    // AgentCore Runtimeに対してBedrockへのアクセス権を付与
    const bedrockModel = BedrockFoundationModel.fromCdkFoundationModelId({
      modelId: 'openai.gpt-oss-120b-1:0',
    });
    bedrockModel.grantInvoke(this.agentCoreRuntime);
  }
}
次にLambdaを作成します。
AgentCoreRuntimeのARN参照が必要なので、環境変数に渡してあげます。
interface Props {
  agentCoreRuntime: IBedrockAgentRuntime;
}

export class ProxyLambda extends Construct {
  public readonly function: lambda.IFunction;
  public readonly functionUrl: lambda.FunctionUrl;

  constructor(scope: Construct, id: string, props: Props) {
    super(scope, id);

    const { agentCoreRuntime } = props;

    this.function = new nodejs.NodejsFunction(this, 'AgentCoreProxyFunction', {
      functionName: 'agentcore-proxy',
      entry: path.join(__dirname, '../../resources/proxy-lambda/index.ts'),
      handler: 'handler',
      runtime: lambda.Runtime.NODEJS_24_X,
      timeout: cdk.Duration.minutes(15),
      memorySize: 512,
      environment: {
        AGENT_RUNTIME_ARN: agentCoreRuntime.agentRuntimeArn, // 環境変数にAgentCoreのARNを設定
      },
    });

    // AmazonBedrockFullAccess マネージドポリシーを付与
    this.function.role?.addManagedPolicy(
      iam.ManagedPolicy.fromAwsManagedPolicyName('AmazonBedrockFullAccess')
    );

    // BedrockAgentCoreFullAccess マネージドポリシーを付与
    this.function.role?.addManagedPolicy(
      iam.ManagedPolicy.fromAwsManagedPolicyName('BedrockAgentCoreFullAccess')
    );
  }
}
最後にAPIGatewayをストリーミングで作成します。
integrationOptionsでSTREAMを設定するだけです。
interface Props {
  readonly lambdaFunction: lambda.IFunction;
}

export class ApiGateway extends Construct {
  public readonly restApi: apigateway.IRestApi;

  constructor(scope: Construct, id: string, props: Props) {
    super(scope, id);

    const { lambdaFunction } = props;

    // LambdaRestApi作成(ストリーミング対応)
    // すべてのリクエストがLambdaに転送される
    // responseTransferMode: STREAM でストリーミングを有効化(最大15分)
    this.restApi = new apigateway.LambdaRestApi(this, 'RestApi', {
      handler: lambdaFunction,
      restApiName: 'FrontendApi',
      description: 'REST API for Frontend Lambda with response streaming',
      deployOptions: {
        stageName: 'v1',
      },
      integrationOptions: {
        proxy: true,
        responseTransferMode: apigateway.ResponseTransferMode.STREAM, // ストリーミング有効化
        timeout: cdk.Duration.minutes(15), // タイムアウトを15分に設定
      },
    });
  }
}
フロントエンドの実装
HonoXでAPIGatewayにリクエストして結果をストリーミングで表示するようなものを作ります。
クライアントサイドから直接APIGatewayを叩きたくないのでHonoXにバックエンドAPIを作成し、サーバサイドでAPIGatewayを実行するようにします。
import { createRoute } from 'honox/factory'
import { createRoute } from 'honox/factory'
import { stream } from 'hono/streaming'

export const POST = createRoute(async (c) => {
  // フォームからpromptデータを取得
  const body = await c.req.formData()
  const prompt = body.get('prompt')
  // APIGatewayにリクエスト
  const res = await fetch(
    'https://APIGATEWAY_ID.execute-api.ap-northeast-1.amazonaws.com/v1/invoke', // APIGatewayのURL
    {
      method: 'POST',
      headers: { 'Content-Type': 'application/json' },
      body: JSON.stringify({ prompt }),
    }
  )

  // Cloudflare workerでストリーミングするためにヘッダーを設定
  c.header('Content-Encoding', 'Identity')
  // レスポンス
  return stream(c, async (stream) => {
    await stream.pipe(res.body!)
  })
})
次にクライアントサイドでバックエンドAPIの実行と結果のストリーミング表示を実装します。
import { useState } from 'hono/jsx'

export default function Chat() {
  const [response, setResponse] = useState('')

  const handleSubmit = async (e: Event) => {
    e.preventDefault()
    setResponse('')

    // フォームデータを取得
    const formData = new FormData(e.target as HTMLFormElement)
    // バックエンドAPIを実行
    const res = await fetch('/api/invoke', {
      method: 'POST',
      body: formData,
    })

    // ストリーミングで表示
    const reader = res.body!.getReader()
    const decoder = new TextDecoder()
    let text = ''
    while (true) {
      const { done, value } = await reader.read()
      if (done) break
      text += decoder.decode(value, { stream: true })
      setResponse(text)
    }
  }

  return (
    <div>
      <form onSubmit={handleSubmit}>
        <input
          type="text"
          name="prompt"
        />
        <button type="submit">送信</button>
      </form>
      <pre>{response}</pre>
    </div>
  )
}
デプロイ後、フォームから適当な質問をしてみるとストリーミングで結果が返ってくることを確認できます。

さいごに
ストリーミングの実装機会が増えて設計が求められる場面になったら、真っ先にAPIGatewayを提案して行きたいと思ってます。
というか、個人開発から業務の商用環境までAPIGateway&Lambda実装を使いまわして行きたいと思ってます。