みなさん、こんにちは。空中清高です。
突然ですが、ConstraintLayout使っていますか?
ConstraintLayoutは表現力が高く、しかもパフォーマンスもよくて、いいことずくめなViewです。
参考:ConstraintLayout がもたらすパフォーマンスのメリットを理解する
最近はConstraintLayoutばかり使っているのですが、ある日どうしてもConstraintLayoutを使って動的なレイアウトを作成したくなりました。
そういうことってよくありますよね?
そこでいろいろ探しているうちに、コード上からConstraintLayoutの制約を設定するのに便利なConstraintSetを見つけたので紹介したいと思います。
まずはxmlでConstraintLayoutを使う
公式リファレンスにxmlから設定する方法が詳しく載っています。
公式リファレンス
またたくさんの人がxmlで設定して利用する方法を紹介してくれています。
たとえば、「ConstraintLayout」でググってみると
@Yuki312さんの記事や
@tomoima525さんのQiita記事「Androidの新しいLayout、ConstraintLayoutことはじめ」
など画像付きでわかりやすい解説記事がたくさん見つかると思います。
いつも助かっています、ありがとうございます。
コードからConstraintLayoutを設定する
さて本題のコードからConstraintLayoutを設定する方法です。
まずはConstraintLayoutのインスタンスを取得しましょう。
すでにxml等から生成されているならfindViewById()等で探して、これから生成するならコンストラクタで生成します。
val constraintLayout = findViewById(R.id.constraint_layout)
val constraintLayout = ConstraintLayout(context)
こうやって取得したconstraintLayoutのレイアウトを動的に変更したいとします。
たとえばconstraintLayoutの中央にTextViewを追加したくなったら、こう書きます。
// TextViewを生成して追加
val textView = TextView(context).apply { id = View.generateViewId() }
constraintLayout.addView(textView)

// ConstraintSetを生成してConstraintLayoutから制約を複製する
val constraintSet = ConstraintSet()
constraintSet.clone(constraintLayout)

// TextViewを中央にセット
constraintSet.connect(textView.id, ConstraintSet.LEFT, ConstraintSet.PARENT_ID, ConstraintSet.LEFT)
constraintSet.connect(textView.id, ConstraintSet.RIGHT, ConstraintSet.PARENT_ID, ConstraintSet.RIGHT)

// 編集した制約をConstraintLayoutに反映させる
constraintSet.applyTo(constraintLayout)
コードの解説
ConstraintSetはConstraintLayoutの制約を設定するときに便利なクラスです。
デフォルトコンストラクタで生成したあと、cloneを使って制約を編集したいConstraintLayoutから設定を複製してください。
val constraintSet = ConstraintSet()
constraintSet.clone(constraintLayout)
次にConstraintSet#connect(int startID, int startSide, int endID, int endSide)を使って制約を追加します。
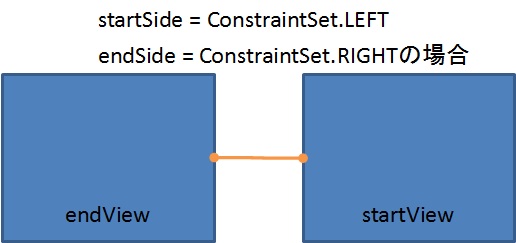
startIDで指定されるviewをstartView、endIDで指定されるviewをendViewとすると、この制約
constraintSet.connect(startID, ConstraintSet.LEFT, endID, ConstraintSet.RIGHT)
は以下の図のようになっています。(橙色の線が制約です)
また、ConstraintSetで制約を編集するときにxmlの"parent"と対応するのはConstraintSet.PARENT_IDです。
なので
constraintSet.connect(textView.id, ConstraintSet.LEFT, ConstraintSet.PARENT_ID, ConstraintSet.LEFT)
constraintSet.connect(textView.id, ConstraintSet.RIGHT, ConstraintSet.PARENT_ID, ConstraintSet.RIGHT)
と書くと、xmlでTextViewに
app:layout_constraintLeft_toLeftOf="parent"
app:layout_constraintRight_toRightOf="parent"
と指定したときと同じ制約になります。
最後に、これまで編集したconstraintSetを反映させるには
constraintSet.applyTo(constraintLayout)
というふうにapplyToを使います。
ConstraintSetの便利メソッド
ConstraintSetのconnectは基本的なメソッドですが、他にも便利なメソッドがたくさんあります。
たとえばconnectに第五引数を渡すと、制約の追加と同時にマージンが指定できますし、clearで制約を消したり、今回の中央寄せのショートカットメソッドcenterHorizontallyなどもあります。
また@takahiromさんがQiita記事で紹介してくれているChainを利用するための
createHorizontalChain,addToHorizontalChain,setHorizontalChainStyleなどや
GuideLineを利用するためのsetGuidelineBegin,setGuidelineEnd,setGuidelinePercentや
GuideLineを生成するConstraintSet#create(int guidelineID, int orientation)などもあります。
このようにxmlで設定できることはConstraintSetで簡単にできるので、
みなさんもぜひConstraintSetを使ってConstraintLayoutの動的なレイアウトを作ってみましょう!
まとめ
- ConstraintLayoutの動的なレイアウトにはConstraintSetが便利
- ConstraintSetはcloneしてapplyToする
- ConstraintSetには便利なメソッドがいっぱい
