TL;DR
大人の事情とやらでPHP5.3.3の環境を用意する必要があったので、
WindowsにDockerを入れて環境を作ろうとした軌跡です。
実行環境
OS:Windows 10 Pro 64bit
RAM:8GB
Docker for Windowsのインストール
以下からダウンロードしてインストールする
Install Docker for Windows | Docker Documentation
Docker Composeの設定
コンテナたちを操る「DockerCompose」を設定していく。
なお手順は以下の公式に載っているので参考にする。
Install Docker Compose | Docker Documentation
まず、Powershellを開く。
In Powershell, since Github now requires TLS1.2, run the following:
とのことなのでPowershell上で以下のコマンドを実行。
PS C:\WINDOWS\system32> [Net.ServicePointManager]::SecurityProtocol = [Net.SecurityProtocolType]::Tls12
Then run the following command to download Docker Compose, replacing $dockerComposeVersion with the specific version of Compose you want to use:
Docker Composeをダウンロードするコマンドを実行。
その際、「$dockerComposeVersionにはDocker Composeのバージョンを入れる」と書いてあるのでその通りにする。
この時GitHubのReleases · docker/composeを 開き、最新のバージョンを確認すること。
以下は2018年3月27日現在の最新版の1.20.1をダウンロードする場合のコマンドです。
Invoke-WebRequest "https://github.com/docker/compose/releases/download/1.20.1/docker-compose-Windows-x86_64.exe" -UseBasicParsing -OutFile $Env:ProgramFiles\docker\docker-compose.exe
ダウンロード終了後、以下のページを参考にdocker-compose.ymlを作成する。
Compose file structure and examples
Docker実行例
以下に記すのはitaloc/php53を入れたときの実行例です。
(デスクトップ上にphp53フォルダを作り、その中にdocker-compose.ymlを置いてある状態です。)
version: "3"
services:

  www:
    image: italoc/php53
    ports:
      - "8080:80"
    volumes:
      - .:/var/www/html
DBとかを入れる際もこのymlファイルに記述していく。
コマンドはPowershellで実行していきます。
PS C:\Users\sola\Desktop\php53> ls


    ディレクトリ: C:\Users\sola\Desktop\php53


Mode                LastWriteTime         Length Name
----                -------------         ------ ----
-a----       2018/03/26     20:16             91 docker-compose.yml


PS C:\Users\sola\Desktop\php53> docker-compose up
Creating network "php53_default" with the default driver
Pulling www (italoc/php53:latest)...
latest: Pulling from italoc/php53
7b52546cd236: Pull complete
8ba2efcfb1a8: Pull complete
ce75f2b5ec84: Pull complete
3093a6f5a720: Pull complete
506db9d11bc6: Pull complete
Digest: sha256:*******************
Status: Downloaded newer image for italoc/php53:latest
Creating php53_www_1 ... done
Attaching to php53_www_1
www_1  | httpd: Could not reliably determine the server's fully qualified domain name, using 172.18.0.2 for ServerName
Gracefully stopping... (press Ctrl+C again to force)
Stopping php53_www_1 ...
Killing php53_www_1 ... done

PS C:\Users\sola\Desktop\php53> docker ps
CONTAINER ID        IMAGE               COMMAND             CREATED             STATUS              PORTS               NAMES

PS C:\Users\sola\Desktop\php53> docker ps -a
CONTAINER ID        IMAGE               COMMAND                  CREATED             STATUS                        PORTS               NAMES
ebc8039e1494        italoc/php53        "/bin/sh -c 'exec /u…"   2 minutes ago       Exited (137) 15 seconds ago                       php53_www_1

PS C:\Users\sola\Desktop\php53>
http://localhost:8080/
を開く。
「Apache 2 Test Page powered by CentOS」みたいなページが表示されれば成功
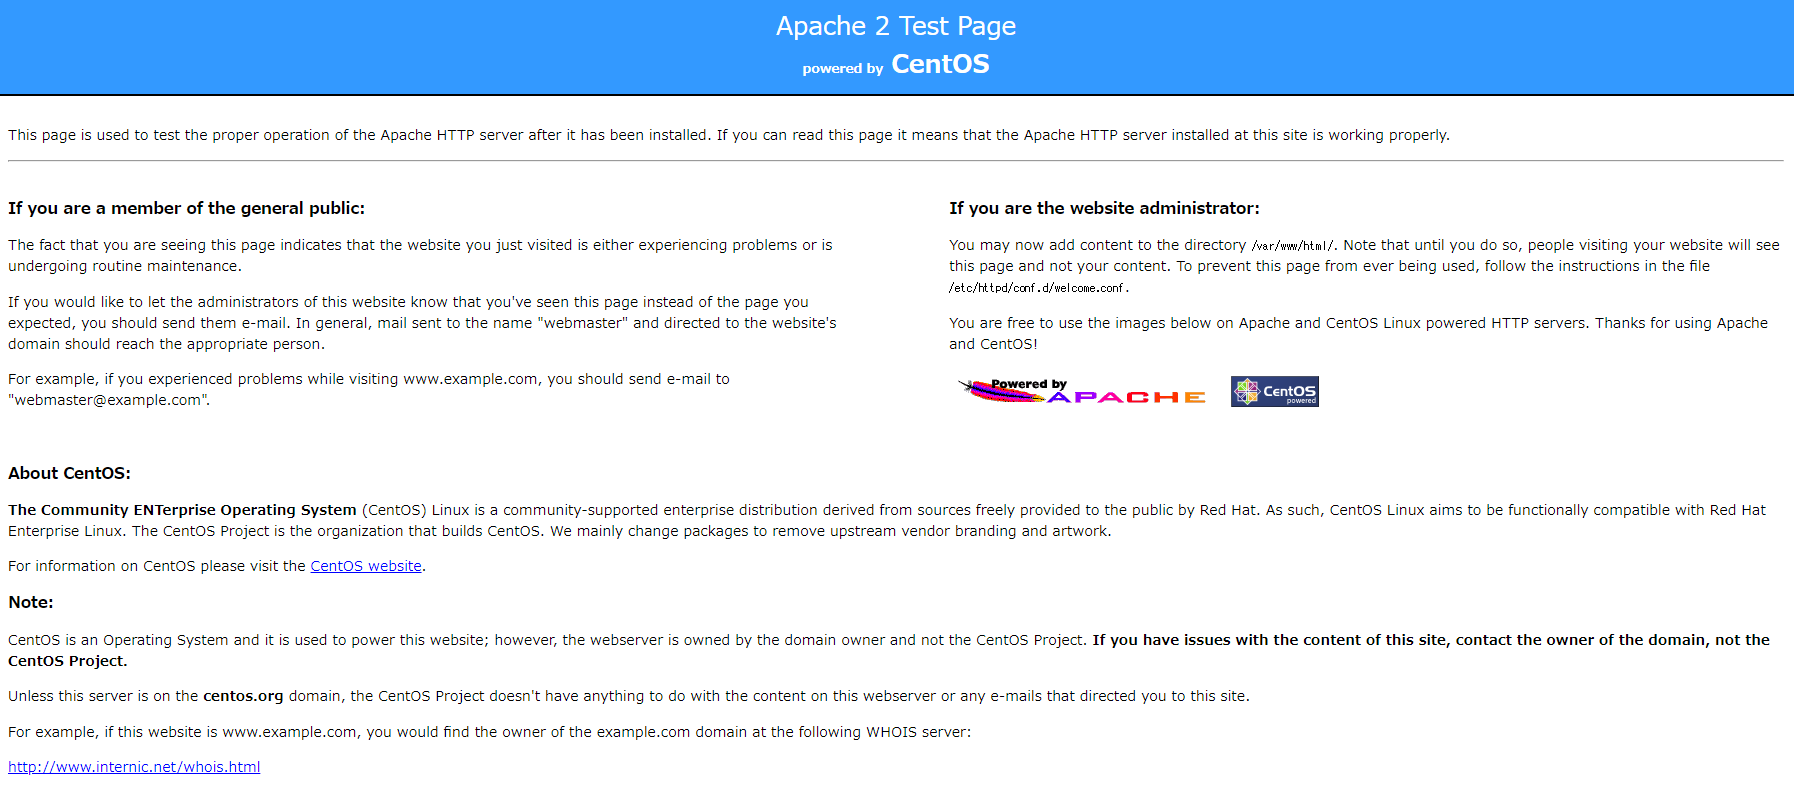
この場合は「php53」フォルダのルートがドキュメントディレクトリになるので、適当にindex.htmlなどを作成して表示されるかも確認してください。
ついでにMySQL5.1.73を入れる
vsamov/mysql-5.1.73 - Docker Hub が環境にドンピシャだったんでこれを使用する。
まずイメージ取得
Microsoft Windows [Version 10.0.16299.309]
(c) 2017 Microsoft Corporation. All rights reserved.

C:\Users\sola>docker pull vsamov/mysql-5.1.73
Using default tag: latest
latest: Pulling from vsamov/mysql-5.1.73
30d541b48fc0: Pull complete
8ecd7f80d390: Pull complete
46ec9927bb81: Pull complete
2e67a4d67b44: Pull complete
7d9dd9155488: Pull complete
0b0a5e453b33: Pull complete
e8a67e96f27e: Pull complete
1a233fe4e788: Pull complete
679cc5f63dfc: Pull complete
cb730efe6d35: Pull complete
7d5b1100bc65: Pull complete
Digest: sha256:ef03d57334761ca1e3d93cbd9f83ee1f93dafd7cac74203fbf97f20ac098c82b
Status: Downloaded newer image for vsamov/mysql-5.1.73:latest
mysqlサーバインスタンスを起動する
C:\Users\sola>docker run -d --name mysql-5.1.73 -p 3307:3306 -e MYSQL_ROOT_PASSWORD=[password] vsamov/mysql-5.1.73:latest
**********************************************
動作中のコンテナ確認
C:\Users\sola>docker ps
CONTAINER ID        IMAGE                        COMMAND                  CREATED             STATUS              PORTS                           NAMES
6b84ca917d1a        vsamov/mysql-5.1.73:latest   "/entrypoint.sh mysq…"   23 seconds ago      Up 21 seconds       0.0.0.0:3307->3306/tcp          mysql-5.1.73
1ac16b346422        italoc/php53                 "/bin/sh -c 'exec /u…"   5 hours ago         Up 18 minutes       443/tcp, 0.0.0.0:8080->80/tcp   php53_www_1
MySQLのDBを見に行く
C:\Users\sola>docker exec -it mysql-5.1.73 bash
root@6b84ca917d1a:/usr/local/mysql# mysql --version
mysql  Ver 14.14 Distrib 5.1.73, for unknown-linux-gnu (x86_64) using readline 5.1
root@6b84ca917d1a:/usr/local/mysql# mysql -u root -p
Enter password:
Welcome to the MySQL monitor.  Commands end with ; or \g.
Your MySQL connection id is 7
Server version: 5.1.73 MySQL Community Server (GPL)

Copyright (c) 2000, 2013, Oracle and/or its affiliates. All rights reserved.

Oracle is a registered trademark of Oracle Corporation and/or its
affiliates. Other names may be trademarks of their respective
owners.

Type 'help;' or '\h' for help. Type '\c' to clear the current input statement.

mysql> show databases;
+--------------------+
| Database           |
+--------------------+
| information_schema |
| mysql              |
+--------------------+
2 rows in set (0.00 sec)

mysql>
これでおーけーかな
ちなみにAdminerなどからMySQLに接続する場合は
上の例で行くとホストを**172.17.0.1:ポート番号(3307)**に指定しないと入れない。
エラーが出た場合の確認箇所とか解消方法とか
「Hyper-V feature is not enabled」みたいなエラーが出る。
Hyper-Vが有効になっていない為、PCを再起動させて有効にする必要がある。
しかし、既にVagrantを使ってるなら問題があります
BIOSの仮想化設定を有効にする
これはVagrantを使用していたなら有効になっているはずです。
設定する場合はBIOS上で設定する必要があります。
docker-compose up で「blocked by a firewall」というエラーがでた
↓こんな感じのエラーが出た場合は、おそらくセキュリティソフトのファイアウォール設定が原因です。
PS C:\Users\sola\Desktop\php53> docker-compose up
Recreating ebc8039e1494_php53_www_1 ... error

ERROR: for ebc8039e1494_php53_www_1  Cannot create container for service www: Drive sharing seems blocked by a firewall

ERROR: for www  Cannot create container for service www: Drive sharing seems blocked by a firewall
ERROR: Encountered errors while bringing up the project.
偉大な先人たちが対策を書いてくれています。
docker-compose up で「mkdir /host_mnt/c: file exists」というエラーがでた
PS C:\work\php53> docker-compose up
Creating network "php53_default" with the default driver
Creating php53_www_1 ... error

ERROR: for php53_www_1  Cannot start service www: error while creating mount source path '/host_mnt/c/work/php53': mkdir /host_mnt/c: file exists

ERROR: for www  Cannot start service www: error while creating mount source path '/host_mnt/c/work/php53': mkdir /host_mnt/c: file exists
ERROR: Encountered errors while bringing up the project.
こんな感じのエラーが出た場合は、Dockerを開き、「Shared Drive」のCドライブにチェックを入れて「Apply」を押すと恐らく大丈夫。
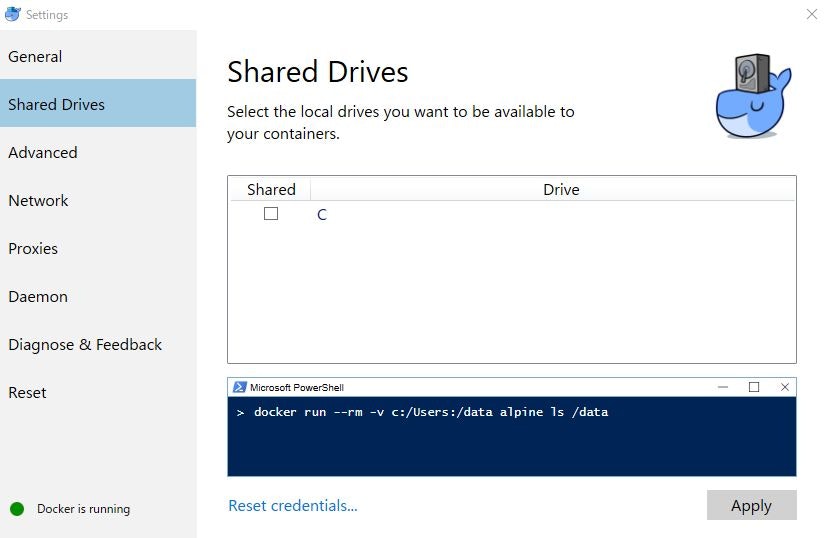
(環境によって異なるかもしれません)
「Firewall detected」というエラーがでた
セキュリティソフトがESETの場合、445ポートの開放に加えて、次の画面から対象のデバイスのブロックを解除する必要があるみたいです。
(自分はこれで解消しました。)
ESETを開き左メニューの「設定」を開く。
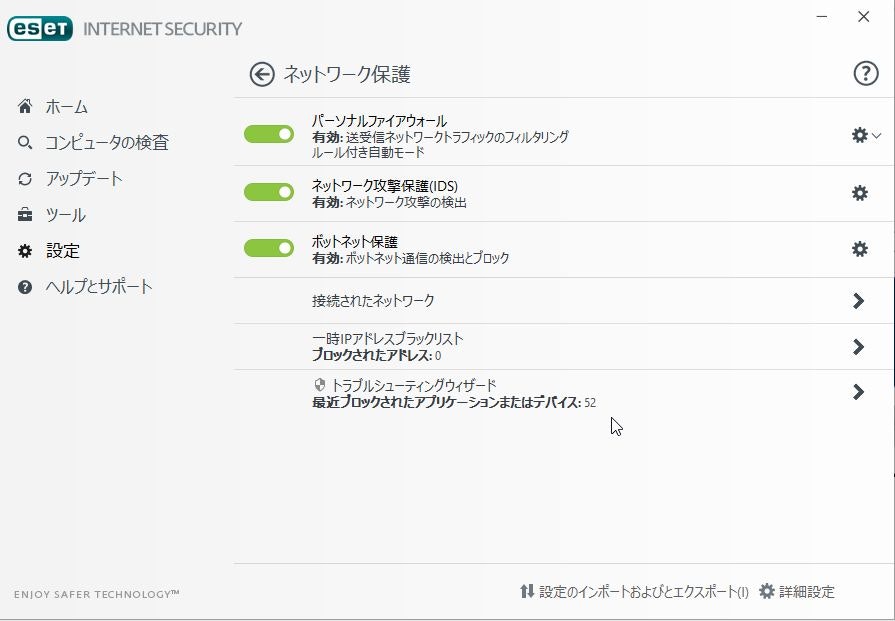
「最近ブロックされたアプリケーションまたはデバイス」を開くとずらっとデバイス一覧がでてくるので、
**10.0.75.2 (dockerのデフォルト設定IP)**を探し出す。

こいつを「ブロック解除」する。
これでOKなはず。
↓ちなみに以下を参考にしました。
Settings to Windows Firewall to allow Docker for Windows to share drive - Stack Overflow
docker-compose upで「ERROR: Windows named pipe error: 指定されたファイルが見つかりません。 (code: 2)」エラー
docker立ち上がってなくないですか??
「Docker is running」になってからdocker-compose upしましょう
【番外】おもむろに vagrant up したらブルースクリーンが表示された
既に構築してあるVagrantを起動しようとするといきなりブルースクリーンになります。
原因はdockerインストール時に有効にした「Hyper-V」らしい。
以下参考
- Windows10(Virtualbox/Vagrant構築済)にDockerを立てると既存VMがコケる – WordPress×MicrosoftAzure/AMAZON AWS×kintone | ニシインターナショナル 名古屋市瑞穂区
- Windows 10 で Vagrantが落ちる原因は、Hyper-Vだった - H2O blog
- VirtualBoxとHyper-V(Docker for Windows)は共存できない? - 速さこそ正義
偉大な先人が便利なものを作ってくださっているので使わせてもらうことにします
再起動を避けられないのはいたいですね・・・
おわり
- ここまで長かった・・・スペシャルサンクスえろい人
- 単純にコンテナひとつだけだとDockerコマンドでいけるけどDocker Compose使った方が楽みたいなんでDocker Compose使ってます。
- 勉強中なので不備があるかもしれません。あしからず
いまどきPHP5.3.3ってなんやねん