メール確認機能(Email Verification)を実装する
よくWebサービスにある
「登録できたけど仮登録状態だよ!入力されたメールアドレス宛にメール送信したからそこに書いてあるURLから本登録済ませてね!」
ってやつを実装していくぞ、ていう感じです(ついでに日本語化もしていきます)
実装例
Laravel5.7系から実装されているみたいですがここではLaravel5.8系で実装していきます。
認証系の実装(スキャフォールディング)
まず初めにmake:authコマンドでパッと認証系の実装を済ませる
php artisan make:auth
このコマンドでユーザー登録・ログイン・パスワードリセット機能が数秒で出来上がります。
Userモデルの確認と追記
おそらくLaravelインストールした状態で以下のUserモデルはデフォルトで準備されていると思います。
ので、そこに追記でMustVerifyEmailをimplementsします。(インターフェイス実装)
<?php

namespace App;

use Illuminate\Notifications\Notifiable;
use Illuminate\Contracts\Auth\MustVerifyEmail; // デフォルトでuseされていますが一応確認
use Illuminate\Foundation\Auth\User as Authenticatable;

class User extends Authenticatable implements MustVerifyEmail // MustVerifyEmailをimplements
{
    use Notifiable;

    // ...
}
DB生成(マイグレート)
デフォルトで用意されているusersテーブルを作成する
php artisan migrate
route(ルート)の変更
デフォルトで追加されているAuth::routes();を以下のように変更
// Auth::routes();
Auth::routes(['verify' => true]);
このあたりカスタマイズする場合は以下のようにかけたりします
例:メール認証済みかつログイン済みのユーザーが見れるようにする
Route::middleware('verified')->group(function () {
    Route::group(['middleware' => 'auth:user'], function () {
        // メール認証済みかつログイン済みのユーザーが見れる画面
        Route::get('/home', 'HomeController@index')->name('home');
    });
});
これで一応メール確認機能の実装は完了です。
ですが、デフォルトではすべて英語表記なので日本語化していきます。
確認メール機能のカスタマイズ(日本語化対応)
主に以下を行います
- メール未認証時の画面の文言
- メールをオリジナルなものに変更かつ文言の日本語化
メール未認証時の画面の文言の日本語化
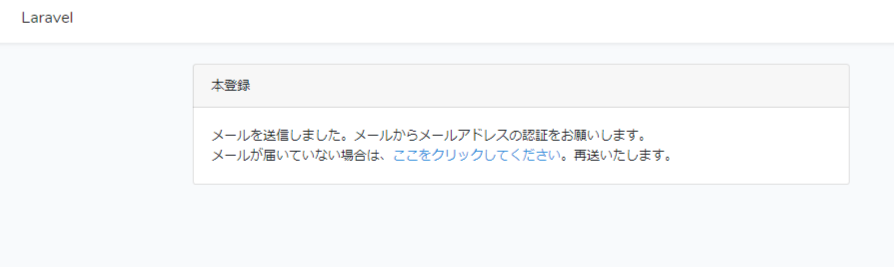
resources\views\auth\以下に生成されているverify.bladeを日本語化するために以下のように変更
@extends('layouts.app')

@section('content')
<div class="container">
    <div class="row justify-content-center">
        <div class="col-md-8">
            <div class="card">
                <div class="card-header">本登録</div>

                <div class="card-body">
                    @if (session('resent'))
                        <div class="alert alert-success" role="alert">
                            メールが送信されました。
                        </div>
                    @endif

                    メールを送信しました。メールからメールアドレスの認証をお願いします。<br>
                    メールが届いていない場合は、<a href="{{ route('verification.resend') }}">ここをクリックしてください</a>。再送いたします。
                </div>
            </div>
        </div>
    </div>
</div>
@endsection
以下のような感じになります。
メールをオリジナルなものに変更かつ文言の日本語化
まずは以下のArtisanコマンド実行
php artisan make:notification VerifyEmailJapanese
すると以下のapp\Notifications\にVerifyEmailJapaneseクラスが作成されるので、
その中のtoMailメソッドを以下のように変更していきます。
    /**
     * Get the mail representation of the notification.
     *
     * @param  mixed  $notifiable
     * @return \Illuminate\Notifications\Messages\MailMessage
     */
    public function toMail($notifiable)
    {
        return (new MailMessage)
            ->subject(Lang::getFromJson('登録確認メール')) // メールのタイトル
            ->markdown('emails.verifyemail', ['url' => $this->verificationUrl($notifiable), 'user' => $notifiable]);
    }
resources\views\emails\以下にメール用のテンプレートverifyemail.bladeを作成し日本語化していきます。
以下の例ではbladeの中でMarkdownを使用してメールの文言を書いてます。
@component('mail::message')

@if (!empty($user->name))
    {{ $user->name }} さん
@endif

** 以下の認証リンクをクリックしてください。 **

@component('mail::button', ['url' => $url])
メールアドレスを認証する
@endcomponent

---

※もしこのメールに覚えが無い場合は破棄してください。

---

@if (!empty($url))
###### 「ログインして本登録を完了する」ボタンをクリックできない場合は、下記のURLをコピーしてWebブラウザに貼り付けてください。
###### {{ $url }}
@endif

@endcomponent
最後にUesrモデルでsendEmailVerificationNotificationメソッドのオーバーライドし、日本語化したメールを送信させるようにします。
    /**
     * Send the email verification notification.
     *
     * @return void
     */
    public function sendEmailVerificationNotification()
    {
        // 日本語化したメールを送信
        $this->notify(new \App\Notifications\VerifyEmailJapanese);
    }
デフォルトの登録機能を使用する場合はこのままでいいのですが、別のコントローラーを使用する場合は別途対応する必要があります。
例えばUsersControllerのstoreメソッドで登録処理が成功した場合にメールを送信する場合はこんな感じになるのかなと
<?php

namespace App\Http\Controllers;

use App\User;
use Illuminate\Http\Request;
use Illuminate\Auth\Events\Registered;

class UsersController extends Controller
{

    /**
     * Store a newly created resource in storage.
     *
     * @param  \Illuminate\Http\Request  $request
     * @return \Illuminate\Http\Response
     */
    public function store(Request $request)
    {
        // ...

        // 登録処理
        $user = new User();
        if ($user->fill($request->all())->save()) {
            // メール確認の為の仮登録完了メール送信
            event(new Registered($user));
        }

        // ...
    }
メールが以下のような感じになります。

ちなみに
ユーザー登録処理の完了時に確認メールを送信するようにしている(イベントのフック)のはEventServiceProviderクラスです
<?php

namespace App\Providers;

use Illuminate\Support\Facades\Event;
use Illuminate\Auth\Events\Registered;
use Illuminate\Auth\Listeners\SendEmailVerificationNotification;
use Illuminate\Foundation\Support\Providers\EventServiceProvider as ServiceProvider;

class EventServiceProvider extends ServiceProvider
{
    /**
     * The event listener mappings for the application.
     *
     * @var array
     */
    protected $listen = [
        Registered::class => [
            SendEmailVerificationNotification::class, // これ
        ],
    ];

    /**
     * Register any events for your application.
     *
     * @return void
     */
    public function boot()
    {
        parent::boot();

        //
    }
}
おわり
- 思った以上に便利だこれ