本記事の目的
Vue の変数の扱い方を整理してより,使いこなせるようになること.
登場人物たち
登場人物たちを簡単に嚙み砕いて紹介します.
| 登場人物 | 説明 |
|---|---|
| マスタッシュ構文 | 「{{ 変数名 }}」で Vue に定義した変数をコンポーネントやテンプレートに埋め込む |
| v-bind | 変数をコンポーネントの props や,HTML の属性に渡すために使用する |
| ref | 変数をリアクティブにする関数 |
| v-model | フォーム入力要素またはコンポーネントで入力した値を簡単に双方向バインディングするために使用する |
| Computed プロパティ | 定義済みの変数を加工する |
| Watcher | リアクティブな変数,Computed プロパティの変更を監視し,変更を検知した場合に処理をする |
| props | 親から子に変数を渡すために使用 |
| emit | 子から親にイベントを通知するために使用 |
マスタッシュ構文
script タグ内で定義された message の値が,
template タグ内の p タグで {{ message }} のようにきさいされてます.
これで,message の値 Hello World が画面に表示されました.
v-bind
変数をコンポーネントの props や,HTML の属性に渡すために使用します.
下記の例では,script タグ内の変数 link に URL を代入しています.
これを template タグ内の a タグ内で href 属性に link の値を渡しています.
<script setup>
  const link = 'https://qiita.com/';
<script>
<template>
  <div>
      <a v-bind:href="link">Qiita</a>
  </div>
</template>
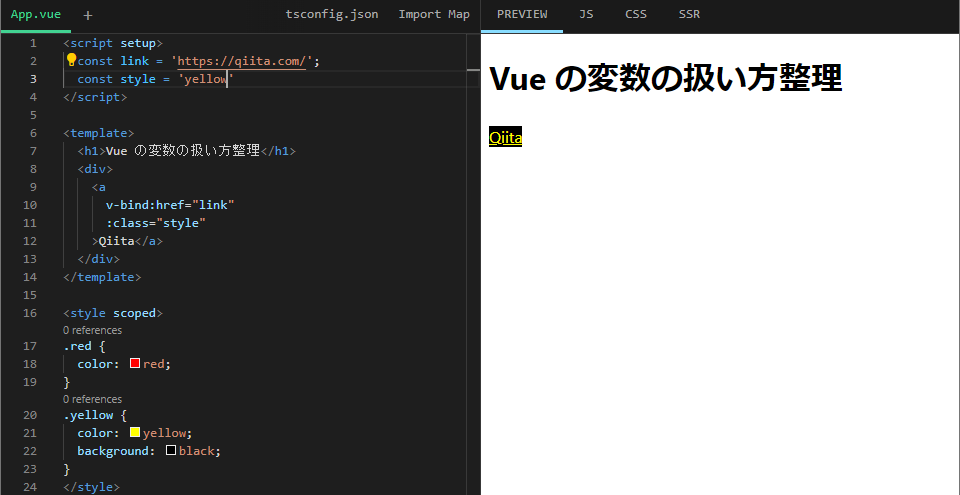
次の例として,class 属性に値を渡してみます.
下記の例では,変数 style を class 属性に渡しています.
style の値が red なので,class が red になり,
red クラスのスタイルが適用されて赤字になっています.
sytle の値を yellow にすると下のようになります.

<script setup>
  const link = 'https://qiita.com/';
  const style = 'yellow'
</script>

<template>
  <h1>Vue の変数の扱い方整理</h1>
  <div>
    <a
      v-bind:href="link"
      :class="style"
    >Qiita</a>
  </div>
</template>

<style scoped>
.red {
  color: red;
}
.yellow {
  color: yellow;
  background: black;
}
</style>
class 属性に変数を渡す方法は他にもあるのですが,
情報量が多くなるのでここでは割愛します.
ref
変数をリアクティブにする関数です (?)
まずリアクティブってなんだよ...となるので説明します.
Vue にはリアクティビティシステムという仕組みがあります.
ref を使用した変数に変更があった時,
Vue が自動的にその変更を検知し,
それに応じて DOM を更新する仕組みです.
つまりは,ref を使うとその変数の変更を自動的に検知して、DOM を更新するよってことですね.
ということで使用例です.
以下ではボタンを押下すると,ref でリアクティブになった変数 count の値を二乗する例です.
尚,ref を使用しない場合は count の表示は変更されません.
<script setup>
  import { ref } from 'vue';
  const count = ref(2);

  const squaredCount = () => {
    count.value = count.value ** 2;
  };

</script>

<template>
  <h1>Vue の変数の扱い方整理</h1>
  <button
    type="button"
    @click="squaredCount"
  >
  count is: {{ count }}
  </button>
</template>
v-model
フォームで入力したタイミングで,入力した値を反映させたい場合,以下の設定が必要です.
- value 属性に v-bind で変数を渡す(バインド)
- 入力された値を,value 属性にバインドした変数に代入する
<input
  :value="text"
  @input="event => text = event.target.value">
これを簡単にするのが v-model です.
なんと,v-model="バインドする変数"だけで先ほどの挙動ができます.
<input v-model="text">
ということでこちら例です.
入力フォームで入力した値が,変数 message に即座に格納されます.
Click ボタンを押下するとコンソールに変数 message の値が出力されるのでそれで確認できます.
尚,画面の p タグの箇所には変数 message の初期値「Yeah!」が表示されたままになっています.
変数 message はリアクティブではないので,値が変わっていても画面には反映されません.
<script setup>
  let message = 'Yeah!';

  const clickButton = () => {
    console.log(message);
  };
</script>

<template>
  <h1>Vue の変数の扱い方整理</h1>
  <p>{{ message }}</p>
  <input v-model="message" />
  <div><button @click="clickButton">Click</button></div>
</template>
使用できるのは下記に限定される点が注意です.
あくまで,入力に使うディレクティブということですね.
<input><select><textarea>
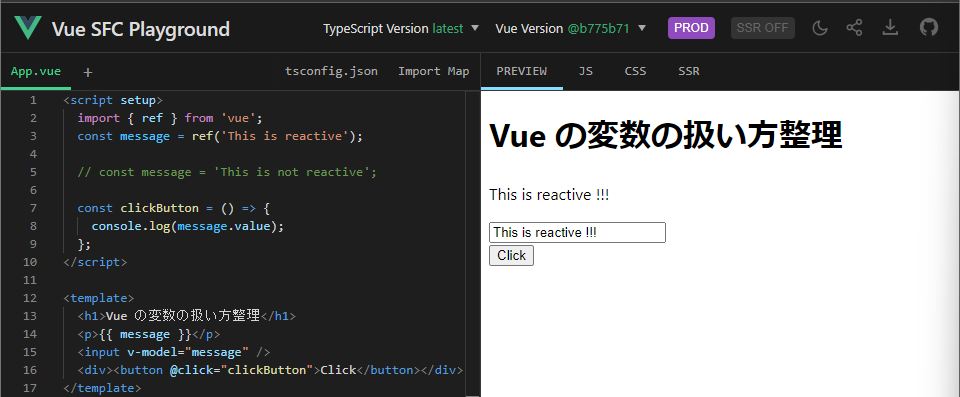
ということで次は,入力した値を画面に表示する例です.
リアクティブにすると変更が即座に反映されます.
<script setup>
  import { ref } from 'vue';
  const message = ref('This is reactive');

  // const message = 'This is not reactive';

  const clickButton = () => {
    console.log(message.value);
  };
</script>

<template>
  <h1>Vue の変数の扱い方整理</h1>
  <p>{{ message }}</p>
  <input v-model="message" />
  <div><button @click="clickButton">Click</button></div>
</template>
3 つの修飾子
修飾子をつけることで v-model の動作を変更できます.
| 修飾子 | 説明 |
|---|---|
| lazy | 入力毎ではなく,input 要素からカーソルを外した時に変更を反映する(input イベントではなく,change イベントに変更する) |
| trim | 先頭と最後の空白をトリミングする |
| number | 入力した値を文字列ではなく数値(Number)として扱う |
ということで使用例です.
<script setup>
import { ref } from 'vue'
  const inputLazy = ref('カーソルを外したら反映')
  const inputTrim = ref('先頭・最後の空白を削除')
  const inputNumber = ref('0123')

</script>

<template>
  <h1>Vue の変数の扱い方整理</h1>
  <p>lazy : {{ inputLazy }}</p>
  <input v-model.lazy="inputLazy" />
  <p>trim : {{ inputTrim }}</p>
  <input v-model.trim="inputTrim" />
  <p>number : {{ inputNumber }}</p>
  <input v-model.number="inputNumber" type="text"/>
</template>
Computed プロパティ
Computed プロパティは定義済みの変数を加工し,元のデータとは異なる形でユーザに表示することができる機能。
なんのこっちゃなので,とりあえず例です.
<script setup>
  import { computed } from 'vue';
  const users = [
    { id: 1, name: 'taka', admin: true },
    { id: 2, name: 'tora', admin: false },
    { id: 3, name: 'batta', admin: false },
  ];

  const adminUsers = computed(() =>
    users.filter((user) => user.admin === true)
  );
</script>

<template>
  <h1>Vue の変数の扱い方整理</h1>
  <div v-for="user in adminUsers" :key="user.id">
    <div>{{ user.id }} {{ user.name }} </div>
  </div>
</template>
reactive な変数を利用して Computed プロパティを定義した場合は reactive な変数が更新されるとその更新に合わせて再計算、再加工が自動で行われます.
下記の例では,入力した値の変更を検知し,再度 f と l を結合させて返しています.
<script setup>
  import { reactive, computed } from 'vue';
  const user = reactive({
    f: '苗字',
    l: '名前',
  });

  const full = computed(() => `${user.f} ${user.l}`);
</script>

<template>
  <h1>Vue の変数の扱い方整理</h1>
  <h2>fullName: {{ full }}</h2>
  <p>input first name</p>
  <input v-model="user.f" />
  <p>input last name</p>
  <input v-model="user.l" />
</template>
キャッシュ機能
関連のある変数が変更された時のみ,再計算・再加工をするキャッシュ機能があります.
以下の例では,通常の関数と,Computed 関数を使用した比較です.
どちらもリアクティブな変数 user を加工する関数です.
ボタン押下でリアクティブな変数 count の値を変更しています.
ボタン押下のたびに,通常の関数は実行されますが,
Computed 関数は関連がない変数の変更なので実行されませぬ.
<script setup>
import { ref, reactive, computed } from 'vue';
const count = ref(0);

const clickBtn = () => {
  count.value += 1;
}

const user = reactive({
  firstName: 'John',
  lastName: 'Doe',
});

const fullName = () => {
  console.log('Function');
  return `${user.firstName} ${user.lastName}`;
};
const cFullName = computed(() => {
  console.log('Computed Propety');
  return `${user.firstName} ${user.lastName}`;
});
</script>

<template>
  <h1>Vue の変数の扱い方整理</h1>
  <h2>fullName: {{ fullName() }}</h2>
  <h2>cFullName: {{ cFullName }}</h2>
  <button
    @click="clickBtn"
  >
  cnt: {{ count }}
  </button>
</template>
Computed まとめ
- 既に定義されている変数を加工して返す
- リアクティブな変数を加工する場合,その変数に変更があった時自動で再加工して返す
- キャッシュ機能があり,関連のある変数が変更された時だけ再加工して返す
- Computed で加工した変数はリードオンリーで,直接書き込みたい時は Setter と getter を使う
Watcher
リアクティブな変数,Computed プロパティの変更を監視し,
変更を検知した場合に別の処理をするのがこれです.
watch(監視する変数, (変更後の値, 変更前の値) => {
  console.log('count:', count);
  console.log('previousCount:', previousCount);
});
では例を見てみましょう.
ボタン押下すると,
変更後の値,変更後の値,変更後の値を更に加工した値をコンソールに出力します.
<script setup>
import { ref, watch } from 'vue';

const count = ref(0);

watch(count, (count, pre) => {
  console.log('count:', count);
  console.log('pre:', pre);
  count += 2;
  console.log('count + 2:', count);
});
</script>

<template>
  <h1>Vue の変数の扱い方整理</h1>
  <button @click="count++">Count:{{ count }}</button>
</template>
props
親コンポーネントから子コンポーネントに変数を渡すために使用します.
子で,props の定義をして,
親で,子で定義された変数名に値を渡します.
数値,真理値,リアクティブな変数を渡すときは,
v-bind を使用します.
<script setup>
import { ref } from 'vue';
import Child from './Child.vue';

const parentRef1 = ref('papa');
const parentBtn1 = () => {
  parentRef1.value += '[pa]'
}
</script>

<template>
  <h1>Vue の変数の扱い方整理</h1>
  <Child
    msg1="親から子に渡したい値"
    msg3="入力必須"
    :num1="29"
    :bool1="true"
    :childRef1=parentRef1
  />
  <button @click="parentBtn1">parentRef1</button>
</template>
<script setup>
import {computed} from 'vue';
const props = defineProps({
    msg1: String,
    msg2: {
        type: String,
        default: 'デフォルトあり'
    },
    msg3: {
        type: String,
        required: true
    },
    num1: Number,
    bool1: Boolean,
    childRef1: String,
});

</script>

<template>
  <h2>親からもらった値を扱う</h2>
  <p>{{ props.msg1 }}</p>
  <p>{{ props.msg2 }}</p>
  <p>{{ props.msg3 }}</p>
  <p>{{ props.num1 + 1}}</p>
  <p>{{ props.bool1 === true}}</p>
  <p>{{ props.childRef1}}</p>
</template>
emit
親→子には変数を渡せますが,子→親には変数をわたせません.
困りました...そこで子から親にリアクティブな変数を更新して欲しいですよと伝える機能を使います.これが emit です.
何はともあれこちらをご覧ください.
<script setup>
import { ref } from 'vue'
import Child from './Child.vue'

const parentRef = ref('init')
const val = ref(100)

const handleEvent = (args) => {
  parentRef.value = 'changed!';
  val.value = args.arg1
}
</script>

<template>
  <h1>Vue の変数の扱い方整理</h1>
  <Child
    @childEvent="handleEvent"
    :childProps=parentRef
    :val=val
  />
</template>
<script setup>
    const props = defineProps({
        childProps: String,
        val: Number
    })

    const emit = defineEmits(['childEvent']);

    const sendNotification = () => {
        emit('childEvent', {arg1:props.val + 20});
    }
</script>

<template>
    <div>
        <h2>子コンポーネント</h2>
        <p>Emit: {{ props.childProps }}</p>
        <p>{{ props.val }}</p>
        <button @click="sendNotification">通知</button>
    </div>
</template>
子コンポーネントで表示されている通知ボタン押下すると,
親コンポーネントに通知を送ります.
また,この時引数も渡します.
この例では親からもらった val に 20 を足して親に渡してます.
通知を受け取った親は parentRef の値を変え,val に子から渡された引数を代入します.
最後に
色々と変数の扱い方を見てまいりました.
他にもまだ残っているので時間を見つけ次第追記できたら良いなと思います.


