この記事はZYYX Advent Calendar 2019の22日目の記事です。
今回はRustでJavaのClassファイルを読むプログラムを作成したので(まだすべてのパターンに対応したわけではありませんが)そのプログラムの紹介をします。(N番煎じ感半端ないですが、自分のアウトプットの練習、めもなどもかねて記事としました)
実行環境
この記事では以下の環境で動作確認しています。
- OS: MacOS (Catalina 10.15.2)
- Java: adoptOpenJdk(11.0.5+10)
- Rust: rustc 1.39.0 (4560ea788 2019-11-04)
Classファイルリーディング
JavaのClassファイル
一般的に知られているように、Javaはコンパイラによってソースコードを中間言語に変換し、それをJava VMと呼ばれる仮想マシン上で実行することで実行されます。この中間言語はバイトコードなどと呼ばれており、javaの拡張子のソースコードをjavacでコンパイルし生成されたclassの拡張子のファイルのことを指します。
Classファイルの生成
まずは実装するにあたってテスト的に読んでいくClassファイルを用意します。
class Test {
    public static void main(String [] args) {
        int a = 0;
        int b = 3;

        int c = a + b;
    }
}
なんてことはない変数に一時的に保存した値を足し算するプログラムです。上記のコードでコンパイルして生成されたファイルを読んでいく対象とします。上記のコードをTest.javaというファイルで保存し、以下のコマンドを実行します。
$ javac Test.java
上記のコマンドが成功すると同じディレクトリにTest.classが生成されます。Macのターミナルで xxd Test.class と叩くと以下のように出力されるかと思います。
00000000: cafe babe 0000 0037 000f 0a00 0300 0c07  .......7........
00000010: 000d 0700 0e01 0006 3c69 6e69 743e 0100  ........<init>..
00000020: 0328 2956 0100 0443 6f64 6501 000f 4c69  .()V...Code...Li
00000030: 6e65 4e75 6d62 6572 5461 626c 6501 0004  neNumberTable...
00000040: 6d61 696e 0100 1628 5b4c 6a61 7661 2f6c  main...([Ljava/l
00000050: 616e 672f 5374 7269 6e67 3b29 5601 000a  ang/String;)V...
00000060: 536f 7572 6365 4669 6c65 0100 0954 6573  SourceFile...Tes
00000070: 742e 6a61 7661 0c00 0400 0501 0004 5465  t.java........Te
00000080: 7374 0100 106a 6176 612f 6c61 6e67 2f4f  st...java/lang/O
00000090: 626a 6563 7400 2000 0200 0300 0000 0000  bject. .........
000000a0: 0200 0000 0400 0500 0100 0600 0000 1d00  ................
000000b0: 0100 0100 0000 052a b700 01b1 0000 0001  .......*........
000000c0: 0007 0000 0006 0001 0000 0001 0009 0008  ................
000000d0: 0009 0001 0006 0000 002d 0002 0004 0000  .........-......
000000e0: 0009 033c 063d 1b1c 603e b100 0000 0100  ...<.=..`>......
000000f0: 0700 0000 1200 0400 0000 0300 0200 0400  ................
00000100: 0400 0600 0800 0700 0100 0a00 0000 0200  ................
00000110: 0b                                       .
Java Specification
Javaのバイトコードを読むにあたって避けて通れないのはJava Specificationの存在でしょう。(英語苦手マンの私にはとてもつらい所業です)これはJava VMなどのJavaに関わる仕様を取りまとめたドキュメントになっており、Java VMなどを実装するにあたってこの仕様を準拠する必要があります。
今回はJava 11のバイトコードを読んでいくので、The Java® Virtual Machine Specification Java SE 11 EditionのChapter 4. The class File Formatを見ていきます。
まず 4.1. The ClassFile Structure にclassファイルの構造の説明があります。
ClassFile {
    u4             magic;
    u2             minor_version;
    u2             major_version;
    u2             constant_pool_count;
    cp_info        constant_pool[constant_pool_count-1];
    u2             access_flags;
    u2             this_class;
    u2             super_class;
    u2             interfaces_count;
    u2             interfaces[interfaces_count];
    u2             fields_count;
    field_info     fields[fields_count];
    u2             methods_count;
    method_info    methods[methods_count];
    u2             attributes_count;
    attribute_info attributes[attributes_count];
}
u4, u2はunsignedの4bit, 2byteのことです。先頭4byteがmagic, 次2byteにminor_version, major_version, constant_pool_countが続く構造となっているようです。
magic
ドキュメントのmagicの項目を見ると0xCAFEBABEの固定の数値が来るようです。Classファイルか判別するためのマジックナンバーなのでしょう。実際にxxdした結果の先頭4byteがcafe babeになってています。
minor_version, major_version
次のminor_version, major_versionはClassファイル自体のバージョン番号を示すようです。Java VMのバージョンによって実行できるclassファイルのバージョンが決まっているので、ここで判定しているようです。ちなみに対応表はドキュメントのTable 4.1-Aにあります。
xxdした結果を見ると、0x0000 0x0037 がそれに当たります。minor_versionが0, major_versionが55となってます。
constant_pool_count
名前の通り後述するconstant_poolの数を表します。
xxdした結果だと、0x000fで、10進の15です。
constant_pool
この辺りから英語を読むのが辛くなってきたのでだいぶ曖昧理解になります。constant_poolはStringの定数やclass, interface, fieldの名前などを持ちます。この定義はドキュメントの4.4(cp_info)にあります。先頭のtagの1byteによってcp_infoの構造が変わりますが共通した構造として、以下の形になっています。infoの部分がtagの値によって構造が変わりイメージです。
cp_info {
    u1 tag;
    u1 info[];
}
xxdした結果をベースに説明していきます。
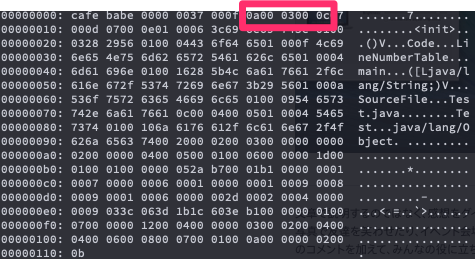
まず0x0aは10進で10、Table 4.4-Aの表によるとCONSTANT_Methodrefで、構造は以下です。
CONSTANT_Methodref_info {
    u1 tag;
    u2 class_index;
    u2 name_and_type_index;
}
これはクラスのメソッドの情報で、class_indexにこのメソッドが属するクラスのconstant_poolでの場所を指すindexが、name_and_type_indexにこのメソッドの名前を保持するconstant_poolの場所を指すindexを持ちます。
xxdした結果だと0x0a00 0300 0cの部分に当たります。class_indexが 0x0003(10進で3), name_and_type_indexが 0x000c(10進で12)となります。
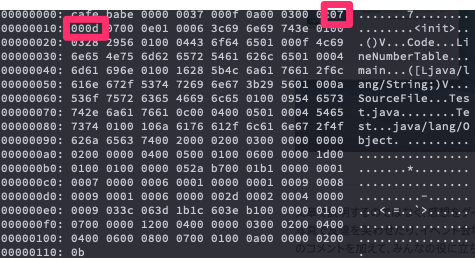
次のtagの値は0x07です。同じくTable 4.4-Aの表によると[CONSTANT_Class_info](4.4.1. The CONSTANT_Class_info Structure)で、構造は以下のとおりです。
CONSTANT_Class_info {
    u1 tag;
    u2 name_index;
}
こちらはクラスの情報で、name_indexにクラス名のconstant_poolでの場所を指すindexです。
xxdした結果だと0x0700 0dの部分に当たります。
name_indexが 0x000d(10進で13)です。後ほどconstant_poolの表を示しますのでそのときにまとめて確認してみましょう。
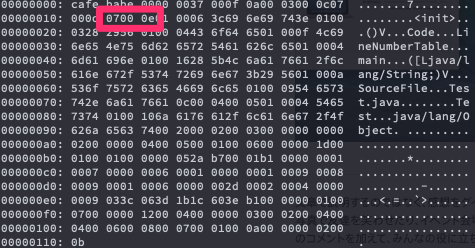
次のtagも0x07なので、同じくCONSTANT_Class_infoです。
xxdした結果の0x0700 0eの部分です。
name_indexが0x000e(10進で14)です。
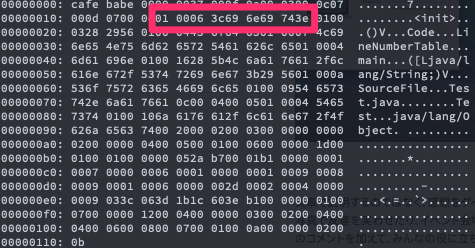
次のtagは0x01です。CONSTANT_Utf8_infoで、これはUtf8の文字列を持ちます。
定義は以下です。
CONSTANT_Utf8_info {
    u1 tag;
    u2 length;
    u1 bytes[length];
}
lengthにそのUtf8のbyte数を、bytesはlengthの値だけbyte数を持ちます。
xxdした結果だと0x01 0006 3c69 6e69 743eの部分です。
lengthは0x0006なのでここから6byte分の0x3c69 6e69 743eがbytesの値になります。
ちなみにこれは<init>になります。
以降はCONSTANT_Utf8が続くので、16進の値とそれぞれの対応表を以下に示します。
| 16進 | length | bytes | デコード結果 |
|---|---|---|---|
0x0100 0328 2956 |
3 | 03282956 |
()V |
0x0100 0443 6f64 65 |
4 | 436f6465 |
Code |
0x0100 0f4c 696e 654e 756d 6265 7254 6162 6c65 |
15 | 4c696e654e756d6265725461626c65 |
LineNumberTable |
0x0100 046d 6169 6e |
4 | 6d61696e |
main |
0x0100 1628 5b4c 6a61 7661 2f6c 616e 672f 5374 7269 6e67 3b29 56 |
22 | 285b4c6a6176612f6c616e672f537472696e673b2956 |
([Ljava/lang/String;)V |
0x0100 0a53 6f75 7263 6546 696c 65 |
10 | 536f7572636546696c65 |
SourceFile |
0x0100 0954 6573 742e 6a61 7661 |
9 | 546573742e6a617661 |
Test.java |
0x0100 0454 6573 74 |
4 | 54657374 |
Test |
0x0100 106a 6176 612f 6c61 6e67 2f4f 626a 6563 74 |
16 | 6a6176612f6c616e672f4f626a656374 |
java/lang/Object |
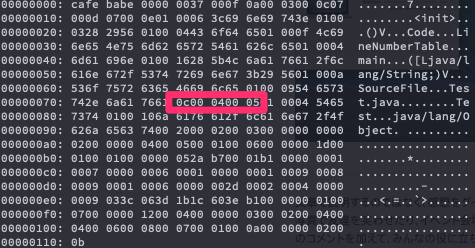
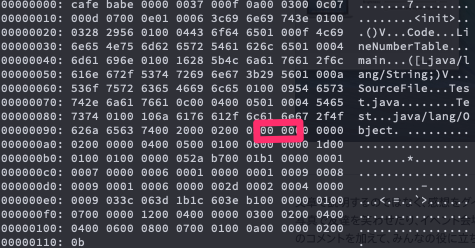
途中でUtf8以外のtagがあったのでそれを説明します。以下の画像の部分です。tagが0x0cなので、CONSTANT_NameAndType_infoです。
これは以下の構造で、メソッド、もしくはフィールドを表すために使用され、各値がconstant_poolの場所を指します。
name_indexはメソッド名のconstnat_poolの場所を指します。descriptor_indexはGoogle翻訳さんによるとフィールド記述子§4.3.2または、メソッド記述子§4.3.3のようです。
CONSTANT_NameAndType_info {
    u1 tag;
    u2 name_index;
    u2 descriptor_index;
}
xxdの結果の部分だと、name_indexが0x0004、descriptor_indexが0x0005です。
これでconstant_poolの値が出揃ったので一通り確認してみましょう。
| index | constant_pool |
|---|---|
| 1 | Methodref_info {class_index: 3, name_and_type_index: 12 } |
| 2 | Class_info {name_index: 13 } |
| 3 | Class_info {name_index: 14 } |
| 4 | Utf8 {bytes: '<init>'} |
| 5 | Utf8 {bytes: '()V'} |
| 6 | Utf8 {bytes: 'Code'} |
| 7 | Utf8 {bytes: 'LineNumberTable'} |
| 8 | Utf8 {bytes: 'main'} |
| 9 | Utf8 {byets: '([Ljava/lang/String;)V'} |
| 10 | Utf8 {bytes: 'SourceFile'} |
| 11 | Utf8 {bytes: 'Test.java'} |
| 12 | NameAndType {name_index: 4, descriptor_index: 5} |
| 13 | Utf8 {bytes: 'Test'} |
| 14 | utf8 {bytes: 'java/lang/Object'} |
2のClass_infoのname_indexは13なので"Test"、3のClass_infoはname_indexが14なので"java/lang/Object"です。
1のMethodrefはclass_indexが3なので、先のjava/lang/Objectに属するメソッドということがわかります。name_and_type_indexが12なので、12のNameAndTypeを見ます。これのname_indexは4なので、<init>, descriptor_indexは5なので()Vです。
これは引数無しで返り値がVoidのメソッドということを示してます。
access_flags
constant_poolが終わったので、クラス定義に戻って次はaccess_flagsを見てみます。access_flagsはclassもしくはinterfaceのアクセス修飾子などを表します。Table 4.1-Bの値となっており,各値の組み合わせで表現します。
例えばabstract public class Testがあった場合、各値はabstractが0x0400、publicが0x0001でなのでその総和の0x0401になります。
今回で言えば、0x0020が設定されています。
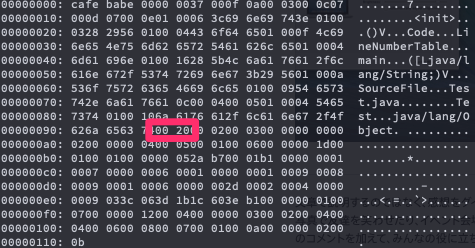
this_class
この値は自身のクラスの情報のconstant_poolのindexを指します。
0x00 02なので、constant_poolの2番目のClass_info(Test)ということがわかります。
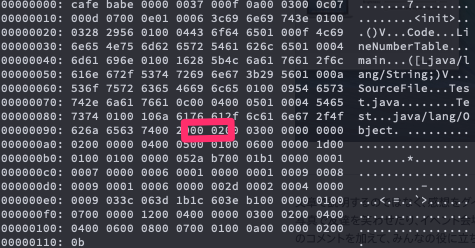
super_class
super_classは自身のクラスの親クラスを指すconstant_poolのindexの値です。
0x00 03なので、constant_poolの3番目のClass_info(java/lang/Object)が親クラスということがわかります。
interfaces_count
こちらも名前の通り、interfacesの数を指します。今回はinterfaceを定義していなかったので、0になっています。
fields_count
こちらも名前の通り、fieldsの数を指します。Testクラスにfieldを定義していなかったので、こちらも0になっています。
methods_count
同じく、methodsの数を指します。今回は2になっています。methodsは後述します。
methods
methodsの定義は以下です。
method_info {
    u2             access_flags;
    u2             name_index;
    u2             descriptor_index;
    u2             attributes_count;
    attribute_info attributes[attributes_count];
}
access_flagsはメソッドのアクセス修飾子などを表します。
クラスのaccess_flagsの値と同じように、こちらの表Table 4.6-Aにある該当する値の総和がaccess_flagsになります。
name_indexはメソッド名のconstant_poolの場所を指します。
descriptor_indexはメソッドの記述子を示す文字列のconstant_poolの場所を指します。
attributes_countは次のattributes_infoの数です。
attributesは後述しますが、定数の値やメソッドのコードなど、様々な値を表します。
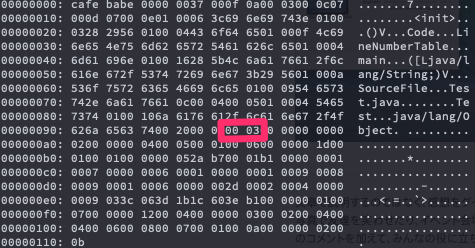
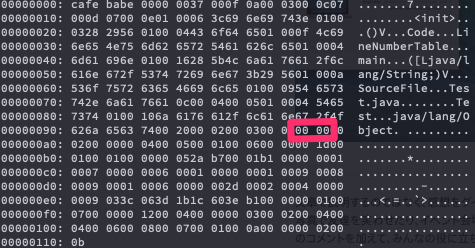
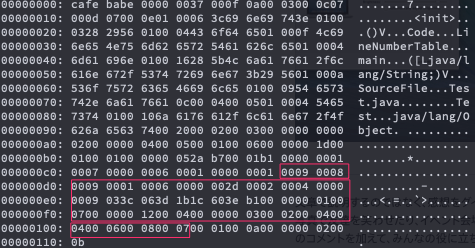
このClassファイルでは、1つ目のmethodsは以下の画像の赤枠で囲った部分。
method_info {
    access_flags: 0,
    name_index: 4,
    descriptor_index: 5,
    attributes_count: 1,
    attribute_info: [
        '0x0006 0000 001d 0001 0001 0000 0005 2AB7 0001 B100 0000 0100 0700 0000 0600 0100 0000 01'
    ]
}
access_flagsは0なので修飾子は特になにもついていない。name_indexは4なので、constant_poolの4番目の'<init>'となります。descriptor_indexは5なので、constant_poolの5番目の'()V'です。attributes_countは1なので、attributeの個数は1ということがわかります。
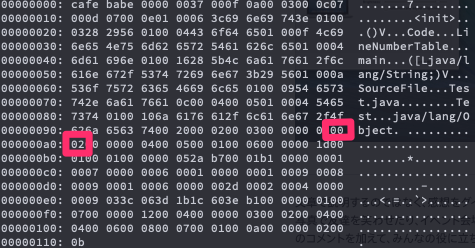
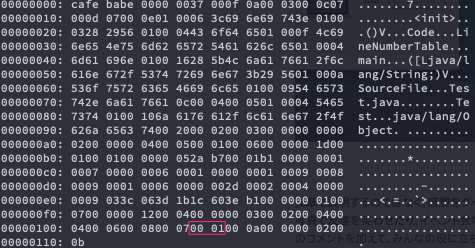
2つ目のmethodsは以下の画像の赤枠で囲った部分です。
method_info {
    access_flags: 9,
    name_index: 8,
    descriptor_index: 9,
    attribute_count: 1,
    attribute_info: [
        "0x0006 0000 002d 0002 0004 0000 0009 033C 063D
1B1C 603E B100 0000 0100 0700 0000 1200 0400 0000 0300 0200 0400 0400 0600 0800 07"
    ]
}
access_flagsは9なので、ACC_PUBLIC: 0x0001とACC_STATIC: 0x0008の値の和になってますので、public, staticの修飾子がついていることがわかります。
name_indexは8なのでconstant_poolの8番目の値の'main'です。
descriptor_indexは9なので、constant_poolの9番目の'([Ljava/lang/String;)V'です。
これは引数がjava/lang/String、返り値がvoidということです。
attribute_countは1なので、attributeの個数は1ということです。
attributes_count
こちらも名前の通り、attributesの個数を表します。
attributes
こちらの定義はまだ未実装なので、今回は説明を省きます。
実装
上記で見てきたことを実装に落とし込みます。ソースコードの全体はgithubのリポジトリにありますので、そちらをご確認ください。
基本的にやっていることは、各定義の構造体を用意しファイルを上から順に読んでいっています。
例えばmethod_infoだと、以下の構造体を用意しています。
   173  #[derive(PartialEq, Debug)]
   174  struct MethodInfo {
   175      access_flags: u16,
   176      name_index: u16,
   177      descriptor_index: u16,
   178      attributes_count: u16,
   179      attributes: Vec<AttributeInfo>
   180  }
access_flagsや、name_index, descriptor_index, attributes_countはu2の2byteなので、u16型で定義します。
ファイルを読んでmethodsの構造体を作っているのが以下のコードになります。
   275      let methods = (0..methods_count).map(|_| {
   276          let access_flags = reader.read_u16::<BigEndian>().unwrap();
   277          let name_index = reader.read_u16::<BigEndian>().unwrap();
   278          let descriptor_index = reader.read_u16::<BigEndian>().unwrap();
   279          let attributes_count = reader.read_u16::<BigEndian>().unwrap();
   280
   281          let attributes = (0..attributes_count).map(|_| {
   282              let attribute_name_index = reader.read_u16::<BigEndian>().unwrap();
   283              let attribute_length = reader.read_u32::<BigEndian>().unwrap();
   284
   285              let info = (0..attribute_length).map(|_| {
   286                  reader.read_u8().unwrap()
   287              }).collect();
   288
   289              AttributeInfo::new(&cp_info_vec, attribute_name_index, attribute_length, info)
   290          }).collect();
readerは以下のようにBufReaderでClassファイルをオープンしています。
193 let mut reader = BufReader::new(File::open("res/Test.class")?);
そのreaderを使って、read_u16などで指定のbyte数ずつ値を読み取っていきます。read_u16やread_u32などは byteorderというcrateで提供される関数です。これがあるbyte数ずつ値を読み取り、指定の型に変換してくれるので今回の実装でとても使いました。また、関数を呼ぶ際にendinanの指定が必要なのですが、ClassファイルはBigEndianで書かれているので、BigEndianを指定しています。
次はconstant_poolの読み込みのコードを見ていきましょう。
    28  #[derive(PartialEq, Debug, Clone)]
    29  enum Info {
    30      Offset,
    31      Class {name_index: u16},
    32      Methodref {class_index: u16, name_and_type_index: u16},
    33      Utf8 {length: u16, bytes: Vec<u8>},
    34      NameAndType {name_index: u16, descriptor_index: u16}
    35  }
    36
    37  #[derive(PartialEq, Debug, Clone)]
    38  struct CpInfo {
    39      tag: u8,
    40      info: Info
    41  }

============================================

   203      let mut cp_info_vec = Vec::new();
   204      cp_info_vec.push(CpInfo {tag: 0, info: Info::Offset});
   205      for _ in 0..(constant_pool_count - 1) {
   206          let tag = reader.read_u8()?;
   207          match tag {
   208              1 => {
   209                  let length = reader.read_u16::<BigEndian>()?;
   210                  let vec = reader.read_limit(length as u32);
   211                  cp_info_vec.push(CpInfo {tag, info: Info::Utf8 {length, bytes: vec}})
   212              }
   213              7 => {
   214                  let name_index = reader.read_u16::<BigEndian>()?;
   215                  cp_info_vec.push(CpInfo {tag, info: Info::Class {name_index}})
   216              }
   217              10 => {
   218                  let class_index = reader.read_u16::<BigEndian>()?;
   219                  let name_and_type_index = reader.read_u16::<BigEndian>()?;
   220                  cp_info_vec.push(CpInfo {tag, info: Info::Methodref {class_index, name_and_type_index}});
   221              }
   222              12 => {
   223                  let name_index = reader.read_u16::<BigEndian>()?;
   224                  let descriptor_index = reader.read_u16::<BigEndian>()?;
   225
   226                  cp_info_vec.push(CpInfo {tag, info: Info::NameAndType {name_index, descriptor_index}})
   227              }
   228              n => {
   229                  println!("{}: unimplmeneted!", n);
   230                  break;
   231              }
   232          }
   233      }
constant_poolはまず結果を格納するVec(cp_info_vec)にOffsetを入れます。これはconstant_poolを指すindexの値が1から始まっているため、0番目を埋めるために入れています。あとはconstant_pool_count - 1の数だけループで回し、最初のタグの値によって読み取り方法を変えている実装になっています。
まだ、1(CONSTANT_Utf8), 7(CONSTANT_Class), 10(CONSTANT_Methodref), 12(CONSTANT_NameAndType)にしか対応していないので、それ以外が来た場合は、unimplementedと表示してループを中断しています。(今回の読む対象としたClassファイルにはそれ以外が登場してこなかったので読み取れるはずです。)
まとめ
今回はJavaのバイトコードであるClassファイルの仕様を見ていき、その使用をRustのプログラムコードに落とし込んでいくところを紹介しました。
Classファイルを読むこと自体はそこまで難しくなく、淡々と仕様どおりに実装していくことができるので(内容を理解することはまた別問題ですが…)、楽しかったです。
今後は、まだ実装していない部分を実装し、最終的にオレオレJVMを作りたいと考えています。進捗があれば、Qiitaの記事で投稿したいと思っています。
今回の記事で誤りなどあればコメントをお願いいたします。また、まだまだRustの初心者なので、コードの方でもっと効率のよい方法などあればgithubのissueなどでご指摘いただければ幸いです。