はじめに
Part3ではTransformerを使って英日翻訳タスクを解きました。
今回は、Transformerからの差分に焦点を当ててGPT-2の実装を解説します。
GPT-2 とは
GPT-2はOpenAIが2019年に発表した言語モデルで、「Language Models are Unsupervised Multitask Learners」という論文で提案されました。
Part2で実装したTransformerはEncoder-Decoderアーキテクチャでしたが、GPT-2はDecoder-onlyアーキテクチャを採用しています。
今回やること
本記事では、Transformerとの差分に絞って以下の点を解説します:
- Decoder-onlyアーキテクチャ
- Pre-Layer Normalization
- Positional Embedding
- GELU活性化関数
- Weight Tying
- 重み初期化(Residual Scaling)
Transformerの実装について確認したい場合はPart2の記事を参照してください。
コード全体: GitHub
1. Decoder-only アーキテクチャ
Transformerの構造
Part2で実装したTransformerは、EncoderとDecoderの2つのコンポーネントで構成されていました:
class Transformer(nn.Module):
    def __init__(self, config):
        super().__init__()
        # 入力と出力で別々の埋め込み
        self.src_embedding = TokenEmbedding(config.src_vocab_size, config.model_dim, ...)
        self.tgt_embedding = TokenEmbedding(config.tgt_vocab_size, config.model_dim, ...)
        self.positional_encoding = PositionalEncoding(...)
        self.encoder = Encoder(...)  # 入力系列を処理
        self.decoder = Decoder(...)  # 出力系列を生成
        self.decoder_proj = nn.Linear(config.model_dim, config.tgt_vocab_size)
翻訳タスクではEncoderが入力文(英語)を処理し、Decoderがその情報を参照しながら出力文(日本語)を生成します。
GPT-2の構造
GPT-2では入力と出力が同一の系列です。「これまでのテキスト」から「次のトークン」を予測するだけなので、Encoderは不要になります:
class GPT(nn.Module):
    def __init__(self, config):
        super().__init__()
        self.layer_num = config.num_layers

        # 単一のトークン埋め込み(入出力で共通)
        self.token_embedding = TokenEmbedding(
            config.vocab_size, config.model_dim, config.padding_idx, scaling=False
        )
        # Positional Embedding
        self.positional_embedding = PositionalEmbedding(
            config.max_seq_len, config.model_dim
        )
        self.embedding_dropout = nn.Dropout(p=config.dropout)

        # Decoderのみ
        self.gpt_block = GPTBlock(
            config.model_dim,
            config.num_layers,
            config.num_heads,
            config.feedforward_dim,
            config.dropout,
            config.activation,
        )
        self.final_norm = nn.LayerNorm(config.model_dim)
        self.proj = nn.Linear(config.model_dim, config.vocab_size)

        # Weight Tying(後述)
        self.proj.weight = self.token_embedding.embedding.weight
        self._init_weight()
GPTLayer
TransformerのDecoderLayerには3つのサブレイヤーがありました:
- Masked Self-Attention(未来のトークンを見ない)
- Cross-Attention(Encoderの出力を参照)
- Feed Forward Network
class DecoderLayer(nn.Module):
    def __init__(self, model_dim: int, num_heads: int, feedforward_dim: int, dropout: float, activation_func: str):
        super().__init__()
        self.masked_attention = MultiheadAttention(model_dim, num_heads, dropout)
        self.normalizer_1 = nn.LayerNorm(model_dim)
        self.attention = MultiheadAttention(model_dim, num_heads, dropout)
        self.normalizer_2 = nn.LayerNorm(model_dim)
        self.feed_forward = FeedForward(model_dim, feedforward_dim, dropout, activation_func)
        self.normalizer_3 = nn.LayerNorm(model_dim)
GPT-2ではEncoderがないためCross-Attentionは不要となり、2つのサブレイヤーのみになります:
- Masked Self-Attention
- Feed Forward Network
class GPTLayer(nn.Module):
    def __init__(self, model_dim, num_heads, feedforward_dim, dropout, activation_func):
        super().__init__()
        self.masked_attention = MultiheadAttention(model_dim, num_heads, dropout)
        self.normalizer_1 = nn.LayerNorm(model_dim)
        self.feed_forward = FeedForward(model_dim, feedforward_dim, dropout, activation_func)
        self.normalizer_2 = nn.LayerNorm(model_dim)
2. Pre-Layer Normalization
TransformerとGPT-2では、Layer Normalizationを適用する位置が異なります。
Post-LN(Transformer)
オリジナルのTransformerでは、「サブレイヤー → 残差接続 → 正規化」の順で処理します:
def forward(self, inputs, encoder_out, tgt_mask=None, src_mask=None):
    # Attention → Add → Normalize
    masked_attention_out = self.masked_attention(inputs, mask=tgt_mask)
    normalized_1 = self.normalizer_1(inputs + masked_attention_out)

    # Cross-Attention → Add → Normalize
    attention_out = self.attention(normalized_1, encoder_out, mask=src_mask)
    normalized_2 = self.normalizer_2(normalized_1 + attention_out)

    # FFN → Add → Normalize
    feed_forward_out = self.feed_forward(normalized_2)
    normalized_3 = self.normalizer_3(normalized_2 + feed_forward_out)
    return normalized_3
Pre-LN(GPT-2)
GPT-2では、「正規化 → サブレイヤー → 残差接続」の順序に変更されています:
# GPTLayer(Pre-LN)
def forward(self, inputs, mask=None):
    # Normalize → Attention → Add
    normalized_1 = self.normalizer_1(inputs)
    masked_attention_out = self.masked_attention(normalized_1, mask=mask)
    x = inputs + masked_attention_out

    # Normalize → FFN → Add
    normalized_2 = self.normalizer_2(x)
    feed_forward_out = self.feed_forward(normalized_2)
    output = x + feed_forward_out
    return output
Pre-LNは深いネットワークでも学習が安定するという利点があります。
なおPre-LNを採用する場合、最終出力の前に追加のLayer Normalizationが必要になります:
def forward(self, tokens, mask=None):
    token_embed = self.token_embedding(tokens)
    token_embed = self.positional_embedding(token_embed)
    token_embed = self.embedding_dropout(token_embed)

    gpt_out = self.gpt_block(token_embed, mask)
    gpt_out = self.final_norm(gpt_out)  # Pre-LNで必要
    output = self.proj(gpt_out)
    return output
3. Positional Embedding
Positional Encoding(Transformer)
Part2で実装したPositional Encodingは、正弦波と余弦波を用いた固定のパターンでした:
$$PE_{(pos,2i)} = \sin\left(\frac{pos}{10000^{2i/d_{\mathrm{model}}}}\right)$$
$$PE_{(pos,2i+1)} = \cos\left(\frac{pos}{10000^{2i/d_{\mathrm{model}}}}\right)$$
class PositionalEncoding(nn.Module):
    def __init__(self, model_dim, dropout, max_len):
        super().__init__()
        self.dropout = nn.Dropout(p=dropout)
        pe = torch.zeros(max_len, model_dim)
        position = torch.arange(0, max_len, dtype=torch.float).unsqueeze(1)
        denominator = torch.exp(
            torch.arange(0, model_dim, 2).float() * (-math.log(10000.0) / model_dim)
        )
        pe[:, 0::2] = torch.sin(position * denominator)
        pe[:, 1::2] = torch.cos(position * denominator)
        pe = pe.unsqueeze(0)
        self.register_buffer("pe", pe)
Positional Embedding(GPT-2)
GPT-2では、位置情報も学習可能なパラメータとして扱います:
class PositionalEmbedding(nn.Module):
    def __init__(self, max_seq_len, model_dim):
        super().__init__()
        # 学習可能な位置情報
        self.embedding = nn.Embedding(max_seq_len, model_dim)

    def forward(self, inputs):
        batch_size, seq_len, model_dim = inputs.shape
        positions = torch.arange(seq_len, device=inputs.device).unsqueeze(0)
        positions = positions.expand(batch_size, -1)
        position_embed = self.embedding(positions)
        return inputs + position_embed
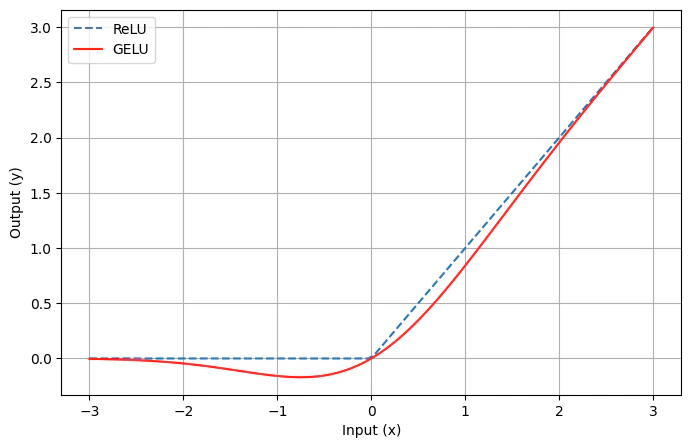
4. GELU 活性化関数
Transformerでは活性化関数にReLU関数を使用していましたが、GPT-2ではGELUを使用します:
$$\text{ReLU}(x) = \max(0, x)$$
$$\text{GELU}(x) = x \cdot \Phi(x)$$
($\Phi$ は標準正規分布の累積分布関数)
class FeedForward(nn.Module):
    def __init__(self, model_dim, feedforward_dim, dropout, activation_func):
        super().__init__()
        self.linear_1 = nn.Linear(model_dim, feedforward_dim)
        if activation_func.lower() == "relu":
            self.activation_func = nn.ReLU()
        elif activation_func.lower() == "gelu":
            self.activation_func = nn.GELU()
        self.linear_2 = nn.Linear(feedforward_dim, model_dim)
        self.dropout = nn.Dropout(p=dropout)
5. Weight Tying
Weight Tyingは、入力のToken Embeddingと出力の投影層で同じ重みを共有する手法です:
class GPT(nn.Module):
    def __init__(self, config):
        super().__init__()
        self.token_embedding = TokenEmbedding(
            config.vocab_size, config.model_dim, ...
        )
        self.proj = nn.Linear(config.model_dim, config.vocab_size)

        # 入力埋め込みと出力投影で重みを共有
        self.proj.weight = self.token_embedding.embedding.weight
これによりモデルの精度を維持しつつパラメータ数を削減することが出来ます。
6. 重み初期化(Residual Scaling)
GPT-2では、残差接続のある層に対して特別な重み初期化を行います:
class GPT(nn.Module):
    def _init_weight(self):
        # スケーリング係数: 1 / sqrt(2 * レイヤー数)
        scale = 1.0 / math.sqrt(2.0 * self.layer_num)

        # 全ての線形層を標準偏差0.02で初期化
        for module in self.modules():
            if isinstance(module, nn.Linear):
                nn.init.normal_(module.weight, mean=0.0, std=0.02)
                if module.bias is not None:
                    nn.init.zeros_(module.bias)

        # 残差接続前の投影層は追加でスケーリング
        for layer in self.gpt_block.gpt_layers:
            # Attention出力投影
            nn.init.normal_(
                layer.masked_attention.out_proj.weight,
                mean=0.0,
                std=0.02 * scale,
            )
            # FFN出力投影
            nn.init.normal_(
                layer.feed_forward.linear_2.weight,
                mean=0.0,
                std=0.02 * scale,
            )
残差接続は各レイヤーの出力を加算していくため、レイヤー数が増えると活性値の分散が大きくなりやすいです。これを防ぐため、残差接続に流れ込む出力の重みを $1/\sqrt{2N}$(Nはレイヤー数)でスケーリングしています。
7. Token Embeddingのスケーリング
TransformerではToken Embeddingに $\sqrt{d_\mathrm{model}}$ を掛けていましたが、GPT-2ではこれを廃止しています:
class TokenEmbedding(nn.Module):
    def __init__(self, vocab_size, model_dim, padding_idx=None, scaling=True):
        super().__init__()
        self.embedding = nn.Embedding(vocab_size, model_dim, padding_idx=padding_idx)
        self.model_dim = model_dim
        self.scaling = scaling

    def forward(self, inputs):
        if self.scaling:
            return self.embedding(inputs) * sqrt(self.model_dim)  # Transformer
        return self.embedding(inputs)  # GPT-2
GPT-2では位置情報も学習可能なため、スケールは自動的に調整されます。
GPT-2 完成形
以上の差分を踏まえたGPT-2の全体構造です:
class GPT(nn.Module):
    def __init__(self, config):
        super().__init__()
        self.config = config
        self.layer_num = config.num_layers

        self.token_embedding = TokenEmbedding(
            config.vocab_size, config.model_dim, config.padding_idx, scaling=False
        )
        self.positional_embedding = PositionalEmbedding(
            config.max_seq_len, config.model_dim
        )
        self.embedding_dropout = nn.Dropout(p=config.dropout)
        self.gpt_block = GPTBlock(
            config.model_dim,
            config.num_layers,
            config.num_heads,
            config.feedforward_dim,
            config.dropout,
            config.activation,
        )
        self.final_norm = nn.LayerNorm(config.model_dim)
        self.proj = nn.Linear(config.model_dim, config.vocab_size)
        self.proj.weight = self.token_embedding.embedding.weight
        self._init_weight()

    def _init_weight(self):
        scale = 1.0 / math.sqrt(2.0 * self.layer_num)
        for module in self.modules():
            if isinstance(module, nn.Linear):
                nn.init.normal_(module.weight, mean=0.0, std=0.02)
                if module.bias is not None:
                    nn.init.zeros_(module.bias)
        for layer in self.gpt_block.gpt_layers:
            nn.init.normal_(
                layer.masked_attention.out_proj.weight, mean=0.0, std=0.02 * scale
            )
            nn.init.normal_(
                layer.feed_forward.linear_2.weight, mean=0.0, std=0.02 * scale
            )

    def forward(self, tokens, mask=None):
        token_embed = self.token_embedding(tokens)
        token_embed = self.positional_embedding(token_embed)
        token_embed = self.embedding_dropout(token_embed)

        gpt_out = self.gpt_block(token_embed, mask)
        gpt_out = self.final_norm(gpt_out)
        output = self.proj(gpt_out)
        return output

    def generate_next_token(self, tokens, context=None):
        logits = self.forward(tokens, mask=None)
        return logits[:, -1, :]
事前学習
作成したGPT-2を用いて事前学習をしてみようと試みましたが、計算資源の不足により断念しました...
何も最適化がない状態だと、個人のポケットマネーの範囲ではGPT-2の学習を行なうのは厳しそうな雰囲気です。
途中までの学習曲線と、モデルの出力結果を雑に載せておきます(H200 1枚で4時間ほど学習をしてみた結果です)。
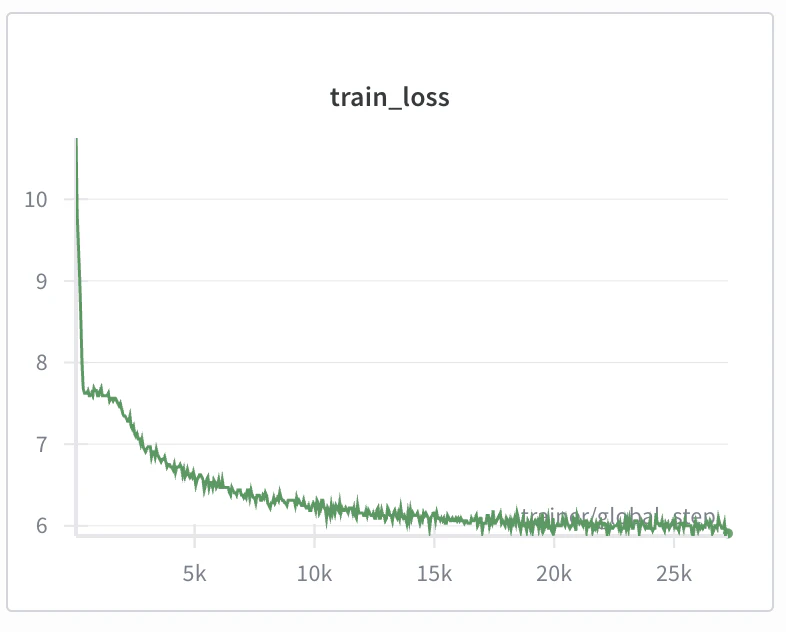
断片的に正しい文法の英文が出力されていますが、全体として意味の通らない出力になっています。

まとめ
本記事では、Transformerからの差分に焦点を当ててGPT-2の実装を解説しました。
GPT-2のアーキテクチャの実装は出来たものの、個人が利用可能な計算リソースではGPT-2を訓練することは現実的でないことがわかりました。次回以降のパートではより効率的なアーキテクチャについて解説・実装を進めていきたいと思います。
参考
ゼロから作るLLM - 目次