NeoBundle のインストール
README.mdを参考にNeoBundleをインストール
vimrcの設定は以下のように設定した
"================
" NeoBundle
"================
set nocompatible
filetype off

if has('vim_starting')
  set runtimepath+=~/.vim/bundle/neobundle.vim
endif

" Initialize
call neobundle#begin(expand('~/.vim/bundle/'))

" NoeBundle で NeoBundleを管理
NeoBundleFetch 'Shougo/neobundle.vim'

" originalrepos on github
NeoBundle 'Shougo/neobundle.vim'		" <-もしかしたら不要
NeoBundle 'Lokaltog/powerline', { 'rtp' : 'powerline/bindings/vim'}

call neobundle#end()

filetype plugin indent on     " required!

" 起動時にインストールチェック
NeoBundleCheck
あと、powerlineとは直接関係無いけど、以下の行を .vimrc に追加した。
" 常にステータスラインを表示
set laststatus=2
" 256色対応?
set t_Co=254
vim への powerline のインストール
上記の設定したら、vim を立ち上げ :NeoBundleInstall で powerline がインストールされる
tmux への powerline のインストール
以下を ~/.tmux.conf に記述
#### Powerline ####
source ~/.vim/bundle/powerline/powerline/bindings/tmux/powerline.conf
フォントの設定
powerline をインストールしただけだと一部文字化けするので、以下からpowerlineに対応したfontをインストールする。
powerline/fonts: Patched fonts for Powerline users.
とりあえず評判の良さそうな SourceCodePro を使用することに。
ローカルの適当な場所に clone
$ git clone https://github.com/powerline/fonts.git
clone が終わったら、そのディレクトリに移動して ./install.sh を実行(引数にインストール対象のフォント名を指定する)
$ cd fonts
$ ./install.sh
Copying fonts...
Powerline fonts installed to /Users/nakamatsu/Library/Fonts
個別にフォントを指定する場合の注意
フォント名はディレクトリ名と異なる場合があるので注意。
たとえば、"SourceCodePro"ディレクトリに格納されているフォントは"Source Code Pro xxxxx" (スペースあり) だが、ディレクトリ名は "SourceCodePro"(スペースなし)になっている。
ディレクトリ名ではなく、あくまでもフォント名を指定すること。
OSにフォントを登録したら、あとはターミナルの設定。
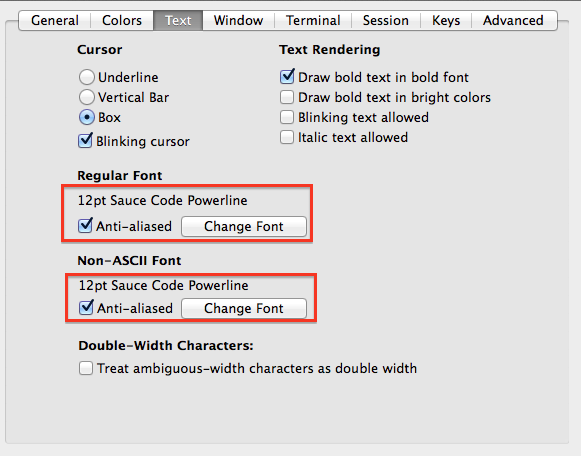
iTerm2を使っているので、preferenceで Text のタブを開いて先ほどのフォントを使用するように設定変更。
以上で設定完了。
