はじめに
少し期間が空いてしまったが、Mac(M1)を購入したため、Flutterのアプリ開発をまた始めてみた(自分がiphone利用者なので、そもそもiphoneメインでアプリを開発したかった。)
以前にFlutterからFirestoreを利用する方法まとめたが、今回Macでそれを試したら、Flutterやパッケージのバージョンが上がっていたため動かなかった。
大した変更ではないが、一応整理し直したのでメモとして残しておく。
以前の記事はこちら。【FlutterからCloud Firestoreのデータ取得 & データ書き込み】
実施環境
【PC】
MacBook Air (M1, 2020)
【各SWバージョン】
macOS Big Sur 11.6
Flutter 2.5.3 (dart 2.14.4)
Xcode 13.0
AndroidStudio 2020.3
Cocoapods
手順
1.Cloud Firestoreにデータ書き込み
2.Cloud Firestoreからのデータ取得
※事前準備として以下が完了している前提!
・Flutter のサンプルアプリが起動できる状態までのセットアップ。
・Firebaseのプロジェクト作成 & iosアプリ追加。
・cloud_firestoreのパッケージをmain.dartから呼び出せる状態であること。
1.Cloud Firestoreにデータ書き込み
試しに作るものは以前と同じ。
ちゃんと書き込みができるか確認するため、main.dartを以下の様に作成してflutter runを実行。
下のテストアプリではエミュレータ上で 【Save-button】をクリックすると、コレクション&ドキュメントが作成される。
import 'package:flutter/material.dart';
import 'package:firebase_core/firebase_core.dart';
import 'package:cloud_firestore/cloud_firestore.dart';

void main() async {
  WidgetsFlutterBinding.ensureInitialized();
  await Firebase.initializeApp();
  runApp(TestApp());
}

class TestApp extends StatelessWidget {
  @override
  Widget build(BuildContext context) {
    return MaterialApp(
      debugShowCheckedModeBanner: false, // <- Debug の 表示を OFF
      home: FirestoreSave(),
    );
  }
}

class FirestoreSave extends StatefulWidget {
  @override
  _MyFirestorePageState createState() => _MyFirestorePageState();
}

class _MyFirestorePageState extends State<FirestoreSave> {
  @override
  Widget build(BuildContext context) {
    return Scaffold(
      body: Center(
        child: ElevatedButton
          (
              style: ElevatedButton.styleFrom(
                primary: Colors.red,
              ),
              child: Text('Save-button'),
              onPressed: () async {
                // ドキュメント作成
                await FirebaseFirestore.instance
                    .collection('test_collection1') // コレクションID
                    .doc() // ここは空欄だと自動でIDが付く
                    .set({
                  'name': 'sato',
                  'age': 20,
                  'sex': 'male',
                  'type': ['A', 'B']
                }); // データ
              },
            ),
      ),
    );
  }
}
以前との変更点は大きく以下6つ
・import 'package:firebase_core/firebase_core.dart';の追加
・runApp()の前に以下を2つの行を追加。 ※あるバージョン以降、これが必要になったらしい。
・WidgetsFlutterBinding.ensureInitialized();
・await Firebase.initializeApp();
・RaisedButtonが使えなくなっていたので、ElevatedButtonに変更
・ElevateButtonではstyle:が必要。
・Firestoreのメソッド名をFirebaseFirestoreに変更。
・Firestoreへのデータ登録を .document().setData()ではなく、.doc().set()に変更。
※【Save-button】をクリックした時に、もし下記の様なエラーが出た場合はFirestoreのルールを確認してみる。
[cloud_firestore/permission-denied] The caller does not have permission to execute the specified operation.
Firebaseのコンソールからデータが入っているか確認
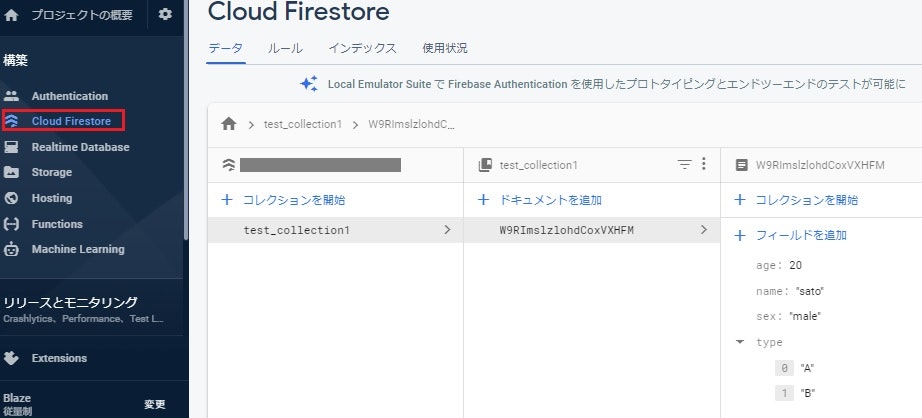
上記の通り、ドキュメントやデータが確認できたら書き込みはOK!
2.Cloud Firestoreからのデータ取得
ここもやっている事は以前と同じ。
ちゃんと読み込みがができるか確認するため、main.dartを以下の様に作成してflutter runを実行。
下のテストアプリではエミュレータ上の 【LoadAlldocs】をクリックすると、指定したコレクション内にある全てのドキュメントのkey = nameが表示される。
import 'package:flutter/material.dart';
import 'package:firebase_core/firebase_core.dart';
import 'package:cloud_firestore/cloud_firestore.dart';

void main() async {
  WidgetsFlutterBinding.ensureInitialized();
  await Firebase.initializeApp();
  runApp(TestApp());
}

class TestApp extends StatelessWidget {
  @override
  Widget build(BuildContext context) {
    return MaterialApp(
      debugShowCheckedModeBanner: false, // <- Debug の 表示を OFF
      home: FirestoreLoad(),
    );
  }
}

class FirestoreLoad extends StatefulWidget {
  @override
  _MyFirestorePageState createState() => _MyFirestorePageState();
}

class _MyFirestorePageState extends State<FirestoreLoad> {
  // ドキュメント情報を入れる箱を用意
  List<DocumentSnapshot> documentList = [];

  @override
  Widget build(BuildContext context) {
    return Scaffold(
      body: Center(
        child: Column(
          mainAxisSize: MainAxisSize.min,
          children: <Widget>[
            ElevatedButton(
              style: ElevatedButton.styleFrom(
                primary: Colors.red,
              ),
              child: Text('LoadAlldocs'),
              onPressed: () async {
                // 指定コレクションのドキュメント一覧を取得
                final snapshot = await FirebaseFirestore.instance
                    .collection('test_collection1')
                    .get();
                // ドキュメント一覧を配列で格納
                setState(() {
                  documentList = snapshot.docs;
                });
              },
            ),
            // ドキュメント情報を表示
            Column(
              children: documentList.map((document) {
                return ListTile(
                  title: Text('name:${document['name']}'),
                );
              }).toList(),
            ),
          ],
        ),
      ),
    );
  }
}
以前との変更点は大きく以下7つ ※基本的には1の書き込みソースと同じ様なところを修正。
・import 'package:firebase_core/firebase_core.dart';の追加
・runApp()の前に以下を2つの行を追加。
□WidgetsFlutterBinding.ensureInitialized();
□await Firebase.initializeApp();
・RaisedButtonが使えなくなっていたので、ElevatedButtonに変更
・ElevateButtonではstyle:が必要。
・Firestoreのメソッド名をFirebaseFirestoreに変更。
・Firestoreへのデータ呼び出しを .getDocuments()ではなく、.get()に変更。
・ドキュメント一覧の取り出しも snapshot.documentsではなく、snapshot.docsに変更。
エミュレータ上でUIに表示されるのを確認できたらOK!