はじめに
Flutterを使って試しに何かネイティブアプリを作ろうと考えていた時、バックエンドの構成で迷ったため、最近流行っているCloud Firestore を使ってみることにした。
そもそもFirebase自体の利用が初めてだったので、まずは簡単な読み書きのテストをしてみた。その時の内容をメモ。
実施環境
- Ubuntu 18.04LTS(GCP上)
- Flutter 1.22.6
- Dart 2.10.5
- Android Studio 4.1.2
- VScode 1.53.0
手順
1.FlutterアプリにFirebaseを追加
2.Firebaseに接続するためFlutter側に設定
3.Cloud Firestoreにデータ書き込み
4.Cloud Firestoreからのデータ取得
※事前準備として以下が完了している前提!
・Flutter のサンプルアプリが起動できる状態までのセットアップ。
・Firebaseのプロジェクト作成。
1.FlutterアプリにFirebaseを追加
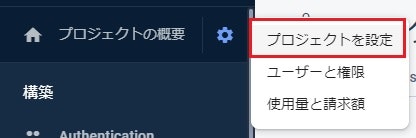
まず、Firebaseコンソールに入り、プロジェクト概要からプロジェクト設定をを開き、『アプリ追加』ボタンをクリックして、IOS、Android、Webアプリのどれかを選択する。
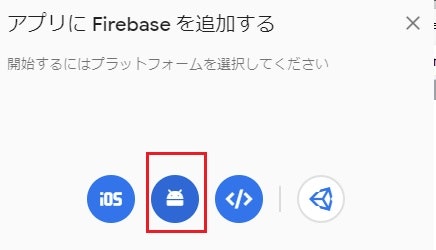
(今回のアプリは、Android Studioを使ったエミュレータをベースに開発しているたためAndroidアプリを選択)
アプリ情報の入力
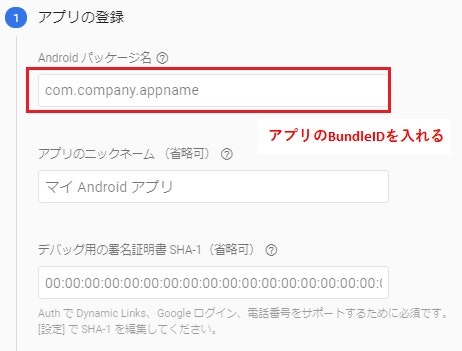
※BundleIDの確認、プロジェクトディレクトリ > android > app > bundle.gradle に書かれている applicationId でOK!
設定ファイルのダウンロード(jsonファイル)と設置
手順に従うとコンソールからjsonファイルをダウンロードできるので、それをAndroid > android > app に格納する。
Firebase SDK の追加
プロジェクトディレクトリ > Android > build.gradle の中にあるdependenciesに以下の様に追記。
※バージョンは手順の中でスクリプトに記載があるので、それをそのままコピーすればよい!
buildscript {
    ext.kotlin_version = '1.3.50'
    repositories {
        google()
        jcenter()
    }

    dependencies {
        classpath 'com.android.tools.build:gradle:3.5.0'
        classpath "org.jetbrains.kotlin:kotlin-gradle-plugin:$kotlin_version"

        // ここが追記部分!
        classpath 'com.google.gms:google-services:4.3.5'
    }
}

// --- 省略 ---
プロジェクトディレクトリ > Android > app > build.gradle の中にある 適用プラグインとdependenciesに以下の様に追記。
// --- 省略 ---

// 適用プラグインの追加文
apply plugin: 'com.google.gms.google-services'

// --- 省略 ---

// dependenciesの追加分
dependencies {
 ・・・
  implementation platform('com.google.firebase:firebase-bom:26.5.0')
}

// --- 省略 ---
2.Firebaseに接続するためFlutter側に設定
プロジェクトディレクトリ > pubspec.yaml を編集
# --- 省略 ---

dependencies:
  flutter:
    sdk: flutter

  # The following adds the Cupertino Icons font to your application.
  # Use with the CupertinoIcons class for iOS style icons.
  cupertino_icons: ^1.0.0

  # firebase
  cloud_firestore: ^0.13.5   # ここが追記部分!!!

# --- 省略 ---
必要なパッケージをインストール
$ flutter pub get
一旦ここでMain.dartにimport文を追加して保存したら、flutter run を実行し、問題なくパッケージが読み込めているか確認。
import 'package:flutter/material.dart';

// ここが追記部分! Cloud Firestoreに繋ぐためのパッケージをインポート。
import 'package:firebase_core/firebase_core.dart';
import 'package:cloud_firestore/cloud_firestore.dart';

//--- 省略 ---
$ flutter run
・・・
Plugin project :firebase_core_web not found. Please update settings.gradle.
Plugin project :cloud_firestore_web not found. Please update settings.gradle.
・・・
※上記の様なエラーが出る場合、以下の変更を行う
変更箇所①(プロジェクトディレクトリ > Android > app > build.gradle の中にあるdefaultConfig を以下の様に編集)
// --- 省略 ---

defaultConfig {
        // TODO: Specify your own unique Application ID (https://developer.android.com/studio/build/application-id.html).
        applicationId "com.example.share_necessary_project"
        minSdkVersion 23  // ここが編集箇所。デフォルトは "16" になっているはず。
        targetSdkVersion 29
        versionCode flutterVersionCode.toInteger()
        versionName flutterVersionName
    }

// --- 省略 ---
変更箇所②(プロジェクトディレクトリ > Android > app > settings.gradle の最後に追加)
// --- 省略 ---

// ---------↓追加↓-------------------------------------
def flutterProjectRoot = rootProject.projectDir.parentFile.toPath()

def plugins = new Properties()
def pluginsFile = new File(flutterProjectRoot.toFile(), '.flutter-plugins')
if (pluginsFile.exists()) {
    pluginsFile.withReader('UTF-8') { reader -> plugins.load(reader) }
}

plugins.each { name, path ->
    def pluginDirectory = flutterProjectRoot.resolve(path).resolve('android').toFile()
    include ":$name"
    project(":$name").projectDir = pluginDirectory
}
// ---------追加ここまで-------------------------------------
ここで再度 flutter run を実行して、先程のエラーが消えるか確認
3.Cloud Firestoreにデータ書き込み
ちゃんと書き込みができるか確認するため、main.dartを以下の様に作成してflutter runを実行。
下のテストアプリではエミュレータ上で 【Save-button】をクリックすると、コレクション&ドキュメントが作成される。
import 'package:flutter/material.dart';
import 'package:cloud_firestore/cloud_firestore.dart';

void main() {
  runApp(TestApp());
}

class TestApp extends StatelessWidget {
  @override
  Widget build(BuildContext context) {
    return MaterialApp(
      debugShowCheckedModeBanner: false, // <- Debug の 表示を OFF
      home: FirestoreSave(),
    );
  }
}

class FirestoreSave extends StatefulWidget {
  @override
  _MyFirestorePageState createState() => _MyFirestorePageState();
}

class _MyFirestorePageState extends State<FirestoreSave> {
  @override
  Widget build(BuildContext context) {
    return Scaffold(
      body: Center(
        child: Column(
          children: <Widget>[
            RaisedButton(
              child: Text('Save-button'),
              onPressed: () async {
                // ドキュメント作成
                await Firestore.instance
                    .collection('test_collection1') // コレクションID
                    .document() // ここは空欄だと自動でIDが付く
                    .setData({
                  'name': 'sato',
                  'age': 20,
                  'sex': 'male',
                  'type': ['A', 'B']
                }); // データ
              },
            ),
          ],
        ),
      ),
    );
  }
}
Firebaseのコンソールからデータが入っているか確認
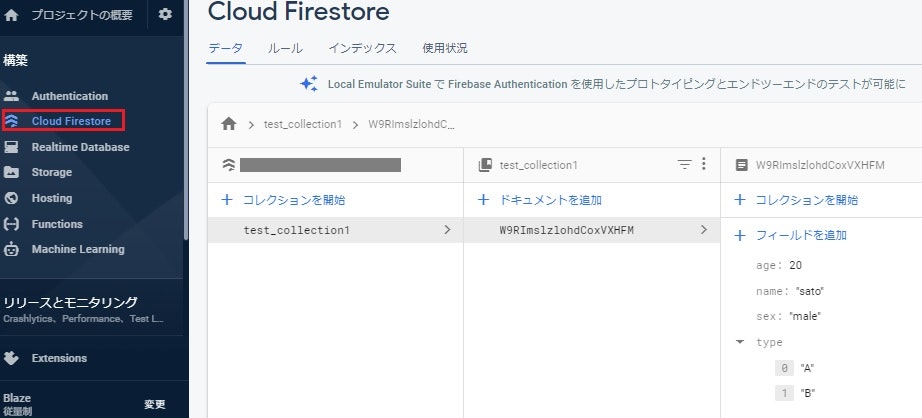
上記の通り、ドキュメントやデータが確認できたら書き込みはOK!
4.Cloud Firestoreからのデータ取得
ちゃんと読み込みがができるか確認するため、main.dartを以下の様に作成してflutter runを実行。
下のテストアプリではエミュレータ上の 【LoadAlldocs】をクリックすると、指定したコレクション内にある全てのドキュメントのkey = nameが表示される。
import 'package:flutter/material.dart';
import 'package:cloud_firestore/cloud_firestore.dart';

void main() {
  runApp(TestApp());
}

class TestApp extends StatelessWidget {
  @override
  Widget build(BuildContext context) {
    return MaterialApp(
      debugShowCheckedModeBanner: false, // <- Debug の 表示を OFF
      home: FirestoreLoad(),
    );
  }
}

class FirestoreLoad extends StatefulWidget {
  @override
  _MyFirestorePageState createState() => _MyFirestorePageState();
}

class _MyFirestorePageState extends State<FirestoreLoad> {
  // ドキュメント情報を入れる箱を用意
  List<DocumentSnapshot> documentList = [];

  @override
  Widget build(BuildContext context) {
    return Scaffold(
      body: Center(
        child: Column(
          children: <Widget>[
            RaisedButton(
              child: Text('LoadAlldocs'),
              onPressed: () async {
                // 指定コレクションのドキュメント一覧を取得
                final snapshot = await Firestore.instance
                    .collection('test_collection1')
                    .getDocuments();
                // ドキュメント一覧を配列で格納
                setState(() {
                  documentList = snapshot.documents;
                });
              },
            ),
            // ドキュメント情報を表示
            Column(
              children: documentList.map((document) {
                return ListTile(
                  title: Text('name:${document['name']}'),
                );
              }).toList(),
            ),
          ],
        ),
      ),
    );
  }
}
エミュレータ上でUIに表示されるのを確認できたらOK!
補足(iosの場合)
基本的な流れは一緒だが、手順1や手順2において、中身や
手順1の違い
まず、最初にアプリを追加する時に ios のアイコンを選択する。
次に、同様にBundleIDを入力する必要があるのだが、BundleIDは、プロジェクトディレクトリ > ios > Runner.xcodeproj > project.pbxproj に書かれている PRODUCT_BUNDLE_IDENTIFIER をコピペ。
GoogleService-Info.plistをコンソールからダウンロードし、プロジェクトディレクトリ > ios > Runner > に配置。
buildscript {
    ext.kotlin_version = '1.3.50'
    repositories {
        google()
        jcenter()
    }

    dependencies {
        classpath 'com.android.tools.build:gradle:3.5.0'
        classpath "org.jetbrains.kotlin:kotlin-gradle-plugin:$kotlin_version"

        // ここが追記部分!
        classpath 'com.google.gms:google-services:4.3.5'
    }
}

// --- 省略 ---
プロジェクトディレクトリ > ios > Runner.xcodeproj > build.gradle の中にある 適用プラグインとdependenciesに以下の様に追記。
// --- 省略 ---

// 適用プラグインの追加文
apply plugin: 'com.google.gms.google-services'

// --- 省略 ---

// dependenciesの追加分
dependencies {
 ・・・
  implementation platform('com.google.firebase:firebase-bom:26.5.0')
}

// --- 省略 ---